Film cameras
Kodak Jiffy Six-20 Six-16 User manual
User manual for Kodak Jiffy Six-20 Six-16. 12 pages in English. Read the original PDF, download or print a copy without registration.
12 pagesEnglish1.4 MB PDF
Loading your manual…Open PDF directly
Document details
- Brand
- Kodak
- Model / document
- Kodak Jiffy Six-20 Six-16
- Document type
- User manual
- Language
- English
- Pages
- 12
- File size
- 1.4 MB
- Category
- Film cameras
- Document date
- Not specified in catalog
Search available document text
Find a term, then jump to its page in the original PDF. Image-only pages may not be searchable; check the PDF for exact wording and diagrams.
Page 1 · Read text
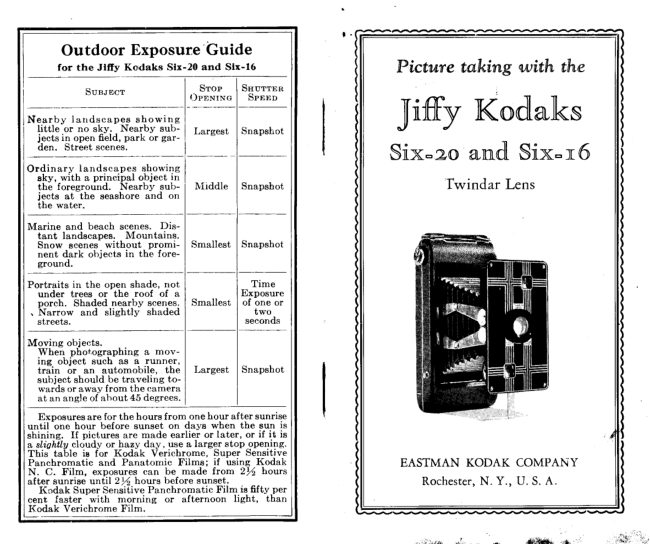
"Guide    Outdoor Exposure
        for  the  Jtffy Kodaks  Stx-20 and Stx-16                      Picffi,uretaking  with  the.
                                 Srop     Srrurrrn
                                    ()peNrlro   Spnro
                     Kodancs                                         Largest   Snapshot                          Jitry
                               Six-zo anxdlSix=r6
                                                               'Iwindar                                     Nliddle   Snapshot                           Lens
   jects   at  the  seashore  and  on
   the  water.

Marine and beach scenes. Dis-
  tant  landscapes.  Mountains.
  Snow scenes without  promi-   Smallest  Snapshot
  nent dark objects in the fore-
 _cr:"ng.     ---
Portraits  in the open shade, not             Time
  under  trees  or  the  roof  of a           Exposure
  porch. Shaded nearby scenes.  Smallest   of one or
 . Narrow  and  slightly  shaded              two
  streets.                                 seconds

Moving
   wnen  pnor,ograpnrng   a mov-
   ng. object  such.as  a.runner,
   train  or an  automobile,  the    Largest   Snapshot
  subject should be traveling  to-
  wards or away from the camera
   at an angle of ahout 45 degrees.
  Exposures are for the hours from one hour after sunrrse
until one hour before sunset on days when the sun is
shining.   If pictures are made earlier or later, or  if  it  is
a slighilu cloudy or hazy day, use a larger stop opening.
This  table  ig for Kodak  Verichrome,  Super Sensitive
Panchromatic  and Panatomic  Filme;   if  using Kodak             EASTMAN KODAK COMPANY
N,  C. Film,  exposures can be made from 2%  hours
after sunrise until 2rA hours before sunset'                           Rochester,N.Y., U. S. A.
  Kodak Super-withSensitive Panchromatic Film  is fifty-per
cent  faster       morning  or  afternoon  light,  than
Kodak Verichrome Filnr.


                                                                                                                                                                                          ditHiidfli   .,,*,                ,*$:''':li:.
View original page 1Page 3 · Read text
Turn  the           in position in the center of the window.
                        winding key
                       onceortwice
                             to  bind  the
                       paper on the
                              reel, and be
                        sure that the
                       p a p e r        i s                                        Push back the  slide over the redstarted straight.                                          window;  this  slide prevents fogging
                                     when using Super Sensitive Panchro-
                                             matic or Panatomic Filrn, and makes
                                               the adhesive included with  the  film
                                           unnecessary.
                                                     After each exposure be sure to wind
                                               the next number into position.
                                           OpBurNc rHE FRoNT
  Replace the back, fitting the flange
on the end nearest the red window,
into  the  slot opposite the  carrying
handle.  Press the back so that  the
eatch snaps into place.
             Push the round  slide
               that covers the red win-
          dow on the back of the
           Kodak  in the  direction
               of the arrow.                     Press the button on one side of the
                                           Kodak.  The  lens and  shutter   will
  Turn the winding key. A warning          automatically  spring  into  position.
hand will appear in the red window;        The Twindar Lens, is adjustable for
then turn slowly until the figure 1 is         close-upsand distant subjects.
View original page 3Page 4 · Read text
When the lens is re-             Instantaneous Exposures
               volved  so  that  the                                                                   "Snapshots"           w h i t e  d o t  o n   t h e
                flange is at the arrow          Move indicator A to the letter "I."
              marked: "Beyond 10          Be sure the stop opening slide C is
                  feet," the Kodak is in             in the correct position, (see Exposure
               focus for  all subjects         Guide on the last page).
             beyond ten feet. For            Press lever B, slowly, as far  as  it
                close-ups, revolve the              will go. Th'is nzakesthe er,postr,re.The
                lens  until  the  white           lever  automatically   returns  to   its
                dot  is  at  the arrow            original position when it is released.
marked: "5 to 10 feet." Be sure that          Do not jerk the lever as any move-
the lens is always turned as far as it         ment of the Kodak,  at the instant of
will go, until  the pin on the flange is                                             exposure, will blur the picture.
again*stthe -qtopon ttre front plate.                                    When making snapshots the subject
       THn SHurrnn                    should be in the broad, open sunlight,                                                but the camera must  not.  The sun
                                             should be behind your back 0r over
                                                the shoulder.  If  it shines directly into
                                                the lens it will blur and fog the picture.
                                               For  subjects in  the shade, untler
                                                the roof of a porch or under a tree, a
                                               time exposure must be made. When
                                         making  pictures under these condi-
                                                   tions the camera must be placed on
                                     some steady, firm support.
      A  -Indicator  for Instantaneous
               or Time Exposures                            Srop OpBxtucs
       B-Exposure                     Lever                                         The  stop  openings  regulate  the            (-'          --Stop Opening                            Slide                                        amount  of light passing through the
         Nour:  lVeuer oi,l the sLt'utter.                  lens. When slide C is all the way in,
                            www.orphancameras.com
View original page 4Page 5 · Read text
the largest stop opeuing is in position.         upwards, move backwards until   it  is
This is the one to use for snapshotso{             all included with the camera held leuel.
ordinary  outdoor subjects. To  bring
the middle stop in position, draw out
slide C until  it catches. When slide C
is drawn out as far as it  will go, the
smallest stop opening is in position.
  When  setting  the  stop  openings
always make sure that the one to be
used is brought to the certterof the lens,
where it catches.
                                                                                        Holding  Kodak  for  o Ilorizontal    Picture.
        THB Frxripns                                         If the subject is below the normal
  There  are  two  finders, one  for           height, like a small child or a dog, the
vertical and the other for horizontal         Kodak should be held down level with
pictures.  Only what  is seen in  the          the center of the subject.
finder will show in the picture.                                       After an exposure
                                                         has been made, turn
                                                                                                                      t h e w i n d i n g , k e y
                                                                    slowly, a few times,
                                                                               until  No. 2 (or the
                                                               next number)  is  in
                                                 the center of the red window.
                                               RBrrovrNG THE Frr,ur
                                                       After  the  last  section of  film  has
                                        been exposed, turn  the winding key
     Holtling   Kotlak  when  making  a Vertical   Picture.                 until the end of the paper passes the
  The Kodak must be held level.   If          red window.
all the subject can no'i, be included in              In a subdued light, open the back
the  finder without   tiltins  the  lens           of the Kodak.
View original page 5Page 6 · Read text
Important:    Film  should be de-
                                            veloped as soon as possible after ex-
                                              posure. The quality  of the image on
                                                                 all sensitized products is retained by
                                           prompt  development after exposure.


  Hold the end of the paper taut and
turn the key ultil   all the paper is on
the roll.   If the sticker folds under the
roll, turn the key to bring  it up.                      I
                                      Remove the empty spool by push-
                                                  ing one of the ends of the spool and
                                                      at the same time pressing back one of
                                                the spring flanges, as shown above.


  Take hold of the ends of the pro-
tective paper and sticker to prevent
the paper from loosening. Draw out
the key and remove the film. Fold un-
der about half-an-inch of the paper,
and fasten it with the sticker.
  "Cinch"   Marks:   After removing            Place the empty spool in the wind-
the film from the Kodak, do not wind           ing end of the camera, bringing the
it  tightly  with a twisting  motion, or           slotted end next to the winding key.
the film misht be scratched"                The Kodak is now readv for reloadine.
                           www.orphancameras.com
View original page 6Page 7 · Read text
TruB Exposunns-IunooRs
  For time exposuresthe camera must
always be placed on a firm support like
a table or chair, net)er hold  it  in the
hands.


                   RU                        a.\

  Place the Kodak in such a position
that the finder  will include the view                                         To make the exposure, steady the
desired. The above diagram shows                                       Kodak  with one hand and press thethree  positions  for  the  camera.   It                                          exposure lever carefully to open the
should not be pointed at a window as                                                   shutter. Give the proper time (using a
the glare of light  will blur the picture.                                          watch  if more than five seconds), then
If  all the windows can not be avoided,         press down the exposure lever a second
draw the shades of those within ranqe                                              time to close the shutter. The Kodak
of the lens.                                          must be steady or the picture  will be
  Use the standard 2 for a support.           blurred; do not hold it in the hands.
The camera must not be more than             After making an exposure, turn the
two or three inches from the edge of         winding key  until  the next number
the table. Turn the Kodak on its side        appears in the red windclw.
when making a horizontal picture.                                                                                 If no more time exposures are to be
   Adjust  the shurter  for a time  ex-        made, adjust the shutter for an instan-
posure by moving the indicator A (see        taneous exposure, by moving the indi-                        ((T."page 4) to the letter                            cator A to the letter  "I,"  see page 4.
                                                               l 0                                                                                                                                                            l 1
View original page 7Page 9 · Read text
shown in the diagram on page 13"        the lens. A larger image can be ob-
    If the above suggestion for lighting         tained by having the Kodak  2 feet,
is followed, an exposure of about one       8 inches from the subject, if the white
second with the largest stop opening        dot on the lens is at the arrow marked:
will be sufficient on a bright day.             "5 to 10 feet."
                                        Measure carefully the distance from   Making  Portraits  Outdoors                                              the lens to the face.
  When making  portraits  outdoors,            'Ihe                                         same exposure is required aswith  the sun  shining  brightly,  the                                              without the Attachment.subject should be in the shadow of a                                                        IIse Kodak Portrait Attachment I{o.building or a large tree, but with clear                                                           6tt, wilh the Jiffy Kodak Six-20; andand unobstructed sky overhead. Place                                       use the I,{o.74  with the Jiffy Kodakthe Kodak on a steady, firm support,                                            Six-16.use the smallest stop and make a time
exposureof about one or two seconds.          Kodak  Diffusion  Portrait
By following this rule unpleasant and                  Attachment
distorting shadows on the face will be         The Kodak  Diffusion  Portrait  At-
avoided. When the subject is five to        tachment   is  a  supplementary  lens
ten feet from the Kodak, the white dot       used in the same manner as the regu-
on the  lens must  be  at  the arrow          lar Kodak  Portrait  Attachment.     It
marked: "5 to 10 feet."                    produces a true, soft-focus effect.
                                                  IJse the  Kodalt, Diffusion  Portrait   Kodak  Portrait  Attachment
                                         Attachment .l/o. 6A,  with  the  Jitry  The Kodak  Portrait  Attachment                                      Kodak  Six-20: and use -ly'o.7A  withmakes head and shoulder portraits.  It                                              the Jiffy Kodak Six-16.can also be used for photographing
flowers and similar subjects.                 Trur ExposuRES-OurDooRs
  Place the Attachment over the lens       When  the  srnallest stop opening
and compose the picture in the finder.           is used, the light passing through the
    If the white dot on the lens is at the        Iens is so much reduced that  very
arrow marked: "Beyond 10 feet," the         short  tirne exposures may be made
subject must be exactly 3% feet from        outdoors.
                                                              l 4                                                                        l5
View original page 9Page 10 · Read text
With  Light  Clouds-From   one tcr     damp cloth, especially if the camera
three seconds will be suffi.cient.            has not been used for some time.
  With  fleavy Clouds-Four   seconds           ttAr HolrE wrrg Youn Koorr<"  is a
to eight seconds will be required.            booklet  containing many  diagrams
  With  Sunshine--Time   Exposures      and illustrations showing various light-
should not be made.                          ing effects.It gives suggestionsfor mak-
  \Yhen making  time exposures the        ing pictures, in and around the home.
Kodak must be placed on some steady,          t'Ptctunp  TexrNc  e:r Nrcgr"   is a
firm  support, do not  hold  it  in  the        booklet  that  describes in  detail the
trands or the picture  will be blurred.        rnethods of making pictures by electric
        Crnex LBNsns                      light,  flash-light exposures, campfire                                          scenes,fireworks, lightning, moonlight
  These pictures illustrate the differ-                                                  effects, silhouettes and other unusual
ence between results with a dirtv and        pictures.
clean lens.
                                        These two  booklets are free, and
                                           copies of them  will be sent upon re-
                                          quest to our Service I)epartment"

                              EASTMAN KODAK COMPANY,
                                                       Rocunsrnn, N" Y.
JIo,tle a'itlr. D'i,rtll Letn.  Mad,e u:itlt (.lleon I'erts.
  Open the back of bhe Kodak,  antl
wipe the front and back of the lens
with a clean handkerchief. Never un-
screw the lens.
  Keep Dust Out  of the Camera
  Wipe the inside of the camera and
bellorvs, occasionally, with a slightly
                         1 6         www.orphancameras.com
View original page 10Page 12 · Read text
IMPORTANT
                                                           This  manual  should  be read  thoroughly,
                                                        before you make any pictures"
                                                        While loading and unloading the camera, be   SERVICE                                                         very  careful  to  keep  the  protective  paper
                                              wound  tightly  around the film to prevent  light DEPARTMENT                    striking   it.
                                                         Before making an exposure be sure that  the
                                                            shutter  is adjusted properly  for an instantane-
  Aoorrroxer AssrsrANCEFoR                ous or a time exposure whichever  is required;
  Mar<rNc Bnrrpn  PrcruRBs                    that  the  correct  stop opening  is in  position,
                                                 and that  an unexposed section  of the  film  is
                                                                    in place.
                                                  The sun must be behind vour back or over
 A LTHOUGH  we give in this rnanual                 the shoulder.    If  the sun sdines directly  into
^fa. the  essential directions  for  using                 the lens  it  will  blur and fog the picture.
the camera   it aecompanies, there  are                 Hold  the camera leuel.
amateurs  u'ho wish  for  further  knowl-                  Hold  the camera steady when making   in-
                                                      stantaneous  exposures  or  snapshots.   The
edge of photography.                               camera should be held firmly  against the body
  The Service Department   is at  their              and when pushing the exposure lever, hold the
service, gour service.                                   breath  for the instant.    If the camera is moved
                                                         during   the  exposure,  the  picture   will  be
  Do not  hesitate  to  call on us for  in-                 blurred.
formation  on any photographic  subject.              When making  a close-up between 5 and 10
                                                                   feet, be sure to revolve t,he lens until  the white
                                                        dot i-qat the arrow marked:  " 5 to l0 feet," and
We are  at your  seru'ice, write  to  us-                    that   it  is turned  o,sfar as it  will go.
    there is no charge, no obligation.                     Turn  a new section of film into position  im-
                                                        mediately   after  making  an  exposure.   This
         Address  all Communications                                   will prevent making two pictures on the same
                                                          section of film.
                                                 Keep the lens and inside of the camera clean.
     SpnvrcB DnplnrupNr                              fnstructions   for making  time exposures, in-
ERsrueN Kooar< CoupAN Y               doorsmanual.and  outdoors,  are  included   in   this
     RocnBsrER.N. Y.                                                 trASTMAN  KODAK  COMPANY,
                                                                           Rocupsrun.  N. Y.
                         www.orphancameras.com
View original page 12From the M. Butkus archive. Original publisher and archive notices are retained.
Check the model and edition against your equipment.
PDF verified 2026-10-10.