Film cameras
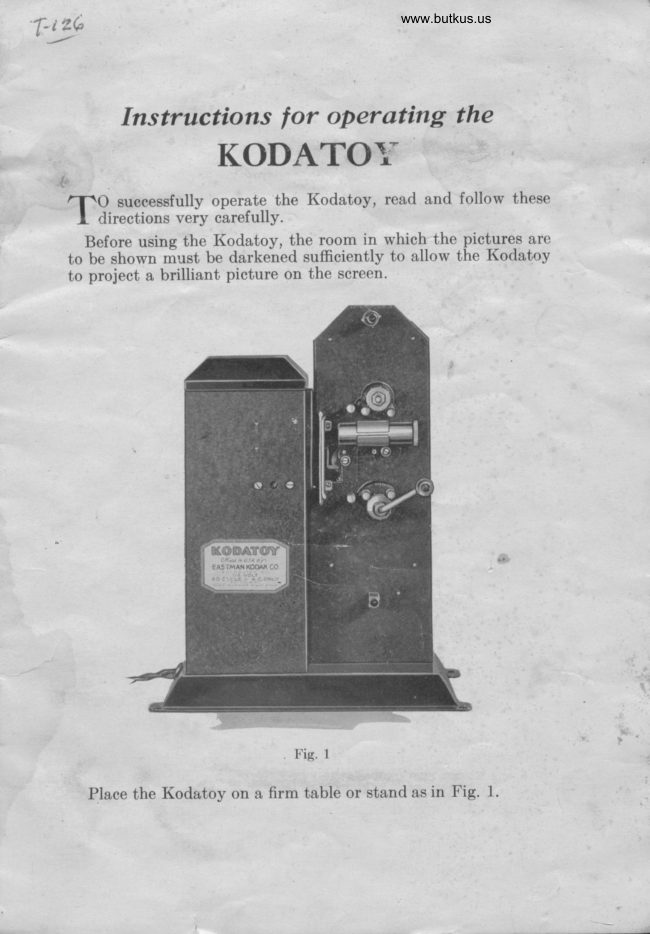
Kodak Kodatoy User manual
User manual for Kodak Kodatoy. 13 pages in English. Read the original PDF, download or print a copy without registration.
13 pagesEnglish3.1 MB PDF
Loading your manual…Open PDF directly
Document details
- Brand
- Kodak
- Model / document
- Kodak Kodatoy
- Document type
- User manual
- Language
- English
- Pages
- 13
- File size
- 3.1 MB
- Category
- Film cameras
- Document date
- Not specified in catalog
Search available document text
Find a term, then jump to its page in the original PDF. Image-only pages may not be searchable; check the PDF for exact wording and diagrams.
Page 2 · Read text
Threading
   Place the reel of film or supply reel I on the supplv spindle 2,
 Fig. 2, s_o that the film draws from the top of reel, witn the shinv
 side of film towards the center of the reel, and with the picturei
 upside down. Push in the supply reel 1 until the spring on the
 spindle^snaps into- position. This spring keeps the re-el f6m shp-
 ping off the spindle.
   Kodaplay Films (15- and 2s-foot lengths) are supplied on small
 reels, these films may be rewound on 100-foot metal reels. Two
 gmpty 100-{9-o-t 1e9ls are sup_plied with the Kodatoy. The 100-
 foot reels will hold several Kodaplay Films, and exira reels can
 be obtained from your dealer.
  unwind about two feet of the film to be projected to act as a                % leader strip for threading.
                            #
         rN )V\
      R<                         ==\\l

   a

                 4   3\                                      t^
                 o   @            www.butkus.us
                                      Fig. 2
   Insert the film by sliding it between the two guide pins B and 4
and.the upper sprocket 5, then between the guide pins 4 and 6,
as shown in the diagram, Fig. 2. Be sure that the film perfor-
ations engage with the teeth on the sprocket.
View original page 2Page 3 · Read text
www.butkus.us

             Slide the film sidewaYs behind
        the gate 7, as shown-in Fig.-3.
         Start inserting the film at the
        upper end of the gate- Be sure
           ttrat the dull side of the film is
        towards the lens barrel 8, and
         that the film is Pushed all the
           way'in, so that none of it Projects
        beyond the edges of the gate. - If
         the filrn does not slide easilY be-
         hind the gate, turn the crank -9,         Fig. 3, a trifle, until the Pull-
        down claw 10 is withdrawn from
         the small hole in the gate.
        When sliding the film behind
         the gate, form the uPPer looP
          11, rnaking it the same size as
        shown in Fig. 4.                                         Fig. 3


                                            Insert the film bY sliding it
                                                            and                                above the guide Pin t2
                                     under the two guide Pins 13 and
                                                   14, bringing the film between the
                                           guide pins and the lower sProcket
                                        15 as in Fig. 4. Be sure that the
                                              film perforations engage with the
                                         teeth on the sprocket.
                                When sliding the film between
                               the guide pins and sProcket,
                                      form the lower loop 16, making
   lj                 tz                                 it the same size as shown int    I                                           Fig. 5, page 4.
  a
  i

                           Fig. 4
View original page 3Page 4 · Read text
"t*

   Slip the empty or take-up reel L7, on the take-up spindle 18. Be
 sure that the reel is pushed all t,he way in so that the spring on
 the spindle snaps fnto position.


                                                                                                                                                                                                                                                                                                                                      i


                                                                    fl
      ffi


                                    Fig. b                                                                          7
                                                #
  Thread the film on the                         by pressing the end,of film against                                   -reel,the core of the take-up reel 17, as sliown in Fig. b. The small Jpring
!_1s.$ on the flanges of the- reel prevent the film from slippingl
     up on the take-up reel any slack that there may ue in th"eWi"4film between the- lower sprockel and reel core, by rotating the
take-up reel to the right  ( clockwise) in the direciion show-n bv
the arrow in Fig. 5.                                                                                                                                                                         I
  when the Kodatoy is,completely threaded, turn the crank g,
Fig. 5, to the right or clockwise a few times to see that the film is
threaded.propelly, and that the pull-down claw 10, Fig. b, en-
gages with the film perforations.
View original page 4Page 5 · Read text
Venmo @mike-butkus-camera  Ph. 2083
PayPal Name  Lynn@butkus.org      www.PayPal.me/lynnbutkus
View original page 5
Page 7 · Read text
Operation
   'l'he Iiotlrrtov slrorrLl lrt'pl:rcctl ott u Iirnr, lt'r't'l trrlrlt'or slutttl.
   Sr'1 rrll tlrc IiorLrlll:r.t' 'l'lrcutrr', tlrt' clrt'rllrouLtl scttt'tt fttlnislretl
n'ith tlrc liotl:ltov, folrlirrg it otr tltt'littt's ltttl ittsct'ting tlrt'tlLlrs
in thc slots intliclrtt'tl  lrv- lcttr.r's. rrt't'ot'tlitrg to rlit't'ctiotts olt tltt'
s(fr'(,('n. lfig. 7 shrlrvs tlrt' Iiotl:r1rLrl"flrt':rtt't'st't  tt1l. t't'ltly fot'us('.
 I'lllct, t,lrt' Iiorlrrlllrr.r' 'l'lrt'rrtlc so tlult tltt'(rt'tttt't' ol' it  i:i rtlrottl ott  lt
lirrt' u'itlr the lens ol' tlrc liotlltov.   'l'lrt' rlistln('t' lrt'twt't'tt  tltt'
set'('('n:rtrtl tlrt'lt'tts of tlrt' liorlrrtov slrottltl lrt'rrlrotrl fivt'l't't'1.


  www.butkus.us
                                                lfig. 7

   'l'he sizc of thr'pt'ojt'ctcrl  pictlll'(, or) 1111. s1'1'1'1'tt is rt'gttllrtt'rl  lrv
clrlrnging tltt, rlistlrrr('t' lrcl \\'('('n tlrt' Iio<llrtot' :rrrtl  l lle scl'['('I].  'l'lre
clos('r'tlrt'scrt'r'rr is to tlrc liotlrrtot', tlrt'srrrrrllcr tlrt'sizt'of  tlrc
picttrn,.
   (lonrrcct tlrt'pltrg on tlrt't'rrtl of llrt,conl ltt:rclrt'tl to tltt' Iiotlrr-
toy, rvith trry t'lt'ctric st'rvict'soclit't thrrt is on t littt'of lOir to 125
volts, (i0 cr'<'lc,\. ('. otrly.  If it is not linorvn rvhllt voltllgr')'oul
litrc crlrrics, inrluire of your krcll clectric scrl'icc cotttprr,tty.  If
tlicrc is a srvitctr in thc st'rvicc sockt't, tttrn it on.  \\'ltt'tr  tltt'
current is turned on it autonurticlrllt' lights tlrt' lunrll.
View original page 7Page 8 · Read text
www.butkus.us


           Turn the crank 9, Fig. 8, to the right or clockwise, at the rate
            of two revolutions a second.

r
s


                                                                  I'ig. 8

                 If the picture is not sharp on the screen, focus the Kodatoy by
            sliding the lens barrel 8, Fig. 8, forward or backward.
                  If the picture on the screen is upside down, and if the action is
          backwards, the film has not been rewound. If the subject is
           reversed, left and right, the dull side of the film is away from
           the lens barrel 8; this will occur if the top reel was turned in the
         wrong direction, or if the film was twisted, when rewinding.r          When a still picture is desired of any subject during projection,
            just stop turning the crank 9, Fig. 8. If the shutter is closed and
         no picture appears on the screen when the crank is stopped, turn
           the crank a trifle to open the shutter.
View original page 8Page 9 · Read text
Rewinding
   After the film has been projected it is necessary to rewind it so that when it is shown again it will be in the right order, and the
 back or shiny side will be towards the center oT the reel.


                                       www.butkus.us
               Fig. 9                                       Fig. l0

  Remove the crank 9, Fig. 8, page 7, by turning it backwards
or counter-clockwise, unscrewing  it from the lower sprocket lb,
Fig.. 9. Attlch the crank to ttre shaft of the uppef spindle 2,
as shown in Fig. 10.
   Slide the lens barrel 8, Fig. g, against the gate.
   Place the empty 100-foot reel (extra reels can be obtained from
your dealer) on the supply spindle 2, Fig. g.
  Attach the film to the upper reel l, by pressing the end of thefilm a-gainst the core of the reel, as shown in Fig. g. To make
sure that the end of the film is securely attached, give the upper
reel I a few turns with the crank 9, Flg. 10, turning the crank^ to
the_right or_clockwise, in the direction indicated by the arrow
in Fig. 10. See that the film is not twisted: a film can be ruined
by careless rewinding.
  To rewind, turn the crank 9 in the direction indieated bv the
arrow in Fig. 10.
View original page 9Page 10 · Read text
www.butkus.us


                Care of the Kodatoy-Oiling
         The Kodatoy must be oiled before using, and it must be kept
         clean. The Kodatoy should be oiled at intervals which depend
.-{       upon the frequency of its use.

   I
      I
 I{


  1


                         Fig. 11                                     Fig. 12


          There are 11 places that should be lubricated and all places
        where oil should be applied are indicated in Figs. 11 and L2.
         Be sure that all points marked "OIL" are supplied at each oiling.
         Ordinary sewing machine or "3 in 1" oil may be used. In any
         case use only very small quantities. A drop or two in each oil
          hole and at eaeh bearing point is sufficient.
 +*              Cleaning the Lenses and Reflector
         The lenses of the Kodatoy should be cleaned whenever neces-,T\ti       sary. Dirt on the lenses will cause the picture on the sereen to
         appear cloudy or flat. Remove the lens barrel 8, Fig. g, page 8,
     I       I       by sliding it out of the carrier. Wrap the end of a woodenmatch
       I        with a soft, elean lintless cloth and carefully wipe the two lens
         I
View original page 10Page 11 · Read text
www.butkus.us


                                     Fig. 13

surfaces, also wipe the condensing lens 19, Fig. 13, located be-
tween the lamp and the gate. To clean the rear surface of the
condensing lens, first remove the lamp house cover and the lamp
as described on page 11. The front surface of the condensing
lens can be reached by inserting the cloth covered match through
the opening in the gate while the lens barrel 8, Fig. 9, page 8,
is removed. Do not moisten the cloth used for cleaning lenses.
  The reflector 20, Fig. 13, fastened inside of the lamp house,
must be clean. If it is dirty, wipe it carefully with a clean cloth.
              Cleaning the Gate
  To remove the rear section of the gate 7, Fig. 11, page 9, take
hold of the ends of the gate, push the gate against the lamp house,
lift it off the projection on the rigid part of the gate and push it
down. Clean the tracks of both parts of the gate, rvith a slightly
moistened, clean cloth. Be sure to remoae any blach specks that
may be found in the tracks of the gate. To replace the gate, insertit from the top, then push it against the lamp house and fit the
projection on the rigid part of the gate into the small hole on the
rear sectibn or removable part.
             Replacing the Lamp
  Should the lamp burn out, replace it with an automobile head-
light lamp: No. 1110, double filament,6-8 volt,2lc.p. only. It
can be obtained from any store handling automobile accessories.
                                      l0
View original page 11Page 12 · Read text
www.butkus.us


                                                  house cover, by          - To replace the lamp, first renlove the lamp            lifting it off.
             Press down slightly on the lamp and give it a quarter turn to the
              left, then lift it out of the socket 21, Fig. 13. Ins-ert the new lamp,
          press it down into the socket and give it a quarter turn to the
          right until it snaps into position.
       _ Thq lamp furnished with the Kodatoy needs no adjustment.
        The filament wires of the newlamp may not be in exactly the same
           position as in the old lamp. If the illumination on the screen is not
          qven, remove the lamp house cover, loosen the adjusting screw 22,
           Fig:_ 11, page 9, and raise or lower the lamp socket a  trifle,
          until tests show the illumination on the screen to be even, then
          tighten the adjusting screw.
            Attaching Leaders to Kodaplay Films
        To make a longer picture, it is desirable to attach several
         lengths of Kodaplay Films together, and wind them onto a
          100-foot reel. In order to show the complete picture, a leader
                 ( about two feet long) should be attached to the end of the Koda-
         play Film. When threading the film onto the Kodatoy, use the
         leader instead of the picture itself. The leader can-be easily
        attached !v using the Kodascope Film splicing outfit; full          directions for splicing are included with the outfit.-
    t         Leader material is supplied in 100-foot lengths ( sufficient for
            fifty reels of film), and it can be obtained from your dealer.
   I
 It*l,\                                - Price List of Accessories
         Kodaplay Films, sh-ort pictures of various subjects, such as comedies,
            dramas, animated cartoons, adventure and travel.
          No. 1.  7-footlengths.......                            $.80           No. 2. 15-foot lengths.                                                .60           No. 3. 2l-foot lengths.                                                .90
           Cinegraphs, covgr a wide variety of subjects, each complete in itself.               100-foot lengths                                                     7.50        E-p!y 100-foo-t reel for holding several Kodaplay Films spliced to-
             gether to make l00-footlengths, each .          .. . ...
         Kodascope 4Im Splicing Outfit, for attaching several lengths of           Kodaplay Films together, and for mending breaks in the film-.  . . . . .   1.b0J         Leader material for attaching to ends of Kodaplay Films. 100-foot          length.                                                                   1.50
          No..00 Kodascope Screen, a substantially made, folding screen, fortt            pictures 10x 13 inches.                            .... :..........      8.00*                          All pri,ces subject to change without notice.
   t                    EASTMAN KODAK COMPANY,
  It4:;                                       RocnBsrER, NEw Yonx.

                                                    l1
View original page 12Page 13 · Read text
--
                                                                                                                                                                                                                                                                                                                                                                                                                               |
 KODAPTAYS for yamr                                                             '{*"    }
   KODATOY
   f f fHAr kind of motion pictures do you like
                       sure to find just rvhat you VV best? You are
  want in the assortment of Kodaplay$ carried
                                                                                                    .  by your KodatoY dealer .
    You'll find Felix the Cat, Charlie Chaplin,
  and many other well-known movie comedians
    . . . thrilling air pictures  . . . actual battle pic-
                                            scenes  tures of the World War . .  . interesting
  in strange lands
    Kodaplays are all made on 16 mm. Kodak
   Safe.ty Film. There are three sizes ranging in
   price from 30 to 90 cents, depending upon their
   length. Ask your dealer about Kodaplays and
  make your selection. As you add to your col-
   Iection you can exehange them with friends
", who have Kodatoys.

                         o1-4@JLaD>-1o
 EASTMAN KODAK COMPANY
           RocHESTrn, Nnrv Yonrc
View original page 13From the M. Butkus archive. Original publisher and archive notices are retained.
Check the model and edition against your equipment.
PDF verified 2026-10-10.