Film cameras
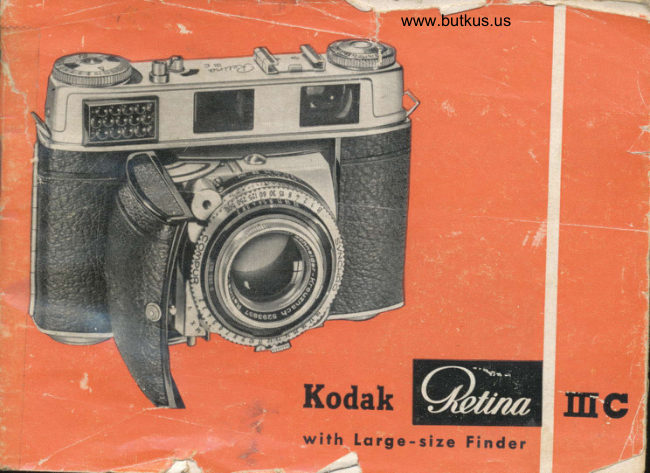
Kodak Retina IIIC User manual
User manual for Kodak Retina IIIC. 49 pages in English. Read the original PDF, download or print a copy without registration.
49 pagesEnglish9.8 MB PDF
Loading your manual…Open PDF directly
Document details
- Brand
- Kodak
- Model / document
- Kodak Retina IIIC
- Document type
- User manual
- Language
- English
- Pages
- 49
- File size
- 9.8 MB
- Category
- Film cameras
- Document date
- Not specified in catalog
Search available document text
Find a term, then jump to its page in the original PDF. Image-only pages may not be searchable; check the PDF for exact wording and diagrams.
Page 8 · Read text
www.butkus.us

 Open ihe comero by pushing the
 smoll button (l) on the boseboord
  r\oooK . At the some time pull
 open ihe boseboord until it engo-
 ges with on oudible click.
You con only close the comero
when the focusing scole  (9) + is sel
to infinity. Simulloneously press in
the lwo buttons (16) ot fhe side of
the lens ponel with two fingers of
one hond, ond fold up thJ bose-
boord. Prociise these operolions o
Tew ttmes.
Feel how smoothly rhe RETINA  lll C
opens ond closes!
* The numbers nol shown on individuol
  poges ore indicoted on the generor
 view of lhe comero feolures on oo_
  ses 42-45 (unfold poge).
View original page 8
Page 9 · Read text
Holding and Viewing


ffi
Now hold your RETINA with both honds ond try different woys of
gripping  it until you hove found o cqmero hold thot suits you best.
Our illustrotions for horizontol ond verticol shots ore intended iust
os suggestions. After o few ottempts you will soon hove o reolly sure
grip on it.
View original page 9
Page 10 · Read text
www.butkus.us

 Look. through th.e finder eyepiece (35): the
 new      .forge-size view-.ond rdngefinddr ihows

  f inder
 The three reflected line fromes indicote the
 oppropriote fiefd of view with the stondoid,
         ond              wide-ongte                             tenses respeiiGli, le]go!oto,ond prevent              foulty                    viewing.
 Pleose note:
The middle line frome opplies to the stondord
  2 inch (50 mm.) lens;
the jnner .line frome opplies to the 3% inch  (80 mm.) telephoio leij;--
the^-outer.line frome. opplies to the 13/a inch
  (35 mm.) wide ongle'l6ns.-
For further detoils of the imoge fromes fortelepholo ond wide ongle shois- sgg p;;; i7;for setting the distonce-see p",gi22.--
At neor subiect distonces (closer thon g feet)
pteose n.ote lhe remorks on poge 3Z oboui
thelo^oro   I lox correction mo rks'on"Joii, i;"#rrome.
View original page 10Page 12 · Read text
www.butkus.us


When you hove your subiect nicely
fromed in the viewfinder, press the
releose button (13) hough. The porti-
culorly smooth oction of the releose of
your RETINA effectively guords ogoinst
comero shoke.
You con only press the releose button
once you hove tensioned the shuiter.
So moke o hobif of operoting the ro-
pid winding lever immediotely ofier
every exposure. Your RETINA is then
olwoys reody for oction. Keeping the
shufter lensioned - even for some time- does not horm it in ony woy.
View original page 12
Page 13 · Read text
THE TECHNIQ,UE OF PICTURE TAKING
Inserting the Film


                      Your first shots will soon show the odvontoge of hoving
                           proctised the bosic operolions without o film in the comero.
                   You hove olreody got the feel of your RETINA, ond cqn
                       devote more qttention io the subiect itself. So let us stort
                          toking pictures in eornesf.
                     To lood the film you must open the comero bock. Turn lhe
                          milled end of the sofety lever (34) surrounding the tripod
                     bush (3i!) in the direction of the orrow to uncover the
                      opening butfon (32). Depress this bufton, ond the comero
                       bock will spring open. The odvontoge of this double locking
                       syslem of lhe cqmero bock is lhot you connot open ihe
                     bock by ony occideniol movemenl or knock.
                            Fully pull out the rewind knob (20) fo its second stop.
View original page 13Page 14 · Read text
www.butkus.us


 Turn lhe built-in toke-up spool (41)
                                                                           I

words. Push the trimmed end of the
film into ihis slii, so os to onchor o
perforolion hole in the little hook of
ihe slit (see bottom illustrotion oppo-
siie).
Now drow the film ocross the film
lrock, ond insert the cossette into
the cossette chomber. Push bock the
rewind knob (20), turning it ot the
some lime in the direction of the
orrow unlil you feel o slight resi-
stonce, lhus tensioning the film. The
teeth of lhe tronsport sprocket (40)
must properly engoge both rows of
perforotions of the film. Then close
the comero bock.
View original page 14Page 15 · Read text
Setting the Film Gounter


                     Press the film releose button (14) ond ot the some time push
                  the film counter setting buttdn (38) in the-direction of the                   orrow. Reoeol ihis until-the diomond-shoped t mork between
                                                                    (15) is opposite the                No. I onil No. 36 of the film counter
                  notch in the uiper'c'qssette-setedge of the film counier window. With              o 20-exposure             the film counter to ihe diomond                       I mork ot No. 23.
             Now press ihe film releose button (14) ogoin, ond operote
                   the robid windinq lever (37). Repeot this until No. 36 (or 20)
                 oooeors opposiie- the noich in ihe film counter window. At
                           tfid sqme iime, the rewind knob (20) must rotote ogoinst the
                     direction of ilie orrow engroved on it. Thoi shows ihot the                     film is odvoncing properly. lf  ii does noi rotote, lension lhe
                     film oqoin os described on poqe 13.
                 The fiim counter olwovs indicoles ihe number of shots siill
                     ovoiloble. When you releose ihe shulier ofter the counter hos
                   reoched No. l, oh oulomotic ironsport lock come.s into ope-
                     rotion ond ih6 ropid winding lev6r locks. Se" t-h.e remorks
                on the film releose on poge 38. A guord on the film releose
                    button prevents occidentol releosing.
                          t1
View original page 15Page 16 · Read text
www.butkus.us
 Sefting the Film Speed


 Set ihe speed of lhe film looded in the comero on
 the film speed disc (ll) of the exposure meter. lf you
 omil this setting, the meter moy indicote incoriect
 lighl volues, ond thus leod to wrong exposur"s. Us"
lhe smoll stud to rotoie ihe film speed jisc (ll) until
the block triongulor index points to the oppropriote
speed figure of the film in one of the two windows
(for DIN ond ASA respectively). For instonce use 12for q 12ll0o DIN film.
The film indicotor (2i) on the rewind knob (20) is
ols.o, o. useful memory oid. Turn the serroteJinJuntil          friongulor                           points            V mork                               to     .the                                    th;                                         ryp; ;;speed       of the              film looded                              in the                            comero.                                         pilrion                                                ff,.
of fhis fitm indicotor does not offect the
In ony wcy.                             "rporur"
View original page 16
Page 17 · Read text
Determining the Light Value


                                  Your RETINA lll C hos o single-ronge
                                               photo-electric exposure meter with pre-
                                               cision scole built into the bodv. This eli-
                                        minotes o lot of colculotions, for it in-
                                               dicotes the correct"lightvolue"  for olmost
                                      ony subiect. This light volue is shown bv
                                  o number (morked in red) which is o meo-
                                            sure of the omount of light required for
                                             correci exposure.
                                     The precision scole of the exposure meter
www.butkus.us                             enobles you to reod off whole os well os
                                             intermediole light volues, which is impor-
                                           tont for occurote exposure with colour
                                                           film.
View original page 17Page 20 · Read text
www.butkus.us


          I second. When set to B, the shutter remoins
       open os long os you keep the releose buiton
       depressed. The operiures  (f/ numbers) ore
       found on the operiure scole (4); the figures
      ore relotive lens openings. Thus f/2 is the
        lorgest, and tf22 the smollesl lens opening.
      So remember: the higher the operiure nuri-
        ber, the smoller the lens opening. The choice
        of ihe lens operture is closely connected with
        the depth of field required (see poge 23).
           lf, for instonce, you hove set o light volue         o_f ll ond you rotote the shufer sfeed ring
           (6), y9u con reod off the following'operiurei
       speed combinotions in turn opposili the index
      mork (3):
     Aperturef/ nftl    I5.6  4 2.9 2
      )nunel3peed  th th 1/s 1/zo r/so 1ltzs lzso rlsoo
                                   {i:':i "'
                                                               X\,'iYt                                                                                                                                                 r,l   !e'  -11
I                                                                  iA"    L!"
View original page 20Page 22 · Read text
www.butkus.us

                                                                                                                                                                                                                                                l,
                                                                                                                                                                                                                                             I
                                                                                                                                                                                                                                                                        I


without reference to light volues. ln thot cose set the shutter speed
first, ond then the operture.  lf you do it the other woy round, the
operture-speed coupling would olter the operture when setting
the shutter speed.
Therefore first rotote the shutter speed setting ring (6) until the
required speed is opposite the index mork (3). Then pull the light
volue setting lever oufwords os olreody described, ond move it
sidewoys until ihe operture to be set is olso opposiie the index
mork (3). Even when y6u hove set the exposure in this woy, you
con use the operture-speed coupling io odiust the shutter speed
ond operture together ot will by turning the shutter speed setting
ring.
lf the shuttei speed setting ring reoches the limit of its movement
during odiustmenf, this indicotes thot the lighting conditions ore
not suitoble for the operture or speed you intended to use.
View original page 22Page 23 · Read text
Setting the Dietance


 When you look ihrough ihe eyepiece (35) of the lorge-size view- ond rongefinder,
 you will see o round rongefinder field oppeoring speciolly bright in the centre
  of the finder imoge. As long os the disionce is not occurotely set, port of the
  imoge oppeors with double ouilines inside this rongefinder field. Therefore
 move ihe focusing knob (31) until the outlines of the double imoge fuse into one.
 Your comero is then correctly focused. For setting the distonce with the inter-          I  chongeoble lenses see poges 28 ond 29.

22
View original page 23
Page 25 · Read text
Focusing Zones

                         Your RETINA lllC hos two zone focus settings.
                           With these you do not hove to set the distonce
                                 ofresh for every shot, provided the subiect keeps
                                within the quitb oppr6cioble region covered bv
                                ihe depth of field.
                                q) The NeolFocusing Zone
                            Foi neor subiects set the distonce to the smoll
                                   circle neor the '10 feet mork, ond the operture
                                       This                                          f/8.                                           yields o depth of field from obout \\                          to61/z                                                   feet.                                   lo 20
                                b) The For Focusing Zone
                           For more distont subiects set the scole to the
                             smoll circle corresponding to 20 feet, ond the
                               operture to f/8. You then hove of your'10disposol                    o zone of shorp focus from obout    feet to
                                         infinity.
                             For the zone focus seltings you must, however,
                          hove enough lighi to permif -o- guflicientlv fost                                   shutter spe6d ot on opeiture of f/-8. On thot point                               consuli your exposure meter: for exomple, g                                  fight volue of 12 corresponds to lleo second
                                ot f/8.
              F.e rj.:o
View original page 25Page 27 · Read text
Removing and Inserting the Lens


                               The froni component of the RETINA lens
                                        is inierchongeoble. To remove the ston-
                                dord lens, rotote  it onti-clockwise os for
                                os it will go, ond lift out of ihe shutter.
                       We recommend the use of the speciol lens
                                     contoiner designed for the stondqrd lens
                                            for eosy chonging ond convenient storoge.
                            To inserl the olternotive lens unit in the
                                   comero, ploce the red dot on the mount
                                   of the lens (,l8) opposite the red dol on
                                     the boyonet fifiing (19), os in the illusiro-
                                           tion. Then turn ihe lens clockwise os for
                                  os it will go, fo engoge lhe boyonel lock.
                               To remove lhe olternolive lens unit ogoin,
                                   oroceed os described obove.


                                                26
View original page 27Page 28 · Read text
www.butkus.us
     The Large-size View.
     and Rangeflnder


        The new lorge-size view- ond rongefinder
            for- o series of focol lengths greolly sim-
          plifies photogrophy with- fhJ inteichon-
         geoble lenses.-While previously on occes-
        sory multiple finder wos neceslory to de-
         lermine the field of view, the r'eflected
        imoge fromes.of the new irultiple combi-
        ned view- ond rongefinder instontly show
        the correci field for tele ond widd-ongle
          shots.
  i       The inner brilliont frome outlines lhe field
  {        oreo for telephoto exposunes (see iop illu-
           strotion), the outer brillicnt frdme thi view  I         for wide-ongle shots (see boitom illustro-
           tion). You therefore see ot the some time
       which lens is the most suitoble one foi       ony given subieci.
         The morks on the imoge fromes serve for porol-It  I           t.ox correction with nmr subiects closer'lhon  I      U teet (see poge 37).

   I

 I
 {ti
View original page 28Page 29 · Read text
Setting the Distance


When oholoorophino with the interchongeoble  lenses, first meosure the subiect
distonc'e os disci'ibed- on poqe 72, ond reo-d off the figure obtoined on the distonce
siote fgt of the comero bpposit6 lhe focusing indei (7). Then set this figure on
the wliiie scole ring of th'e'olternotive lens unit (45) opposite the.red triongulor
index (44). This sco-le ring is morked in red "35'mm." .oq.^lhe wide-ong.le lens,                                        ond "80 mm.o on the tele'
                                                  photo lens.
                                 Now reod off the distonce
                                                            figure on the blqckscole  (43)
                                                     of your olternotive lens unit
                                                  op6osiie the red triongulor
                                                             iridex. Set the some figure
                                             on the distqnce scole of the
                                             comerq opposite-     the focus-                                         ing indei   (7). The olter-
                                                     notive lens is now shorply
                                            focused of the meosured
                                                            distonce.

                                                                 28
View original page 29Page 30 · Read text
www.butkus.us
        For exomple (see illustrotion on the left) you ore shooting with the wide-ongle
          lens, ond with the lorge-size view- ond rongefinder hove found the subiect
         distonce to be 7 feet. On the white scole ring of the wide-ongle lens (45) there-
         fore set-the figure 7 opposite the red triongulor index mork I++). On th6 block         scole (€).you reod off opproximotely 13 feet opposite the tiiongulor index.
      Now set this figure opposite the focusing index (7) of the comero.
      Setting lnterchangeable Lenses without
                      on.olternotive                            RETINA                                                 lens             lf you hove                                           without                                GOmpafi56n        comporison                       scole,                                        scoles                          use the two                                        below                                                       - - ---r.       SCaleS                                        the
          lens ponel on the comero, on the other side of
         fhe distan"-e scole, for focusing (see illustrotion).
       $ove the focusing lever (31) to set the distonce         for wide-ongle sliots opposite rhe \  mqrk (29)
       on the white scole (30) (block figures on white),
       ond for telephoto shofs oppos-ite the T-indeii
         mark. (24) o_n the blo-ck scolb-(26) (white figures
       on block). The zone focus settinq.s'for the wide-         ongle. lens (9 gt 10 feei) ond for the telephoto
         lens (O ot 50 feet for the for zone, ond'O ot
        obout l5 feet for the neor zone) ore olso morked
       on these two scoles. The vellow fioures on ihe
           blo.ck. telephoto scole (25) ore fo-r exposures
        with the telephoto lens in'coniunction *ith thet      T l/60 close-up lens oi distonces Setween 6 ond
          3rlz feei.
IL
View original page 30Page 31 · Read text
Focusing Zones with the Interchangeable Lenses


l. The Wide-angle Lens
The zone focus setting is morked on your wide-ongle lens by o block circle. Set
this circfe opposite the red triongulor index (44ll, yov con then reod off qpproxi-
motely 20 feet on the block scole ring (4i]).
With the operture sel to f111, you then hove o depth of field zone from obout
5% feet to infinity (see left-hond illustrqtion on poge 31). Finolly set lhe distonce
scole (9) of your RETINA lllC to 20 feet.
2. The Telephoto Lens
Your telephoto lens corries two zone focus settings morked by two block circles:
o) The Neor Focusing Zone
Set the block circle neor the 15 feet mork to the red triongulor index (44). The
block scole ring (4il) of the telephoto lens then indicotes o distonce of obout 6 feet.


30
View original page 31
Page 33 · Read text
Readlng Ofl the Depth ol Fleld
lf you wish io know the depth of field ot your disposol, reod off the distonce
meosured by the lorge-size view- ond rongefinder opposite the focusinq index(l of your RETINA lllC, ond set this figure on the whiie scole rins (45)- of the
olternotive lens opposiie the red trionqulor index (44).
Tq _thg.left ond- right of the red triong-ulor index iou con now reod off the depthof field limits for the vorious operture settings on the white scole ring (45) of ihe
olternotive lens.
Nole: The reference Nos.43 to 45 opply only lo ports of the olternotive lens unils, ond
      do not therefore oppeor in the survey of lhe comero feotures on poges 42-45.

              Telephoto Shots between 6 and $ l/2 Feet
                 The telephoio lens covers subiect distonces from infinity to
             6 feet. With the T 1/60 close-up lens fitted in front you
                con olso ioke telephoto shots 6f subiects between 6 ond                          3^1lz feet (e. g. portroits to ovoid perspective distortion).
                  Set ihe distonce in exoctly the some woy os described on
                 pose ?-8 for the interchongeoble  lenses, but in this cose use
                     the yellow figures on the white scole (45) to obtoin the figure                    to which the distonce scole of the comero must be set. -

                         32
View original page 33Page 34 · Read text
www.butkus.us
     Unloading the Film


      To rewind ihe exposed film, depress the reversing button
        (39) in the bose of the comero, ond holf puliout the
       rewind knob (20) to its first stop to get ot it more eosily.
       Turn the rewind knob in ihe direction of the orrow until
       the reversing button ceoses to rotote. This button corries
     o block dot neor its edge for eosier observotion. you
      hove now rewound the film into its cossefie. Open ihe
      comero bock (see poge '12), fully pull out the rewind
       knob, ond remove the cosseite from the film chomber.
      The exposed film is best protected ogoinst the light in
        its-originol pocking. In ony cose do nor rood or unrood      o film in                    fulf sunlight or strong ortificiol light, to ovoid,i-     possible                 fogging.
i  ,/.
ii                                                                       33
ut
View original page 34Related documents and language editions
From the M. Butkus Camera Manual Library. Original publisher and archive notices are retained.
Check the model and edition against your equipment.
PDF verified 2026-10-10.