Film cameras
Kodak Vest Pocket Model BAKA: Girl Scout Camera User manual
User manual for Kodak Vest Pocket Model BAKA: Girl Scout Camera. 29 pages in English. Read the original PDF, download or print a copy without registration.
29 pagesEnglish2.3 MB PDF
Loading your manual…Open PDF directly
Document details
- Brand
- Kodak
- Model / document
- Kodak Vest Pocket Model BAKA: Girl Scout Camera
- Document type
- User manual
- Language
- English
- Pages
- 29
- File size
- 2.3 MB
- Category
- Film cameras
- Document date
- Not specified in catalog
Search available document text
Find a term, then jump to its page in the original PDF. Image-only pages may not be searchable; check the PDF for exact wording and diagrams.
Page 1 · Read text
www.orphancameras.com
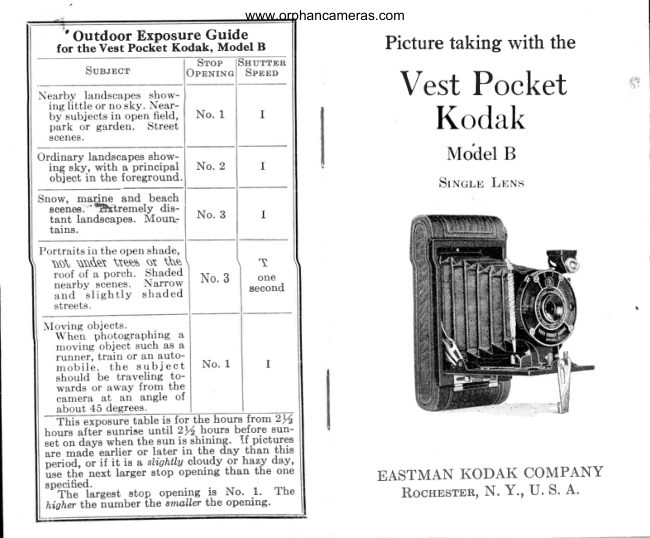
        ''     Outdoor Exposure Guide    for the Vest Pock-et Kodak,  Model B              Picture taking with the
                                Srop    Srruttpn
         Sus.rnct          OppNrNc    S p p p p
                                                                                                                      *+.  t   '                      Vest Pocket
                          No. 1


Ordinary  landscapes show-
  ing sky, with a principal    No. 2
  obiect in the foreground.
Snow.  marine'btremelyand  beach  scenes.                dis-
   tant landscapes. Moun:    No. 3
   tains.
                                              \
                           No. 3      one
                                         second


                           No. 1


                                 gl .tb" hours f-torn 2/2
  tro"is  uft.it sunrise until  2rfi-\ours  before sun-
  ;;t     auvt whe., the sun is shining.  If-pictures
  ;;;;tA;";      earlier or later  in- the dav.than  this
  ilii.a,     rt   iii-t   it a  slishttu cloudv  .oi hazv dav,
  irse the next larger stop opemng than  t'he one        EASTMAN KODAK COMPANY  specified--tG-largest                  stop- opening  is  No'   1'  The             RocnnsrER,N.Y., U. S. A'
  nts-h; the iumber  the smaller the opening'
View original page 1Page 3 · Read text
www.orphancameras.com
   66Kodak"                ..KODAKERY''

         TRADE               MARK                         rf\HIS  most interestins and profuselv                 1888
                                                                                  I  illustrated monthly magazinesho#s
                                  how to make better pictures, and de-
EASTMAN KODAK COMPANY             scribes many novel and unusual meth-
       Rocnnsrnn, N. Y.                 ods of making photographs. Anyone                                   who buys an Eastman camera is en-
                                                         titled to "Kodakery,"  free of charge.
         Manufacttners o!                                           Return the post card included with
                                                    this manual, properly  filled out, and
  K o n e r  B R o w N r E A N D             your name will be put on the mailing
                                                                  list, to receive "Kodakery."  H e w r - E v n   C . I M E R A S
   Crwf-Kooars   Kooascopns               "Kodakery"   will  be sent  for  six
                                       months on this offer. A post card will be  Koner  Frr,u  Vnr,ox  Sor,ro                                         enclosedwith the fifth copv: if this nost
  EesrueN  Bnorvrrop Pappns              card is filled out and retuir'ea  to ui,   it
     K o ' p e r   F r ' r ,l r  T . r N r s                       will  entitle you  to an additional'six
      Easruan  TpsrEb  Cnnnrc.r.r.s                months, free of charge.  After that the
      Koo.g DnrM  ouNrrNcTrgsun                  subscription price  will be sixty  cents
      Tnrpoog eNp. Org,pn Pnoro-                     for one year, or one dollar  for two
        GRAPHTcM.rrsnr.rr,s-                     years, but you are under no obligation
                                                   to renew.                                            j     Trade Marlcs Reg. U. S. Pat. Of  .                                     Send us the card promptly, and start                                                                                                                             :lll                                            enjoying "Kodakery"  at. once. There
                                                         is no charge; no obligation.

                              EASTMAN KODAK  CON{PANY,
                                                    Rocupsrnn, Npw Yom.
View original page 3Page 4 · Read text
www.orphancameras.com
                  Picture taking with tlte
         Vest Pocket
          Kodak
                     Model B
                                SrNcr,o LpNs


                                       Published bu
           EASTMAN KODAK COMPANY
                 Rocnosrnn,N. Y., U. S. A.
View original page 4Page 5 · Read text
www.orphancameras.com


 Order Film  by Number             Before Loading
                                              Before taking any pictures with your   All Kodak  Films are distinguished
bv the numbers on the ends of the         Kodak, read the following instructions
ci,rtons.  The number  is also on the            carefully. Make yourself familiar with
cartridge, and on the Kodak.                    the camera,taking especialcare to learn                                    how to operate the shutter (see page
  L 127 is the number of film for the           11). Work   it  for both instantaneous
Vest Pocket Kodak, Model B.                and time exposuresseveral times before
  Autographic Film can be used in the          Ioading the Kodak with fiIm.
earlier moiiels of cameras,and "N.C."           The first thing to remember is that
film  can  be  used  in  Autographic           the  light, which impresses the photo-
Kodaks.                                       graphic image upon the sensitive film
  Autographic results can only be ob-            in a fraction of a second. when it comes
tained by'using  Autographic- Film  in          through the lens, can destroy the fiIm
an Autographic Kodak.                       as quickly  as  it makes the  picture.
                                             While loading and unloading, be very
         IMPORTANT                        careful to keep the red paper wound                                                           tightly  around the film to prevent the
  When  autograPhing   film,   bear             light striking it.
down  $tith  the  stylus as heauilY
as the paper  will  stand  without
tearing.
View original page 5Page 6 · Read text
www.orphancameras.com
                                     Loading the Kodak
                                                    rf\HE   Vest Pocket Kodak,  Model  B,
                                                                                                 I  can be loaded or unloaded  in day-
                                                                 light.  This should be done in a subdued
                                                                 light, not in direct sunlight.
      CONTENTS                            IJse film No. A L27 for  this Kodak.
Loading the Kodak           c           broken,After  carethe mustseal bearoundtaken theto keepfilm theis
Making the Exposures     10          red paper tight on the spool or  it might                                                                slip  and  loosen  sufficiently   to  let  in
 Openingthe tr'ront           10             light which would fog and ruin the film.
  Operating the Shutter           1 1           To load the Kodak:
  Instantaneous ExPosures       13                        l.  Push the sliding lock as shown in                                                       Fig.  I, to unfasten  it.
  Diaphragm  or StoP OPenings    16
  Autographic  I'eature           22
  Time Exposures-Interiors        27
  To Make a Portrait         .      .     31
  Time Exposures-Outdoors       35
  Flash-light ExPosures          37
  Closing the Kodak             38
Removing the F ilm        39
Finishing the Pictures  .    44
                                                                      Frc. I.

                                              Take the front  of the camera by the
                                            edges and  lift the end on whieh the lock
                                                                   is attaehed. then draw out and remove
View original page 6Page 7 · Read text
www.orphancameras.com
that  part  of the Kodak  entirely,  as in              reel.  The  paper  must  draw  straight
Fig.  II.                                      and the  full spool must not loosen.
   2.  In one end of the roll holder there                        SLOT
is a reel with  a slit  in  it, on which  the
film  is wound  after exposure.
   3. Draw  out the winding  key as far
as it  will come, and remove the empty
spool or reel by tapping  the roll holder
on the palm of the hand.


                                                                               Fra. III.
                                                               5.  Unroll  about  four  inches  of  the
                                                   red paper and place the spools into the
                                                              film  pockets,  keeping  the  red  paper
                                                              taut.   The  slotted  end  of  the  empty
                                                   spool must be placed next to the wind-
                                                      ing key, Fig. IV.


   4. Remove the band from around


                                                                                 Fro. IV.
                                                       6. Press in and turn  the winding
                                          key until  it  fits into the slotted end of
the red paper, Fig. III, Page7.                 the empty spool, as in Fig. V, page 8.
  Give the empty spool three or four        The red paper must draw from  the
 turns, enough tb bind the paper on the         under side of the full spool.
View original page 7Page 8 · Read text
www.orphancameras.com                                                             8. Turn  the key and watch  the red
                                              window.   After  a few turns have been
                                                     given, a warning hand will appear; now
                                                        turn  the key  slowly  until  the figure 1
                                                                   is in the center of the red window.
       f
 - 7 . Replace the  front,  first  inserting
the end opposite the lock, FiS. VI;  the
edge of the roll holder must  fit into the           The  film  is now  in position  for  the
                                                                      first exposure.
                                                 Press  in  the  winding  key  slightlSr
                                         when  turning    it,  to keep the web on
                                                    the key in the slot in the spool.

                                             Load   your  Kodak   with   Kodak
                                                              Filrn.
                                              Look  for  this  Trade  Mark  on the
                                               Digitally signed by mike butkus
                                      cn=mike butkus,  mike               DN:o=orphancameras,                                                     ou=29,                             box:
  butkus          email=mike@butkus.org,Date: 2019.08.15 10:53:34c=US-04'00'             EASTMAN


               Frc YI.
groove on this end of the front.  Press
the end on which the lock  is attached
into place and push over the lock, mak-                     " If  it isn't Eastmart,
ing sure that  it  is fastened seeurely.                                                it  isn't Kodak Film."
View original page 8Page 9 · Read text
www.orphancameras.comOperating the Shutter   Making the Exposures
D EFORE  making  an exposure with               A
 I-D the Vest Pocket  Kodak,  three
things must be done:
   First-The    shutter must be adjusted
 for an instantaneous  or time exposure.
   Second-The   diaphragm  dial turned
to the correct stop opening.
   Third-An    unexposed section of the
film turned  into  position.
     Openin$ the Front


                                                               In the illustration,  A is the indicator
                                                          that  adjusts  the  shutter  for  instanta-
                                            neous or time exposures.
                                              The  dial B  eontrols  the diaphragm
                                                        or  stop  openings  indicated   by  the
                                          numbers  l, 2,3 and 4, which appear in
                                                     the eircular opening on the front  of the
                                                     shutter near the letter B.
                                      C  is the exposure  lever; one move-
                    Frc. I.                           ment,  either up or down with  indicator
             Opening the Front.                  A at  "I,"  makes a snapshot or instan-
                                               taneous exposure; and two movements
  Raise the lever near the winding  key,           -one   to open the shutter  and another
trig.  I, and draw down  the bed of the             to close  it,  with  indicator  A  at  "T,"
Ko?ak  until  the side arms catch.              make a time exposure.
  Draw  out  the  lens standard  by  the
knurled  finger grips, Fig.  II, page 14.
                   10
View original page 9Page 10 · Read text
Instantaqeous Exposureswww.orphancameras.com31 and 32, and the table for Time Ex-
                                          posuresOutdoors on page 35.          "Snapshots"
                                                Third-Press   the exposure lever C  Fdrsf-Move  the indicator A to "I."                                                          until  it clicks. This opensthe shutter,This adjusts the shutter for Instantan-                                          which norv stays open. Time the ex-eous or Snapshot Exposures.                                         posureby a watch. Pressthe exposure
  S econd-Revolve  the diaphragm dial          Iever in the opposite direction.- This
B'by the milled edge, until number  I          closesthe shutteris cdntered in the ciicular opening, see
illustration of shutter on page 11. This            Important-Neaer    oil the shutter.
brings the largest diaphragm or stop              In caseof accident. return the Kodak
open"inqbefore the lens. No.  I  is the           to your dealer or to us for repairs.
correciopening for ordinary outdoor
pictures,                          nearby                     scenes,            as street        such
                                    is                                    in the         Instantaneous Exposures                 the subject         whenviews, etc.,                                                        ttsnapshotsttbright sunlight.                                                               .
  Third-To  ma!<ethe exposure,move         When making instantaneous expo-
the lever C once either up or down.         sures or snapshots, the subject shouli.
Push the Iever until   it  clicks. Unless        be in the broad, open sunlight, but the
it is pushedas far as it will go, no click        camera must not. The sun should be
will be heard and no exposure will be         behind your back or over the shoulder.
made. Move the lever slowlg so as not                 If  it shines directly into the lens it will
to jar the Kodak.                                 blur and fog the picture.
      Time Exposures                To make portraits outdoors, when
                                               the sun is shining brightly, the subject  First-Move   the indicator A to "T"                                            should be in the shade of a buildins(time).  This adjusts the shutter for                                                  or a large tree, but with clear and unlTime Exposures.                                              obstructed sky overhead-use stop No.
  Second-Revolve   the  dial B  unti^         3 or No. 4, place the Kodak on some
No. 1, 2, 3 or 4 shows in the circular            firm, steady support (do not hold it in
opening.' Seeinstructions for using the          the hands) and make a short time ex-
diaohrasm or stop openings given on          posure. The exposure lever C should
pasesl6'and 17; aisot-hetable for mak-        be moved twice. up and down or down
ing Interior Time Exposureson pages        and up rvithout a pause, and care must
                     t2                                                             13
View original page 10Page 11 · Read text
www.orphancameras.combe taken  not  to  jat  the camera.                               By           What Depth of Focus Meansfollowing  this rule, unpleasant and dis-
torting  shadows  on  the  face  will  be         When the lens is used with its larsest-dis-
avoided.                                      opening, No. 1, an object 7rh feet
  Special instructions   for making  por-            tant will be sharp, objects about O feet
traits indoors, are given on page 31.               distant, ryhile not as sharp, will be sharp
                                       enough for ordinary purposes. Turir
    To Focus the Kodak                the diaphragm dial to No. 2 and ob-
                                                    jects nearer to the Kodak will increase
  Draw  out  the  lens standard  by  the            in sharpness. Go farther and use stop
knurled  finger grips, below the shutter,          No. 4 and everything about 4 feet and
as in  Fig.   II.     It  must be drawn  out         beyond, will be sharp.  It  will thus be
until  the focusing catch  "clicks"   into         seen that the smaller the stop opening
the notch  of the raised spring on the           the greater the depth of focus, that  is',
camera bed.                                    the greater the power of the lens to de-
                                                     fine -sharply nearby and distant objects
                                                     at the same time.   It  is obvious ihat
                                                with the small stops the exposuremust
                                        be correspondinglyincreased.
                                                 Depth of Focus
                                                                            _ -Stop  or           Range   of
                                                                        Diaphragm             Sharpness
                                                                      No.    I                           . 7%  feet  to  Infinity
                                                                                                                                                  , ,  2                           . 6 %    u    4            '
                                                                                                                          a a e Fu g.  .u. t. !                                        .  )
                                                                                                                                                                                               "     4                         .  .  .  .  .  . 4                            ,  t       u                   i
                                        The table -above gives the range of
                                                    sfarp. definition or depth of focus-,for
                    Frc. II.                          the different stop openings of the Vest
         Dratting out the Lens Standard.               Pocket Kodak, Nlollel B.
   The  Kodak    is now   in  focus  for  sub-
 jects  about   six  feet and  beyond.
                 T4
View original page 11Page 12 · Read text
www.orphancameras.com
                      These   eircles
        N0. I     show the  actual            bright, and there are no heavy shadows,                        sizes of the  dia-         such as views at the seashoreand on the
                    phragm  or  stop          water, with  the shutter adjusted for
        N0.?      openings  of  the         an instantaneous exposure. For  In- o              shutter  used on            terior Time Exposures, the time  for
       NO.3     the Vest Pocket         which is given in the table on pages 31  o
   o  N0.4    K o d a k , M o d e l         and 32.                        B,  with   Single           No. 3-For  instantaneous exposures       CoPYRTcHT 1922 By                      Lens.Theyclear-            of extremely distant views, marines,    EASTMAN KoDAK  CoMpANy
                               ly shor,vthe rela-        snow scenesand clouds, in bright sun-
                            tive  sizes of the            Iight.  For  Interior Time Exposures,
stop  openings  and  how  their  areas        see table on pages 31 and 32, and for
differ.                                  Time Exposures Outdoors on cloudv
                                            days. The exposuresrequired for Time
       Diaphragm  or                 Exposures Outdoors are given in the
       Stop Openings                   table on page 35.
  The  diaphragms,   or  stops as they           No. 4-For  Interior Time Exposures.
are sometimes  called, are the openings          also for Time Exposures Outdoors ori
that  regulate the amount  of light  pass-         cloudy days. Neuer for i,nstantaneous
ilg  through  the lens. The openings are          efr'posuTes,
changed by revolving  the milled  dial B,                                       The smaller the stop opening thesee page 11.                                           sharper the nearby objects will be, see
  No.  l-For     all ordi.nary outdoor pic-          table on page 15.
fzres, such as nearby landscapes show-      1
ing  little  or no sky, groups and  street                    If stops No. 3 and No. 4 are used for
scenes, when the subject  is in the bright         I    ordinary instantaneous exposurcs,fail-
sunlight,  with  the shutter  adjusted  for         ure will result.
instantaneous exposures. For  Interior        .1     Throughout  this manual  all expo-
Time Exposures, see table on pages 31         sures given for outdoor subjects are for
and 32.                                       the hours from two and a half hours
  No.  2-For   open  views, when  the           after sunrise until two and a half hours
sunlight  on  the  subject   is  unusually          before sunset.  If  earlier or later, the                                         exposuresmust be longer.
View original page 12Page 13 · Read text
www.orphancameras.com
  For  subjects  in  the shadow,  under                          It  will be noticed  that  the top  of the
porches  or  under- trees, no  accurate              finder  is notched, as shown  in Fig. V.
directions can be given; experience only             This  enables the  one finder  to  show
can teach the correct exposure to give.             the  correct  view when  the  Kodak   is
When  making   pictures  under  these            held   in  either  the   vertical   or  the
conditions  the Kodak  must be placed             horizontal position.
on a tripod  or some other steadY, firm
support.
      Using the Finder
  The finder shows what  will aPPear in
the  picture,  but  on a much  reduced
scale.
   Point  the  lens at  the  subject  to be                              .*.q
photosraphed   and  looking   into   the                                1"
hnderJrom   directly  over the center  of                               Frc. IV.
it,  include what  you want bY turning              Only what  is seen in that  part  of the
to the  right  or  left, see illustration  on              finder  represented  by  the  white  area
page 20.                                                   of the diagrams below,  will be includ-
                                              ed in the nieture.


                                                                   VIEW  INCI,UDED   WIIEN     VIEW  INCIJUDED   WEEIN
                                                                 MAKING   A YERTICAL       MAKING   A EORIZONTAIJ
                 Frc. III.                                                   PrcruRE'           Frc.    v.       PrcruRE'
  To make a vertical  picture,  hold the              Hold   the  Kodak   steadv-hold        it
Kodak as in Fig.  III.   For a horizonta'l              level as shown  in the illustrbtions,  and
picture,  turn  thb Kodak  and the f'nder  ,           press the exposure  lever up  or down.
as in Fig. IV, page 19.                             This makes the enposure.
                    18                                           19
View original page 13Page 14 · Read text
www.orphancameras.com
                                         Hold  the Kodak  Level
                                             The  I(odak  must be held  level.    If
                                                                       all  of the subjeet cannot be included
                                                               in  the  finder  without   tilting  the  lens
                                               upwards, move backwards  until    it  is
                                                                      all inelucled uith  the camera held leuel.


         IMPORTANT
  When  making  instantaneous   ex-
posures   or  snapshots    with   any            R esutt p, oaur rlJf, Itnrors the K odarc.
Kodak,   hold    it  firmly   against   the                                                               Tilting  the Kodak   to  bring  in  thebody as shown,  and when  pushing                                                    top of a tall building produceJthe  dis-the exposure  lever hold  the  breath                                                       torted  effeet shown in Fig.  VI.  Some-for  the  instant.      If  the  camera   is                                                  times  a  tall  building  can be  photo-moved  during   the  exposure,   the                                               graphed from a building  opposit-e, at apicture   will  be blurred.                                                         level r,vith its center.
                                                                        2T
View original page 14Page 15 · Read text
www.orphancameras.com
    If  the  subject  is below  the normal            the great advantage  of making  the date
height,  like a small child or a dog, the         and  title  a part  of the negativ *made
Kodak  should be held down level with          on the fiIm, and at the t'ime.  It forms an
the center of the subject.                          indisputable  record that  will be appre-
  The Autographic Feature              by.ciatedManymore picturesand moretellas thethe years"where"go                                                          t'who"  The  autographic  feature  makes   it         and          but  the more  important
possible to record on Autographic  Film,           "when"  can only be guessed at.  Even
at the time  of exposure, any  data, such         when  the  title  of a picture  is obvious,
as the name of place or subject, the date           the date should always be put on as a
or  any  other  memo.   This   is  done           matter   of  record  for  future  certaintv
through a small opening in the back of         and satisfaction.
the Kodak  and  the  record  normallv
comes just  outside the picture area df              The Method
the negative.

  Aufo Rant {-P Piht& ?2&   f"rf ,g !/aoo$gac.
    t{ertA*.$ftr^^t' Rrt4-&0f{r},if,Y, 9/t  I z"r
    La^*aU      rV;t;vn    w*4 S q{rr17t, ,t/"*     | 2V
  N;Ad  A f&Ij'",f\r,y"  g,6-,lt$0  src'
   8 pv;^f466"4*Dwa.f,G.C.   $u tlr&,w
  Wa#;t  G fe^,  tl.Y..f. $, z*es&.Va#rz                                        Pushins ulif ,lr"tti dins-d,oo,.
               Autographic   Records.                         After the exposure has been made,
  The   Autographic   Reeords  above        remove the stylus from the side of the
suggest a few  of  the many  ways  in           shutter. Push back the sliding-door on
which they may be used to add value to          the back of the Kodak, with the point
your negatives.                                    of the stvlus in the hole in the eenter of
  An  Autographic  Kodak  used  with          the dooi, as shown in Fig. VII.  Hold
the Autographic  Film  Cartridge  offers          the  stylus  as  upright  as possible,
View original page 15Page 16 · Read text
www.orphancameras.com
 Fig.  VIII,  and write on the strip of                -  Close the sliding-door  with  the stylus
 red paper any memorandum desired,          before winding  the next section of hh
 suehas the title of the picture, the date,           into place.
 or anv other details.                              Turn  a new  section   of  film   into
                                                          position:    Press  in   slightly  on  the
                                                  winding  key  and  turn  it-slowly,  three
                                                           to four times, until the next number ap-                                                 {     pears in the red window.  Do  this  aft-er
                                              each exposure.  The warning  hand  an-
                                                 {     pearsfilm.  only before No.  1 of each roll  bf
                                              To  bring  the  autographic   records
                                                       exactly between the negatives, the film
                                              must be turned  carefully,  untii  the next
                    Frc. VIIL                       number  is centered in the red window.
        Position  oI Stulus when making on                                 It  is advisable  to turn  the next sec-
              Autographic Becord.  .                              tilrn  of  film  into  position  ,immediatelll
  To get a clear impression, press            after making an exposure and the auto-
 firmly  on both  the up and down           graphic^reeord  This avoids the possi-
strokes.  While  writing,  or  after-                bility  of getting  two exposures on the
wards, shield the paper from  the         same section of filnr.
sun.                                             Importanf-When      you  have  ex-
  When the record has been made.         posed the  last section  of the  film and
exposeit to the light as follows:              made the autographic  record of  it, turn
  Erpose to the Sky, but not to the Sun:           the  winding   [ey   until   the  letter  A                                               appears in the center of the red window.
                                  t"i3ll""3'.?,,1"         Push back  the  slidins-door  and  write             ourDooRs
BRTLLTANT LrcHT   2 to   5 Secs.    5 to   7 Secg-           your nam_e on the red-paper, expose  it
DULrr LrcHT         5 to  10 Secs.   10 to  15 Secs.             to the  light  as when mbking'the  expo-
  Erpose to Artifi.cial Light:                      sure records, then  close the door Cnd
                                                             finish winding  film and red paper for re- __Er,ocrnrc Lrcnr,  distance two inches, 30 to
60 seconds.                                     moval  from  the  Kodak.   The  film   is   W'nr,gs.lcrr           Ges  Lrcur,  distance six inches,         now ready to send to your  finisher, and30    to 60 seeonds.
                     24
View original page 16Page 17 · Read text
www.orphancameras.com
when developed  will -be easily  identi-         Time Exposures-Interiors                                   your                                     of                          c.opy              i,utographic         the   UVn.a                                              To make                                                                 Exposure                                                            a Time                                                                                         with                                                                                            the                                   paper'                              red           you                wrote on the         iotti.ttnu-.                                            Kodak                                                                                      position,                                                                           in  the                                                                                vertical                                                                            open
  Kodak-for    SkY  Filter:   This  accessory             the   front   and  draw   out   the   lens
is      obtaining  more  . detail   in  the            standard,  see pages 10 and  14.  Use
aona. when photograp\ing  landscap.es'            the  locking  lever  as a  support,  and
The upper  htlf  of the  filter  is stained' a            place the camera on something  steady
;;ilt*-iolor    which  reduces. the bright-           and level, such as a table or chair, in the
it...      the sky  and- equalizes the  ex-             position as shown in Fig.  IX.  Be sure,
        "f  the col6rless lower h^ulf permits            however,  to place the Kodak  not more;;;t",
;;;"ial     exposure for -the- foregrotttt+'            than two or three inches from the edse.
The  same exPosure should  be made              to avoid  including  part  of the table-oi
;iih   tn"  roaat   Skv  Filter  in. position             chair in the picture.
ar would be required  without    it'
  Use Kod,ak SkA Filter  l{o'  8 with  the
Vesf Po.t  .t Kodak,  Model B, when  it
is fitted  with  the Single Lens'
  Kodak   Color   Filter:   This  attach-
 -."i       i.            valuable  in outdoor
 pn-otogtaPhy,"tp"ciallya+a for  all subjectt   tg,t-
 taininE  cblors  that  act  slqwly  on  lne
 sensitive  film.    It  is helpful  in cleartng
 iui"   when  photograPliing   extremely
 distant  landscapes;  also. tor  recordlng
 the eorrect-print, coloi ualues itt u black and
 *^nit"          of flowers,  fruit  and other
 ;;i;;;douieicts.    When'using the Kodak           The Kodak has one tripod socket for
 Coiot   Filt'er make  an exposu-re .about         making pictures in the vertical position.
 seven times  longer than  would' be re-          The diagram on page 28, shows three
 quired without    it.                                positions for the Kodak.   It should not
   Use Kod'akColorFilter  l[o' 8 with the         b_epointed directly at a window, as the
 Ve.f Pocket Kodak,  Mo-del B, when  it           glare of light will blur the picture.   If
 is fitted  with  the Single Lens'                          all the windows cannot be avoidedn
View original page 17Page 18 · Read text
www.orphancameras.com
draw the shades of those n'ithin  range          posure lever, once, either up or down.
of the lens.                                      This opens the shutter.  Time the expo-
                                                sure by a watch.  Press the lever in the
                                                 opposite direetion  to close the shutter.
                                                          In doing this be careful that the finger
                                            does not come in front  of the lens.
                                          Another  Method
                                                 Another  way  of making  short  tirne
                                               exposures, which has much  to recom-
     Diagram  Showing   Positions  for Kodak            mend  it,  is as follows:
  To make a Time Exposure with  the           Hold  the hand  or a card, elose to
camera in the horizontal position, move           the  front  of the Kodak,  to cover the
the locking lever until  it projects slight-           lens and exclude all light as in Fig. XI.
ly bevond the front edge of the bed of
Kodak,  and place the camera in  the
po:ition shown in Fig. X.


                                                             -Tt"
                                                                            xt.-
                  Frc. X.                         Press the exposure lever  to open the
                                                       shutter: remove the hand and give the
   Adjust  the  shutter  for a Time  Ex-           proper  exposure; replace the hand  in
posure by placing the indicator A at the             front  of the lens and again press the
top of the shutter exaetly at the letter            lever to close the shutter.
"Tl'  see pages 11 and 12.                                       Some amateurs  prefer  this method
   All  being ready, steady the Kodak            with  any camera not  having  a cablewith  the  left hand, then press the ex-
                 28
View original page 18Page 19 · Read text
www.orphancameras.com
release, as it practically  does away with             tripod,   for  photographing  objects  at
any danger of jarring  the camera during           close range and  at an angle fiom  the
exposure, and thus blurring  the picture.          camera, that  would make the use of a
  Turn   the  Winding    Key:   After             tlip.od  irnpossible  without   this  tilting
making  the  autographic  record,  turn           deviee.
the winding  key  until  the next number                       . The O_p-tipod is_ very  compact,  slip-
appears in the center of the window.             ping readily into-the pocket and may 6e
  Tnn  Kooar   rs Now READY FoR THE          carried without  inconvenience.
NEXT INrpnron  ExposuRE.              Bxposure Table for Interiors
   Follow  these directions  for each ex-          The  table on page 32 gives suitableposure.                                              exposures  for  varying   conditions   of
  When the last Interior  Exposure has             light, using stop No. 2.   If stop No. 1 isbeen made, always move the indieator                                                        ( (T"          used,  give  one-half  the  time   of  the
A at the top  of the shutter, from                 table.   If stop No. 3 is used, double the
to  "I,"   to be ready  for Instantaneous           time; ?nd when stop No. 4 is used, giveor SnapshotExposures.                           four  times  the exposures given  in  the
  O p t i p o d :  A                                   table.
small, Iight, con-                            The  smaller  the  stop  opening  the
venient accessory                              greater_the depth  of focus, see page-average15.
that can often be                             Stop  No.  ?  gives  the  bestused in place of a                                   results for  Interiors.
tripod, or together                             The exposures in the table on page 32
with a tripod. The                              &re for rooms where windows  get the
Optipod  is a com-                                    direct  light from the sky, and foi hours
bined  tripod  head                              from  three  hours  after  sunrise  until
and felt-protected        Frc'XII'                 three hours before sunset.   If  earlier or;i;;p   *[i;ti   -;t                                        later the exposures must be longer.
be attached to the edge of a table, chair
or other suitable objEct, see Fig.  Xff.           To Make a Portrait
  The ball and socket joint on the Opti-           The  subject  should  be seated  in  a
pod permits  tilting  the camera to almost           chair  partly  facing  the  light,  with  the
qny  a_n_gle. This  feature   is  especially-a        body  turned  slightly  away  from,  and
desirable  if the Optipod  is used with             the  face  turned  towards  the  camera
                                                                3 1
View original page 19Page 21 · Read text
www.orphancameras.com  Instructions   for  making  portraits          duces a truen soft-focus effect free from
outdoors, are given on pages 13 and 14.          objectionable "fuzziness"  or  out-of-
                                               focus appearance. By using this  At-
 Kodak Portrait  Attachment            tachment,  portraits  are made more
  The Kodak  Portrait  Attachment  is             artistic, due to the softening effect of
an extra lens, which, when slipped over           diffusion.
the regular lens mount, makes large          Use Koilnk Difrusion Portrait Attach-
head and shoulder portraits.                     tnent No.  8  with  the  Vest  Pocket
  Place the Attachment over the lens         Kodak, N4odelB.
mount. Compose the picture  in the
finder, then turn the Kodak just a lttttle       Time Exposures-Outdoorsto the  left:'subjectas the short distance at
which the        must be from  the         When the smaller stop openings (No.
Iens makes it necessary to center the         3 or No. 4) are used, the light passins
subject by eye instead of by the finder.          through the lens is'so muEh reducefi
  The subject must be three and one-           that time exposuresoutdoors may be
haUjeet from the lens, and the distance       made the same as for interiors, bui the
musi be measured c6,refully from the         exposuresmust be much shorter.
lens to the face.                                 Adjust the shutter for a Time Expo-
  The Attachment  can also be used         sure by placing the indicator A at the
for making pictures of flowers and simi-          top of the shutter exactly at the letter
lar subjects.                                           ttT," and move the exposure lever C,
  The exposure when using the  At-           twice, seepage 11.
tachment is the same as without  it.                                               With  Sunshine-The    shutter ean
   IJse Kodak Portrait Attachment No. 8          hardly be opealed and closed quickly
with the Vest Pocket Kodak, Model B.         enough to avoid over-exposure.
  Kodak Diffusion  Portrait               With  Light  Clouds-From   one to
        Attachment                       three seconds will be sufficient.
  The Kodak  Difrusion  Portrait  At-            With Heauy Clouds-Four  seconds
tachment is a supplementary lens used           to eight secondswill be required.
in  the same manner as the  regular          These exposures are for hours from
Kodak  Portrait  Attachment.    It  pro-       2% hours after sunrise until 2% hovs
                 34                                           36
View original page 21Page 22 · Read text
before sunset and for subjects inwww.orphancameras.comthe            Flash-light Exposures
open. For other hours, or for subjects
in the shadow, under porches or under           Eastman  Flash Sheets make  picture
trees, the lighting conditions vary so           taking   at  night  easy.  A  package  of                                                         flash  sheets, a piece  of  cardboard,  a
ercallv that no definiteinstructionscan            pin, a split stick about two feet long and5e given; experienceonly can teach
the correct exposureto give.                    a match  complete the  list  of necessary                                                       extras, although  a Kodak  Flash Sheet
  Neuer make T'ime Erposures with the          Holder  is a great convenience.
Kod,akheld'in the hands. Always place            With  flash sheets there is little smoke.
it upon some fi,rm support, such as a         They  are safer than  other  self-burning
table,cha'ir,tri,podor Kodapod.                     flash mediums,  and give a softer  light
                  Kodapod:  An            that  is less trying  to the eyes.
                  a e c e s s o r yt h a t             Flash sheets make possible the pho-
                   tahes the place of           tographing  of many  interiors  that could
                  a tripod when a           not be taken  otherwise.  either  for lack
                      tree. fence or sim-            of  illumination   or  because  there  are
                    ilar'rough object         windows  in a direct  line of view rvhich
                          is near at hand.         must have the shades drawn  to prevent
                          Its  toothed jaws           blurring  the picture.
                  g r i p   t h e w o o d            Evening   parties,  groups  around  a
                    firmly, see Fig.           dinner  or card  table  or an individual
                        XI[.  By meansof        may be easily photographed  by  using                  a                    clamping                              screw,                                                                    providing                                                        flash  sheets,                                                                             souvenirs                                                                                                            -of       Fro. XIII.                           may                      the                      camera                                        many                                                          occasions,                                                                      which,                                                                                 but   for  the
be adjusted  to the vertical  or horizontal              flash-Iight, would be impossible.position.  The  Kodapod  can be used
with  any camera  that  has a standard               "Picture  Taking  at Night,"  a book-
tripod  socket.   It  is small and mav be              let that gives full information  regarding
cairied  easily in the pocket.                           flash-light   photography   and   other
                                           ways to make pictures  at night,  will be
                                                   sent free upon  request  to  the  Service
                                                Department,   Eastman  Kodak  Com-
                                                panyr Rochester, New York.
View original page 22From the M. Butkus archive. Original publisher and archive notices are retained.
Check the model and edition against your equipment.
PDF verified 2026-10-10.