Film cameras
Konica A3 format User manual
User manual for Konica A3 format. 25 pages in English. Read the original PDF, download or print a copy without registration.
25 pagesEnglish1.4 MB PDF
Loading your manual…Open PDF directly
Document details
- Brand
- Konica
- Model / document
- Konica A3 format
- Document type
- User manual
- Language
- English
- Pages
- 25
- File size
- 1.4 MB
- Category
- Film cameras
- Document date
- Not specified in catalog
Search available document text
Find a term, then jump to its page in the original PDF. Image-only pages may not be searchable; check the PDF for exact wording and diagrams.
Page 2 · Read text
FOR SAFETY'S SAKE

Your Konica camera reflects the latest advances in photographic engineering and is designed to give you
dependable, trouble-free use. Operation is probably somewhat different from cameras which you have
previously owned. For this reason, it is strongly recommended that you shoot a "test" roll of film, have this roll
processed, and examine the pictures before exposing additional rolls. The processed "test" roll will verify that
you are using your new equipment correctly, and allow you to make any necessary changes in operating
patterns; additionally, it will confirm that all camera functions are operating perfectly. In the event you are
leaving on a trip (or some equally important events shortly, your Konica dealer can recommend the fastest way
of having your f ret roll processed ..so that you can be certain that an subsequent rolls win be as good -or better!

                                CONTENTS


                                                                       Using your Konica
                                                                             Autoreflex-A3: Seven
                                                                            Basic Steps ·~ 3

                                                                            Operating Controls a
                                                                                                                                       ...................

                                                                     Major Specifications ~ 6

                                                                                      Inserting Batteries a 8

                                                                      Changing Lenses a
                                                                                                                                       .................... 9

                                                                        Film Loading 10
View original page 2Page 4 · Read text
SEVEN BASIC STEPS

1. Insert the two 1.35 Volt mercury photographic batteries supplied with your camera into the compartment at
bottom of camera. (This supplies power to the CdS meter.)

2. Load camera. Konica's "Insta-Grip" take-up spool assures trouble-free operation.

3. Set ASA rating required for your film speed.

4. Move Aperture Control Ring to "AK" position ("EE" on some Lenses).

5. Select desired shutter speed. (For most shots, 1/125th is recommended.)

6. Focus and compose picture in viewfinder.

7. Shoot...as long as me needle in the finder is in the "white" area, you pictures will be perfectly exposed
automatically!


MAJOR SPECIFICATIONS OF KONICA AUTOREFLEX-A3

Camera Type: 35mm TTL (Through-the-Lens metering) AEC (Automatic Exposure Control) SLR (Single-Lens-
Reflex)

Film: Standard 35mm 20 or 36-exposure cassettes

Format: 24x36mm

Standard Lens Options: Konica Hexanon AR 50mm f/1.7 (6 elements, 5 groups) Konica Hexanon AR 50mm
f/1.4 (7 elements, 6 groups) Konica Hexanon AR 57mm f/1.2 (7 elements, 6 groups)

Minimum Focusing Distance: 17.4" from film plane

Lens Mount: Konica Bayonet (47mm diameter)

Flange/Film Distance: 40.5mm

Aperture Control System: Automatically sets correct f/stop (or fractional f/stop) with all Konica Automatic
Hexanon lenses

Shutter: Metallic, vertical-scanning Copal Square-S

Shutter Speeds: Convenient top-mounted selector for all speeds from I second to 1/l000th second plus "B" (for
time exposures)

Flash Synchronization: Electronic flash synchronization at all speeds to and including 1/125th second.
Positive PC flash cord terminal. Optional Konica Accessory Clip 3 attaches to camera eyepiece.

Viewing System: Parallax-Free Single Lens Reflex System. Coated, eye-level pentaprism shows upright,
unreversed image; apparent magnification 0.78X with 50mm lens.

Focusing Screen: Standard Konica Microdiaprism screen.
View original page 4Page 5 · Read text
In-Finder Readouts: "Control-Center" viewfinder shows vital data at a glance: exact lens aperture being set
automatically; maximum aperture of lens; under/over-exposure ranges; match-needle indicator for semi-
automatic operation.

Reflex Mirror: Oversize, coated mirror prevents image cutoff in finder even with bellows extensions at 1:1
magnification. Mirror design permits automatic operation even with extreme wide-angle lenses. Instant-return
mirror action prevents image blackout aRer exposure.

Exposure Control System: Fully Automatic Exposure Control (AEC) system selects and sets correct lens
aperture (or fractional aperture) automatically, based on information obtained from dual through-the-lens CdS
cells located in pentaprism. Metering system automatically matches acceptance angle to match focal length of
lens: provides virtual spot readings with wide-angle lenses, center-weighted readings with standard lenses,
intergrating readings with telephoto lenses.

Meter Power Source: Two 1.35 Volt mercury photographic batteries, photographic type (Mallory PX-675,
Everready EPX-675, or equivalent).  See this link on a Wein Air replacement battery.

Meter Coupling (Sensitivity) Range: 98,304:1 (EV 1.5-EV 18 with f/1.2 lens and ASA 100 film). Meter
coupling range automatically indicated by red flag in viewfinder, which shiRs if coupling range is exceeded by
existing illumination with film type in use.

Film Speed Range: ASA12-3200(Equivalent DIN 12-36 for European films).

Exposure "Memory" Lock: Memorizes and holds exposure reading to allow precise meter operation in backlit
or spotlit situations; operates via shutter release.

Loading: Konica Insta-Grip Loading (IGL) system use~ multi-slotted take-up spool to grip film securely.

Film Transport: Single-stroke lever automatically advance~ film, winds shutter, counts exposures, and
prevents unwanted double exposures. Lever returns to "ready" position away from camera body to permit
continuous operation at eye-level. Oversize plastic grip on lever provides finger tip control, extra comfort.

Unloading: Oversize rapid-rewind crank permits rewindin' within seconds; cutaway film cassette chamber
allows drop out cassette removal.

Dimensions: With standard lenses:
              5.9" wide, 3.9" high, 3.6" deep.
           Body only: 5.9" wide, 3.9" high, 1.8" deep.

Weights: Body: 24 oz.

Lenses:  50mm f/1.7: 8.5 oz.
      50mm f/1.4: 10.2 oz.
      57mm f/1.2: 16.2 oz.
View original page 5Page 6 · Read text
INSERTING BATTERIES
Open Battery Compartment (37) by turning the cover counter-clockwise as shown. Remove batteries from
protective packing (handle them by the edges to keep the surfaces clean). If the batteries appear to have a thin
deposit of dust on them, wipe clean with a dry cloth.


Insert the two batteries into the compartment, with "+" sides facing up. (For your convenience, + and -
indicators are marked in the compartment.)

After the batteries are in the chamber, replace cover.

To obtain longest service from your batteries, always cover the lens when your camera is not being used. If the
lens cap has been lost, you may obtain a replacement Konica Lens Cap from your dealer.

When needle movement becomes extremely sluggish or stops altogether, replace your batteries with a fresh set.
Normal life of PX-675 mercury batteries an one year in normal use.

Prolonged heat and moisture may reduce battery life. Always keep your camera (and any spare batteries) in a
cool, dry place. And, when obtaining new batteries, make certain they are photographic type 1.35 Volt PX-675
(Mallory PX-675, Everready EPX-675, or exact equivalent). Many other batteries are similar in appearance, but
the difference in voltage and construction may cause incorrect exposures.

See this link on a Wein Air replacement battery.

CHANGING LENSES

To Remove the Lens from your Camera:


Grip lens securely in one hand. With the other hand, hold the camera body and press the Lens Lock Release
Button (22). Holding this in, turn the lens counterclockwise until the two Red dots (one on the camera body, and
View original page 6
Page 7 · Read text
one on the lens) line up. The lens may now be removed.

Note: When the lens is removed, be sure not to touch the interior of the camera. If the lens will be left off the
camera for any length of time, a Konica Body Cap will protect your camera from dust and dirt.

To Mount the Lens on your Camera:


Line up the Red dot on the lens with the matching dot on the camera body; the lens win "seat" into the body
easily. Now, grip the lens and turn it clockwise gently until it "clicks" into place. No further adjustments are
required!

Loading your KonicaAutoreflex-A3 is exceptionally fast, accurate, and foolproof, because of Konica's Insta-
Grip Load take-up spool...another Konica innovation. Here's how:

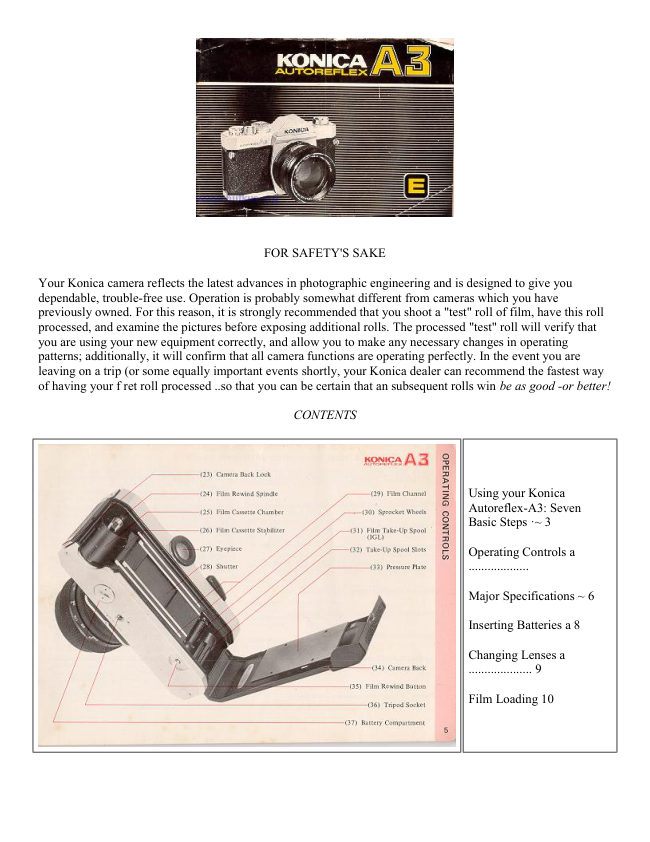
1. Press down Camera Back Lock (23), and swing the back open.

2. Slide the film cassette into the Cassette Chamber (25) as shown above.


3. Pull out enough film to reach the Take-Up Spool (31). Insert film end into any slot (32) in the spool. The
film will be gripped instantly as you .

4. Advance the Film Transport Lever (11) one full stroke. Make sure that the sprocket holes in the film engage
the Sprocket Wheel (30) in your camera.
View original page 7
Page 8 · Read text
5. Close the camera back. Gently, turn the Film Rewind Crank (18) until resistance is felt (this takes up the
slack of the film within the cassettes

6. Press the Shutter Release Button (1) and operate the transport lever until the Number I appears in the center
of the Film Counter (2).


To Check Film Advance

It's easy to make sure your camera is loaded correctly. While operating the transport lever, watch the Film
Transport Indicator (17) to see if it rotates. If it does, you know that film is going through properly; if it doesn't
it's not.

SHUTTER SPEEDS AND LENS APERTURE

 Your Konica Autoreflex-A3 has a metal Copal Square-S focal plane shutter, with the control dial conveniently
   located on top of the camera. This unique shutter is noted for exceptional accuracy even under extremes of
        temperature and climate, and is virtually impervious to damage or deterioration in normal use.


This shutter, because of its exceptionally fast (7.5 milliseconds) traverse time, permits use of electronic flash at
all speeds to and including l/125th second (this speed is marked in red on the shutter speed dial). Flashbulbs or
flash cubes are synchronized up to l/30th second.
View original page 8Page 9 · Read text
At "B", the shutter remains open as long as the Release Button (I ) is depressed. (For details on taking Time
exposures, see page 30.)

Speeds may be changed at any time, whether or not the shutter is wound. If your camera will be out of operation
for several months, it's desirable to release me shutter to minimize tension. For anything less than several
months, however this Oration is not necessary.

Like your eye, your camera lens has an iris, generally called me diaphragm. Open it up, and it admits more
light; close it down, it admits less. The amount of light is indicated by f/stops (also known as "apertures"): f/2.8
admits half as much light as f/2; f/4 admits one-quarter as much as f/2, and so on.

When a Konica Automatic Hexanon lens is mounted on a Konica Autoreflex-A3, the iris or aperture
automatically closes to the correct f/stop before the picture is taken. The needle in the viewfinder shows the
actual f/stop being set. After the exposure, the aperture automatically re-opens to me widest position, giving you
a brilliant image for easiest viewing and focusing.

Uncoupled lenses and accessories may also be used with your camera's metering system. (For details, see pages
15-16).


Automatic Operation:

With a Konica Automatic Hexanonlens on your Konica Autoreflex-A3, just check the indicator needle in the
viewfinder, which shows the exact aperture the camera is selecting...and shoot! The automatic aperture
mechanism sets this lens opening for you at the moment of exposure-and you can concentrate on your subject,
instead of your camera. This is the decisive advantage of the Konica Autoreflex system.

Semi-Automatic Operation:

Yet, this amazingly precise instrument actually allows more actual control of aperture and shutter than most
non-automatic cameras, because shutter and aperture are cross coupled, with easily-seen in-finder readouts to
tell you exactly what your camera's doing at all times. Thus, if you wish to use a specific lens aperture for
View original page 9
Page 10 · Read text
maximum (or minimum) depth-of-field, just change the shutter speed until the aperture you want is indicated by
the needle. With the Konica Autoreflex-A3, you see the exact lens aperture being used at all times! (Semi-
Automatic operation is also possible with uncoupled lenses and accessories; see page 21.)

Manual Operation:

Full manual operation is possible at any time, with any ten or accessory: just move your Hexanon AR lens off
the AS (EE) position, dial the desired aperture, choose your shutter speed and shoot. (The meter indicator
continues functioning for information purposes only.)

"CONTROL CENTER" VIEWFINDER
As long as the Meter Needle (41) is in the white area between the upper (40) and lower (43) red bands,
shoot...your picture will be perfectly exposed!

The upper red band (40) also shows you the maximum aperture of the lens in use; in the illustration on the
opposite page, an f/1.7 lens is on the camera, so the band rests between f/1.4 and f/2. When you mount a faster
or slower lens on the camera, this band will more up or down to show the new maximum aperture (and,
simultaneously, the new underexposure zone.)

"Your Konica's sensitive through-the-lens meter automatically determines correct exposure over an
exceptionally wide range of lighting conditions...with ASA100 film, from a subject so dimly-lit it requires an
exposure of 1/2 second at f/1.7 to a scene almost 50,000 times brighter - so bright it requires an exposure of
l/l000th second at f/16! Within this basic "range" of meter sensitivity, the red band (40) in the viewfinder
remains at a position corresponding to the maximum aperture of your lens (f/1.7 in the illustration).


Under certain conditions, the red band (40) will drop below the maximum-aperture position. For example, with
an f/1.7 lens and ASA 100 film, selecting a shutter speed of one second will cause the red band to drop down to
a position between f/2 and f/2.8. Here, your camera is preventing incorrect exposure by actually showing you
that, with this film/lens/shutter-speed combination, f/2.4 is the widest lens opening at which your camera will
automatically operate. As always, your photograph will be perfectly exposed, so long as the Meter Indicator
Needle (41) does not go into the red-band. Thus, with your Konica Autoreflex-A3 you need never worry about
whether or not you're operating within your meter's "coupling range" - You are, and will obtain a perfectly-
exposed photograph automatically, so long as the meter needle is out of the red!
View original page 10
Page 11 · Read text
Konica's Control-Center viewfinder also shows you:

1) Underexposure Indicator for f/1.2 Lens (38);

2) Complete Aperture Scale (42); and

3) Match-Needle Index Mark for stop-down metering with uncoupled lenses or accessories (39).

USING AUTOMATIC EXPOSURE CONTROL (AEC)

Full Aperture AEC Operation:

The figures in brackets in the chart at under show actual values of the dots between marked numbers on the film
speed indicator.

1. Set the Film Speed.
Lift the outer collar surrounding the Shutter Speed Dial (15) and turn it until the correct ASA number appears in
the Indicator Window (13). (The window marked "DIN" allows use of European films, in the event their ASA
rating is not specified.)


2. Select the Shutter Speed.
For most situations, 1/125th is an excellent choice; it's fast enough to freeze most action and stop camera
movement, and lets you shoot in most situations with today's film types. Generally, slower shutter speeds
should be used only when there's not enough light to work at 1/125th; faster speeds are required usually only for
extremely fast-moving subjects (racing cars, sports) or when shotting with telephoto lenses which naturally
magnify possible camera movement just as they magnify the subject. (See page 20 for other situations in which
faster or slower speeds may be desired)
View original page 11
Page 12 · Read text
3. Check Aperture Ring.
Make certain the Aperture Control Ring (9) is at the AE (EE) position as shown. If lens is not on AE(EE)
position, your picture will be exposed at the opening shown on the aperture ring. irrespective of the f/stop
indicated in the viewfinder.


4. Take the Picture!
Aim camera at subject, focus...and shoot. As long as the Meter Indicator Needle (41) is out of the red under and
over-exposure bands, you'll get a perfectly exposed picture...automatically!


(Note: When using uncoupled lenses or accessories, follow the instructions outlined on page 21.)
View original page 12
Page 13 · Read text
UNDER/OVER-EXPOSURE SAFEGUARDS

If the meter needle goes to the upper red band (shown above for the three standedLenses), choose a slower
shutter speed. If, at the slowest shutter speed (1 second), the needle's still in the red zone, there's not enough
light to get a perfectlyexposed picture. (Naturally, when using speeds of 1/30 second or slower, use a tripod or
brace the camera on a firm support if at all possible, and trip the shutter with a cable release.)


If the needle goes down to the lower red band (as shown in the fourth example above), there's too much light;
choose a faster shutter speed.

When the Automatic Exposure is Not Used ....


For full manual operation, just dial the desired lens aperture on the aperture ring (f/5.6 is shown above). The
meter needle will continue to indicate the recommended f/stop, but the camera will actually shoot at the aperture
you've set.

SEMI-AUTOMATIC OPERATION WITH UNCOUPLED LENSES/ACCESSORIES

Your Konica's through-the-lens metering system works perfectly even with non-automatic lenses and
accessories, which do not couple to the camera's automatic exposure mechanism. (Example: Pre-set lenses,
mirror lenses, lenses from other cameras used with Konica adapters, even extension rings or bellows.) Here's
how to use your Autoreflex-A3 in these situations:
View original page 13
Page 14 · Read text
1 Set the Film Speed.

2. Select the Shutter Speed.

3. Align the Indicator Needle.

Open up (or close down) the lens aperture until the Meter Indicator Needle (41) lines up with the Stop-down
Metering Index Mark (39). (If preferred, you can also do this by changing the shutter speed instead of the lens
aperture.)

4. Take the Picture!

Remember...this stop-down metering procedure is not needed (and in fact is not possible) with Konica
Automatic Hexanon lenses mounted on the camera body. Stop-down metering is used only for uncoupled lenses
or accessories.

SEMI-AUTOMATIC OPERATION WITH UNCOUPLED LENSES/ACCESSORIES: REMINDERS
When using the stop-down metering system with uncoupled lenses or accessories, keep in mind that the
f/stopscale in the viewfinder no longer applies; neither do the under or over-exposure warning bands. If the
needle's above the Index Mark (39) as shown (above, left) there's not enough light; ff it's below this mark
(above, right)there's too much light. Solution: change lens aperture and/or shutter speed until the needle lines up
with the Index Mark.
View original page 14
Page 15 · Read text
In full-aperture metering with Konica Automatic Hexanon stray light which may enter the eyepiece and reach
the meter cells hay virtually no effect on exposures. In stop-down metering with uncoupled lenses or
accessories, however, such light can have the effect of incorrectly influencing the meter's reading. Whenever
you're using the stop-down metering system, be sure to place your eye as close as possible to the eyepiece, to
prevent stray light from entering. (A Konica Rubber Eyecup, available from your dealer, helps here.)

Using Preset Lenses....
Lenses of this type do not automatically close down to the desired aperture; you turn the aperture control ring
by hand to select the desired f/stop. Still, you can speed up operation considerably by setting both control rings
of these lenses to the smallest f/stop (f/22 in the example shown above), then turning them together until the
meter needle lines up with the Index Mark in the viewfinder. As soon as it lines up, you're ready to shoot . . .

HINTS FOR UNUSUAL EXPOSURE SITUATIONS

The through-the-lens metering system of your Konica Autoreflex-A3 provides consistently accurate exposures
under an amazing variety of lighting conditions. In some instances, however, it may be desirable to compensate
for unusual


                                    Backlit Subjects: See how the sun is shining towards the
                                 camera in the illustration at the right? Chances are, the
                                       subject will have a much more natural expression than she
                                would if she had to stare into the sun...but as a result, her fact
                                               is much darker than the rest of the scene as seen by the
                                   camera. Solution walk up to the subject, hold the camera
                                      close to the most important part (her face), press the shutter
                                        release halfway down...and you've "frozen" the meter needle
                                            at the correct position. Holding the release button in place,
                                       step back, focus and shoot: the exposure is actually taken at
                                       the aperture indicated when you first depressed the release,
                                      as shown within your Konica's viewfinder.


                               Extremely Dark Backgrounds: In the illustration at left, a
                                        relatively light subject is being photographed against a very
                                    card background. Here again, taking a "close-up" reading,
                                   holding or locking that reading, then going back to the desired
                                      position and taking the picture, will automatically provide a
                                     professional close-up exposure reading and a perfectly-
                                exposed picture. As soon as you release the shutter button, the
                                 meter resumes continuous operation so there's nothing to set
                                     or re-set.


Sometimes, of course, it's not possible to approach the subject for a close-up reading: if this is the case, you can
easily compensate by temporarily re-setting your camera's ASA rating If you're working with ASA 64 film,
resetting the film speed to ASA 32 will provide one f/stop(100%) more exposure; resetting it to ASA 125 will
provide one f/stop less exposure. In extreme cases, lower or higher adjustments will porduce proportionately
greater compensation. Remember, however, to return the ASA indicator to the actual film speed after you've
completed the picture.
View original page 15Page 16 · Read text
Summary: extra compensation as outlined above is suggested only when the subject is (because of lighting or
surroundings) much lighter or darker than the balance of the scene. In these conditions, the small extra effort
described will reward you with even better exposures.


· Hold the Camera securely - comfortably for your hand


One secret for getting ultra-sharp pictures is to prevent accidental camera movement. To do this it is suggested
that you hold the camera firmly, as shown in the picture above, cradingthe body of the Autoreflex-A3 against
the face. Depress the shutter release button firmly but gently. Do not punch the shutter release button but
squeeze the exposure off smoothly for "jar-free" operation.

Vertical shots add variety to a series of pictures. They are especially desirable when making head and shoulder
portraits and architectural shots. Hold the camera as shown above. This position prevents accidentally pushing
the lens release button.

With Microdiaprism Focusing Screen: Turn the Focusing Ring (6) of the lens until the image within the
center of the viewfinder (44) is sharpest and clearest. (When you're out of focus, this central area - composed of
hundreds of microscopic prisms - appears quite hazy and unsharp.)


Under almost all conditions, this precision focusing screen works easily and with great accuracy. However,
under certain conditions problems can develop: here's what they are ... and how to overcome them.
View original page 16
Page 17 · Read text
With Microdiaprism... when using 35mm (or shorter) wide-angle lenses, and lenses slower than f/4.5, or any
lens used with substantial bellows extension, the grid-like pattern in the center of the viewfinder may remain
visible regardless of focusing ring adjustment. (This phenomenon is caused by the angles at which light rays
enter the focusing screen, and does not indicate any defect in your camera or lens.) Solution: focus by
concentrating on the circular doughnut shaped Fine Ground Glass Areas (45) around the Microdiaprism. Most
people find this easiest to do by starting out with the lens deliberately thrown out of focus, then turning the
focusing ring very swiftly until the point of greatest apparent sharpness is reached. If you turn the focusing ring
very slowly, your eye will find it more difficult to determine the point of greatest sharpness.


DEPTH-OF-FIELD CONTROL
Depth-of-Field is the distance between the nearest and farthest objects in the scene that will be sharp in the
finished picture. In practical terms this means that when you bring an object into sharp focus, objects behind
and in front of this will be rendered more or less sharply as well. For more Depthof-Field, use a smaller f/stop
(for example, f/11 instead of f/5.6). For less Depth-of-Field, use a larger f/stop (for example, f/4.0 instead of
f/8).

Using Depth-of-Field Scale on Lens:
On the Depth-of-Field Scale, f/stop markings identical to those on the Manual Aperture Scale (7), are repeated
to the right and left of the Distance Scale Index Mark (46). The Depth-of-Field for any focused distance will be
found between any two identical f/stop markings on the Depth-of-Field Scale. Thus, if the lens is focused at 15
feet and the picture is to be made at f/16, referring to f/16 on both sides of the scale tells us that the Depth-of-
Field extends from Infinity to about 8 feet. For maximum Depth-of-Field including Infinity, set the Infinity
mark at the f/stop in use, on the right hand side of the scale.

Film Plane Mark: For certain highly specialized applications, it is sometimes desirable to place your subject at
a specific distance from the film (focal) plane. Should you wish to do this, measure the distance from the center-
of-interest of the subject (the part you'll focus on) to the Film Plane Mark "my" (16) atop the camera body.

Infrared Film Compensation Mark: Infrared rays come to a different focus than visible light rays. When
shooting infrared film with the appropriate filter, focus as usual. Then bring the distance figure opposite the
Distance Scale Index Mark (46) into line with the Infrared Film Compensation Mark (47).
View original page 17
Page 18 · Read text
FILM REWIND AND UNLOAD
After all the pictures on the roll have been taken, the film is rewound into the cassette prior to removal for
processing.

An occasional look at the Film Counter (2) will help keep you posted as to when you are coming to the end of
the roll and prevent your accidentally tearing the film out of the cassette. If you should come to the end of the
film while the camera is at your eye in shooting position, the Film Transport Lever (11) will tighten and refuse
to advance even ff the shutter has been released. If this happens do not force it! Instead, depress the Film
Rewind Button (35) and at the same time move the Film Transport Lever as far as it will go. It will then snap
back into its normal position. Then, just ...


1. Depress the Film Rewind Button (35). Once it is depressed, the button remains in place.

2. Lift up the Film Rewind Crank (18) and turn it clockwise at moderate speed in a continuous motion. An
arrow on the Rewind Crank indicates correct direction toward.

3. When tension on the Film Rewind Crank eases, the film has been fully rewound. You can now open the
camera back and remove the cassette by tipping it towards yourself and letting it drop out of the bottom
opening.

The Film Rewind Button returns to its original position once the Film Transport Lever is again actuated. In
addition, the Film Counter automatically resets itself "S" (Start) as soon as the back was opened ... so you're
ready to load your next roll right away!
View original page 18
Page 19 · Read text
FLASH PHOTOGRAPHY
The all metal Copal Square-S focal plane shutter is synchronized for use with flashbulbs (and flashcubes) or
electronic flash. These light sources are useful for making action stopping photos in dim light. Their high light
output makes it possible to produce negatives that have good Depth-of-Field too, and an overall sharpness.
Flash and electronic flash are also used outdoors to lighten or fill in deep shadows.


One standard "PC" flash terminal (X) are provided on the side of the Konica Autoreflex-A3. The "X" flash
terminal is Ma for use with electronic flash units. The Copal Square-S shutter synchronizes these at all speeds to
and including 1/125th second. Flashbulbs or flashcubes are synchronized up to 1 /30th second.

To mount the Konica Accessory Clip 3, unscrew the eyepiece cover, position the Accessory Clip atop the
camera, fit the eyepiece cover to the Accessory Clip, and re-attach the eyepiece cover by screwing it on
(clockwise).

Determining Exposure for Flash Pictures
Manual settings are required for flash shooting. The AEC system is not applicable. Exposures are usually
calculated on the basis of "Flash Guide Numbers" furnished by the makers of flashbulbs (and flashcubes) or
electronic flash units. To find the correct f/stop to use, the guide number is divided by the flashto-subject
distance. Thus if the guide number is 110 and the subject is 10 feet away:

If in doubt, refer to the table above as to which shutter speeds are useable with a specific type of flash
illumination. Guide numbers for flashbulbs are generally printed on the package. Electronic flash guide
numbers are generally furnished by the maker of the unit. Guide numbers are exactly that - they can serve as
guides but all other existing light will affect your exposures to some extent and you should make allowance in
your settings for intermediate f/stops which also click into place.

When the shutter speed dial is set at "B", the shutter win remain open as long as the shutter release is held
down. As a result, exposures longer than one second--as long, in fact, as several hours may be taken at night, or
in dimly- lit places where there is no moving subject. If an exposure of more than several seconds is desired,
attach a Konica Cable Release (available from your dealer) to the Shutter Release Button (1). Set the shutter
speed dial to "B". Press down the cable release "plunger", and hold it down for as long an exposure time as is
desired. When the cable release plunger is released, the shutter closes.

Manual diaphragm settings must be made when the Copal Square-S shutter is set at "B". The AEC (AK) setting
on the lens is not used. Instead the lens is set manually at the desired f/stop.
View original page 19
Page 20 · Read text
It is necessary that you use a tripod or other support for "B" time exposures and all other exposures longer than
l/30th second. Use of a cable release will minimize jarring the camera.

ACCESSORIES


· KONICA Filters
Konica Filters help make more natural looking pictures in black and white or color. They may also be used to
create special effects. They are made with the same precision as are Konica lenses. Since exposure is read
through-the-lens in the Konica Autoreflex-A3, the filter "exposure factor" is computed by your Konica
automatically.


· Lens Hoods
Prevent stray light from striking lens surfaces and causing unwanted reflections. Each Konica Lens Hood is
specifically calculated and shaped to give maximum protection to the lens on which it is used.

· Eyecup
Large, soft rubber eyecupshields meter, eye from extraneous light, aids concentration. Prevents metal-to-skin
contact in cold weather. Eyecup folds down for eyeglass wearers.

· Eyesight Correction Lenses
Corrects viewfinder optics to prescription requirements; vastly aids viewing/focusing comfort, accuracy. +1, +2,
and +3 dioptor lenses for farsighted persons; -1, -2, and -3 for nearsighted persons. Includes Soft Rubber
Eyecup for added comfort, protection,


· Magnifier
Precision magnifier attaches to standard eyepiece, provides full 2X magnification of central finder area, Flips up
when not in use. Focusing optics provide individual diopter correction. Doubles focusing accuracy.

· Angle Finder 3
Attaches to viewfinder eyepiece, enables convenient 45° viewing angle. Shows entire finder image including
aperture scale. Swivels 360° for viewing from any angle. Individual diopter adjustment

· Close-Up Lens Number 1 (55mm)
Achromatic 2-element formula. Requires no exposure compensation: all camera controls remain automatic.
Permits focusing from 25" - 12" from film frame with subjects from 9 x 131/2''to 31/zx 5~/4".
View original page 20
Page 21 · Read text
· Close-Up Lens Number 2 (55mm)
Achromatic 2-element formula, range from 14" - 10" from film plane. Fills frame with area from 41/2 x 6~/2"
to 2~/2 x 33/4", combined with Number I close-up lens, focuses from 12" - 8~/2", covers area from 3 x 4~/2" to
2 x 3" (0.5 X--one half actual size).

· Extension Ring Set 3
Six-piece Set allows 14 different extensions from 10mm - 88mm; magnification to 1.88X (almost twice actual
size) with standard lens. Supplied with 8mm camera and body mounting rings, 8mm, 16mm, and 24mm screw-
in extension rings, and 30mm reverse adapter for 55mm - thread lenses. Manual diaphragm control; stop-down
(match-needle) metering. Converts to automatic diaphragm control with accessory Auto-Ring 2 and double
cable release. Does not accept Macrostand or Slide Copier- 2.

·Auto Helicoid
Automatic, continuously-variable focusing mount enables lO5mm f/4 Auto Macro Hexanon AR lens to focus
from Infinity to 23". Retains full AE (EE) and automatic diaphragm coupling. May also be used with lO5mm
lens and Konica Auto Bellows for semi-automatic operation with magnifications greater than 1,28X.


· Accessory Clip 3
For use with cord-type flash-guns. May be left on camera at all times.


· X-20 Electronic Flash
Exceptionally compact electronic flash for cord ess or cord-type operation. Guide Number 64 with ASA 80/125
film permits shooting distances to 40 feet with f/1.7 lens. Up to 400 flashes with four standard AA Alkaline
batteries.
View original page 21
Page 22 · Read text
· Cube Flash
   With PC cord contact. Built-in test circuit with indicator light that shows when cube is ready to fire. With
                  exposure guide table and case. Use at 1/30th second or slower with A3.


· Auto Bellows with Double Cable Release
Maintains automatic diaphragm operation. Extension Range 47mm - 1 70mm, magnifications from O.9X - 3.5X
with standard lens. Entire front standard reverses without accessories, retains automatic diaphragm coupling in
reversed position. Geared front and rear focusing controls with positive locks. Main focusing rail permits
moving entire assembly over 114mm range for focusing at predetermined magnifications ratios. Focusing rail
may be used laterally, for sideways movement of entire assembly over 114mm range. Locking depth-of-field
preview control. European and American-style tripod sockets. Cable release supplied simultaneously activates
lens diaphragm, body shutter release. Used with stop-down (match-needle) metering. Accepts accessory Macro
Stand, Slide Copier 2.

· Macro Stand
For use with Konica Auto Bellows: Positions subject absolutely parallel with camera and lens. Rotating (75mm
diameter) specimen "stage" has hold down spring clamps to secure subject in desire position. Stage has 18%
grey reflectance factor for correct exposure readings irrespective of subject size, coloration (exposure readings
taken directly from stage). Used at magnifications Prom O.9X - 2.3X with standard lens. Superb tool for
photography of stamps, coins, insects, any small easily-moved subject.

· Slide Copier 2
Attaches to Auto Bellows or Standard Bellows 3, allows same-size or cropped duplicates of standard 24 x
36rnm or smaller transparencies. Accepts mounted slides or uncut strips, rolls. 18mm horizontal, 1 2mm
vertical shift. Require special Slide Copier Reverse Ring; auxiliary Reversal Ring to reverse-mount lens on
bellows.

· Slide Copier Reverse Ring
This ring is required for photography with the slide copier and used together with a lerts reversal ring. The Slide
Copier Reverse Ring is usable at the magnification ratios of 1.4X to 4X with a standard lens (50mm f/1.7).
View original page 22From the M. Butkus Camera Manual Library. Original publisher and archive notices are retained.
Check the model and edition against your equipment.
PDF verified 2026-10-10.