Film cameras
Konica FP-1 User manual
User manual for Konica FP-1. 26 pages in English. Read the original PDF, download or print a copy without registration.
26 pagesEnglish2.5 MB PDF
Loading your manual…Open PDF directly
Document details
- Brand
- Konica
- Model / document
- Konica FP-1
- Document type
- User manual
- Language
- English
- Pages
- 26
- File size
- 2.5 MB
- Category
- Film cameras
- Document date
- Not specified in catalog
Search available document text
Find a term, then jump to its page in the original PDF. Image-only pages may not be searchable; check the PDF for exact wording and diagrams.
Page 3 · Read text
Thank you for your purchase of a Konica FP-1 .
The Konica FP- I is a programmed Automatic-Exposure (AK) Through-the-Lens (TTL) Single Reflex Lens
Camera which automatically selects both the aperture and shutter speed at the instant the shutter is released.
Due to the incorporation of various electronic components the Konica FP-I is one of the easiest to use camera
ever made.

The use of the optionally available Auto-Winder F converts the Konica FP- I into an fully automatic loading
and advancing camera. The availability of a vast array of lenses and accessories enables you to broaden your
picture-taking range.

Contents


                                            Film Rewind .. 20
Nomenclature of Parts- .. 2

                                              Photographing with Self-timer .. 21
Operating Instructions 6

                                            Exposure Compensation .. 21
How to Attach Strap .. 8

                                                   Electronic Flash Photography ... 22
Mounting and Dismounting of Lens ... 9

                                             Photography with the Auto-Winder .. 24
Inserting Battery .. 10

                                                Accessories ... 27
Power ON/OFF Switch and Battery Check Ring
11
                                           Konica Hexanon Interchangeable Lenses ..32
View original page 3Page 4 · Read text
Film Loading .. 12                          Programmed Automatic Exposure   .. 35

AE (Automatic Exposure) Photography .. 15       Precautions for Use.. 36

Focusing .. 16                                      Specifications of the Konica FP-I .. 38

Holding the Camera .. 17

LED Information in the Viewfinder .. 18
View original page 4
Page 5 · Read text
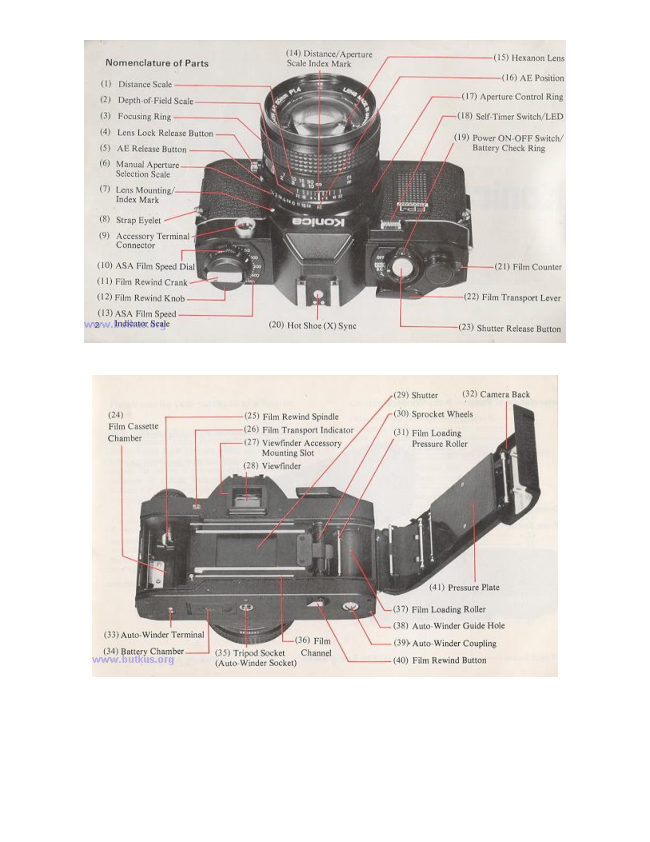
1) Open the metal fastener and detach the tip of
the strap.

2) Put the strap through the triangular ring of the
Strap Eyelet (8) on the front of the camera body.


                                    To remove the lens, hold the base of the lens
To attach the lens, align the red dot of the lens
                                           and turn it counterclockwise while the Lens
with the Lens Mounting Index Mark (7) (red
                                         Lock Release Button (4) is kept depressed.
dot) of the camera body and lightly sink the lens
                                      Remove the lens when the red dot of the lens
into the camera body. Hold the lens and turn it
                                         comes in line with the red dot on the camera
clockwise until it stows with a clicking sound.
                                               body.


When the lens is removed from the camera body the front and rear caps should be placed on the lens to prevent
accumulation of dust or scratching of lens cements. The body cap should also be placed on the camera body to
prevent damage to internal camera parts. Internal camera parts should not be touched under any circumstances.

 Use a 6V alkaline battery 4LR44 (Eveready No. 537) or a silver oxide battery 4SR44 (Eveready No. 544).
View original page 5Page 6 · Read text
1) To open the Battery Chamber (34) place your
                                                        2) Wipe an alkaline or silver oxide battery with
      fingernail in the indented area and push it in the
                                                    a piece of dry cloth. According to the " +" and
                   direction of the arrow.
                                                               "--" position marks indicated inside the battery
                                                  chamber, place the battery and close the cover.


     Caution

       · When pictures are to be taken with the temperatures less than 0°C (32°F), use new battery. In this
      situation, the performance of the battery will be lower than at normal temperature. Keep them warm.

     Even if an under-exposure warning appears at the temperature standing at less than 0°C (32°F), the
      battery will be usable at normal temperature.

       · When you know you will use the camera at a cold place, make sure that you will have spare
      battery and keep them warm with your body or in some other means to prevent a drop in the battery
     performance.


The Power On/Off switch and Battery Check Ring

The ring around the Shutter Release Button (23) serves as a power On/Off Switch (19) and a battery checker.


                                             Battery Check Look through the finder while
Shutter Release Lock 1) Turn the ring and
                                              pushing the battery check ring in the direction of
bring the index mark in line with ON, and your
                                                   the arrow. The lighting of the green LED in the
camera will be ready to take pictures.
                                                    left-hand side of the field of view indicates a full
                                                    voltage. If the LED is not turned on, replace the
2) When the index mark is aligned with OFF, the
                                                    battery with a new one.
battery will be switched off to prevent the
shutter from being released. It will also prevent a
                                                              · The battery will generally last for one year or
rundown of the battery. If the battery is switched
                                                       so. Make sure that you check the battery when
off after the film is wound, racing may be
                                              your camera has not been used over a long span
prevented.
                                                  of time.
View original page 6Page 7 · Read text
Film Loading
The Konica FP-I uses all standard 35 mm 12-, 20-, 24-, 36-exposure film cassettes.

Your Konica FP- I features a unique, film loading system so designed that a roll of film can be loaded with ease
and certainty. Just follow there six easy steps.


                                                 2) Insert a cassette into the Cassette Chamber
1) Pull up the Film Rewind Knob (12) until back  (24) and push the film rewind knob down to the
cover opens.                                        original position. A slight turn of the knob may
                                           be needed for it to be properly seated.


                                                              · Should you wish to load a film cassette with a
3) While lightly holding down the film cassette,
                                                   torn leader simply cut the leader at a right angle
pull out the film and place it onto the Film
                                                     to the film and follow the previous loading
Loading Roller (37).
                                                       instructions.

· For films with longer leaders, pull out the film
                                                  4) Make sure that the film does not warp and
until the first two or three perforations on the
                                                       that the film outlet of the cassette is not lifted
upper portion of the film appear.
                                                      out.
View original page 7Page 8 · Read text
6) Push down the Camera Back (32) and make
                                                  sure that it is tightly closed. Turn the Film
                                                Transport Lever (22) until it does not move any
5) Place the film leader onto the lower Film
                                                        further. Let it return to original position. By
Channel (36).
                                                  repeating this step until the lever will no longer
                                     move you have automatically advanced your
                                                  film to frame #1.


Film Transport Indicator
· If the film is being advanced properly, the Film Transport Indicator (26) will turn each time the film transport
lever is wound. This feature is a positive indicator of proper film advance and rewind. ** Missing Picture

AE (Automatic Exposure) Photography


                                                                Ascertain the Correct
 Setting of ASA Film Speed
                                                               Exposure
                                 Setting Lens to AE Position
Turn the ASA Dial (10) and
                                                          While looking through the
align the ASA speed of the      For AE (Automatic Exposure)
                                                                            finder, slightly depress the
film loaded in your camera      photography turn the lens
                                                                         shutter release button. The
with the index mark ON the      Aperture Control Ring (17) to
                                                                       lighting of the green LED in the
ASA Speed Indicator Scale       the AE Position (16). A safety
                                                                       left-hand side of the field of
(13)                            lock will prevent accidental
                                                         view indicates that the correct
                               change.
                                                             exposure is assured for the AE
                                                                  mode.


Wind the Film
When the shutter has been released advance the film to the next frame by turning the film transport lever until it
does not move further.
View original page 8Page 9 · Read text
Focusing
When looking through the viewfinder you will see three different focusing areas. A split image is provided at
the center of the field of view. Around the split image is a micro-diaprism and remaining portion is a round
class screen.


Split Image -- Turn the focusing ring until the upper half of the subject is in line with the lower half.

Micro-Diaprism -- Turn the focusing ring until the image stops flickering and is clearly visible.

Ground Glass -- Should be used for focusing of close-up or telephoto lenses.


 Holding the Camera


To take sharp, clear pictures, it is important to
accustom yourself to the proper grip of your
camera so that it will not be jarred when a picture
is taken.


Hold your camera as illustrated pressing it firmly
against your face. Keep the elbow of the arm
which is supporting the camera tightly against
your body.

A slow shutter speed will be selected when the
subject is in a situation where the light is dim. If
possible, use a tripod and a Konica Cable Switch
(optionally available).
View original page 9
Page 10 · Read text
LED Information in the Viewfinder


The Konica FP-I is a fully programmed
AE camera with an ideal program in
which the shutter speeds vary in non-
stage progression from 1/30 to 1/1000
see and are coupled to the variable
apertures in three stages from f/2.8 to 5.6
and 11 to select the correct combination
of shutter speed and aperture. For this
reason, a lens mounted on this camera
which is brighter than f/2.8, serves in the
same capacity as an f/2.8 lens, and the
smallest aperture value is f/l 1. While
looking through the finder, slightly
depress the shutter release button, and the
green or red LED in the left hand side of
the field of view will light up or blink,
providing information on the correct
exposure and other photographing data.

         Indication of the Correct Exposure              Under- exposure Warning

  The green LED will light up when the subject is    The red LED will light up when the subject
within the correct range of exposure. In this situation,   is in a situation where the light is dim. This
depress the shutter release button, for a properly          is an under-exposure warning. Switch your
exposed photograph.                              camera to the flash mode.


                                                          Indication for Completed
                                                   Recharge of the Electronic Flash
                                                      Unit

                                           When a Konica X-18 Auto
                                                               Electronic Flash or other Konica
                                                             dedicated electronic flash unit is
                                                                         fitted to the hot shoe clip of your
                                                     Konica FP-I, the green LED will
                                                                   blink, indicating the completed
                                                            recharge of the electronic flash unit.
View original page 10Page 11 · Read text
Manual Indication

                                                    While depressing the AE Release
                                                         Button (5) of the lens move the
                                                               aperture ring from the AE position
                                                                  to the aperture indicated on the
                                                                 electronic flash unit. The red LED
                                                                  will blink and the shutter speed will
                                                       be set to 1/100 sec.

                                                  Use this system for electronic flash
                                                        photography with an electronic flash
                                                                  unit other than a dedicated one.


Film Rewind


                                                                  3) Film rewind is completed
                                 2) Flip up the Film Rewind
                                                   when the tension on the film
                                Crank(l1) and turn it in the
1) Push the Film Rewind                                      rewind crank suddenly reduces
                                   direction indicated by the
Button (40) on the bottom of                                 and the film transport indicator
                                arrow. The film transport
the camera body inwards, and                                     stops turning. The film rewind
                                   indicator will turn assuring you
the button will lock.                                             button will return to the original
                                     that the film is being returned
                                                                    position when the film transport
                                   to the film cassette.
                                                                    lever is turned.


Photographing with Self-Timer


Push down the Self-Timer LED (18) and the self timer
will be put into operation. The LED will blink at a
continuously faster rate advising the subject as to when
the shutter will be released. Self timer duration is
approximately 10 seconds.
View original page 11Page 12 · Read text
· The self-timer can not be used while a Konica Cable
Switch or other accessory is attached to the accessory
terminal connector.


· Shield the eyepiece, when the self-timer is to be used,
or when a picture is to be taken with the eye away from
the eyepiece, place the eyepiece cap in the accessory
grooves so that stray light will not fall into the eyepiece.
Otherwise, the correct exposure will not be assured.


Exposure Compensation for Backlight Photography


When used in normal AE settings your Konica FP-I will
give you correctly exposed photographs. However, in a
situation where the subject is in front of a bright
background.

1 In a situation where the subject is dark against a
bright background scene. The AE responds to the overall
bright background and in some cases the subject may
appear dark (underexposed). Reduce the ASA number by
1/2.

Example: ASA of film 100, change ASA scale to 50.

2 In a situation where the subject is bright and
background dark. reverse the above instructions.
Double the ASA number.

Example: ASA 100 to 200.

· After special exposure photography, be sure to reset the
ASA speed dial to the correct ASA of the film in use.
View original page 12
Page 13 · Read text
Electronic Flash Photography


 At night or in a dimly light room where AE photography is unsuitable, the use of the Konica X-18,
X-24, X-36 Auto electronic flash are recommended. The X-18 flash was especially designed for use
           with the Konica FP- I camera to eliminate complicate exposure calculations.


To Use the Konica X-18 Auto Flash

1) Use two AA Alkaline or Ni-Cd rechargeable batteries to power the Konica X-18 Auto flash.


2) Attach the X-18 Auto flash to the hot shoe clip atop the Konica FP-I camera.


3) When the X-18 Auto flash is charged-ready to shoot;

a. the shutter speed will automatically change to l/l00th second flash sync speed.

b. the aperture will automatically change to f/5.6.

c. the green LED in the viewfinder will blink indicating that the flash is ready.

d. the ASA information will be automatically transferred from the camera to the X-18.


· With flash photography using the self-timer, check that the charge is complete before depressing
the self-timer switch.
View original page 13Page 14 · Read text
Use of Other Types of Electronic Flash Units

An electronic flash with a hot shoe, such as the     3) For manual flash units, determine the correct
Konica X-28, X-20 and X-14, may be              aperture to set by dividing the guide number of
electrically connected simply by fitting it to the    the flash by the camera to subject distance.
hot shoe clip. 1) The shutter speed will           Example: Using ASA 100 film with a Konica X-
automatically charge to l/100th second flash      20 flash, you will get a guide number (GN) of 64
sync speed.                                                       (ft.), divided by the distance (16 ft.) results in a
                                                    lens aperture of f/4 (64 . 16=4).
2) Set the lens aperture manually per the
instructions of the electronic flash unit.


                          The Auto-Winder F. used in
                               conjunction with the Konica
                            FP- I makes possible auto-
                                loading and continuous
                               shooting at 1.5 frames per
                               second.


                                                  Mounting to the Camera

                                                      Turn the Auto-Winder Power
                                                         Switch (2) to "OFF", insert the
                                                      Guide Pin (5) into the guide hole
                                                     on the bottom of the camera body,
                                                                      line up the mounting screw and
                                                                   tighten the Mounting Knob (9)
                                                                    firmly.
View original page 14Page 15 · Read text
Auto- Loading

1) Please be certain to turn "OFF" the Auto-
Winder Power Switch (2).

 2) Load the film the same as is normally
done without the Auto-Winder; that is,
pulling out the film lead for enough to cover
the roller.

3) Close the back cover and turn "ON" the
Auto-Winder power switch. The Auto-
Winder's red Operation Lamp (1) will turn on
and the film will be automatically advanced
to frame 1. The film transport indicator turns
at this time, indicating that the film is moving
properly.
View original page 15
Page 16 · Read text
Film Rewind

1) When finished shooting a
roll, the Auto-Winder will stop                              Continuous Shooting
                               Single Frame Shooting
and the operating indicator
lamp will come on. Turn                                       Continuously depressing the
                                           If the shutter release button is
"OFF" the Auto-Winder power                                    Shutter Release Button permits
                              immediately released after the
switch.                                                        continuous shooting. Linked up
                                 shot is taken, one frame
                                                              with a shutter priority AE meter
                                shooting becomes possible
2) Rewind film by firmly                                  moving objects in a location
                               with the film automatically
depressing the Rewind Button                                  with strongly varying light can
                              advancing one frame at a time.
(4) on the bottom of the Auto-                                be continuously shot.
Winder. The Auto-Winder
does not have to be removed
when rewinding.

  Accessories to Accessory
  Terminal Connector with
  Auto-Winder F Mounted


                          Radio Controller Set
                                                                Interval Timer
Remote Control Switch
                          The radio controller set consists
                                                     The interval timer is so
With a remote control switch    of a receiver, which is fitted to                                                              designed that the shutter may
fitted to the accessory terminal   the accessory terminal                                                          be released at a fixed interval,
connector, the shutter may be    connector, and a transmitter,                                                               ranging from 2 sec. to 60 min.
released at a place away from   which is held at a place away                                      A bracket, available as an
the camera. The cord is 15     from the camera. At a place up                                                                   accessory, is used in fitting the
feet in length, making it          to 230 feet away from the                                                                        interval timer to the accessory
possible to shoot pictures in     camera, the shutter may be                                                                  terminal connector. A Konica
succession, while you stay       released while an FM signal is                                                      X-18 or X-24 Auto flash unit
away from your camera.         transmitted. As this unit is                                                may be used at the same time.
                                      fitted to the camera with a
                                                     The interval timer is usable for
                                  bracket, which is available as an
                                                                  various purposes, such as the
                                 accessory, a Konica X-18 or X-
                                                          documentary photographing of
                           24 Auto flash unit may be used
                                                                   flowering, ecological features
                                     at the same time.
                                                                  of fauna and flora and changes
                                                                       in the phenomena of nature.
                      Two AA alkaline batteries each
                                             Two alkaline batteries are used
                                 are used for both receiver and
                                                                       for the power source.
                                   transmitter.
View original page 16Page 17 · Read text
The Konica Electronic Flash that displays its power ability with an Auto-Winder F


                Konica New X-
In the range of     24 Auto
the Konica Auto    Electronic Flash  When the New X-24 is fitted to a Konica FP- I and the
electronic flash                        recharge is completed, the photo graphing mode is
units, the New X-  The New X-24 is   automatically changed. Here, the shutter speed is
24 and X-36 are    a flat-type          automatically set at 1/100 see and the aperture at f/5.6
available, in         electronic flash      (All). The data on the EAST film speed is automatically
addition to the X-   unit for which      fed from the camera.
18. Like the X-     four AA alkaline
18, both units are   or Ni-Cd         The flash angle is so designed as to cover the picture field
so designed that    rechargeable        of a 35 mm wide-angle lens. The use of a Wide Adapter
the data on the      batteries are used   makes it possible to cover that of a 28 mm wide-angle lens.
aperture, shutter    as its power         In a situation where portraits are to be taken at a distance
speed and ASA     source. The three   of 6.6~10 ft. in a room with few light obstacles, the New
speed are         modes of f/5.6, f/   X-24 is so designed that pictures may be taken in
automatically      11 and manual      succession with ASA 400 film and new (fully charged)
transmitted        photographing       batteries.
between them and  may be selected
the camera.        with an f-stop
                      selector.
View original page 17Page 21 · Read text
Konica Hexanon Interchangeable Lenses

                   The Hexanon series of interchangeable lenses for the Konica FP-I comes in
                              all types of fully automatic aperture AE lenses, ranging from a 15 mm fish-
                      eye lens to a 400 mm ultra-telephoto lens; zoom lenses in focal lengths of
                     35-70 mm, 70-150 mm and 80-200 mm, and macro lenses.

                   The Hexanon series of interchangeable lenses features a high image
  Interchangeable
                          resolution, a beautiful delineation and a high contrast. In particular, the
      Lenses
                          series is provided with the dynamic color coating for a better color
                         penetration, depending on the composition and materials of the lens. Flare,
                       ghost and other adverse effects are eliminated and the color reproducibility
                              is enhanced.

                        Select yours from among the abundant Hexanon series of interchangeable
                          lenses, depending on the photographing purpose, and broaden the range of
                      your Konica FP-l's versatility.


Selection and Use of Hexanon Interchangeable Lenses


The Konica FP-l's programmed automatic exposure system is so designed that shutter speeds are
available in a range of 1/30 see to 1/1000 sec and f-stop values of f/2.8, V5.6 and f/11 and the
correct exposure is determined with a combination of shutter speed and aperture.
View original page 21Page 22 · Read text
Even a lens, brighter than f/2.8, may be used as one with V2.8 at its full opening and with the
smallest aperture at f/11. An f/3.5, f/4 or f/5.6 lens, darker than f/2.8, may be used as it is.

On the Konica FP- I, any of the Hexanon series of interchangeable lenses may be used.

In the manual mode, the shutter speed is constantly set at 1/100 sec. The apertures from the value at
the full opening of the lens to f/11 are usable. For example, an V1.4 lens may be used only as an
f/2.8 lens in the AE mode, but in the manual mode, it may be used with U1.4 at 1/100 sec.

When the Konica FP- 1 is to be used, note that the use of some of the Hexanon interchangeable
lenses is limited.


Hexanon Interchangeable Lenses with Limits on Use on Konica FP-1

Macro Hexanon AR 105 mm f/4

Usable only when you have an auto-helicoid. Reflex Hexanon ARM 1000 mm f/8

This is an ultra-telephoto lens for the manual mode. Mounted with this lens, the Konica FP-I serves for the
manual mode and the shutter is set at a fixed speed of 1/100 sec. Adjust the amount of light with the built-in ND
filter for photographing in the manual mode.


Caution

Hexanon Tele-Converter AR 2X
This is a handy auxiliary lens which doubles the focal length of a normal lens. All standard and telephoto
lenses, 40 mm and bigger in focal length, and all zoom lenses are usable for telephoto photographing in the AE
mode.

If a Tele-Converter AR 2X is mounted, the f-stop value at the full opening of the lens will be reduced by two
stops. The f/2.8 lens will serve as an V5.6 lens. The pictures would be under-exposed for a subjection in a
situation where the light is dim, so for the use of a tale-converter, use film with an ultra-high speed, such as
ASA 400.
View original page 22
Page 25 · Read text
Specifications of the Konica FP-1

Type: 35 mm focal plane shutter TTL-Programmed AE single-lens reflex camera.

Film: 35mm film in cassette.

Picture size: 24 x 36mm.

Standard lens: Konica Hexanon AR 40mm f/1.8 Konica Hexanon AR 50mm f/1.4 Konica Hexanon AR
50mm f/1.7 Konica Hexanon AR 50rnm f/1.8 Konica Hexanon AR 57mm f/1.2

Mount: Bayonet-type Konica mount II

Aperture mechanism: Programmed AE-type fully automatic apertures with three stages of f/2.8, f/5.6, and
f/11.

Shutter: Digital-controlled, vertically travel electronic metal focal plane shutter. The shutter speeds are
available with a non stage progression from 1/30 sec. to 1/1000 sec.

Shutter speeds: 1/30 ~ 1/1000 sec. Synchro: Hot shoe synchro socket, automatically set to. 1/100 sec. with
exclusive Konica X-18, X-24, X-36 Automatic Electronic Flash. Manually set to 1/100th sec. with electronic
flash other than X-18, X-24, X-36.

Self-timer: Digital-controlled electronic self-timer

Finder: Pentaprism eye-level finder, magnification X 0.67 (at infinity with 40mm standard lens), field-of-view
ratio 90%, real-image alignment system with split image, microdiaprism and ground glass.

Viewfinder information: LED indicator for aperture in use from f/2.8~f/11 advises correct exposure in AE
photography.

Lighting of green LED: Indication of the correct exposure.

Lighting of red LED: Under exposure warning. Blinking of green LED: Indication for completed recharge of
the electronic flash unit. Blinking of red LED: Manual indication.

Exposure adjustment: Center weighted metering system with CdS (Cadmiun Sulphide) photo cell.

· The programmed AE mode is an automatic exposure system with a combination of shutter speed and aperture
is determined for a given brightness.

· Manual aperture lens (stopped-down metering): System of alignment with fixed point coupled to film speed,
shutter speed (1/100 sec.) and lens aperture.

AE coupling range: In the programmed AE mode of the Konica FP-I, a combination of shutter speed and
aperture is determined in a range of EV 8 (f/2.8 with 1/30 sec.) to EV 17 (f/11 with 1/1000 sec.) with ASA 100.

Coupled film speed range: ASA 25-800

Film loading: Unique Konica film loading system will advance film to first frame without releasing shutter.
Fully automatic film loading system when used with Konica Auto-Winder F.
View original page 25
Page 26 · Read text
Film wind: In an arc of 138° with a lever on the camera top, automatic film wind with Auto-Winder F.

Film transport confirmation: A flicker indicator confirms film is properly winding.

Film rewind: Crank type with rewind button returning to the original position with loading of new film.

Film counter: Positive type. Resets to start with opening of back cover.

Power source: 6V alkaline battery 4LR-44 or silver oxide battery 4SR-44 (Eveready No. 544).

Others: Accepts Konica Auto-Winder F for single frame or rapid sequence photography at 1.5 f.p.s. Auto-
Winder F batteries serviceable for 40 rolls of 36-exposure film (with AA alkaline batteries).

Dimensions and weight: 140 x 89 x 45 mm, 495g (w/o battery) body only.

· All specifications and design are subject to change without notice.

Lenses available
View original page 26
From the M. Butkus Camera Manual Library. Original publisher and archive notices are retained.
Check the model and edition against your equipment.
PDF verified 2026-10-10.