Film cameras
Konica Autoreflex T3 User manual
User manual for Konica Autoreflex T3. 81 pages in German, French. Read the original PDF, download or print a copy without registration.
81 pagesGerman, French3.3 MB PDF

Loading your manual…Open PDF directly
Document details
- Brand
- Konica
- Model / document
- Konica Autoreflex T3
- Document type
- User manual
- Language
- German, French
- Pages
- 81
- File size
- 3.3 MB
- Category
- Film cameras
- Document date
- Not specified in catalog
Search available document text
Find a term, then jump to its page in the original PDF. Image-only pages may not be searchable; check the PDF for exact wording and diagrams.
Page 5 · Read text
FEATURES OF                                  DIE WICHTIGSTEN EIGENSCHAFTEN DER
   KONICA AUTOREFLEX-T3                     KONICA AUTOREFLEX-T3
       1. The KONICA  Autoreflex-T3   is  a  fully  automatic          1.  Die KONICA Autoreflex-T3  ist  eine vollautomatische,
      SLR*(TTL-AEC system) in which preference is given to           einäugige  Spiegelreflex-Kamera.  Die  Blende  wird. bei
         shutter speed. It is also usable in manual shooting.                  vorgewählter Belichtungszeit automatisch eingestellt. Die
      2. The KONICA Autoreflex-T3  has a TTL meter of the         Automatik kann auch  abgeschaltet und die Blende von
         variable metering type in which the kind of metering that         Hand eingestellt werden.
           is  fitted  to  the  picture  coverage  angle  of  a  given         2.  Bei  der KONICA Autoreflex-T3  wird  das  Licht vom
        interchangeable lens  is  selected. Metering may be done          CdS-Belichtungs-Meßsystem durch das Objektiv gemessen.
          either  at the full opening of the taking lens or with the         Durch eine variable Winkelmessung paßt sich das Meßfeld
         lens stopped down, and  this  feature  is common to  all           der Brennweite des verwendeten Objektivs an. Die Belich-
        interchangeable lenses.                                          tungsmessung  erfolgt  bei  voll  geöffneter  Blende  bei
      3.  All  kinds  of information  necessary  for  picture-taking,           vollautomatischen  Objektiven,  bei  nicht automatischen
        such  as  the  shutter  speed and aperture  value, and the          Objektiven  und  bei  Verwendung  von  Zwischenringen,
        meter needle may be instantly ascertained in the field of          Adaptern, Balgengeräten usw. wird die Belichtung durch
       view of the finder.                                             Abblenden auf Arbeitsblende  festgelegt.
      4. The  lens  used  in your  camera  is a  high-quality  and         3. Jede zum  Fotografieren notwendige Information, wie
        high-performance  color-coated Hexanon which  displays          Verschlußzeit, Blendenwert oder Stellung der Belichtungs-
           its full force in color photography.                                  messernadel, kann im Sucher unmittelbar abgelesen wer-
      5.  Your  camera  makes   it  possible  to  produce  perfect           den.
        multiple exposures, and there are no shears in picture area         4.   Die  Original-Hexanon-Objektive sind hochwertig-vergütete
          at all.                                                                Qualitätsobjektive.
      6. The  shutter   is  of a  metal  plane  type and  excels  in         5.  Mit der KONICA Autoreflex-T3 sind auch Mehrfachbeli-
        winterization.  It  is synchronized  to strobos  at  shutter          chtungen auf ein Filmbild möglich.
        speeds of up to 1/125  sec. Both hot shoe clip and M.X         6.  Der  Ganzmetall-Schlitzverschluß   arbeitet  auch  bei  ex-
        synchro sockets are available on your camera.                     tremen  Temperaturen im Sommer und im Winter ein-
      7. Each manipulation control is equipped with a safety lock.          wandfrei.  Er  ist  für  Elektronenblitze  bis  1/125  sec.
        For example, your camera  is provided with a shutter            synchronisiert.  Je  ein X- und M-Blitzkontakt sowie ein
        button lock which concurrently serves as the meter switch           aufsetzbarer  Sucherschuh  mit  Blitzmittenkontakt  sind
         to prevent erroneous manipulation, an EE release button         vorhanden.
        designed to prevent the EE system from being accidental-         7.  Die Kamera verfügt über verschiedene Sicherheitssperren,
          ly put into operation, and a self-timer button.                    wie  z.B.  Auslösersperre,  die gleichzeitig den Stromkreis
    *SLR  (TTL-AEC):  Single-Lens  Reflex  (Through-The-Lens          des  Belichtungsmeßsystems  abschaltet, Sperre für vol-
     Metering, Automatic Exposure Control)                              lautomatische Belichtungseinstellung und Sperre für den
                                                                     Hebel des Selbstauslösers.


4
View original page 5Page 6 · Read text
www.butkus.us

CARACTERISTIQUES DU                        BESKRIVNING  AV
KONICA AUTOREFLEX-T3                      KONICA AUTOREFLEX-T3
1. Le KONICA Autoreflex-T3 est un appareil automatique          1. KONICA  Autreflex-T3   är  en  helautomatisk  SLR*
  SLR* (système TTL-AEC) qui accorde la priorité à la        (TTL-AEC system) där slutarhastigheten har givits pre-
    vitesse  d'obturation.  Les  prises manuelles  sont  égale-            ferens. Även manuell användning är möjlig.
   ment possibles.                                                            2. KONICA  Autoreflex-T3  har  en  TTL-mätare  av den
2.  Le KONICA Autoreflex-T3 incorpore un posemètreTTL            variabla  inställningstypen,  där den  inställning, som är
   du type à mesure variable qui permet de sélectionner la           lämplig  för   ett  givet  utbghbart  objektivs  bildvinkel,
   mesure  appropriée à  l'angle de ouverture d'image de             väljes. Inställning kan göras antingen med objektivet helt
    l'objectif donné. La mesure peut être effectuée à pleine           öppet  eller med  objektivet  nerskärmat,  något som är
   ouverture du diaphragme ou à l'ouverture bloquée. Ceci         gemensamt för alla utbyt-bara objektiv.
   s'applique à tous les objectifs de rechange.                           3.  All information nödvändig för fotografering, som slutar-
3.  Toutes les informations nécessaires pour une prise telles           hastighet och  bländarvärde  samt mätarnal  syns ögonb-
   que  la vitesse,  et l'ouverture, sont affichées instantané-            lickligen  i sökaren.
   ment dans le viseur par l'aiguille du posemètre.                    4.  Objektivet   i  Er  kamera  är  ett  färgskicktat Hexanon-
4.  L'objectif est Hexanon au revêtement en couleur d'une           objektiv av hög kvalitet och utomordentlig effektivitet;
   grande performance, très puissant pour la photographie              ett objektiv - helt lämpat för färgfotografering.
   en couleurs.                                                               5. Med Er kamera kan perfekta multi-exponeringar utföras
5.  L'appareil permet de réaliser des multi-expositions et les          och utan några rispningar i bilden.
   images reproduites ne sont jamais coupées.                          6.  Slutaren, som är av metallplan-typ, är mycket lämplig i
6.  L'obturateur est du type au plan métallique et résiste à           vinterbruk. Den  är  synkroniserad  till strobo vid slutar-
   des  températures  extrêmement  basses.   Il  peut  être            hastigheter upp  till 1/125 sek. Både klämfäste och M.X
   synchronisé avec un strobo jusqu'à la vitesse de 1/125           synkro-fäste finns tillgängliga på Er kamera.
   de sec. L'appareil peut être muni d'une griffe d'allumage         7.  Varje manövrerkontroll är försedd med sökerhetslås. Så
   ou d'une prise de synchronisation M.X.                                är  till exempel Er kamera utrustad med  ett slutarknap-
7.  Toutes  les commandes  sont munies d'un  système de           plås  vilket  samtidigt  tjänar som mätarkontakt för  att
    verrouillage.  Par exemple,  le verrouillage du bouton           förhindra  manövrering  av  misstag,  en  EE-frigöringsk-
   d'obturateur sert également du commutateur du pose-         napp utförd så att EE-systemet förhindras kopplas in av
   mètre, prévenant ainsi toutes manipulations erronnées.           misstag, och en självutlösarknapp.
   Le bouton du déclenchage EE est conçu pour empêcher      *SLR (TTL-AEC):  Enkelobjektivreflex (Through-the lens,
    le fonctionnement accidentel du système EE. Enfin il y       automatisk exponeringskontroll)
   a également un bouton du retardateur.
* SLR (TTL-AEC):   Reflex mono-objectif (Mesure à tra-
vers l'objectif, contrôle automatique d'exposition)
View original page 6Page 7 · Read text
BASIC MANIPULATION FOR AEC PHOTOGRAPHING
      1.  Insert  Mercury  Batteries    2. Load Film (P. 17)                3.  Set Film Speed (P.21)          4.  Set AE Mark (P. 36)
         (P. 13)

   BEDIENUNG FÜR AUTOMATISCHE AUFNAHMEN
       l. Einlegen der Quecksil-        2. Filmeinlegen(S.17)             3.  Einstellen der Filmemp-       4.  Einstellen  der AE-Markie-
        berbatterien (S. 13)                                                    findlichkeit (S.21)             rung (S. 37)

   MANIEMENT FONDAMENTAL POUR  LES PHOTOS AEC
      1. Mettre les piles dans leur    2. Mettre  la  pellicule  (p. 17)    3. Régler la sensibilité de       4. Régler la marque AE (p.37)
       logement (p. 13)                                                 l'émulsion (p.21)

   AEC-FOTOGRAFERING;  INSTRUKTIONER
       l.  Sätt   i  kvicksilverbatterier    2.  Sätt i film (S. 17)                 3.  Ställ  in filmhastighet        4.  Ställ  in AE-markering
        (S.13)                                                             (S.21)                            (S.37)

6
View original page 7Page 8 · Read text
www.butkus.us


5.  Determine  Shutter Speed.    6. Focus and Frame (P.44)       7. Check Exposure and Shut-    8.  After  the  film  has
   1/125  sec.  outdoors and                                                ter Release (P.34)               been  exposed,  rewind
    1/30 sec. indoors (P.36)                                                                                                                                                         it (P.54)

5. Die   Verschlußzeit   ein-    6.  Die  Entfernung  einstellen    7.  Prüfen  Sie  die Belichtung    8. Wenn   der   Film   be-
   stellen.   l/125sek.  im     und  den   Bildausschnitt     und   drücken    Sie   den        lichtet   ist,  spulen  Sie
   Freien und  l/30sek. im       festlegen (S.44)                  Auslöser (S. 34)                   ihn zurück(S.55)
   Zimmer  (S.37)

5. Déterminer  le  temps  de    6.  Régler  la mise au point et   7.  Contrôler  l'exposition  et    8.  Avant terminé les prises
   pose:  1/125  de  sec.  en      cadrage (p.44)                   déclencher     l'obturateur      pour  une  cartouche,
    plein    air    et   1/30   de                                           (P.35)                           rebobiner le film (p.55)
   seconde à l'intérieur (p. 37)

5.  Välj slutarhastighet. 1/125    6.  Rikta in kameran och ställ    7.  Kontrollera  exponeringen    8.  Efter  att  bilderna  på
   sek utomhus, 1/30 sek ino-        in avståndet (S.44)             och   tryck  ner   slutaren      filmen tagits,  återrullas
   mhus (S. 37)                                                       (S.35)                          filmen (S.55)
View original page 8Page 10 · Read text
www.butkus.us
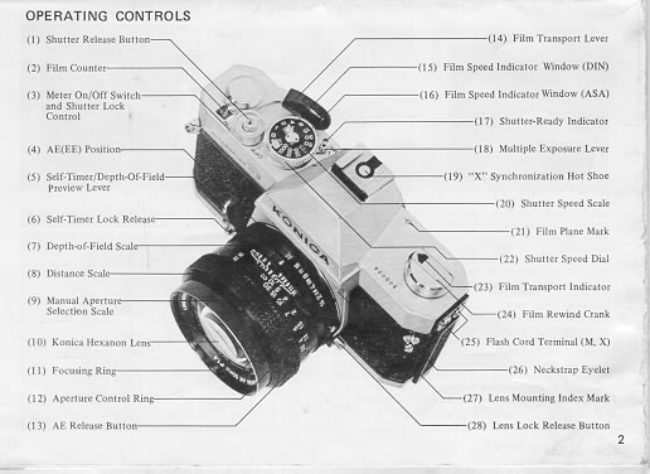
BEZEICHNUNG DER          NOMENCLATURE DES PIECES
EINZELTEILE                 ET ORGANES ESSENTIELS     NAMN PÅ VARJE DEL
  (1) Auslöser                                  (1) Bouton de déclenchement                 (1)  Slutarknappen
 (2) Bildzählwerk                              (2) Compteur                                 (2) Bildräknare
 (3) Belichtungsmesser-An/Aus-               (3) Commutateur du posemètre On/          (3) Mätarkontakt (On/Off) och slut-
     Schalter und Auslösersperre               Off et verrou d'obturateur                      arlås  kontroll
 (4) AE-Markierung                             (4) Marque AE                                  (4) AE märke
  (5) Hebel   für   Selbstauslöser  und         (5) Retardateur  et  levier  de  pro-         (5) Självutlösare  och  bilddjupsarm
     Schärfentiefenkontrolle                   fondeur de champ                        (6) Självutlösarens   säkerhetsknapp
 (6) Selbstauslöserknopf                       (6) Bouton de réglage retardateur            (7) Skala för bilddjup
 (7) Schärfentiefenskala                        (7) Echelle de profondeur de champ         (8) Avståndsskala
 (8) Entfernungsskala                          (8) Echelle de distance                         (9) Skala för manuell bländare
 (9) Blendenskala  für manuelle Ein-         (9) Echelle d'ouverture manuelle           (10) Hexanon objektiv
     stellung                                 (10)  Objectif Hexanon                       (11) Fokuseringsring
(10) Hexanon Objektiv                       (11) Bague de mise au point                  (12) Bländarring
(11) Entfernungseinstellring                 (12) Bague d'ouverture                      (13) AE frigöringsknapp
(12) Blendeneinstellring                     (13) Bouton de déverrouillage AE           (14) Filmuppvridningsarm
(13) AE-Abschaltknopf                      (14) Levier d'armement                     (15) Indikatorruta  för  filmhastighet
(14) Filmaufzugshebel                       (15) Fenêtre-indicateur de  sensibilité          (DIN)
(15) Anzeige   der  Filmempfindlich-           d'émulsion (DIN)                       (16)  Indikatorruta  för  filmhastighet
      keit (DIN)                              (16) Fenêtre-indicateur de sensibilité          (ASA)
(16) Anzeige   der  Filmempfindlich-           d'émulsion (ASA)                       (17) Indikator visande om slutaren är
      keit (ASA)                              (17) Indicateur du déclenchement               spänd eller ej.
(17) Anzeige für Auslösebereischaft         (18) Levier de multi-expositions             (18) Arm för multiexponering
(18) Hebel für Mehrfachbelichtung          (19) Echelle des temps de pose              (19) Skala för slutarhastighet
(19) Verschlußzeitenskala                   (20)  Sélecteur des temps de pose            (20)  Inställningsratt   för   slutarhasti-
(20) Verschlußzeiteinstellung                (21) Marque du plan focal                      ghet
(21) Markierung für Filmebene              (22) Manivelle de rebobinage                (21)  Fokalplansmärke
(22) Filmrückspulkurbel                     (23) Bouton de rebobinage                  (22) Spak  för  återförande av filmen
(23) Filmrückspulknopf                     (24) Contact synchroflash (M,X)            (23) Knapp för återförande av filmen
(24) Blitzlichtkontakt (M,X)                (25) Oeillet de sautoir                       (24) Synkro-kontakt (M,X)
(25) Tragriemenöse                          (26) Repère  pour  montage  ou  dé-       (25) Uttag för rem
(26) Anzeigermarke   für   Objektiv-         montage de l'objectif                    (26) Indikator  för  objektivets  påsät-
     aufsatz/-abnahme                     (27) Verrou de changement d'objec-            tning och avtagning
(27) Knopf für Objektivfreigabe                          tif                                      (27) Objektivgytesknapp
View original page 10Page 12 · Read text
www.butkus.us

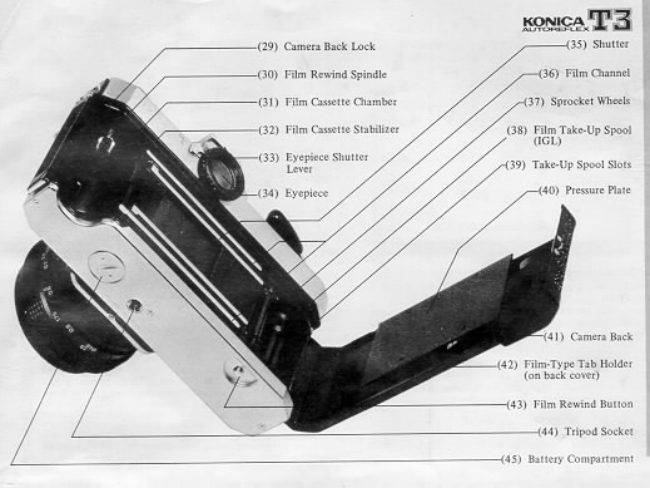
(28) Verriegelung für Rückwand            (28) Verrou du dos                           (28) Bakre lock
(29) Filmriickspulspindel                   (29) Axe de rebobinage                      (29) Axel  för  tillbakavevning  av  fil-
(30) Raum für Filmpatrone                  (30) Logement du chargeur                 men
(31) "X"-Blitzkontakt    (zum   An-       (31) Contact synchro flash "X" (Pour        (30) Kammare för filmhylsa
     schluß  des Zubehörschuhs mit               la griffe d'allumage exclusive)          (31) "X" synkrokontakt (enbart för
     Blitzmittenkontakt.)                    (32) Oculaire de visée                        Fästklämma)
(32) Suchereinblick                          (33) Obturateur                              (32) Sökarfönster
(33) Verschluß                                                                         (33) Slutare


(34) Filmführung                             (34)  Guide-film                               (34) Ledbana för film
(35)  Filmtransportrolle                      (35) Tambour denté                         (35) Kugghjul
(36) Filmaufwickelspule                    (36) Bobine d'entraînement                 (36) Spole för upprullning av filmen
(37) Schlitz  der Filmaufwickelspule       (37) Fente d'amorçage                       (37) Skåra för isättning av film
(38) Filmandruckplatte                      (38) Presse-film                            (38) Tryckplåt


(39) Rückwand                            (39) Dos                                      (39) Baklock
(40) Halter für Filmtyp-Kontrolle           (40) Repère du film utilisé (dos)             (40) Fack för filmtypsanteckning
(41) Druckknopf  für  Filmrückspu-       (41) Bouton de rebobinage                   (41) Knapp  för  tillbakavridning  av
     lung                                   (42) Prise du trépied                            filmen
(42) Stativgewinde                          (43) Logement des  piles au mercure       (42) Hål för stativ
(43) Kammer  für  Quecksilber-                                                       (43) Kammare  för kvicksilverbatteri
     batterien
View original page 12Page 13 · Read text
MAJOR SPECIFICATIONS OF KONICA AUTOREFLEX-T3

    Type: 35mm TTL-AEC SLR with focal plane shutter.              Mirror:   Front  edge  vertically  lifted.  Fully quick return
                                                                      system.     Film: 35mm film in cartridge.
                                                          Exposure  Adjustment:   Fully  automatic  exposure (AEC     Picture Size:  24 x 36mm                                                                    system), variable TTL metering system with 2 supersensitive
    Standard Lenses:  Hexanon AR 50mm f/1.7  (5 groups, 6      CdS cells.
     elements), AR 50mm f/1.4 (6 groups, 7 elements), AR 57mm       *   Fully automatic aperture lens of AEC type (metering at
      f/1.2  (6  groups,  7  elements) Each with AE lock,  closest             full lens opening):
     taking distance 0.45 m, Color Dynamic Coating.                    Correct  aperture  reading  system  coupled  to  film  speed,
                                                                           shutter speed and at-full-lens-opening aperture value.    Mount:   Konica  Mount   II  of  bayonet  type, 47mm  in
                                                                  *   Preset, normal aperture lens (stopped-down metering):     diameter with 40.5mm flange back.
                                                                       Index-point alignment system (match-needle) coupled to film
    Aperture Mechanism:   Fully  automatic  exposure  control        speed, shutter speed and aperture.
    (AEC) system, minimum aperture 16. Equipped with a device                                                       Power Source for Meter: Two 1.35V mercury battery cells,      for checks on depth-of-field.                                                                     Meter on/off switch and shutter lock control which concur-
     Shutter:  Vertically scanning metal focal plane Hi-synchro       rently serves as shutter lock of automatic release type.
      shutter  "Copal  Square-S"  with  built-in  multiple-exposure                                                AEC Coupling Range: EV1.5  (f/1.2, 1/2 sec.) toEV18(f/16,      device.                                                                 1/1000 sec.) with f/1.2 lens and ASA 100.
     Shutter Speeds:  B, 1 - 1/1000 sec. in equally graduated 1:1
     progression  and  single-spindle  non-rotating  dial.  Time  ex-      Film Speed: ASA 12  to 3200 (DIN 12 to 36).
     posure  possible.                                          Exposure Memory Device:  Shutter release button used.
    Synchro-Flash:  "X"  synchro  contact  for  hot  shoe  clip.                                                                Film Loading: Konica EL type.     Synchronized with  all  shutter speeds at M synchrocontact
     with M, FP and MF classes of bulbs and with electronic flash      Film Wind:  Cocking  in  single action with top lever (with
      at X synchro contact at 1/125 sec.                             wind  of  162°  and  play  of  30°).  Equipped  with  wind
     Self-Timer:   Operation  time  variable  in seconds with  full       completion indicator and double-exposure prevention device.
     operation extending to about 10 sec. Equipped with safety      Film Counter:  Indicates number  of exposures and auto-
     lock.                                                                matically returns. Hinged back cover and memo holder.
     Finder:  Pentaprism eye-level finder with magnification at      Film  Rewind:   Cranck  type.  Rewind button automatically
     0.78X (with 50mm lens at infinity) and field of view set at        returns.
     about 92%  of the  actual  field  of picture. Equipped  with
     focusing screen of real image-alignment type using standard      Dimensions and Weight (Body only)
     Micro Dia Prism type (or optional split-image type).               150(w) x 95(h) x 45(d) mm, 740g.
                                                            6"(w) x 3¾ "(h) x l¾"(d), 26 ozs.
     Visible in Finder:  Meter needle, exposure warning marks,
      shutter  speed reading, aperture value, value of lens at full
     opening  and mark for AEC range,  manual  indicator mark,
     index point for stopped-down metering, power source check
     mark.
1 2
View original page 13Page 14 · Read text
INSERTING OF MERCURY BATTERIES           www.butkus.us
                                                                      mit  einer  Münze   in  entgegengesetzter  Richtung  des
                                                                  Uhrzeigers drehen und abschrauben.
                                                                              2. Die beiden Quecksilberbatterien einlegen, wobei die "+"
                                                                              Seite der Batterien entsprechend der Zeichnung in der
                                                              Batteriekammer nach oben zeigt. Die Kappe der Queck-
                                                                    silberbatteriekammer  in  der  Richtung  des  Uhrzeigers
                                                                  drehen und einschrauben. Achten Sie beim Kauf neuer
                                                                         Batterien  auf  die Spannung von  1,35  Volt.  Es  gibt
                                                                      Batterien  gleichen  Aussehens auch  mit  höherer Span-
                                                                nung, die jedoch keinesfalls verwendet werden dürfen.

                                            MISE EN PLACE DES PILES AU MERCURE
                                                         Le posemètre TTL du KONICA Autoreflex-T3 est alimenté
                                                                     par deux piles au mercure 1,35V. Bien essuyer  la surface
                                                                  des  piles  livrées avec  l'appareil, avec un chiffon sec et les
                                                                        placer dans leur logement.
                                                                                         1.  Tourner  le couvercle du logement des piles au mercure
The KONICA Autoreflex-T3's TTL meter takes two 1.35V           (43) dans le sens inverse des aiguilles d'une montre, à
mercury batteries as its electric source. Wipe the separately            l'aide  d'une  pièce  de  monnaie  et  le  détacher  de
enclosed mercury battery cells with a piece of dry and clean            l'appareil.
cloth and put them into the mercury battery chamber.               2.  Mettre les deux piles dans leur logement en orientant le
1.  Turn the cover of the Mercury Battery Chamber (43)           côté marqué de  la  croix  "+",  suivant  les  indications
   counterclockwise with  a  coin  or something alike and           portées dans  le logement. Après  la mise en place des
   detach it from the chamber.                                             piles, mettre le couvercle et le verrouiller fermement.
2.  Insert  the two cells into the mercury battery chamber,
    the "+" side up, as indicated in the figure printed on the
    seal inside the chamber.                        ATT SÄTTA  l BATTERIERNA
   Turn  the  cover  of the mercury battery chamber clock-
   wise and make sure that it has been screwed tightly.               Till KONICA Autoreflex-T3's TTL-mätare används två 1,35
                                                                  Volt  kvicksilverbatterier.  Torka av de medföljande kvick-
                                                                       silverbatterierna med en torr och ren trasa och sätt in dem
EINLEGEN DER QUECKSILBERBATTERIEN                                                               på sin plats.
Der TTL-Belichtungsmesser der KONICA Autoreflex-T3          1.  Locket   till Kamerans batteiutrymme  (43)  skruvas  loss
wird mit zwei 1,35V Quecksilberbatterien gespeist. Die mit           motsols, med hjälp av  ett mynt.
der Kamera zusammen gelieferten Quecksilberbatterien    mit     2. De bada batterierna ska sättas in med "+" polen upp.
einem  trocknen und  sauberen Tuch  putzen und  in  die          Figuren på insidan av batteriutrymmet visar hur Ni ska
Kammer für Quecksilberbatterien einlegen.                              göra.  Locket  till batteriutrymmet skruvas  fast medsols.
l.  Die Kappe der Kammer für Quecksilberbatterien (43)           Förvissa Er om att det blir ordentligt påskruvat.
View original page 14Page 15 · Read text
Belichtungsmesser-An  / Aus-Schalter und
                                                                  Auslösersperre
                                                    Wenn  Sie  den  Belichtungsmesser-Drehschalter  (3) um den
                                                                          Auslöser   (l)  durch  Drehen  gegen  den  Uhrzeigersinn  auf
                                                              "OFF" stellen, wird der Belichtungsmesser ausgeschaltet und
                                                                         der Auslöser arretiert. Stellen Sie den Schalter auf "OFF",
                                                          wenn  Sie  Ihre Kamera mit gespanntem Filmaufzugshebel
                                                                                    tragen.  Sie brauchen den Schalter nicht eigens anzuschalten,
                                                           wenn der Film nicht transportiert  ist, da durch Betätigen des
                                                                    Aufzugshebels  der   Schalter  automatisch  von  "OFF"  auf
                                                      "ON" gestellt wird.


                                                   Commutateur du posemètre On/Off et
                                                             verrou  d'obturateur
    Meter On/Off Switch and Shutter Lock Control             Lorsque  le commutateur du posemètre  (3)  qui encadre  le
                                                                   bouton de déclenchement (1)  est tourné dans le sens inverse
    When  the Meter  Switch  (3) around  the  Shutter,  Release       des aiguilles d'une montre,  et placé devant le repère "OFF",
    Button (1)  is turned counterclockwise and set to "OFF," the          le posemètre ne fonctionne pas et l'obturateur est verrouillé.
     meter  will  be switched  off and the shutter button locked.           Il  est donc  préférable  de maintenir  le commutateur à  la
    Turn off the switch when your camera is to be carried around        position "OFF",  le levier d'entraînement avant  été actionné
     with the film wind lever cocked. You do not have to turn the       au préalable, quand  il s'agit de transporter l'appareil.  Il n'est
     switch, as the switch will be automatically turned on when       pas  nécessaire de tourner  le commutateur puisqu'il tourne
      the film wind lever  is cocked with the switch  set to "OFF".      automatiquement   lorsque   le   levier   d'entraînement   est
                                                                          actionné.


                                                         Mätarkontakt (On/Off) och slutarlåskontroll
                                                                När  mätarkontakten  (3)  runt  slutarknappen  (l) vrides mot-
                                                                                   sols mot "OFF", stänges mätaren av och slutarknappen låses.
                                                                      Låt mätarkontakten stå på "OFF", när kameran ska bäras
                                                      med  slutaren  spänd. När kontakten  står på "OFF" och
                                                                   framvridningsarmen  för filmen vrides  runt,  slås kontakten
                                                                     automatiskt på.
1 4
View original page 15Page 16 · Read text
www.butkus.us


Check of Batteries                                         come  to  that  point  or gone  farther down from  that
                                                                              point,  it  is advisable  to change the battery with a newA mercury battery will be fully usable over a period of one                                                                    one.year in normal circumstances. There will be a sudden drop
in voltage when  its days are numbered. When the meter
needle visible in the finder is immovable at a bright place, it          •  Note that the  all the marks necessary for the checking
means that the battery has run down. You may also check            of  the battery are colored in red. Make sure that the
the battery in the following manner:                                meter needle will come over the red mark when the film
                                                               and  shutter speeds are  set  to the red and the lever  is
1.  While the Lens Release Button (27) is kept depressed,           depressed  in the direction of the red-colored alphabet
   take off the lens, as  it is turned counterclockwise. (See            "C". Check the battery  in the correct order shown on
   P.25)                                                                     the  battery  check  seal on  the bottom  of the camera
2.   Lift  the outer ring around the Shutter Speed Dial (20)          body.
   and set the film speed to ASA 100.                                   •  The  meter  takes two  1.35V  National H-C,  Mallory
3. Turn the shutter speed dial and set it to 1/125 sec.               PX-675  or  Eveready EPX-675 mercury  battery  cells.
4. While the finder is being looked into, detach the Meter          Care must be exercised in selecting the cells as there are
   Switch (3) from the  position of "OFF" and depress it in             cells  which  look  identical   in  shape  but  differ  in
   the direction of "C".  If the meter needle (49) comes in           stipulated voltage, such as battery cells.
   alignment with the Battery Check Mark (50) between          •   In the event that your camera is not to be used over a
    the aperture readings of f/8 and  11,  it means that the           long span of time,  take out the mercury battery  cells
   battery  is fully serviceable.  If the needle has failed to          and keep them in a place free from moisture.
View original page 16Page 17 · Read text
Prüfen der Batterien                                        Contrôle des piles au mercure
     Eine  Ouecksilberbatterie  kann  unter  normalen  Umständen      En usage normal, une pile au mercure dure plus d'un an. La
     über den Zeitraum eines Jahres hinweg voll verwendet werden.        tension descend subitement lorsque la pile est complètement
   Wenn sie sich ihrem Ende nähert, gibt es einen plötzlichen        usée. Lorsque l'aiguille s'arrête à la plage lumineuse, les piles
     Spannungsabfall. Falls die Nadel des Belichtungsmessers, die        sont usées. Le contrôle des piles peut s'effectuer de la façon
    im  Sucher   sichtbar   ist,  an  einer  Stelle  mit  viel  Licht        suivante également:
     unbeweglich  bleibt, so bedeutet das, daß die Batterie leer  ist.          1.  Tout en appuyant sur le verrou de changement d'objectif
      Sie können die Batterie auch auf folgende Weise prüfen:                  (27), tenir la partie chromée de la monture de l'objectif et
       1.  Drücken  Sie  den Knopf für Objektivfreigabe  (27) und              la tourner dans le sens inverse des aiguilles d'une montre
       nehmen  Sie,  ohne  ihn  loszulassen,  das Objektiv  unter          de façon à la détacher de l'appareil. (Voir p.25)
       Drehen im Gegenuhrzeigersinn ab. (Vgl. S. 25)                    2.  Soulever  la bague extérieure du sélecteur des temps de
      2. Heben Sie den äußeren Ring um die Verschlußzeiteinstel-          pose  (20)  et  afficher  le  chiffre  100  dans  la  fenêtre-
        lung (20) an und stellen Sie die Filmempfindlichkeit auf           indicateur de sensibilité (ASA).
      ASA100.                                                                       3.  Tourner  le  sélecteur  des temps de nose  et le régler sur
      3. Stellen Sie die Verschlußzeitenwählscheibe auf l/l25sek.                1/125 de sec.
      4. Während Sie durch den Sucher blicken, drücken Sie den         4.  Tout en regardant dans le viseur, mettre le commutateur
         Schalter (3) von der Stellung "OFF" gegen "C". Falls der            (3)  à   la  position  "C".  L'aiguille  du  posemètre  (49)
         Zeiger des Belichtungsmessers (49) mit der Markierung zur             s'alignera au repère d'alimentation (50)  si la pile n'est pas
         Batteriekontrolle  (50)  zwischen  den  Blendenwerten  f/8            usée, et l'aiguille descend au dessous de ce repère lorsque
       und  11  zur Deckung kommt, so bedeutet das, daß die              la pile est usée.
          Batterie  voll  leistungsfähig  ist.  Falls  die  Nadel  diesen         •  Tous les repères du contrôle des piles sont affichés en
       Punkt   nicht   erreicht   oder   daruntersteht,   empfiehlt            rouge.  Veiller à ce que l'aiguille s'aligne au repère rouge,
         sich ein Batteriewechsel.                                            lorsque  la  sensibilité  et  le temps de pose sont réglés aux
       •  Beachten Sie, daß alle für die Batterieprüfung notwendi-           repères rouges et que le commutateur est mis à la position
        gen Markierungen in rot gehalten sind. Vergewissern Sie            "C". Contrôler  la pile selon les indications données sur
          sich, daß die Belichtungsmessernadel auf die rote Markie-          une étiquette collée sur le fond de l'appareil.
        rung kommt, wenn Filmempfindlichkeit und Verschluß-          •  Le posemètre est alimenté soit par National H-C 1,35V,
          zeit auf rot  gestellt  sind und  der Schalter auf den roten          Mallory PX-675, ou Eveready EPX-675.  Il faut veiller au
        Buchstaben "C"  gestellt  wird.  Prüfen  Sie  die Batterie in           choix  de  ces  piles,  car  il en  existe  des formes  el  des
        korrekter Reihenfolge, wie auf dem Batterieprüfsiegel          dimensions similaires mais de tension non approprier.
         auf der Unterseite des  Gehäuses  Ihrer Kamera angezeigt ist.         •   Si  l'appareil  n'est  utilisé pendant longtemps,  retirer  les
       •  Für den  Belichtungsmesser diesser Kamera  sind 2 stück             piles et les conserver dans un endroit sec.
        1,35V H-C  Quecksilberbatterien,  Mallory PX-675  oder
     VARTA Nr. 7001 verwenden. Achtung: Es gibt Batterien
         gleicher Größe, jedoch mit anderer Spannung, bei deren
       Verwendung falsche Meßergebnisse erzielt werden. Ver-
       wenden  Sie  nur  die  oben  angegebenen  Batterien  mit
        1,35V  Spannung.  Falls  die Kamera  lange  Zeit  nicht
        benutzt wird, nehmen Sie die Quecksilberbatterien heraus
       und bewahren Sie sie an einem trocknen Ort auf.
1 6
View original page 17Page 18 · Read text
www.butkus.usKontroll av Batteriet                            FILM LOADING
Under  normala  förhållande  är  ett  kvicksilverbatteri  fullt      The KONICA Autoreflex-T3 takes 35mm roll film, which
användbart under mer än  ett  år.  Efter denna  tid sker  ett  .     comes  in a  cartridge.  For film  loading,  avoid  the direct
prötsligt  fall  i  volttalet.  Att  batteriet har  tagit  slut kan        sunlight and do  it in the shade.  If there  is no shade, one
iakttagas på det  att mätarnålen  i sökaren inte är rörlig även      way would be to use the shadow of your body.
vid ljusa  platser.  Ett annat sätt att kontrollera batteriet är
följande:
1.  Håll  objektivbytesknappen  (27)  intryckt  och  ta  av
   objektivet genom att  skruva det motsols. (Se.  s. 25)       FILMEINLEGEN
2.  Lyft den  yttre  ringen  runt slutarhastighetsratten (20)                                                                       In der KONICA Autoreflex-T3 können alle handelsüblichen   och sätt filmhastigheten på ASA 100.
                                             35mm Kleinbildfilme in Patrone verwendet werden. Film-3. Vrid slutarhastighetsratten och ställ in den på 1/125 sek.
                                                                      einlegen oder -herausnehmen sollte nie im direkten Sonnen-4. Medan Ni tittar in  i sökaren, lösgör mätarkantakten (3)
                                                                                    licht geschehen.  Sollte kein Schatten vorhanden  sein, so   från  "OFF"-läget och  för den  i riktning mot "C". Om
   mätarnålen (49) ligger i linje med märket för kraftkällan       führen  Sie das  Filmeinlegen im  Schatten  Ihres eigenen
   (50)  beläget  mellan  bländarvärdena  f/8  och  11,  är       Körpers aus.
   batteriet bra. Om nålen ej når upp  till märket är det
   lämpligt att byta ut batteriet.
•   Observera  att märkena  nödvändiga  för  att  kontrollera
   batteriestyrkan  är  färgade   i  rött.  Försäkra Er om  att    CHARGEMENT DE LA PELLICULE
   mätarnålen går över det röda märket när filmhastighet                                                        Le KONICA Autoreflex-T3  utilise  le film de 35mm en   och  slutarhastighet  är  inställd  i rött och  att armen är                                                               cartouche de sécurité. Pour charger l'appareil, éviter l'ex-   förd mot den röda Bokstaven "C". Kontrollera batteriet                                                                     position directe au  soleil. Effectuer l'opération à l'ombre.     i  den  ordning som  är  angiven på  batterikontroll på                                                                                                 S'il n'y a pas d'ombre, l'effectuer à l'abri du corps.   botten av kamerakroppen.
•   Till  ljusmätaren används  två  1,35-Volt National H-C,
   Mallory  PX-675  eller Eveready EPX-675  kvicksilver-
    batterier.  Se  upp  vid  inköpet,  då  det  finns  andra
    batterier, med samma utseende men som skiljer sig vad    ATT SÄTTA  l FILMEN
    gäller spänningen.                                            För KONICA Autoreflex-T3 används 35 mm-film, mon-
• Om Ni inte använder kameran under en längre tid, ta ut        terad   i  kasetter.  Undvik  direkt  solsken  när Ni  laddar
   batterierna och förvara dem på torr plats.                      kameran. Skulle ingen skuggig plats finnas tillgänglig kan Ni
                                                                                 sätta i filmen i skydd av Er egen skugga.
View original page 18Page 19 · Read text
1.  Pull the Back Cover Lock (28) and open the Back Cover         3.  Pull out the film while  the  cartridge  is lightly pressed
         (39).                                               down and then choose any slit of the Film Take-up Spool
      2.  Put  a  film  cartridge  into  the Film Chamber  (30)  as           (36) into which the film tip may be inserted with ease and
        through  it slid into the chamber at a slant from above the            insert the film into the slit.
        underside.
       1.  Ziehen  Sie die Verriegelung (28) nach unten und öffnen         3.  Halten Sie die Patrone fest und ziehen Sie den Filmanfang
         Sie die Camerarückwand (39).                                      soweit heraus, bis er in einen beliebigen Schlitz (37) der
      2.  Schieben Sie die Filmpatrone in die Filmkammer (30).             Aufwickelspule (36) gesteckt werden kann.

       1.  Tirer sue le verrou du dos (28) et ouvrir ce dernier (39).         3.  Insérer  l'extrêmité de  la  pellicule dans une fente de  la
      2.  Diriger la cartouche vers le fond de l'appareil en orientant          bobine d'entraînement  (36). On peut  utiliser toutes les
          le côté d'où  soit  l'axe vers  le bas de l'appareil. Placer           fentes. Choisir ainsi celle qui se présente le mieux.
         ensuite la cartouche dans le logement (30).

       1.  Dra  i bakre lock (28)  i riktning mot Er och öppna locket         3.  Håll  fast kasetten och dra ut filmen så långt att den kan
        på kamerans baklocket (39).                                             fästas i springan på den motsatta spolen (36).
      2.  Sätt  kasetten  för  filmhylsan  (30).  För  in  den  snett
         underifrån.

1 8
View original page 19Page 20 · Read text
www.butkus.us


4. While lightly pressing down the cartridge, turn the Film         5.  Flip up the Film Rewind Crank (22) and turn  it in the
   Wind Lever  (14) and  take up  the film on the spool.           direction indicated by an arrow mark on it to reduce the
   Ascertain that the teeth of the Sprocket (35) are in gear            slack of the film.
   with film perforations before the back cover is closed.
   Depress the back cover with a finger  tip, and  it will be
    closed with ease.                                                          5.  Klappen  Sie  die  Filmrückspulkurbel  (22) nach aussen
4.  Halten Sie die Patrone weiterhin fest und betätigen Sie         und drehen Sie die Kurbel vorsichtig in Pfeilrichtung, bis
   den Filmaufzugshebel (14). Transportieren Sie den Film           Sie einen leichten Widerstand spüren, der Film ist jetzt
    soweit,  bis  die Perforation oben und unten von den           in der Patrone gestrafft.
   Zähnen der Filmtransportrolle (35) erfasst wird. Schlies-
    sen  Sie  die Camerarückwand,  sie  wird durch leichten
   Druck verriegelt.                                                           5.  Après  avoid  fermé  le  dos,  relever  la  manivelle  de
4.  Tour en appuyant légèrement sur la cartouche, action-           rebobinage (22), et la tourner dans le sens indiqué par la
    ner   le  levier d'armement  (14)  et  entraîner  le  film.            flèche pour bien tendre le film.
   Appuyer  sur  le dos avec un  doigt  et  il  se  verrouille
   automatiquement.
 4.  Håll fortfarande fast kasetten och låt filmen rulla upp        5.  Fäll ut återspolningsveven (22) och vrid den försiktigt i
     sig på den högra spolen genom  att vrida film uppvrid-         den riktning som pilen anger  tills Ni känner  ett  lätt
   ningsarmen  (14).  Förvissa Er om  att frammatarhjulets         motstånd. Filmen är då sträckt.
    taggar (35) griper in  i filmens perforering. Därefter kan
    kameralockets stängas med ett lätt tryck.
View original page 20Page 21 · Read text
6.  Transportieren Sie jetzt den Film mit dem Aufzugshebel
                                                                                  (14) und drücken Sie den Auslöser (l). Wiederholen Sie
                                                                                 diesen  Vorgang,  bis  die Zahl  "1" dem Indexstrich im
                                                                       Bildzählwerk (2) gegenüberliegt. Wenn der Film ordnungs-
                                                                   gemäss  transportiert wird, dreht  sich der Filmrückspul-
                                                                    knopf (23) während  des Filmtransportes entgegen dem
                                                                            Uhrzeigersinn.
                                                                                              •  Mit  einer Hebelbewegung  des Aufzugshebels  wird  der
                                                                     Film um eine Aufnahme weitertransportiert, der Ver-
                                                                              schluss gespannt und die Spiegel- und Blendenmechanik
                                                                                       betätigt.


                                                                                       6.  Entraîner  le film et appuyer sur le bouton de déclenche-
                                                                 ment  (1).  Répéter  cette opération à plusieurs  reprises
                                                                              jusqu'à ce que  le chiffre "1"  se trouve devant le repère
      6.  Turn  the film wind lever  until  it does not move further          dans la fenêtre du compteur (2). Lorsque la pellicule est
        and depress the Shutter Release Button (1). Repeat this          entraînée d'une manière  correcte,  le bouton de rebobi-
         action   till  the  figure  "1" comes  in alignment with  the          nage (23) tourne dans le sens inverse des aiguilles d'une
        index mark in the window of the Film Counter (2).  If the          montre.  S'il ne tourne pas, rebobiner  le film (voir page
         film  is transported in the correct manner when the film           55) et recommencer toute l'opération.
       wind  lever  is  turned,  the Film Rewind Knob (23) will         •  Manoeuvrer  le  levier d'armement  à  fond.  Le  film  se
         revolve  counterclockwise.   If  it  does not  turn  counter-                                                                                déplacera de  la valeur d'une image  et  sera  prêt  à être
         clockwise, rewind the film (see Page 54) and start all over                                                                               exposé.  Le  miroir   et   le  système  de  présélection  du
         again.                                                                   diaphragme seront armés simultanément.       •  Turn the film wind lever  until  it does not move further
        and  the film  will be transported by one frame and the
         shutter charged  at  the same  time. The mirror and the
        automatic aperture  will also be  set. Simultaneously, the
         film counter will advance by one reading.                               6.  Dra fram filmen med frammatningsmekanismen så långt
                                                                                 det går och tryck på slutarknappen  (l). Upprepa manö-
                                                                             vern  till dess  siffran  "l" kommer mitt för markeringen.
                                              Om filmen frammatas på rätt sätt ska återspolningsknap-
                                                                     pen (23) vrida sig motsols. Gör den inte det, dra tillbaka
                                                                           filmen och börja om från början.
                                                                                              •  Vid  frammatningen  börjar  exponeringsmekanis  en   att
                                                                             fungera. Samtidigt flyttas bildräknaren fram ett steg.
20
View original page 21Page 22 · Read text
www.butkus.us
                                                                              7.  Einstellen der Filmempfindlichkeit (DIN)
                                                              Der Aussenring  des Verschlusseinstellrades  (20) wird
                                                                  nach  oben  gezogen.  Jetzt  kann  durch  Drehen  die
                                                                  Filmempfindlichkeit nach ASA oder DIN im Sichtfen-
                                                                                      ster  eingestellt werden. Sobald  die gewünschte Film-
                                                                    empfindlichkeit dem  Index gegenüberliegt,  lassen  Sie
                                                                 den Einstellring nach unten einrasten.
                                                                                     •  Die  entsprechende  Filmempfindlichkeit   ist  auf  der
                                                            Packung des Filmes vermerkt. Die Tabelle  zeigt Ihnen
                                                                             die  einstellbaren Werte.  Die  in Klammern genannten
                                                                                                                                         Ziffern      sind  Zwischenwerte,  die  nach  den Punkten
                                                                              eingestellt werden können.

                                                                                  7.  Régler la sensibilité de l'émulsion (ASA)
                                                                      Soulever  et tourner  la bague entourant  le  sélecteur de
                                                                                vitesse  (20)  et  afficher  le  chiffre correspondant à  la
                                                                                sensibilité du film dans l'une des fenêtres ASA ou DIN,
                                                             en regard du repère. La bague doit reprendre sa position7.  Set Film Speed (ASA)                                                                                         initiate.    Lift and turn the external ring of the Shutter Speed Dial                                                                                     •  Les  échelles ASA  et DIN  visibles  dans  la  fenêtre-    (20) and align the reading equivalent to the speed of the                                                                             indicatrice montrent les degrés de l'émulsion des films.   film loaded in your camera with the index mark of the                                                              Ces degrés sont indiqués soit sur la boîte d'emballage du   Film Speed Indicator Window (ASA) or (DIN). When                                                                       film ou sur le mode d'emploi. (Sur le tableau ci-contre   they  are  aligned,  the  ring  drops and  is  fixed  into                                                                                    les  sensibilités  entre  parenthèses  s'affichent  en regard    position.                                                                des points intermédiaires.)•  The ASA and DIN  scales  visible  in  the  film  speed
   indicator window indicate the degrees to which film  is
    sensitive  to  light.  The  film  speed  of  your  film  is        7. Filmhastigheten (ASA)
   indicated on the box in which  it  is contained and in its          Lyft och vrid den yttre ringen på slutarhastighet (20) så
   instruction booklet. (Figures in brackets refer to inter-             att den visar samma hastighet i ASA-fönstret som filmen
   mediate points of sensitivity).                                        har. När rätt känslighet har ställts in släpp ned ringen,
                                                                 den låses då i detta läge.
                                                                                                   • ASA  och  DIN-skalorna, som syns  i
                                                                                                fönstret  visar  vilken  ljuskänslighet  fil-
                                                                   men   har.  Hastigheten  på  filmen  är
                                                                              markerad på kartongen och broschyren
                                                                      som finns runt filmkassetten      när ni
                                                                                köper  den.  (Siffrorna inom parentes
                                                                                       anger  mellanlägena.)
View original page 22Page 23 · Read text
Anzeige für Auslösebereitschaft
                                                                      Ziehen  Sie  den  Filmaufzughebel  etwas  heraus, um  ihn
                                                                                  leichter bedienen zu können. Bewegen Sie den Filmaufzu-
                                                                          gshebel bis zum Anschalg; der Film wird dabei um ein Bild
                                                                              weitertransportiert. Gleichzeitig stellt sich das Filmzählwerk
                                                 um einen Strich weiter und die Anzeige für die Auslösebereit-
                                                                             schaft (17) wechselt von rot auf grün. Dies zeigt an, daß der
                                                                       Filmtransport erfolgt  ist. Nach Drücken des Auslösers kann
                                                                            der Schnellaufzugshebel wieder betätigt werden.


                                                                    Indicateur du déclenchement
                                                                                 Tirer légèrement  sur  le  levier  d'entraînement pour  mettre
                                                                          plus facilement le doigt sur le levier. Tourner ensuite le levier    Shutter-Ready Indicator                                                                         a fond jusqu'à ce qu'il se bloque, ce qui entraîne le film d'un
      Slightly pull out the film wind lever, and  it will be easier to       cadre  et charge l'obturateur. En même temps,  le compteur
     put your finger on the lever. From there, turn the film wind        affichera un  chiffre nouveau,  et l'indicateur du déclenche-
      lever  until  it  stops, and the film will be transported by one      ment (17) affichera en vert au lieu du rouge, marquant le fait
     frame  and  the  shutter  charged.  Simultaneously,  the  film      que  le film a été entraîné d'un cadre. On peut actionner de
      counter  will  advance by  one  reading, and Shutter-Ready      nouveau le levier après une prise.
      Indicator  (17)  will change from red  to green, showing that
      the film wind has been completed. The lever may be cocked
      for a second time when the shutter has been released.

                                                                     Indikator som visar om slutaren är spänd eller ej.
                                           Om  filmuppvridningsarmen  drages utåt en  smula,  blir  det
                                                                                           lättare  att  sätta fingret på armen. Vrid filmuppvridningsar-
                                                         men  till den stoppar. Därvid har filmen transporterats framåt
                                                                     en   bild.  Dessutom  har  slutaren  spänts.  Samtidigt  höjes
                                                                         bildräknarens  tal med ett, och indikatorn (17) som visar att
                                                                             slutaren  är  spänd,  växlar  erån  röd   till  grön.  Härvid  är
                                                                     filmframdragningen  klar.  Efter  att slutaren nedtryckts kan
                                                                 armen spännas igen.
22
View original page 23Page 24 · Read text
www.butkus.us
                                                             Halter für  Filmtyp-Kontrolle

                                                              Als  eine  Information  über Marke und Typ  des  in  Ihre
                                                    Kamera  eingelegten Films und seine DIN-Filmempfind-
                                                                           lichkeit, schneiden Sie den Deckel der Schachtel, in der die
                                                                Filmpatrone  geliefert  wird, ab und  schieben  ihn  in den
                                                                 Halter für Filmtyp-Kontrolle (40) ein.


                                                   Repère du film utilisé

                                                            Pour se rappeler le type du film et sa sensibilité ASA, retirerFilm-Type Reminder Slot
                                                         un volet de la boîte d'emballage du film utilisé et l'inserrer
To take note of the name and type of the film loaded in                                                                sous le presse-note qui sert du repère. On peut également y
your camera and its ASA film speed, cut off the flap of the                                                                           inserrer un morceau de papier sur lequel on aurait inscrit
film  cartridge  box  and   insert   it  into  the  Film-Type       des informations nécessaires.
Reminder Slot (40). A small sheet of note may be inserted,
instead.

                                                    Fack för filmtypsanteckning

                                      Om Ni vill komma ihåg namn och typ av den film som finns
                                                                                                      i kameran kan en del av filmasken klippas ur och föras in i
                                                                         facket. Här kan även anteckningsblad insättas.
View original page 24Page 25 · Read text
SHUTTER                               OBTURATEUR
   A shutter  is designed to control the amount of light reaching      Le rôle de l'obturateur est de contrôler la durée d'exposition
      the film surface in terms of time and photographically to fix       du film en fonction de la vitesse de déplacement du sujet. Il
     an image  of a  subject on  it. The  shutter  speed  scale  has       peut également limiter  la quantité de lumière atteignant  la
      calibrations of B and 1 to 1/1000 sec. and the denominator        surface du film. L'échelle des temps de pose  est graduée B
      of each  speed  is  indicated on  the  shutter speed  dial. The        (pose en un temps) et de 1 sec. au 1/1000è de seconde, dont
      shutter speed may be adjusted simply by bringing a reading in         les dénominateurs sont indiqués sur le sélecteur des temps de
      line with the index mark.                                               pose. Il suffit de porter le chiffre devant le repère.
       •  Shutter  speed  calibrations  are  also  visible  in  the view-         •   L'échelle des temps de pose se voit également à l'intérieur
         finder,  thus  making   it  possible  to  ascertain  the  speed         du viseur, ce qui permet de vérifier la vitesse pendant la
         while looking through the viewfinder.                                      visée.
       •  "B" stands for time exposure and  is used when there is         •  La  lettre "B" indique  la demi-pose, celle-ci est utilisée
          the need for the exposure of over one second. (Page 58).         pour un temps de pose de plus d'une seconde (voir page
       •  The red figure of "125" is the maximum shutter speed for           59).
        synchronization with an electronic flash.                                •  Le chiffre rouge "125" est le temps de pose limite pour
       .  •  Do  not  turn  the  shutter  speed  dial when  the  shutter           synchronisation avec des sources de lumière électronique.
        button is depressed.                                                          •  Ne  pas  tourner  le  sélecteur  tout  en  appuyant  sur  le
                                                                     bouton de déclenchement.

   VERSCHLUSS                             SLUTAREN
     Der Metallschlitzverschluss der KONICA Autoreflex-T3  regelt        Slutarens funktion är att tidsmässigt reglera mängden av det
     die Belichtungsdauer     des Filmes. Verschlusszeiten von l bis      ljus som når filmen, och vilket fotografiskt fäster motivet på
     1/1000 Sekunde und B können eingestellt werden. Auf dem        den.  Slutarskalan  omfattar  "läge  B"  samt  tiderna  från   l
     Verschlusszifferblatt  ist jeweils nur der Nenner des Bruch-       sekund   till  1/1000  sek.  Tiden  avläses på  slutarskalan och
       teiles der Verschlusszeit angegeben (z.B. 60=1/60 Sekunde).          ställs  in genom  att ni vrider ratten  till dess den  slutartid  ni
     Die Verschlusszeit wird durch Drehen des Einstellrades (20)       bestämt er för kommer mitt för avläsningsmärket.
      festgelegt.  Die  eingestellte  Verschlusszeit  sehen  Sie sowohl         •  Slutartiden kan  också  ställas  in medan man betraktar
    am  Index  des  Verschlusszeitenrades  als auch im  Sucher          motivet genom  sökaren.
      eingespiegelt.  Sie können die Verschlusszeit einstellen, wäh-         •  "Läge B" används vid exponeringstider över l sekund: (Se
     rend Sie Ihr Motiv durch den Sucher betrachten.                         sidan 59)
       •  Die Einstellung B ist für Zeitbelichtungen von mehr als l          •  Den  röda   siffran  "125"  anger  att  1/125  sek  är  den
        Sekunde,  der  Verschluss  ist  solange  geöffnet wie  der           kortaste  slutartid  som  kan  användas  vid  synkronisering
         Auslöser niedergedrückt wird (siehe Seite 59).                 med elektronblixt.
       • Die rote Zahl l25   entspricht l /l25  Sekunde. Bis zu dieser         •  Försök  inte  vrida  slutarskalan  när  slutarknappen  är
         Zeit ist die Camera für Elektronenblitze über den X-Kon-          nedtryckt!
          takt synchronisiert.
      •  Drehen  Sie die Verschlusszeiteinstellung nicht während
         der Verschluss abläuft.
24
View original page 25Page 26 · Read text
LENS INTERCHANGE                          www.butkus.us


To Dismount the Lens:  While  the  Lens  Release Button       (27), tourner la partie chromée de l'objectif dans le sens
(27)   is  depressed,  grip  the  lens  barrel  and  revolve   it        inverse de la rotation des aiguilles d'une montre. Lorsque le
counterclockwise. Pull out the lens when the red dots of        point rouge de la monture coïncide avec celui du corps de
the barrel and camera have been aligned with each other.            l'appareil, l'objectif peut être dégagé.
To Mount a Lens: Bring the red dot of the lens in line with      Pour monter  l'objectif:  Inversement,  faire  coïncider  les
the lens mount index mark (red dot) on the camera body       deux points rouges, introduire sans forcer l'arrière de la
and gently sink the lens barrel into the camera. Grip the      monture dans  le corps de l'appareil. Tourner légèrement
lens barrel and turn it clockwise until it clicks into position.         l'objectif dans le sens des aiguilles d'une montre judqu'à ce
                                                                              qu'il se verrouille.
OBJEKTIVWECHSEL
Um  das  Objektiv  abzunehmen,  greifen  Sie  es  an  der    ATT BYTA OBJECTIV
gerändelten Fassung, drücken den Knopf (27) und drehen     Hur man  tar  loss  ett  objektiv:  Medan  ni  trycker  ner
es entgegen dem Uhrzeigersinn. Sobald sich der rote Punkt       lösgörningsknappen  till objektivet (27) fatta om den räff-
am  Objektiv  mit dem roten Punkt am Cameragehäuse        lade  delen och vrid motsols. Dra bort objektivet när den
deckt, lässt sich das Objektiv aus der Fassung herausnehmen.      röda punkten på  objektivet och den röda punkten på
Zum Einsetzen des Objektivs bringen Sie den roten Punkt      kamerahuset kommit mitt för varandra.
am  Objektiv  mit dem  roten Punkt an  der Camera zur     Hur man sätter fast ett objektiv: Placera den röda punkten
Deckung, stecken das Objektiv  in die Fassung und verrie-       på objektivet mitt för lösgörningsmarkeringen (röd punkt)
geln es durch Drehen im Uhrzeigersinn bis es einrastet.            på  kamerahuset  och   låt  objektivet  sakta  sjunka  ner   i
                                                              kamerahuset. Fatta om den räfflade delen av objektivet och
CHANGEMENT D'OBJECTIF                                  vrid  det  medsols    till  det   fastnar.  Ett  klick  hörs  då
Pour démonter l'objectif: Presser le bouton de verrouillage      mekanismen kommit i rätt läge.
View original page 26Related documents and language editions
From the M. Butkus archive. Original publisher and archive notices are retained.
Check the model and edition against your equipment.
PDF verified 2026-10-10.