Film cameras
Kookie Kamera User manual
User manual for Kookie Kamera. 15 pages in English. Read the original PDF, download or print a copy without registration.
15 pagesEnglish4.4 MB PDF
Loading your manual…Open PDF directly
Document details
- Brand
- Kookie
- Model / document
- Kookie Kamera
- Document type
- User manual
- Language
- English
- Pages
- 15
- File size
- 4.4 MB
- Category
- Film cameras
- Document date
- Not specified in catalog
Search available document text
Find a term, then jump to its page in the original PDF. Image-only pages may not be searchable; check the PDF for exact wording and diagrams.
Page 1 · Read text
www.butkus.us           \q+
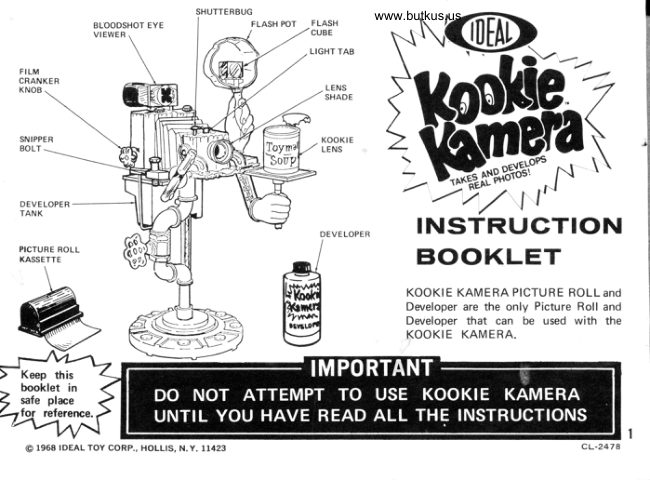
FILM
CRANKER
KNOE


SNIPPE
EOLT -


DEVELOPER              )ry;J"\_iTANK
                      INSTRUGTION
PICTURE ROL!
KASSETTE                   BOOKLET

                                                    KOOKIE KAMERA PICTURE ROLL and
                                                                  Developer are the only Picture Roll and
                                                              Developer that can be used with the
                                               KOOKIE KAMERA.      6€z
Keep this
booklet in
safe place
     reference.

 @) 1968 |DEAL TOY CORP., HOLL|S, N. y. r1423
View original page 1Page 5 · Read text
HOW TO TAKE
PICTURES
             On sunny days push the LIGHT
            TAB down as far as               LIGHT
              on cloudy days lift TAB up as      TAB
                     far as it will go.                    I l,/
                                                 \(4lvi
   SHUTT E R BUG


FOR BEST RESULTS:

                                                        picture.A  Always have the sun behind you when taking a
B To TAKE PICTURE: Sight person (place or thing) through
  BLOOD SHOT EYE Viewer, HOLD KAMERA STEADY
   and GENTLY press SHUTTERBUG down.

                                                                                7.C After taking picture, follow directions on pages 6 and
                    IMPORTANT NOTES
           WHEN TURNING CRANKER KNO8, MAKE SURE
             SNIPPER BOLT IS PULLED OUT AS FAR AS IT
              WILL GO OR PICTURE PAPER WILL NOT ENTER
             DEVELOPING TANK.
            BEFORE REMOVING TANK,MAKE SURE SNIPPER
            BOLT IS PUSHED IN AS FAR AS IT WILL GO OR
              PICTURE PAPER IN KAMERA WILL BE EXPOSED.
View original page 5Page 6 · Read text
www.butkus.usHOW TO TAKh,
PIGTURES
                     lf  picture develops too dark, lift
             LIGHT TAB as far as it will go;if     LIGHT
                too   I  i sh t p, sn T4--e-6iiiiET?6i      TAB
                                                          t/-                                                                    \()'1
                                                     \to4SHUTT E RBUG                                lc{


FOR BEST RESULTS:
A Have ample house lights on when taking Oilures indoors
    with Flash Cube.                                ,
B We recommend "G,E." flashcubes for use with KOOKIE
   KAMERA when taking flash pictures.
C TO TAKE PIcTURE: Sight person (place or thing) through
  BLOOD SHOT EYE Viewer, HOLD KAMERA STEADY
   and GENTLY press SHUTTERBUG down.
D Refer to ASSEMBLY INSTRUCTION SHEET for F|ash.
  CUBE and BATTERY INSTALLATION instruction.
IMPORTANT: Always turn FLASHCUBE to unused portion
before taking Picture. After taking Picture, develop as directed
on pages 6 and 7.
View original page 6Page 7 · Read text
FOR BEST PIGTURE RESULTS

TEMPERATURE                        2A-SMake sure that Picture Roll and Developer are at room
temperature (650-750) for at least one day beforeusing.                                                                  )                                                       t?--On extremely hot days (over 75o), pictures will de'
velop in less than 3 minutes.
On cold days (under 650) pictures will develop in
more than 3 minutes.
DISTANCE
Subject should be NO CLOSER to Kamera lens than
3 FEET. Best distance is between 3 and 4 feet.                www.butkus.us
LENS CARE
Always make sure that the LENS on the KAMERA   HOLD STEADY
and KOOKIE LENS are clean. Remove any dirt or lint  AND PRESS DOWN
by gently rubbing lens with a soft cloth. Don't put  SHUTTERBUG IT
your fingers on the lens.                                                                                                                                        I
EASY DOES IT!                          A simple, numbered, step by step                                                                guide fortaking pictures  is locatedAlways try to hold KAMERA steady and gently     on the back of the Kookie Kamera
push down on SHUTTERBUG when taking PICTURE.       for your convenience.
                        CAUTION
  The Developing Solution is specifically  I while non-toxid: is not intended for in'
  designed for use with Kookie Kamera I ternal consumption. Do not swallow. lf
                                                                            and   Picture Roll. For best results developer  I taken internally will cause nausea
                                                              spilled will stain. Wash  should be used at normal room tempera-  I discomfort. lf
   ture (not lower than 650). This solution,  I area immediately with soap and water.
                       to the detinitron of the Federal Hazardous Substance Labeling Act.
View original page 7Page 8 · Read text
www.butkus.us HOw ro DEVELOP      PIGTURES                lo0h

Pull SNIPPER BOLT out. You will now               To advance picture into developing tank
be able to advance picture into tank.                           pull CRANKER KNOB out and make a
                                                    1/4 turn clockwise, release KNOB and
                                                          continue to turn clockwise slowly until
                                       KNOB snaps in and will go no further.


                            \-|.
                                                                                                www.butkus.us


 Turn 3 MINUTE TIMER so SAND                          Gently shake TANK from side to
 begins to flow from the top into the                              side until all the SAND has reached
 bottom.                                                     the bottom of the TIMER
                                                               {3 minutes).
View original page 8Page 12 · Read text
www.butkus.us

    HOW TO USE "KOOKIE KAMERA"
    PICTUR E ROLL AND IJEVELOPER
  FOR BEST
   PIC]'I.JRE RHSUL'TS


TEMPERATURE
Make sure thal Ptcturo Roll arrd Dcveloper are at room
t{:ml)€rature  (65() i5o) lor al leasl one day balore
usr n g.
On extrerncly  lrot days (ovcr 750), picltrres will de'
velolr in lcss tl)all 3 trit)ult's.
Orr colrl tlays (rrrrticr iiSo) lrictures will develop in
flt(Jrc than 3 minutes.
t)ISTANCE
Srrbject shoulti be NO (;L(lSI n lo Katnera  lelts than
3 FEET, Best (ltstance i5 bi:lw{)crl:}  ancl 4 teet.
I.ENS CARE
Always make sure that tlrc' t Ii!l;  ol1 the KAMLRA     l-l()LO STEADY
dnd KOOKIE [.ENS ard t:lean. Hotttovc any dirt or lint     AI..ID PR€SS T,()IryN
t)y gently rubbing lens v/ttll  .t soll clolh. Don't put     SI,I Ul TE F I]UG
youl fingers on  ll)('  l('lrs,
EASY DOES IT!
Always try  lo  lrolrl KAMI llA  sieady and gently
otrsh <lown on SH U T'l  t: H Bt,(i whon laking PICTUR E.
View original page 12Page 15 · Read text
al   Push SNIPPER BOLT in     and leave in. This cuts lead    O i:il:,:',tK'.',Hl--                                     KAMERA.paper-    from roll and serves as light
seal to protect paper in Kamera.


       Graspins                   PAPER,            LEAD  fll
        press one                  of the TANK V                   Q   nurove PLUG on TANK.
 TOP BUTTONS down then
 remove and di*ard LEAD
 PAPE R.
            LEAD
            PAPER

                TANKW


      Puncture seal on bottle                       fll   neptace TANK onto Kamera with ano fill TANK with DEVEL-        V  CLAMP towards front. Swing
 OPER while holding a TANK            CLAMP into notch on bottom of TANK
 BUTTON down. Tightly cork
 PLUG into TANK.                      TANK

                                   CLAMP
                                        CAUTION:
                                  DO NOT TILT TANK
                                  WHEN REPLACING
                                   ONTO KAMERA.

                                  KQOTIE KAM€RA IS rcW                            .d                             nedov ro rAKE ptcrunEs
View original page 15From the M. Butkus archive. Original publisher and archive notices are retained.
Check the model and edition against your equipment.
PDF verified 2026-10-10.