Film cameras
Kowa KALLOFLEX Automat K2 User manual
User manual for Kowa KALLOFLEX Automat K2. 16 pages in English. Read the original PDF, download or print a copy without registration.
16 pagesEnglish1.1 MB PDF
Loading your manual…Open PDF directly
Document details
- Brand
- Kowa
- Model / document
- Kowa KALLOFLEX Automat K2
- Document type
- User manual
- Language
- English
- Pages
- 16
- File size
- 1.1 MB
- Category
- Film cameras
- Document date
- Not specified in catalog
Search available document text
Find a term, then jump to its page in the original PDF. Image-only pages may not be searchable; check the PDF for exact wording and diagrams.
Page 2 · Read text
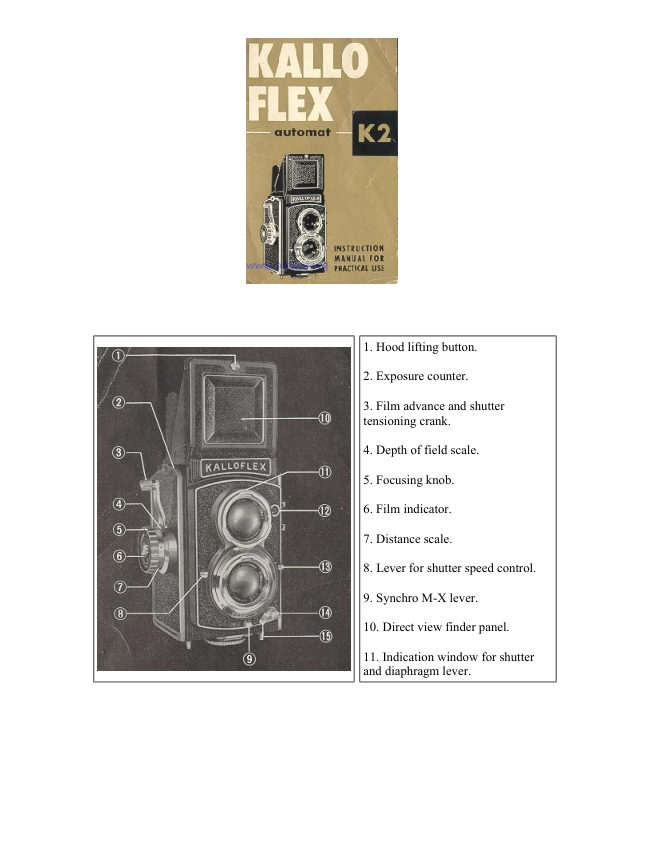
1. Hood lifting button.

2. Exposure counter.

3. Film advance and shutter
tensioning crank.

4. Depth of field scale.

5. Focusing knob.

6. Film indicator.

7. Distance scale.

8. Lever for shutter speed control.

9. Synchro M-X lever.

10. Direct view finder panel.

11. Indication window for shutter
and diaphragm lever.
View original page 2
Page 3 · Read text
12. Flash cable socket.

                              13. Lever for diaphragm control.

                              14. Shutter release button.

                              15. Shutter release guard.

                              16. Tripod socket. Back lock.

                              17. Winding key for take-up spool.

                              18. Eyelet slot for neck strap.

                              19. Take-up spool knob.

                              20. Red mark for loading film.

                              21. Accessory clip.

                              22. Film spool knob.

                              23. Film pressure plate.

                              24. Anti-reflection baffle.


KALLOFLEX INSTRUCTIONS MANUAL FOR PRACTICAL USE


                Your KALLO FLEX CAMERA is a precision-engineered
                   instrument that will give you many years of plea sure. You
                     will find that your KALLO FLEX is faster to operate (a
                    single lever stroke advances and counts your film, winds
                 and winds the shutter), easier to operate (all your settings
                    are viewed from the top,,, you never have to remove the
                 camera from its shooting position.

                Your KALLO FLEX CAMERA contains the finest optical
                     system... highly color corrected, 4-element, 75 mm f 3.5
                 Taking-Lens with an amazing resolving power of 125
                  Lines per millimeter wide open.

                The exclusive, KALLO FLEX convex ground glass makes
                  your picture simpler and surer.., the focusing screen
                    actually gives you up, to 50% brighter center image and 5
                   times brighter image at the edges.
View original page 3Page 5 · Read text
B. Taking the picture


                                                          1) Remove the lens cap by
                                                                     lifting it away from the
                                                   bottom lens with your finger
                                                                 nail and then turn counter
                                                        clock wise about a quarter
                                                            turn to release the upper part
                                                  from the upper lens bayonet.

                                                          2) Erect the focusing hood
                                                by moving button (1) in the
                                                             direction of the arrow.


3) Raise the magnifier to assist critical focusing by use of the finger nail. To close the magnifier, push it down
until it snaps into position. Do not touch the lens itself in these operations since it is difficult to focus the camera
if the magnifier lens is dirty. Always clean loses with optical lens tissue.

4) To use the Direct view sports finder at eye level, push in panel (10) until it snaps into place. Be sure to raise
the magnifier before you attempt to push in panel. To close the sports finder, press the back release located
behind the viewing hood to your right.


                                                       5) To focus the camera, turn the
                                                     focusing knob (5) forward or
                                                  backward. You will observe
                                                             that the image becomes sharp
                                                and unsharp as you do this.
                                      When image appears sharpest
                                              on the ground glass, the camera
                                                                     is in focus.

                                            The magnifier enables you to
                                                         get the sharpest possible
                                                         focus. Since the two lenses
                                                       operate together, the taking lens
                                                                     is properly focused when the
                                                 ground glass image is sharp.
                                            The Kallo flex camera
                                                        incorporate an exclusive
                                                     focusing design in its ground
                                                              glass.


The glass has a convex slope that permits the photographer to view his subjects without bending over the
camera or tilting it. This convex glass also provides a brighter picture area.

6) Center your subject in ground glass, using hairlines on the ground glass to center and compose your picture.
What you see on the ground glass will be on the film. Hairlines will enable you to compose your picture either
View original page 5Page 6 · Read text
for horizontal or vertical format in enlarging.

Center square made by hairlines also makes it possible for you to compose the picture for 2,X 2" slide.

Inexpensive paper mounts for 2" X 2" slide from 120 Roll film can be obtained at any photographic store.

7) The Kalloflex does not require any mechanical compensation for Parallax adjustment. The slope of the
Ground Glass and the design of the viewing system eliminate the possibility of cutting off heads in closeups of
people. This is accomplished by our taking off a very small area from the part of the Ground Glass where this
difficulty would ordinarily occur.


                                                    8) Setting the Diaphragm - The maximum lens
                                               opening of the picture taking lens on this camera
                                                                 is F3.5. This is a measure of the ratio of the
                                                 diameter of the lens to the focal length of the
                                                          lens. It is a measure of the amount of light that
                                               can pass through the lens. The lens openings can
                                                      also be set to F 4, 5.6, 8, 11, 16, 22 each setting
                                                     closes down the lens opening by about half the
                                               amount. F/11 permits half the light allowed by
                                         F8 to pass through the lens. The diaphragm lever
                                                    (13) sets the lens openings. You will notice that
                                                      there is a click stop for each setting, permitting
                                           you to change lens settings in dim light or
                                                 without looking at the window (11) where the
                                                         setting is shown.


9) Setting the Shutter Speeds - The Seikosha MFX shutter permits a full range of shutter - speeds to be used. It
also has click stops that will show the setting in the window (11).

The shutter speeds are B. 1, 2, 5, 10, 25, 50, 100, 250 and 500. To change from one speed to another, move
lever (8).


                                                 10) To snap the picture, hold the camera so that
                                                                               it sits snugly in the palm of your left hand with
                                                your left forefinger or thumb over the Shutter
                                                 Release Button (14). Using your right hand to
                                                      turn your Focusing Knob (5) you're ready to
                                                     take your picture instantly. Merely press gently
                                            on the shutter release button. If the button does
                                                   not depress, check to see whether the shutter
                                                       release guard (15) has been set to prevent
                                                      accidental exposures. Move it to the other side
                                                        in that case. If the film has not been wound, then
                                                      the shutter is not set and the picture cannot be
                                                  taken until the film is wound by moving crank
                                                        (3) forward until it stops and then back until it
                                                         stops.
View original page 6Page 7 · Read text
| Summary of operating procedures |

1. Set the lens opening and shutter speeds for the proper exposure
2. Focus the camera
3. Take the picture
4.- Wind the film, setting the shutter


                                            If the film has been wound, the shutter can be
                                     released, If the shutter cannot be released, the film
                                has not been advanced. When winding the shutter
                              and advancing the film the operation is a motion
                                forward of crank (3) until it stops and then a motion
                              back again until it stops. With each exposure, the
                             amount of crank travel decreases gradually to about
                                     half a turn.

                                  After the 12th and last exposure, several complete
                                forward turns will wind off the paper backing of the
                                  film and the number "O", will appear in the exposure
                                 counter window.


C. Setting the Aperture & Shutter Speed

1) The correct exposure is achieved by the proper setting of the lens opening (diaphragm) and the shutter
speeds. A good basic exposure to use in outdoor pictures in sunlight is at 1/50 second. The use of an exposure
meter or following the instructions that come with your film will be helpful in getting properly exposed
negatives. If the light is less bright, as on the shaded side of a street, open the lens one stop to F8 leaving the
shutter at 1/50 second. If the light is brighter than average, as at the beach or in the mountains or on the water,
close down the lens one stop to F 16 with the shutter left at 1/50 second.
In very dim light, pictures can be obtained with the new fast films at f3.5 and 1/50 second. An exposure meter is
needed for such dim light conditions.

2) Shutter speeds of 1/100, 1/250 and 1/500 are used to stop fast action if pictures are taken of fast moving
objects or sporting events. Since the amount of light is cut clown by faster shutter speeds, the lens opening has
to be opened to obtain equivalent exposures.
Shutter speeds can be changed even after the film has been wound and the shutter set.

The exception to this is the speed of 1/500 second. You cannot move to this speed after the shutter has been
wound.


                    Diaphragm       3.5    4     5.6    8    11    16    22

                      Exposure        3/8    1/2    1     2     4     8    16
View original page 7Page 8 · Read text
3) The Kallo flex camera can
                        be used with a Leica type
                           cable release which fits over
                            the shutter release button
                              (14). To take a time exposure,
                               set the shutter to B (Bulb)
                       which causes the shutter to
                         remain open as long as
                           pressure is maintained on the
                             shutter release, press the
                             shutter release and swing the
                          safeguard release to locked
                             position. To close the shutter,
                        swing the release guard down
                             to the inside position.


          4) Intentional double exposures are possible. To
           reset the shutter without advancing the film,
         push down the release button at the back of
         Focusing knob and turn the crank
         counterclockwise (backward) one full turn.


5) To take your own picture, attach a separate Self-Timer
to the shutter release, using a Leica type adapter. The
model with the curved stem will not get in the way of the
lens.

The Self Timer lets you get into the picture even if taken
by flash or strobe lighting.
View original page 8Page 9 · Read text
6) To remove the front hood of case hold camera in a
picture-taking position, with hood open. Grasping hood
near the Metal hinge, pull to the left so that the hinge
disengages. To replace hood, engage hinge at the right
side, pull toward the left so that you can engage left side
of hinge. (see illustration)
View original page 9
Page 10 · Read text
D. Depth of Field Scale


                                       The purpose of a diaphragm is not only
                                                   to adjust the amount of light that
                                               passes through the lens but also to
                                                 control the depth of field. When a
                                                    certain point is focused upon, a certain
                                                area before that point and behind that
                                                 point will also be in sharp focus.

                                       The zone of sharp focus depends upon
                                                 the distance from the point focused
                                        upon and the F stop used for the
                                              exposure. The smaller the F stop the
                                                  greater the depth of field. The further
                                                 the distance focused upon the greater
                                             depth of field. The 2 diaphragm scales
                                          above the focusing knob indicate the
                                                 extent of the depth of field for any
                                             focused distance or desired stop.
View original page 10Page 11 · Read text
Hyper focal Distance When
                                                              your camera is set for infinity,
                                                          what the nearest distance that
                                                                                    is sharp ? Hyperfocal distance
                                                                        for this camera is as follows:

                                                   F 3.5     108.7'
                                                   F 4      101.3'
                                                   F 5.6     71.8'
                                                   F 8       50.4'
                                                   F 11      36.8'
                                                   F 16      25.3'
                                                   F 22      18.5'


If you focus your camera on the Hyper focal distance, everything from half of the distance to infinity will be
sharp.

For example, we are taking pictures outdoors at F 8. The Hyperfocal distance is 50'. Set your camera for 50' at
F 8, now everything will be in sharp focus from 25' to infinity. At F 16, set your camera for 25', the distance
from 12' to infinity will be sharp.


E. FLASH PHOTOGRAPHY

In modern flash photography the camera shutter takes over the task of firing the bulb electrically at the right
moment. The Seikosha-MX shutter in the KALLOFLEX is for this purpose, equipped with MFX contacts. This
enables adjustment to the required delay of the flash lamps should be synchronized to all shutter speeds by
means of changing lever.
View original page 11Page 12 · Read text
1. X- Contact
This is used for an electronic or strobe flash unit with zero delay. The flash goes off as soon as the shutter
blades reach full opening.
Since the duration of the flash itself is actually shorter than and shutter setting, any shutter speed may be
selected, but it is advisable to use a speed of 1/100 second.

2. F-Contact
This is applicable to F-Class bulb, and is made approximately 5 milliseconds, before the shutter blades are fully
opened.
F-Class bulb is comparatively low in its illumination power so it is most suitable to use in ordinary room or in
your home at about 15 feet.

3. M-Contact
This is applicable to M-Class bulb which has a considerably higher power illumination and a long light duration
as illustrated. The contact is made approximately 20 milk-seconds before the shutter blades reach full opening.
The intensity of flash illumination decreases according to the square of the distance, therefore the distance from
flash to subject must be carefully measured in selecting diaphragm opening.
Lamp manufacturers will supply guide numbers to use which are divided by the distance in feet to get the
required diaphragm opening.

The last but not least. Never forget to attach a lens hood in flash photography.
View original page 12
Page 13 · Read text
F. TO USE FILM REMINDER DIAL ON FOCUSING KNOB

Center scale indicates type of film you cite using, and is adjusted by turning protruding pins on dial face. To set
the proper ASA film speed on the outer dial, press knurled rim down, by pushing at opposite edges of the rim,
which turning to the film speed desired.


                         The film speed in ASA shown in numbers on the disk, 8, 10, 12, 16,
                               25, 32, 40, 50, 100, 160, 200, and 400. While the type of film is
                                  classified in Ortho, Pan, D. Col, T Col, and I.R.

                          D. Col. - Daylight color film.

                              T. Col. - Tungsten color film.

                                             I. R. - Infrared film.


                   COMPARISON TABLE OF FILM SPEEDS


   ASA              8    10   12   16   25   32   40   50   100   125   160   200

   WESTON          6    8    10   12   20   24   32    40    80   100   125   160

    DIN              11   12   13   14   16   17   18    19    22    23    24    25

     Exposure Ratio      6.5   5    4    3.5   2   1 2/3 1 1/3   1     1/2    3/5    1/3    1/4
View original page 13Page 15 · Read text
Kallo 2 way electronic flash


1 ) KALLO Lens Hood; which is fixed securely by means of its bayonet mount, and prevents stray light from
reaching the lens. Especially it will be essential for your synchroflash takings.

2) KALLO Filters; which is attached by means of its bayonet mount, and will insure you to take better pictures.
They are classified as follows:

Yellow Filter
Absorb ultra-violet and some blue-violet rays. It is suitable for landscape or portrait use outdoors. Especially
never fail to use it for such as a scenery of beach, a landscape of snow etc. that reflection of the light is
particularly strong.
( Exposure factor: 1.5 x~2 x)

Orange Filter
Absorbing ultra-violet, violet, blue, and green rays it is used far darkening the blue sky to emphasize cloud
effects, as sometimes called a ''contrast filter''. Moreover, it will exhibit much remarkable effects in the case of
taking pictures with infrared films.
(Exposure factor: 2.5 x~3 x)
View original page 15
Page 16 · Read text
Ultra Violet Filter
Absorbing the greater part of the ultra-violet and some blue-violet rays, it is sometimes called " haze filter''.
When photographed without this filter, the haze--a large amount of ultra-violet rays--hides same of the detail
visible in the original scene. In using color film, this filter will bring out the most natural color rendition.
(Exposure factor: 1 x~1.2 x)

Kowa Optical Works - Kofuku Sangyo Co, LDT.
View original page 16
From the M. Butkus archive. Original publisher and archive notices are retained.
Check the model and edition against your equipment.
PDF verified 2026-10-10.