Film cameras
Kowa Komaflex-S camera User manual
User manual for Kowa Komaflex-S camera. 11 pages in English. Read the original PDF, download or print a copy without registration.
11 pagesEnglish2.3 MB PDF
Loading your manual…Open PDF directly
Document details
- Brand
- Kowa
- Model / document
- Kowa Komaflex-S camera
- Document type
- User manual
- Language
- English
- Pages
- 11
- File size
- 2.3 MB
- Category
- Film cameras
- Document date
- Not specified in catalog
Search available document text
Find a term, then jump to its page in the original PDF. Image-only pages may not be searchable; check the PDF for exact wording and diagrams.
Page 2 · Read text
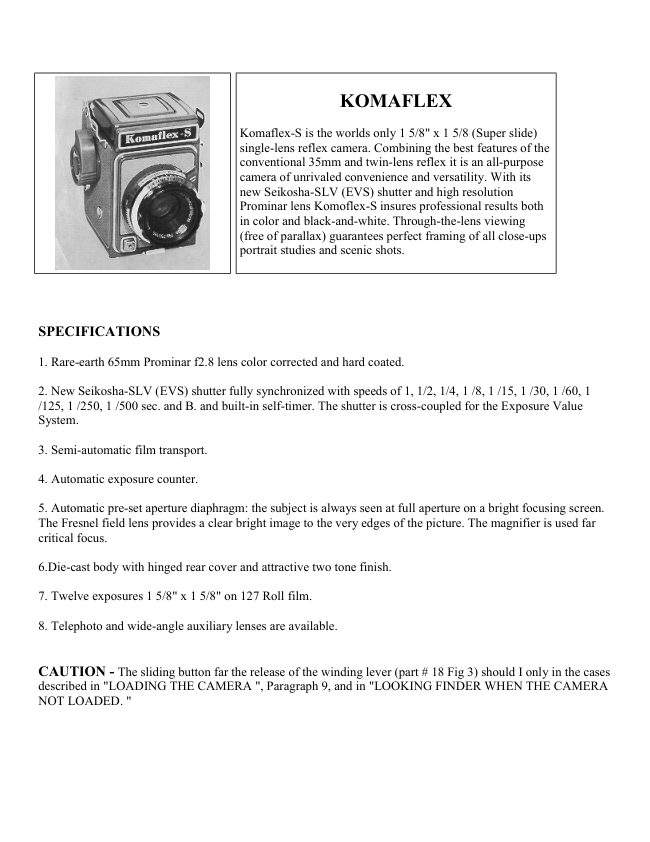
KOMAFLEX

                                Komaflex-S is the worlds only 1 5/8" x 1 5/8 (Super slide)
                                        single-lens reflex camera. Combining the best features of the
                                     conventional 35mm and twin-lens reflex it is an all-purpose
                                 camera of unrivaled convenience and versatility. With its
                             new Seikosha-SLV (EVS) shutter and high resolution
                                  Prominar lens Komoflex-S insures professional results both
                                         in color and black-and-white. Through-the-lens viewing
                                          (free of parallax) guarantees perfect framing of all close-ups
                                           portrait studies and scenic shots.


SPECIFICATIONS

1. Rare-earth 65mm Prominar f2.8 lens color corrected and hard coated.

2. New Seikosha-SLV (EVS) shutter fully synchronized with speeds of 1, 1/2, 1/4, 1 /8, 1 /15, 1 /30, 1 /60, 1
/125, 1 /250, 1 /500 sec. and B. and built-in self-timer. The shutter is cross-coupled for the Exposure Value
System.

3. Semi-automatic film transport.

4. Automatic exposure counter.

5. Automatic pre-set aperture diaphragm: the subject is always seen at full aperture on a bright focusing screen.
The Fresnel field lens provides a clear bright image to the very edges of the picture. The magnifier is used far
critical focus.

6.Die-cast body with hinged rear cover and attractive two tone finish.

7. Twelve exposures 1 5/8" x 1 5/8" on 127 Roll film.

8. Telephoto and wide-angle auxiliary lenses are available.


CAUTION - The sliding button far the release of the winding lever (part # 18 Fig 3) should I only in the cases
described in "LOADING THE CAMERA ", Paragraph 9, and in "LOOKING FINDER WHEN THE CAMERA
NOT LOADED. "
View original page 2Page 4 · Read text
17. Shutter winding lever

       18. Sliding button for the release of shutter winding lever

       19. Automatic exposure counter

       20. ASA Exposure Index recording disc

       21. Focusing ring

       22. Rear cover

       23. Rear cover lacking disc

       24. Film number window


25. Film chamber

26. Take-up spool

27. Reflex mirror

28. Film pressure
plate

29. Spool knob
View original page 4Page 5 · Read text
www.butkus.us


LOADING THE CAMERA CAMERA
Komoflex S uses 127 roll film color or black-and-white. When loading always avoid direct sunlight.


                                          1. Rotate the locking
                                       disc of the rev cover
                                        in the direction of "0"
                                       (open). (Fig.6)

                                          2. Raise the loosened
                                    lock and open the rear
                                      cover. (Fig. 7)


                                          3. Put the empty spool in the take-up chamber while pulling
                                     out the spool knob. (Fig. 8)

                                          4. Break the seal of the film and place the roll in the film
                                  camber.

                                          5. Slip the end of the film into the longer of the two slob of
                                       the empty spool (Fig.9) holding the roll rightly to prevent it
                                from loosening and being careful not to unwind too much
                                      paper.
View original page 5Page 6 · Read text
6. Start to wind a little
film on the take up
spool by slowly
working the film
winding ratchet knob
while checking to see
that the film is
correctly loaded.
(Fig.10).

7. Grasp the rear
cover and rotate the
locking disc in the
direction of "C"
(close). This
completes the loading
of the film.


8. Unmask the film
number window by
turning the adjacent
knurled knob in the
direction of the arrow
(Fig 11) . Work the
film winding ratchet
knob as many times
as necessary until
number 1 appears in
the film window. If
the knob stops
working before
number 1 appears in
the window do not
force it but press
shutter release button.
Now repeat this
operation until
number 1 Appears in
the window.
View original page 6
Page 7 · Read text
www.butkus.us


                                          9. Slide the button for the release of the shutter winding lever
                                 back all the e way and a red triangular mark will appear in
                                       the exposure counter. (Fig. 12)

                                      10. Operate the ratchet knob until it stops. Number 1 will
                                    appear in the exposure counter (Fig.13). Your camera is
                                   loaded and ready far the first exposure.

                                      11. As soon as the film has been loaded it is advisable to set
                                       the ASA Exposure Index of your film on the recording disc
                                      located on the winding knob.


LOOKING INTO THE FINDER WHEN THE CAMERA IS HOT LOADED
Turn the film winding ratchet knob one full turn to bring down the mirror. Slide the button for the release of the
shutter winding lever back all the way hold it there and wind the shutter by pushing the lever down as far as it
will go. You con now look into the finder.


CAUTION
Do not force the lever. If the release button is not held all the way back, damage will result from exerting
pressure on the lever.

FOCUSING AND SHOOTING


                                                           l. Open the finder cover
                               by lifting up the rear
                                     edge. (Fig.14)

                                          2. Operate the film
                                  winding ratchet knob
                                           until it stops (more than
                                 one turn will be
                                       necessary). This will
                                  advance the film one
                                  frame and lower the
                                        reflex mirror.

                                          3. Wind the shutter by
                                   pushing the shutter
                                  winding lever as far as it
                                        will go (Fig.15). The
                                 diaphragm is now at full
                                      aperture and the image
                                    appears on the screen.
View original page 7Page 8 · Read text
4. While looking into the screen turn the focusing ring until the subject
                                   is at its sharpest. (Fig.16).

                               5. When the shutter release button is depressed to take a photograph the
                        diaphragm closes to the pre-set aperture the reflex mirror retracts and
                            the shutter operates at the pre-set speed instantly and automatically.


                                       6. The view finder image
                                            is literally full-size. What
                              you see in the finder is
                                    exactly what the film
                                       registers always free of
                                      parallax.

                                       7. For hairline focusing
                                 use the magnifier. Press in
                                    the top port of the direct
                              view finder frame plate;
                                    the magnifier will
                                   automatically swing into
                                      position. (Fig. 17).


8. To use the direct view-finder frame for rapid eye-level shooting press the frame plate down - flat. The frame
plate can be returned to its original position by slightly pushing inward the sides of the finder cover. (Fig. 18).


DETERMINING THE EXPOSURE
Until the advent of the Exposure Value System (EVS) it was necessary to set the shutter speed and the aperture
separately The EVS system however which has been incorporated in the Komoflex S expresses with one
number the proper relationship between the shutter speed and the aperture for correct exposure. The
conventional methods of setting the speed and aperture separately con of course also be used if so desired.

This camera is so designed that the shutter speed can be changed with the shutter wound.
View original page 8Page 9 · Read text
www.butkus.us

HOW TO USE THE EXPOSURE VALUE SCALE
At the top part of the lens barrel, closest to the camera body, there is a red arrow; next, the shutter speed scale;
next, the Exposure Value Scale, and then the diaphragm scale with a yellow dot under number 8 The range of
the Exposure Value System Scale is from 3 to 18. To determine the proper Exposure Value number far any
scene to be photographed, measure the brightness of the scene with your exposure meter, holding it near the
camera and pointed at the subject. If your meter indicates an Exposure Value of 12, for example, simply set the
yellow dot of the camera diaphragm scale to number 12 of the Exposure Value scale by turning the diaphragm
setting lever.

Your camera is now set so that regardless of the shutter speed you wish to use (within the aperture range of the
lens) the correct corresponding f /number will automatically be positioned. In the case of Exposure Value 12 for
instance the available combinations of shutter speed and diaphragm aperture are: 1/500 sec. at f2.8 I /250 at f4
1/125 at f5.6 1/60 at f8 1/30 at fill, 1/15 at fl6 and 1/8 at f22. (Fig. 1a)

Any of these combinations may be used according to the circumstances and purposes of your photograph with
no change in effective exposure. For instance if you wish to photograph at 1/60 sec. set the shutter speed at the
red arrow by turning the knurled barrel; you will automatically obtain the correct aperture of f 8.


USING THE DEPTH OF FIELD SCALE
The depth of field in any photograph (the area which is in acceptable focus) varies with the aperture used and
the distance from camera to subject.

As shown in Fig. 20 when focusing on a subject 10 feet away with the aperture set at F11 the depth of field
extends from about 8 to 15 feet All objects within this range will be acceptably sharp. The depth of field is
greater as the distance to the subject is increased or the lens aperture is reduced. The depth of field
corresponding to any given aperture and distance can easily be determined by referring to that portion of the
distance score falling between the two figures on the depth of field scale which correspond to the aperture being
used.

HOW TO USE BULB AND SELF-TIMER
Rotate the knurled shutter speed ring until "B" (Bulb) is opposite the red painter. Press the shutter release button
and continue to hold it for as fang a time as you wish to expose. The shutter will close as soon as the button is
released. A tripod and a cable release are recommended when "B" is used. The self-timer is set by making the
synchro-lever to the "V" position prior to winding the shutter. The self-timer allows ten seconds before the
shutter is released.


FLASH PHOTOGRAPHY
Flash is used as the main source of illumination under poor lighting conditions or as a secondary light source
outdoors in daylight to lighten heavy, dark shadows.

The Kamoflex S is equipped with "M" and "X" synchronization. "M" is synchronized at all speeds for
flashbulbs such as No. 5 and No. 25. "X" is synchronized at all speeds and is used for electronic flash. "X" is
also used for cross "F" bulbs. for shutter speeds up to 1/60 sec. "V" (self-timer) is also "X" synchronized.

TELEPHOTO AND WIDE ANGLE AUXILIARY LENS
When compared to the standard lens the telephoto auxiliary lens increases the size of the subject image 1.5
times; the wide-angle auxiliary lens increases the field or angle of view 1.4 times. The auxiliaries are screwed
directly into the standard lens barrel. The Kamoflex-5 being a single-lens reflex needs no mask or other framing
device. The focusing screen shows exactly what the film will record regardless of the lens used.
View original page 9
Page 10 · Read text
HOW TO HOLD THE CAMERA
Be sure to hold your camera steady to avoid blurred pictures.


                                                                      l. Waist-level position. This is the most common
                                              position for a reflex of this type. (Fig 24).

                                                 2. Eye-level position. This position is used for snap
                                                shots. When sighting in the direct view-finder press
                                             the back of the camera firmly against your face.
                                               (Fig.25).


                                                 3. Ground-level position. Steady camera by putting it
                                     on a solid support. (Fig. 26).

                                                 4. Above eye-level position. This position is quite
                                          convenient in shooting over the heads of a crowd.
                                                (Fig. 27).
View original page 10Page 11 · Read text
www.butkus.us


UNLOADING THE CAMERA
After number 12 has been exposed. operate the film winding ratchet knob until there is no more resistance
indicating that the entire film is rolled up on the take-up spool. After removing the film in subdued light it must
be sealed tightly. It is advisable to wrap the exposed film in a light-proof paper such as tin foil.

CARE OF THE CAMERA
1. Take extreme care in cleaning the lens. Remove dust with a dry, soft brush or hand blower, then wipe with
lens tissue. 2. After taking photographs at the seashore or in damp weather, wipe the camera thoroughly with a
dry, soft cloth.
3. Do not leave the camera with the shutter wound for a long period of time as this will strain the mechanism.
4. If you should drop the camera in water wash it with alcohol or another volatile liquid immediately and have it
repaired as quickly as possible.

DO NOT FORCE SHUTTER WINDING LEVER
When there is no film in the camera the shutter winding lever will not operate unless the sliding release button
is held back all the way. Otherwise damage will result from exerting pressure on the lever.

TO LOOK INTO THE FINDER WHEN THE CAMERA IS NOT LOADED:
1. Turn the film winding ratchet knob one full turn.

2. Slide the button for the release of the shutter winding lever all the way back and hold it there.

3. Push the shutter winding lever down as far as it will go.
View original page 11
From the M. Butkus archive. Original publisher and archive notices are retained.
Check the model and edition against your equipment.
PDF verified 2026-10-10.