Lenses & filters
Leica STEMAR Stereo lens User manual
User manual for Leica STEMAR Stereo lens. 3 pages in English. Read the original PDF, download or print a copy without registration.
3 pagesEnglish2.0 MB PDF
Loading your manual…Open PDF directly
Document details
- Brand
- Leica
- Model / document
- Leica STEMAR Stereo lens
- Document type
- User manual
- Language
- English
- Pages
- 3
- File size
- 2.0 MB
- Category
- Lenses & filters
- Document date
- Not specified in catalog
Search available document text
Find a term, then jump to its page in the original PDF. Image-only pages may not be searchable; check the PDF for exact wording and diagrams.
Page 1 · Read text
www.butkus.us


HOW TO ATTACH THE STEREO
      EQUIPMENT TO YOUR

The Leica stereo equipment is made up of two main parts
 ( 1)  the STEMAR stereo lens, and
(2)  the prism attachment
The prism attachment is used on the lens only when taking pictures at
a range of ten feet or more.
Adjusting the Lens to the Comero
The Leica STEMAR stereo lens can be used with any Leica housing
which is equipped with screw-mount for interchangeable  lenses.

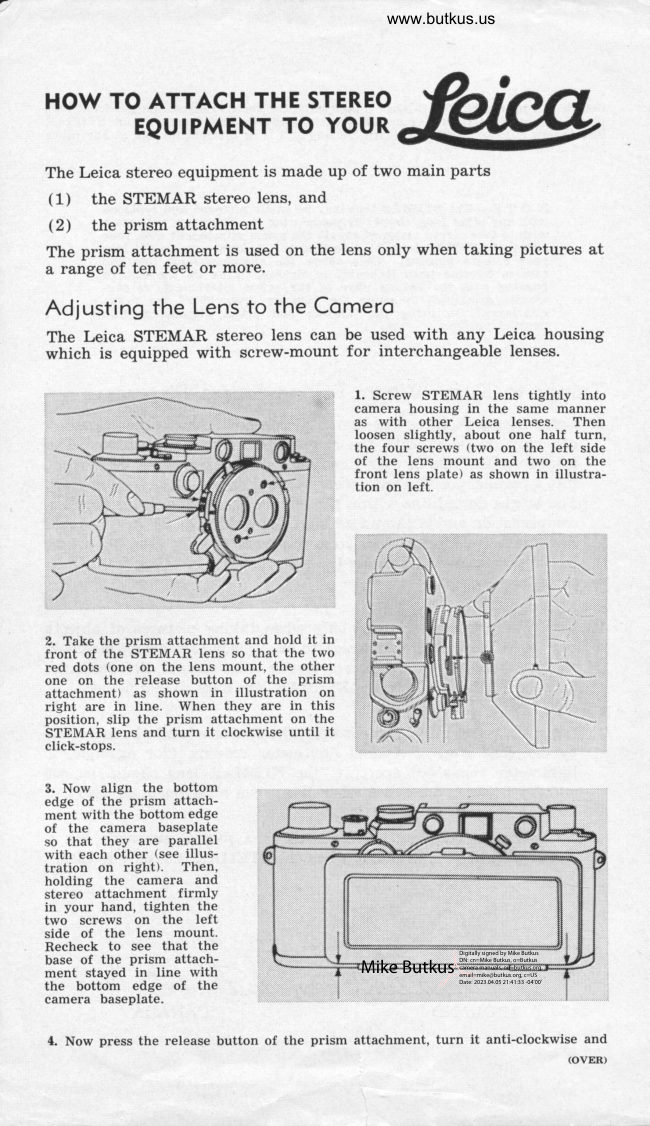
                                                 1. Screw STEMAR lens tightly into
                                      camera housing in the same manner
                                 as with other Leica lenses. Then
                                            loosen slightly, about one half turn,
                                         the four screws (two on the left side
                                      of the lens mount and two on the
                                              front lens plate) as shown in illustra-
                                                tion on left.


2. Take the prism attachment and hold it in
front of the STEMAR lens so that the two
red dots (one on the lens mount, the other
one on the release button of the prismattaehment) as shown in  illustration on
right are in line. When they are in this
position, slip the prism attachment on theSTEMAR lens and turn it clockwise until it
click-stops.

3. Now align the bottom
edge of the prism attach-
ment with the bottom edge
of the camera basePlate
so that they are Parallel
with each other (see illus-
tration on right). Then,
holding the camera and
stereo attachment firmlY
in your hand, tighten the
two screws on the leftside of the lens mount.Recheck to see that the                                                                                                       Digitally signed by Mike Butkus
                                                                                                                                     DN:                                                                                                                                       cn=Mike                                                                                                                                                                         Butkus,base of the prism attach-                                                                                                                                    camera                                                                                                                                                        manuals,                                                                                                                                                                    ou=butkus.org,
                                                                                                                                                c=USment stayed in line with               Mike Butkus  email=mike@butkus.org,Date: 2023.04.05 21:41:33o=Butkus                                                                                                                                                                                                         -04'00'the bottom edge of the
camera baseplate.

4. Now press the release button of the prism attachment, turn it anti-clockwise and
                                                                                   (ovER)
View original page 1Page 3 · Read text
detach it from the STEMAR lens. Finally, tighten the two scre\ /s on the front lens
plate. Do not force them. Turn each screw gradually and evenly. Your STEMAR
lens is now adjusted to your camera housing and is as interchangeable as any other
Leica lens.


     N O T E:-The STEMAR lens may be easily removed antl replaced
        with any other lens, simply by unscrewing it. But when you again
        wish to take stereo pictures, couple the prism attachment with your
        adjusted STEMAR, lens, as described in (2), before puttins it into
       your camera housing. Then screw the combined unit into the       camera housing until it begins to tighten. Line up the camera
       housing with the bottom edge of the prism attachment, as pre-
        viously described, by using the focusing lever (NOT the prism        attachment) to bring the housing and prism attachment into         parallel position.

Things to Know When Tolcing Stereo Pictures
1. Leica Stereo pictures (as stereo pictures with any other camera)
   can only be taken with the camera in horizontal position. The
   bright vertical line in your viewfinder should, therefore, be brought
    into a parallel position with other vertical lines in your field of vievr.
   The bright dotted line within the picture frame allows for parallax
   compensation and is the upper limit for objects at 3+ ft. It should
    likewise be used for subjects frorn this point to 15 ft. The full bright
    line in your viewfinder shows the area that will be taken from 15 ft.
   to infinity.
2. Use your prism attachment only when taking pictures of objects
   over 10 ft. (red figure on scale) to ensure comfortable stereoscopic
   viewing when using your stereo vielver or projector. F or distances
   between 3i ft. and 10 ft. the STEMAR lens only should be used.
3. When the prism attachment is used, the aperture has to be increased
   by one half stop of normal lightmeter reading (for example, if
   lightmeter reads 5.6 aperture, the STEMAR lens should be set
   midway between 5.6 and 4 when the prism attachment is used).
4. The prism attachment itself serves as a partial sunshade but a
   special lens hood is available when the STEMAR lens only is used.


       MIDLAND                  CANADA
View original page 3From the M. Butkus archive. Original publisher and archive notices are retained.
Check the model and edition against your equipment.
PDF verified 2026-10-10.