Film cameras
Lordox 57 User manual
User manual for Lordox 57. 6 pages in English. Read the original PDF, download or print a copy without registration.
6 pagesEnglish0.6 MB PDF
Loading your manual…Open PDF directly
Document details
- Brand
- Lordox
- Model / document
- Lordox 57
- Document type
- User manual
- Language
- English
- Pages
- 6
- File size
- 0.6 MB
- Category
- Film cameras
- Document date
- Not specified in catalog
Search available document text
Find a term, then jump to its page in the original PDF. Image-only pages may not be searchable; check the PDF for exact wording and diagrams.
Page 2 · Read text
And here are some hints for your guidance:

Loading:


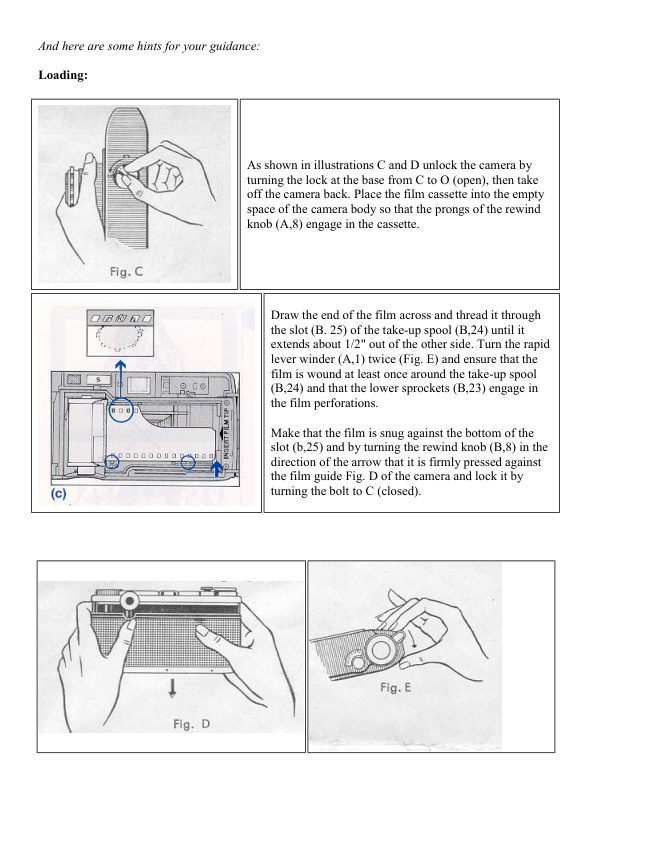
                              As shown in illustrations C and D unlock the camera by
                                        turning the lock at the base from C to O (open), then take
                                          off the camera back. Place the film cassette into the empty
                                     space of the camera body so that the prongs of the rewind
                                 knob (A,8) engage in the cassette.


                                 Draw the end of the film across and thread it through
                                             the slot (B. 25) of the take-up spool (B,24) until it
                                          extends about 1/2" out of the other side. Turn the rapid
                                              lever winder (A,1) twice (Fig. E) and ensure that the
                                            film is wound at least once around the take-up spool
                                           (B,24) and that the lower sprockets (B,23) engage in
                                             the film perforations.

                                Make that the film is snug against the bottom of the
                                                   slot (b,25) and by turning the rewind knob (B,8) in the
                                              direction of the arrow that it is firmly pressed against
                                             the film guide Fig. D of the camera and lock it by
                                            turning the bolt to C (closed).
View original page 2Page 3 · Read text
Setting the Film Counter Dial:


                              As described above, turn the rapid lever winder (A,1) twice
                                       thus setting the shutter. Now, using the film release knob
                                      (A,3) set the black triangle between O and 35 on the film
                                      counter dial (A, 4) opposite the pointer (Fig. F) Press
                                          shutter release button (A 2), wind on the film by the two
                                movements of lever (A, 1), release the shutter, and again
                                        repeat the film-winding movement. The film is now at 0,
                                        the shutter is set, and you are ready to make your first
                                      exposure.


Focusing:
Turn front lens ring (A, 18) until the measured or estimated distance in feet is opposite the red mark on the
depth-of-field ring (A,13) 13). The 00 means "infinity" or long distance.

Lens Apertures:
The Lordox has the following apertures: 2.8; 4; 5.6; 8; 11; 16; 22. F/2.8 is the largest, F/22 the smallest
aperture. These apertures are engraved in black numbers with the exception of F/8 which is frequently used and
therefore indicated in red. To obtain the aperture you wish to use press the coupling lever (A,11) and turn the
aperture scale ring (A,10) until the desired lens aperture is opposite the red mark (A,9). ,

Setting Shutter Speed:
While pressing the coupling lever (A,11) turn the milled ring (A, 16) until the desired speed is opposite the red
mark (A, 9). The 9 speeds are 1 second (1), /e second (2), I/` second (4), 1/8th second (8), 1/15th. second (15)
1/30 th. second (30), 1 /60th. second (60),1/125th. second (125), 1 /300th. second (300) and B (brief). The black
numbers on the speed ring (A,12) -except 1 which means a full second - are fractions of a second. The green
numbers (4 to 60) are full seconds and are intended only to assist in calculating the relative aperture needed for
each exposure duration. if you have to expose for longer than 1 second, you must set the shutter at B. In this
position, it will remain open as long as you press the shutter release button (A, 2).

Exposures of 1/30th. sec. or faster can be made whilst holding the camera in the hand, but far 1/15th. sec. or
slower, also B. a tripod or firm support is needed.

Exposure-Value Setting:
The Prontor S.V.S. Shutter fitted to the Lordox is of the Exposure-Value type. This means that the lens aperture
and shutter speed are automatically coupled the combination thus ensuring uniform exposures. Each
combination is expressed by a single number which is called the Exposure-Value.

This example shows how the combination works: Exposure-Value 9


Shutter
            60         30        15        8         4         2         1
Speed

Lens
              2,8         4           5.6       8         11        16        22
Aperture


Thus, if the correct exposure is 1/8th. sec. at F/8, it is likewise 1/15th. sec. at F/5.6, or 1/60th. sec. at F/2.8 etc.
View original page 3Page 5 · Read text
16. Milled ring
                                                                                17. Synchronization lever
                                                                (M-X-V)
                                                                                18. Milled distance ring
                                                    32mm
                                                                                19. Filter thread M 30.5 x
                                                                                0.5
                                                                                20. Exposure- value
                                                                    numbers and index,
                                                                                21. Cable release thread
                                                                                22. Viewfinder, eyepiece
                                                                                23. Sprockets
                                                                                24. Take-up spool
                                                                                25. Slat of take - up spool
                                                                                26. Tripod bush 1/4"
                                                                                27. Film cassette
                                                                                       (cartridge)


Thus, if is necessary to stop down to F/11, the 2 sec. exposure needed would equal 4 sec. at F/16.

To obtain the required position of the red figure denoting the Exposure-Value, press down the coupling lever
(A,11) and revolve the ring (A, 12) until the number comes against the red indicating triangle.

If you own an exposure meter which gives the Exposure-Value readings, you have only to set the required
number on the scale. It should be noted that if you change the speed setting from 1/125th. to 1/300th. 1 1/2 steps
of the normal progression results so that it follows that the change in aperture should be proportionate, i. e. from
F/5.6 to F/3.5 which represents an increase of 1 1/2 steps. It is possible to set the aperture control between the
engraved figures, e. g. F/3.5 between F/2.8, and F/4 or F/12.5 between F/11 and F/16 but the speed ring must be
set at click stops positions only and not at intermediate mediate positions on the scale.

If when changing from a low Exposure-Value number e. 9. 5 to a higher one such as 12, you find you cannot
proceed to turn the Exposure-Value setting ring (A, 10) because it is locked on the right side by a stop at
aperture 22 or speed B. you must release the coupling lever (A,11) and turn the milled ring (A, 16) to the right
side as far as the movement is arrested by the left stop at aperture 2.8, or the left stop at speed 300.

Similarly, when you wish to move the speed control from a high Exposure Value a lower one, you must operate
the milled ring in the opposite direction after having pressed down the coupling lever (A,11). In both cases, you
can then turn the aperture setting ring (A, 10) whilst pressing down the coupling lever (A,11) so that the desired
Exposure-Value number comes opposite the red triangle.

Self Timer: (Delayed Action)
This device permits you to photograph yourself. After having set the shutter turn the synchronization switch
lever (A, 17) to V (green) position. Press the button (A,2) when the self timer mechanism will commence to
operate and the shutter will be released after a delay of 7 to 8 seconds which is sufficient time for you to walk in
front of the camera. When using the delayed action device, place the camera an a tripod or other firm support.
Delayed action pictures are possible at all shutter speeds except B. After the exposure has been made, the lever
(A, 17) will automatically return from .V to the X position.
View original page 5Page 6 · Read text
Taking Flash Pictures:
There are different classes of flash bulbs usually designated X or M by the respective makers of the bulbs. The
synchro switch lever (A, 17) must therefore be set to either X or M according to the class of bulb in use, X
being for exposures with flash bulbs up to 1/30th. sec. or for exposures at any speed with electronic flash up to
1/300th sec, while M is for exposures with M type flash bulbs at any speed (except B). You may also take
delayed action pictures while using flash, in which case you'll set the synchro switch lever (A, 17) at V and use
a shutter speed of up to 1/30th..second with flash bulbs (regardless of the class of flash bulbs employed) or up to
1/300th. sec. when using electronic flash, so that in effect, the V setting has the same operation with flash as the
X setting. When using an electronic flashgun that has a zero millisecond delayed attachment, you may likewise
use any shutter speed except B. also if you are making delayed action exposures.
It is immaterial, when taking ordinary daylight exposures without flash, whether the synchro switch lever (A,
17) is at X or M.

Depth -of -field:
By means of the hyper focal scale (A, 13) you may determine in anticipation the range within which your
picture will be sharp. As an example for near subjects, set the focusing distance at 7 ft. with the aperture at F/11.
On the depth-of-field ring (A,13), you will see the No. 11 twice, on the right and on the left of the red diamond.
Over the left hand 11 on the distance ring (A,14) you see 5 ft. and aver the right 11, there is 10 ft. Your picture
will therefore be sharp in a zone from 5 to 10 ft. away. For distant subjects, you preferably set the distance at 20
ft. stopping down to F/11. You thus obtain a depth-of-field ranging from 10 ft. to infinity.

Rewinding film:


                                  As shown in illustration G. press the film release
                                      knob (A, 3) and pull out the rewind knob (A, 8).
                                     Then turn the rewind knob in the direction of the
                                         arrow until you feel no tension. This indicates that
                                              the Exposed film is back in the so may then Open the
                                       camera and extract the film for processing.


Cable release socket: Inside the shutter release (A,2) there is a thread for fitting a cable release. It is preferably
to use this release when taking pictures at speeds slower than 1/30th second, and always at the B position, to
avoid camera-shake.

The tripod bush is placed near the center of the camera base and accepts all standard 1/4" tripod and flashgun
screws.

* * On the top of the LORDOX, the slotted shoe is intended for accommodating a flash gun, range finder, or
exposure meter. The little spring inside the shoe ensures that these accessories will be held firmly

* To remind you of the type of film in the camera, set the dial (A,7) when loading. The outside row of figures
are ASA (arithmetical) film speed ratings, the inner row being the German DIN speeds. Place the corresponding
number against the block dot. For color films, set against IN for indoor {Type A) film, or OUT for outdoor
(Daylight) type color film.
View original page 6From the M. Butkus archive. Original publisher and archive notices are retained.
Check the model and edition against your equipment.
PDF verified 2026-10-10.