Film cameras
Mamiya CWP User manual
User manual for Mamiya CWP. 14 pages in English. Read the original PDF, download or print a copy without registration.
14 pagesEnglish1.9 MB PDF
Loading your manual…Open PDF directly
Document details
- Brand
- Mamiya
- Model / document
- Mamiya CWP
- Document type
- User manual
- Language
- English
- Pages
- 14
- File size
- 1.9 MB
- Category
- Film cameras
- Document date
- Not specified in catalog
Search available document text
Find a term, then jump to its page in the original PDF. Image-only pages may not be searchable; check the PDF for exact wording and diagrams.
Page 3 · Read text
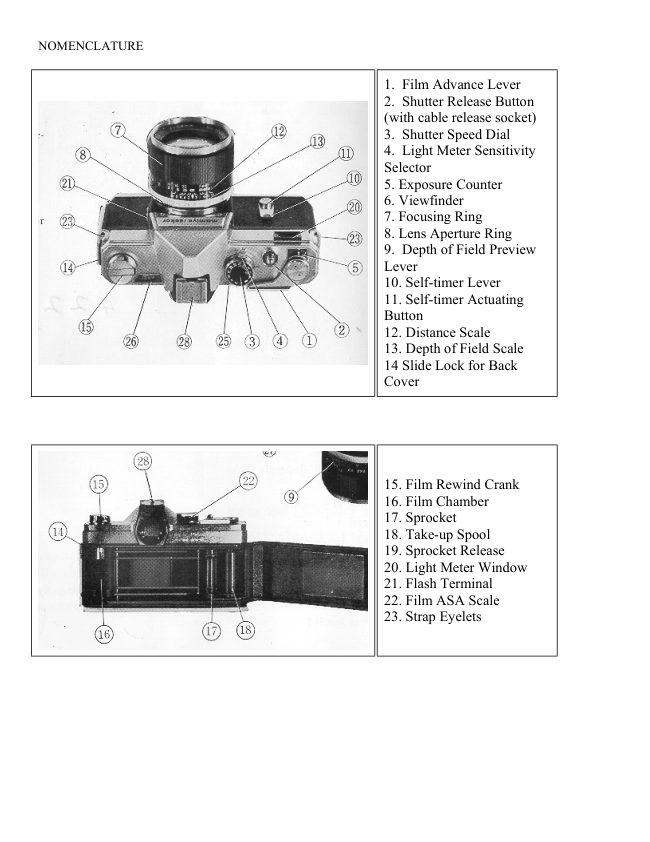
24. Tripod Socket
                                               25. Focusing Indicator
                                               26. Exposure Meter Indicator Window
                                               27. Battery Cover
                                               28. Accessory Shoe


   You are now the proud owner of one of the world's finest cameras

The Mamiya/Sekor CWP with
• Fast 58mm, 6 element, F 1.7 lens with high resolution Built-in CdS light meter
• Through-the-lens viewing no parallax problems
• Instant-return mirror  for before and after viewing
• Shutter speed range: Time to 1/1000
• Single-stroke film advance
• Synchronized for bulb and electronic flash Self-timer  10 seconds
• Automatic re-setting film counter Depth of field preview lever
• Full complement of interchangeable lenses and accessories available
The time spent reading this Instruction Book will be repaid in excellent pictures. Intimate
knowledge of the various parts of your Mamiya/Sekor CWP and their function will make ease of
handling second nature-your pictures will be sharp, clear and properly exposed. Pictures you will
be proud to show  because you have one of the world's finest cameras and you know how to use it
!

GETTING READY
Take your Mamiya/Sekor CWP in hand and notice the fine balance and convenient location of the
controls.
View original page 3Page 4 · Read text
LIGHT METER BATTERY


                    Now, turn the camera over and turn the battery
                        cover (27) counterclockwise with a coin to open.
                            Insert provided battery (1. 3V) so that positive (+)
                           side faces the back of the cover. Replace cover.
                     Your meter is now ready to use.


CARE OF MERCURY BATTERY

                 Positive (+) side and negative (-) side of the battery are as
             shown by drawing. The battery will last approximately one
                year depending on the frequency of use.
               Dispose of the exhausted battery in a safe place. It is
               dangerous to take it apart or throw into a fire.
            You need a replacement Wein Air battery.


IMPORTANT


                                  In switching light meter sensitivity selector
                                    (4) from high (H) to low (L), or vice-versa,
                              be sure to press down with fingers 2 levers
                                     in front and back of shutter speed selector
                               knob.

                         To conserve on batteries, always make sure
                                     to have light meter sensitivity selector (a)
                            on high range side unless light condition
                            demands shifting to low range necessary.

                              Sometimes, you may have to open back
                                cover with winding lever half stroked
                               because old roll is at the end. Before
                                 loading a new roll, be sure to push winding
                                   lever all the way to the end of the stroke in
                                  order to reset frame counter to start position
                                      (S).
View original page 4Page 5 · Read text
The point which corresponds to F 1. 7 in the
                            exposure indicator is the center between 2 and
                               1.4 and is indicated by the arrow in the figure
                         on the right.


LOADING FILM
All 35mm film, black and white, color, 20 or 36 exposures can be used. Always load film in subdued
light.


                                                           1. Open back of camera by
                                                       pulling out the slide lock. Pull up
                                                       the rewind crank knob (15) and
                                                            insert the 35mm cartridge in the
                                             chamber (16). Return the rewind
                                                   crank to its former position   if it
                                                 does not position itself turn
                                                  handle to right or left until it fits
                                                         in place with a click.


                                2. Turn the take-up spool (18) until the slit appears ; insert
                         end of the film in the slit (fold end of film for tight fit, if
                              necessary), wind the film on the spool for one turn. Be
                             sure the lower edge of the film is against the lower flange
                             of the spool and that the sprocket teeth engage the film
                               perforations.


                                   3. Next, turn the rewind crank (15) in direction of the
                            arrow until all film slack is taken up. Check again to
                        make sure the sprocket teeth engage the film
                                 perforations  close and lock the back.
                                   4. The letter S appears opposite the arrow in the
                             exposure counter window
                                     (5). Advance film a single stroke and depress shutter
                                 release button after each stroke. Continue this until the
                                 figure 1 appears opposite the arrow. The camera is now
                              ready for the first picture.
View original page 5Page 6 · Read text
6. Each time the film is advanced the rewind lever will
                                 turn   this assures proper film action in the camera.
                                    7. The shutter is wound when film is advanced ; next
                             frame can only be advanced after shutter is released.


USING THE EXPOSURE METER
The Mamiya/Sekor CWP incorporates a most advanced and sensitive CdS meter.
It's wide range opens up new picture-taking opportunities . . . . this is how to use it:


                               1. Lift the shutter speed dial (3) and by turning match the
                 ASA film speed (22) with the red mark on the lower portion
                            of the dial. The meter is now coupled to the film speed.
                               2. Under normal light conditions the sensitivity selector
                             lever (4) is set on H. This position conserves battery life.
                         For low light conditions set the selector lever at L.

                                                           3. Now, point the camera at the
                                                       subject or scene to be
                                                  photographed. One of two
                                                    choices is now possible: (1) If the
                                                         shutter speed is important (as in
                                                       sports events) this should be set
                                                                     first and then the correct exposure
                                                      regulated by turning the lens
                                                      aperture ring (8) until the pointer
                                                                  is centered in the exposure meter
                                         window (26). (2) If the depth of
                                                            field is important (as in scenery,
                                                                etc.) set the lens aperture ring to
                                                      the desired F stop. Then turn the
                                                         shutter speed dial (3) until the
                                                      pointer is centered in the
                                                 exposure meter window (26).


4. Shutter speeds are set in click stops. If meter indicates an in-between speed, move shutter to
nearest click stop and make adjustment with aperture for proper exposure.
5. When pointer stays in the red portion in either H or L position it indicates too much or insufficient
light for picture taking.
View original page 6Page 7 · Read text
The exposure meter is a reflected light type meter; used properly, excellent exposures can be
expected every time. Here are some helpful hints on exposure:
Since this type exposure meter measures the light reflected from the object to be
photographed, it is necessary to take a meter reading as near to the object as possible
and thereby exclude extraneous light which can affect the exposure.

Portraits
Approach the subject and take the meter reading close to the face. If part of the face is darker,
measure both light and dark areas and use the average.

Landscapes
To expose properly for landscapes, tilt the camera slightly downward, thereby restricting the amount
of light from the sky, which would affect the meter reading.

Backlighting Photography
When shooting a silhouette, measure the light from the bright part of the background. When an object
is to be photographed by backlighting, measure the light from the object at close range so that the
light from the background will not influence the meter reading. When the object and the background
are to be photographed at the same time, first measure the darkest part of the object, then measure
the light from the background and use the average value.

FOCUSING AND VIEWING
The Mamiya/Sekor CWP is a single lens reflex  you see your picture and take your picture through
the same lens. What you see you will get on the film when yon press the shutter release. There are
no problems of parallax. You obtain perfect composition with any lens and you can check the depth of
field at any time before clicking the shutter. Furthermore, you can follow the action up to and
immediately after the picture is taken.

FOCUSING


                                    The focusing ring (7) is turned in either
                                               direction until the image in the small circle
                                             of the finder is sharp. The micro-diaprism
                                            disappears at this point, indicating the
                                             sharpest point of focus. It reappears when
                                            out of focus.
View original page 7Page 8 · Read text
DEPTH OF FIELD


                    To check the depth of field, the preview lever on the lens (9)
                                 is depressed until 'M appears. This closes the diaphragm to
                           the preselected F value and you can now see exactly the area
                          of sharpness which will appear in the picture. When the lever
                                 is returned, `A' appears and aperture adjustment becomes
                          automatic. When in "manual" aperture the viewfinder will
                     become dark until it returns to "A" automatic.


DEPTH OF FIELD TABLE


                               Depth of field can also be determined by
                                    consulting the scale on ring(13). This is helpful
                            when the lens is stopped down so that it cannot be
                                checked with the preview lever due to low light
                                     transmission.

                                 For example, with the standard lens and the
                                     aperture set at F 11, focused at 16 feet, the F ii on
                                         ,the depth of field ring (13) will point to
                                  approximately 10 feet and infinity. This indicates
                                     the range of sharpness within which all will be in
                                      focus. Consult table for other distances and
                                     apertures on page 12.


Mamiya/Sekor F1.7, 58mm  (circle of confusion, 1. 7/1000 inch) -

depth-of-field chart
View original page 8Page 9 · Read text
The lens has an automatic pre-set diaphragm. While focusing, it is wide open and provides the
maximum brightness in viewfinder for ease in composing and focusing. When the shutter is released,
the diaphragm closes to the pre-set aperture for the instant of exposure and immediately reopens
thereafter. In this brief time the viewing screen snaps up, permitting the picture to be taken and then
returns to the viewing position.


SHUTTER SPEEDS


                The shutter speed dial (3) is a single shaft, stationary type with an
                   equally spaced multiple scale. A click stop is provided for each
                   speed. The shutter dial can be set over a range of T to 1/1000 by
                   turning it either to right or left, before or after film advance.
             When the shutter is released with the dial set on 'B', the shutter will
                    stay open during the time the shutter release (2) is being depressed.
             When the shutter release (2) is depressed with the dial on `T', the
                    shutter opens and stays open until the shutter dial (3) is moved to 'B'.
View original page 9Page 10 · Read text
SELF-TIMER


                         This feature makes it possible for the photographer to get in
                           the picture. It can also be used for slow speeds with camera
                      mounted on a tripod or held against a stationary object by the
                          photographer.
                   When the self-timer lever (10) is turned counterclockwise
                         approximately 180°, the timer allows ten seconds before it
                               trips the shutter. Time can be adjusted freely over a range of
                        70° to 180° with the lever.
                   When the self-timer actuating button (11) on the lever shaft
                                 is depressed, the timer starts to operate. After the self-timer
                         has been set, the shutter can still be released by pressing the
                             shutter release button (2).
                           In this case, the self-timer action stops.


Further, before actuating the self-timer, the shutter must first be wound. When releasing the shutter
with the self-timer, the automatic aperture control mechanism works in the same way as when the
shutter is released by depressing the shutter release button.

HOLDING THE CAMERA


                            Lightly support the bottom of the camera with the palm of
                             the left hand ; adjust the position of the camera so that the
                       thumb and forefinger of the left hand can reach the
                            focusing ring (7). Place the palm of the right hand against
                             the end of the camera body. Then the forefinger of the
                                right hand will automatically be near the shutter release
                            button (2) and the thumb will be on the film advance lever
                                  (1). Bring the finder window to the level of the eyes and
                                 rest against the forehead. This will assure steady holding of
                             the camera.


In taking vertical pictures,
the camera is to be held with
the film advance lever
upward. Procedure is the
same as for horizontal
pictures. Hold the camera
with the left elbow as close
to the body as possible.
View original page 10Page 11 · Read text
When the camera is to be held with the film advance
                                 lever (1) downward, with the right thumb on the shutter
                                 release button (2), support the camera with the palm of
                                the right hand. Place the left thumb and forefinger on
                                the focusing ring (7). Hold the right elbow close to the
                             body.
                         The above camera positions are the same when other
                                lenses are used.
                      When taking pictures with speeds of less than 1/30
                              second, use a tripod or rest the camera on a steady
                               supporting base to prevent movement when the shutter
                                       is released, or when using the self-timer.


FLASH PHOTOGRAPHY


                              The flash terminal (21) has two fittings, one for
                             FP and one for electronic (X contact).
                              The relationship between terminal, exposure time
                                 and flash bulb is shown in the table below.
                              The flash terminal and the shutter speed time dial
                                       are synchronized and indicated by symbols of the
                               same color. When using the FP flash you can use
                                 any of the shutter speeds marked in green on the
                                         shutter speed dial (3). When using the electronic
                                         flash you can use any of the shutter speeds
                                marked in orange on the shutter speed dial (3).
View original page 11Page 12 · Read text
CHANGING LENSES


                                 To change the lens, hold the lens cylinder
                                               in the right hand and turn
                                           counterclockwise. When mounting a lens,
                                             turn clockwise until it stops. When
                                      mounting or detaching a lens, hold the
                                             section where the depth of field scale (13)
                                                       is marked.

                              When the lens is detached, the reflecting
                                           mirror becomes visible. Never touch this
                                             mirror. If dust is found on this mirror,
                                    remove by blowing it away with a rubber
                                         bulb or brushing with a camel's hair brush.

Terminal                 FP (Green)            X (Orange)

Exposure time                1/1000 sec.-1/60 sec.           1/30 sec.-1 sec.

Flash bulb                    Focal plane flash bulbs          Electronic or flash bulbs
                                                F and M classes

USING INFRA-RED FILM

                           With this film, use the red ''R' as the marker on the
                               depth of field scale (13). After focusing through the
                                viewfinder note the distance on the distance scale,
                                then turn the ring until the `R' is opposite the same
                                   distance.
                                          If trying IR, go Digital. Lots of options available.


UNLOADING FILM


                         After 20 or 36 exposures have been taken, press the sprocket
                           release button (19), raise the film rewind crank (15) and turn
                           in direction of arrow. A slight tension can be felt as the film
                     comes off the take-up spool. Remove the film cartridge from
                       camera.
                    The sprocket release button (19) returns to its normal position
                   when the film advance lever is operated.

                     Important : Do not force film advance lever when at end of
                           film. Press the sprocket release button (19) to relieve tension
                      and then rewind film.
View original page 12Page 13 · Read text
ACCESSORIES
The following are available:
Interchangeable lenses


Type Length       Speed     Construction   Angle   Diaphragm  Filter     Hood
                         (F)'       (element-                            Size      Type
                              group)                               (p=0.75)

Wide    28mm      2.8         5-7         77°         Preset 58mm


Angle    35mm      2.8         5-6        63°      Auto     52mm    Screw-in


Standard  58mm      1.7         4-6        40°50'     Auto     52mm    Screw-in


        135mm     2.8         4-5        18°20'     Auto     62mm    Attached
                                                                                         to lens

Telephoto              4.5         4-4      12°          Preset    58mm    Screw-in
                                                                             Attached        200mm
                                                                                         to lens

                        6.3         3-3         6°         Preset    72mm    Screw-in
                                                                             Attached
        400mm                                                                     to lens


Extension ring for close-ups 4 per set
Extension bellows
Microscope adapter (for microphotography)
Angle finder (waist level viewing and focusing)
Lens frame (for eyesight correction lens)

HELPFUL HINTS
Storage of the Mamiya/Sekor C WP when camera will not be used for a long period of
time).
1. Store without winding the shutter. This relieves spring tension.
2. Set the light meter sensitivity selector on `H'.
3. Remove mercury battery.
4. Remove camera from carrying case and place inside an air-tight box with a drying
agent (silica gel).
View original page 13Page 14 · Read text
CARE AND CLEANING
1. Never expose camera to direct sunlight for an extended period of time.
2. When any abnormality is found in the camera, do not attempt to disassemble or
lubricate. Contact the camera shop where you purchased the camera, or a service
division of this company.
3. High temperatures of over 100` F and low temperatures of less than freezing, moisture and salty
atmosphere are injurious to any camera. Every precaution should be taken for proper care.

Let’s Review
1. Load camera-advance film and trip shutter until exposure 1 appears. 2. Set ASA speed.
3' Set aperture (scenery, etc.) or shutter speed (action) first.
4. Line up pointer in light meter by turning either aperture ring or shutter speed dial (sec page 7).
5. Focus and compose.
6. Press shutter release button smoothly.

Presto! : You have taken a perfectly exposed picture with your Mamiya/Sekor CWP and we hope
it's a prize-winner!
View original page 14
From the M. Butkus Camera Manual Library. Original publisher and archive notices are retained.
Check the model and edition against your equipment.
PDF verified 2026-10-10.