Film cameras
Mamiya Sekor Auto XTL User manual
User manual for Mamiya Sekor Auto XTL. 22 pages in English. Read the original PDF, download or print a copy without registration.
22 pagesEnglish1.3 MB PDF
Loading your manual…Open PDF directly
Document details
- Brand
- Mamiya
- Model / document
- Mamiya Sekor Auto XTL
- Document type
- User manual
- Language
- English
- Pages
- 22
- File size
- 1.3 MB
- Category
- Film cameras
- Document date
- Not specified in catalog
Search available document text
Find a term, then jump to its page in the original PDF. Image-only pages may not be searchable; check the PDF for exact wording and diagrams.
Page 3 · Read text
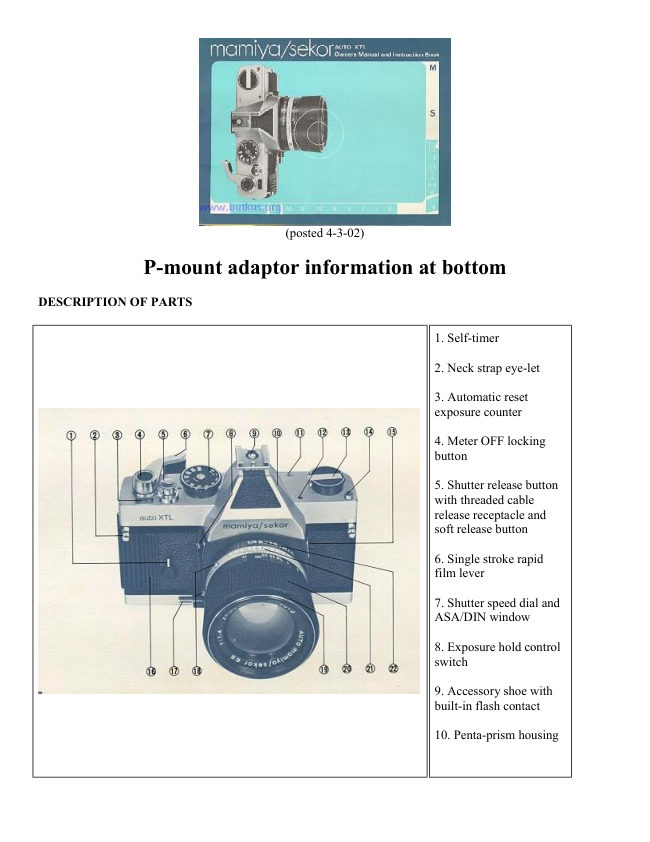
11. Film plane reference point        15. Spot/average meter system selector switch

12. Battery test light                  16. Easy grip pad

13. Rewind knob with rewind crank   17. Depth of Field preview button

14. Battery check button              18. Raised red dots for lens mounting and removal


                                                                            19. Built-in lens hood

                                                                            20. Lens focus ring

                                                                            21. Depth of Field scale

                                                                            22. Aperture ring

                                                                            23. FP and X terminals

                                                                            24. Film chamber


25. Viewfinder eye-piece
                                           32. Lens release knob
26. Focal plane shutter
                                           33. Battery compartment cover
27. Film advance sprockets
                                           34. Tripod socket
28. Rapid loading take-up spool
                                           35. Rewind release button
29. Removable hinged compartment door
                                           36. Motor drive cover
30. Film pressure plate
                                           37. Auxiliary shutter release for motor drive
31. Film cartridge pressure plate
View original page 3Page 4 · Read text
We know that when you purchase an exciting new product like your Mamiya/Sekor Auto XTL Camera, you
want to use it immediately. For this reason, here is an AUTO XTL SHORT COURSE to show you how to take
a few pictures before you read the detailed instructions on all the great features at your command. Have fun.

    SHORT COURSE OF INSTRUCTIONS
View original page 4Page 5 · Read text
INSERTING THE BATTERY


                                   Your new Auto XTL Camera is supplied
                                         with a silver oxide battery (S76) especially
                                         designed for its unique metering system. It
                                               will last approximately one year depending
                                    upon use and must only be replaced with
                                       an Eveready S-76 battery or equivalent. No
                                            other substitute can be used.

                                  Open the battery compartment on the base
                                            of the Auto XTL by turning the cover
                                          counter-clockwise with your thumb and
                                             fore finger, and remove (A). You may use
                                         a coin to loosen the cover if it is too tight,
                                           but continue to remove it with your thumb
                                            or forefinger..
View original page 5Page 6 · Read text
Clean the battery contacts with a clean dry
                                              cloth to assure they are free of oil or dust
                                     which can interfere with making positive
                                               contact. With the (+) sign facing you (B)
                                                 insert the battery and replace the cover,
                                             tightening with thumb and forefinger,
                                            turning it clockwise until It's tight.

                              When the camera is not in use, or when
                                        changing lenses, always LOCK the meter
                                               in the OFF position. To do this, press the
                                           button on top of the film advance lever (C).


CHECKING POWER SUPPLY


Press the red Battery Check Button located near
the Rewind Knob. A green light will show in the
small circular window to the right of the Rewind
Knob indicating the battery has sufficient power
(D).

Check periodically in this manner to make sure
that the battery is up to operating power.


LOADING THE FILM


                                           Pull up on the Rewind Knob until lock
                                        disengages and film door swings open (E).
                             When you do this the Exposure Counter will
                                         automatically return to zero. Drop the film
                                            cartridge into the chamber, push down and
                                              rotate the Rewind Knob until it drops into its
                                              fully seated position.

                                        Rotate the take-up spool with your finger
                                               until one of the slots is facing you. (The
View original page 6Page 7 · Read text
arrow on the take-up spool indicates the
                                            direction in which it rotates). Unwind enough
                                          film (about 2 inches) so that the leading edge
                              may be inserted in the slot (F).


                                  With slow steady pressure advance the film
                                       with the Advance Lever and check to see that
                                           the film sprocket holes are engaged in the
                                             teeth of the film transport sprocket (G). Close
                                           the door firmly until you hear a click. The
                                                   letter " S " will automatically appear in the
                                     Exposure Counter Window every time fresh
                                          film is loaded in the camera. Gently turn the
                                 Rewind Knob clockwise to take up the slack
                                          of the film.

                                         Press the Shutter Button and advance the film
                                  by rotating the Film Advance Lever to the
                                              right with your thumb until it stops. Release
                                           the lever and repeat several times until the
                                            figure " 1 " appears in the Exposure Counter
                              Window (H). is film is advanced, the Rewind
                               Knob will rotate in a counter-clockwise
                                            direction indicating that the film is advancing
                                           properly.

                                  Your new Mamiya/Sekor Auto XTL camera
                                                    is now ready for action.


FILM ADVANCE LEVER

The Film Advance Lever on your Auto XTL
Camera accomplishes the following
operations: 1. Activates the light metering
systems. 2. Advances the film forward one
full frame. 3. Advances the film (frame)
counter. 4. Winds the shutter. As the lever is
slowly pulled away from the body of the
View original page 7Page 8 · Read text
camera (approximately 1/2 inch), it clicks
into a position that turns on the light metering
systems. By continuing the stroke to the right
until the lever stops, it advances the film and
winds the shutter. Release the lever and it
returns to the " meter on " position. You may
turn off the metering system and snap the
lever to its fully seated position by pushing
down on the leatherette button on top of the
Film Advance Lever (1).


SETTING THE FILM SPEED


                                      Lift the outer ring of the Shutter Speed Dial and rotate it in either
                                   direction until the ASA number of the film you are using appears in
                                  the window (J). The speed of the film you are using can be found in
                                  the data sheet which is packed with the film or printed on the film
                                    cassette itself.

                              For films using the DIN rating, turn the ring until the corresponding
                            number appears in the window next to the DIN marking.

                           The table below indicates the ASA and DIN numbers available. The
                             numbers represented by the dots are shown in parentheses next to
                                  the respective dot.


SELECTING THE SHUTTER SPEED


The length of time that light is allowed to strike the film
controlled by 'he focal plane shutter. The shutter
consists of two opaque " curtains " which travel across
the opening and allow light to reach the film. The speed
at which these blinds travel and the gap between the
two blinds determines in fractions of a second the
exposure time for your picture. For example, 1000 on
the dial indicates 1/1000 of a second and 60 indicates
1/60 of a second. The figure 1 indicates one full second.
The B setting is used for longer time exposures. At this
setting, the shutter will remain open as long as the
shutter button is held down. For exposures less than
1/60 of a second, it is advisable to use a cable release,
tripod or other steadying devices to avoid camera
movement which can result in blurred or fuzzy pictures.
View original page 8Page 9 · Read text
To set the shutter speed rotate the Shutter Speed Dial in
either direction until the desired number clicks into
place next to the black indicator arrow (K). The speed
you select is also indicated on the bottom of the
viewfinder control center so that you can set the speed
without removing the camera from your eye.


IMPORTANT: When selecting a shutter speed, do not pull up on the Shutter Speed Dial or you may
inadvertently change the ASA speed setting.


SETTING THE LENS


                     Now that you have determined the time the light will be allowed to
                                     strike the film, you may set the precise amount of light. This amount
                                 of light is represented by " f " numbers or f/stops engraved on the lens
                                 aperture ring which clicks into place as you rotate it. The f/stop
                                 designations indicate the opening formed by the diaphragm of your
                                     lens. When operating manually, you may use the " click stops "
                               provided or set your lens at any setting between click stops (L).


FOCUSING AND VIEWING


The Mamiya/Sekor Auto XTL is a single lens reflex camera.
This means that you view the subject through the taking lens.
Since the same image is transmitted to the eye as to the film,
parallax is eliminated. You see the picture in the viewfinder
exactly how it will appear later on your developed prints or
slides.

Focusing the Auto XTL is made easier by the micro diaprism
focusing grid in the viewfinder.. This small round area in the
center of the finder exaggerates the difference between the "
in focus " and " out of focus " image (M). By rotating the
focusing ring on the lens barrel until the micro diaprism
disarm pears, the image is in focus for both the eye and the
film (N). For subjects with irregular outlines, like wooded
hillsides, the entire ground glass area of the viewfinder may
be used for focusing. In any case (except with infra-red
materials) when the image appears to be sharp in the finder, it
will be sharp on the film.
View original page 9Page 10 · Read text
INFRA-RED PHOTOGRAPHY
When using infra-red film, first focus the image as above. Then note the distance as represented by the number
which appears opposite the footage index mark on the lens barrel. Rotate the focusing ring until this number is
opposite the small red mark, and the lens will be correctly focused for infra-red photography at that distance.
This is necessary because infra-red film is sensitive only to infra-red light rays, which focus on a plane slightly
behind that of ordinary light rays.


USING AUTOMATIC PHOTOGRAPHY


                      Your Mamiya/Sekor Auto XTL has a precision dual metering system
                       which frees you from the necessary manual operations of conventional
                          cameras. Now you can enjoy complete freedom and expression without
                         having to figure out exposure set tinge. With accurate electronic precision,
                            the Auto XTL makes the necessary adjustments for correctly exposed
                              pictures. Just follow these simple steps for automatic operation:

                               1. Load the camera with film and set the correct ASA speed for the film
                            used.

                               2. To turn on the metering system pull the Advance Lever away from the
                        camera body approximately 1/2 inch.

                               3. Select your shutter speed (1/125 for usual outdoor situations) .

                               4. For automatic operation set lens aperture ring so " AUTO " (or green
                            dot) is next to red index dot (O).

                               5. Check viewfinder to verify exposure needle is not in red area.

                               6. Compose and focus your subject in viewfinder and take picture.


SELECTING METER SYSTEM


There are two ways of determining correct exposure with
your camera. Whether you use the Spot or the Average
system will depend upon the type of picture you are taking.

"SPOT " Reading:
The " Spot " method of exposure calculation is especially
valuable when the most important area of the picture is
either much lighter or much darker than the general picture
area, or in landscapes, where sky light would register a much
higher reading than trees or buildings at ground level. Such a
View original page 10Page 11 · Read text
situation would cause under exposure if the subject were to
be measured with a conventional, averaging meter from the
camera position. " Spot " reading is also useful for subjects
under insufficient lighting such as indoor shots or night
scenes.
To obtain a spot reading, move the Spot/Average selector
switch down until the letter " S " appears (P).

Looking through the viewfinder you will notice that the
letter " S " in a yellow square appears in the right vertical
section of the Control Center. This indicates that the
metering system is reading about 6% of the total picture you
are viewing. Focus the lens so that the subject is critically
sharp. Then aim the camera so that the micro diaprism
focusing spot in the center of the viewfinder falls upon the
most important part of the picture you are about to take.
Make sure that this spot does I not include any part of the
picture that is either lighter or darker than the section you are
reading.
Now, snap the shutter for perfectly exposed picture.

"AVERAGE" Reading:
When the scene to be photographed is made up of areas
of equal importance, an overall, average reading is
preferable. Push the Spot/Average selector switch up until
the letter " A" appears (Q). The letter " A " in a yellow
square will also appear in the right vertical section of the
Control Center, indicating that the whole picture is being
measured by the meter. Focus on I the subject and snap the
shutter.


SETTING EXPOSURE HOLD CONTROL


                              You will encounter some picture taking situations in which
                                   you may want to depart from routine metering in the
                                        automatic position such as:

                                              1. Your subject is back lighted or sidelight and will not be
                                         positioned in the center of the picture;

                                              2. The most important light falling on your subject is so
                                                  critical that you have to move in closer to take a reading
                                    and then return to your original position.
                              Many creative photographers feel that the best composed
                                       photographs do not always have the center of interest in the
                                           center of the picture. If this is your preference and if your
                                           subject is positioned to either side of the picture as you see
                                                              it in the viewfinder, you will find the Exposure Hold
                                        Control (R) a helpful feature.
View original page 11Page 12 · Read text
Take a close up reading of the important portion of the picture, press the Exposure Hold Switch and then
compose as desired. The Auto XTL metering system will " memorize " the exposure until you fire the shutter. If
you are taking a portrait in an extremely back lighted situation, you can move up close to your subject and take
a spot reading on a portion of your subject's face; press the exposure hold switch, and then move back to your
original position. After you have taken the picture the exposure hold switch will automatically return to its
original position so that subsequent photographs will not be affected by the previous " memorized " meter
reading.

You can release the exposure hold switch any time by pushing up on it with your fingertip. With a small amount
of pressure the exposure hold switch will return to its original position. (In situations where special readings
will be repeated, we recommend that you reset the aperture ring on the lens to the f/stop which corresponds with
that particular exposure setting. This procedure will ensure that all of your subsequent photographs are made at
the special exposure you have selected).

USING SELF TIMER


The self timer provides a method of taking
delayed action pictures, allowing a photographer
to get in to his own pictures!

When the self timer lever is rotated counter
clockwise, it travels approximately 70 degrees,
and a delay of eight seconds is provided before
the shutter fires. Shorter intervals may be
accomplished by rotating the lever for shorter
distances anywhere between 30 and 70 degrees
(S). The timer is activated by pushing the shutter
release button.

NOTE: If the self timer lever is not rotated at
least 30 degrees, the timer will not function
properly.
View original page 12
Page 13 · Read text
SELECTING DEPTH OF FIELD


                      When a camera lens is focused to give a sharp image of a particular
                                   subject, some objects slightly behind, as well as some objects
                                   slightly ahead of the subject will appear to be sharp. The distance
                            between the nearest and farthest objects, which are in focus, is called
                           Depth of Field.

                           Depth of Field changes each time the f/stop changes, becoming
                                 greater as the lens is stopped down toward f/16, while decreasing as
                                 the f/stop is opened toward f/1.8 or f/1.4. Other factors influencing
                              depth of field are the focal length of the lens and the focusing
                                distance at which the picture is taken. The shorter the focal length
                               and/or the smaller the lens diaphragm opening, the greater the depth
                                of field for any given focusing distance, and vice versa.

                              Proper use of depth of field can enable the photographer to utilize the
                                  principles of " selective focus " which often means the difference
                            between ordinary snapshots and pictures of quality. For example, the
                               proper selection of a " sharp " zone of focus can eliminate an
                           unwanted object in the background. The same could be true of
                              foreground objects. (See photos to left).

                      When you wish to view the depth of field before taking a picture
                              with the Auto XTL, focus with the micro diaprism spot as explained
                               before and press the depth of field preview button. This causes the
                                 lens diaphragm to close (i. e. "stop down "). If you have already
                               taken the meter reading, the lens is now at the diaphragm opening at
                           which the picture will be taken.

The depth of field will appear in the finder exactly as it will be in the
finished picture. By changing the focus while the lens diaphragm is
stopped down, you can select the area of sharpness in your picture.
When using non-automatic or preset lenses, the diaphragm must be
closed manually, but the same results can be achieved.

You may also determine depth of field by checking the scale on the lens
barrel. Numbers representing lens apertures appear at the near and far
limits of depth for any given focus distance and lens opening (T).
For Example, if the standard lens is focused at 15 ft., one of the lines
representing f/11 appears at the 10 ft. mark. The other line (again
representing f/11) is at the 30 ft. mark. This means that a picture taken
with the lens focused at 15 ft., and the diaphragm set at f/11, all objects
in the picture between 10 ft. and 30 ft. will be in focus. This method is
extremely valuable when the lens diaphragm is stopped down too far to
allow enough light for the picture to be viewed through the viewfinder..
View original page 13Page 14 · Read text
CHANGING LENSES


A variety of interchangeable lenses are available
to increase your enjoyment of your new
Mamiya/Sekor Auto XTL Camera. With the
wide angle and telephoto lenses you can take
pictures expressing different points of view.
Telephoto lenses change the perspective
normally associated with shorter focal length
lenses. For example, a telephoto lens allows you
to move up closer to your subject without
physically changing your position. Wide angle
lenses allow greater coverage than is possible
with your normal lens. Interiors and exteriors of
buildings or pictures of large groups of people
are possible.
To change your lens, hold the camera securely
with one hand and press upward on the lens
release knob. With the other hand, firmly grasp
the lens and rotate it counter-clockwise until the
two large red dots are opposite one another. Pull
the lens straight out from the camera body (U).

To mount the lens, match the red dots of the lens
barrel and the camera body and rotate the lens
clockwise until it locks into position with an
audible click.


IMPORTANT: Protect your camera body and lens from damage or dust by using a body cap for the camera
body and front and rear lens caps.

<<<< Additional information not in the manual:
I just wanted to point out that not all Mamiya M42 lenses are safe to use with the P adapter for the Auto-XTL. If
you attempt to use the SX type lenses with the Auto-XTL P adapter, the aperture sensing pin will dig into the P
adapter face since it is not perfectly flush with the outer surface edge of the SX lense. Furthermore, since the
entire moving surface of the aperture ring of the SX lense comes to rest against the P adapter face, it will lock
down the aperture control of the lense and make it impossible to turn, therefore preventing SX lens f-stop
manipulation. Mamiya M42 AUTO lenses seem to be safe choices as are M42 Yashica-Yashinon, M42 Meyer-
Optik and M42 Zeiss MC Sonnar (S) lenses. Any aperture ring that rotates at the extremity of a lens should be
avoided. Of course the SX lens works perfectly well with the "ZE" P adapter for Mamiya ZE series lenses
which it was designed for. Lenses with Auto and Manual switches like Zeiss MC Sonnar work well with the
Auto-XTL P adapter in conjunction with its Auto Aperture pin. Lenses that have no Auto Aperture and only
manual control of aperture appear to work equally well like Meyer-Optik Orestor M42.
Robert A. Genna, Connecticut teacher and photographer, 10-23-04 >>>>>>
View original page 14
Page 15 · Read text
USING FLASH


                                 The flash terminals, marked FP and X allows
                                       a choice of flash synchronizations (V). The
                                            selection of a terminal depends upon the type
                                          of flash used, as well as shutter speed. The
                                        following table shows the correct
                                       combinations to be used in various flash
                                               situations. These combinations must be
                                             rigidly followed to ensure correct
                                          synchronization.


   Shaded areas indicate the shutter speeds at which listed bulbs are to be used, with the cord attached to the
                                              indicated terminal.
View original page 15Page 16 · Read text
REWINDING THE FILM


                        When you have finished taking all your pictures,
                                       (either 20 or 36 exposures), you must rewind the film
                               back into its cartridge.

                          To do this, push in the rewind release button located
                             on the bottom of the camera (W).

                              Turn the crank in the direction of the arrow until you
                                       feel the tension in the film lessen. This indicates that
                                   the film has left the take-up spool (X).

                        When rewinding film, a click can be heard each time
                              one frame is rewound. When the clicks can no longer
                               be heard, the film has been completely rewound. If
                                     for any reason you are not sure that the film has been
                                       totally rewound into the cartridge, continue to
                                 maintain tension on the rewind crank and at the same
                                time advance the film advance lever a full stroke.
                                 Trip the shutter and advance again. Repeat this at
                                       least 3 times. If you do not feel a tension or pulling
                             on the rewind crank when working the film advance
                                      lever, the film has been completely rewound. Open
                                   the back of the camera and remove the cartridge.


AVOID DIRECT LIGHT WHEN UNLOADING THE CAMERA.

OBTAINING MULTIPLE OR DOUBLE EXPOSURES
Your new Mamiya/Sekor Auto XTL Camera is protected from accidental double exposure under normal picture
taking situations since you cannot take a picture until you advance the film and rewinds the shutter. However, to
make double exposures for special effects:

1. Take your first picture in the usual manner.

2. Press the film rewind button on the base of the camera and slowly turn the film rewind knob clockwise until
you hear a click. Stop. The click means that you have rewound the film one full frame. Next, advance the film
twice. This winds the shutter and repositions the original frame for the second shot or double exposure.
View original page 16Page 17 · Read text
Manual or Stopped-down Aperture Operation with Lenses and Accessories


                              You can use lenses other than Auto
                                   Mamiya/Sekor ES lenses with accessory
                                   Mamiya/Sekor " P " and " T " adapters such
                                               as:

                                              1. All Mamiya/Sekor or Praktica universal
                                          thread mount automatic or preset lenses.

                                              2. All preset "T" mount lenses.


Here's how the above lenses are used:

1. Mamiya/Sekor or Praktica mount automatic lenses.

(a) Attach Mamiya/Sekor " P " adapter to your Auto XTL camera by matching the red dots and turning
clockwise until it clicks into position.

(b) Mount lens by screwing it into the adapter.

(c) Turn meter on and focus.

(d) Depress Depth of Field preview button and rotate aperture ring until meter needle in viewfinder moves into
index mark O (see viewfinder control center diagram) immediately above the f/1.4 index.

(e) Release the Depth of Field preview button and shoot. The lens will now automatically stop down to the
proper exposure setting (Y).

2. Preset "T" Lenses

(a) Attach Mamiya/Sekor " T " adapter to any preset " T " lens by screwing on to the lens until it is fully seated.

(b) Mount lens and adapter combination to camera by matching the red dots and turning clockwise until the lens
clicks into place.

(c) Focus on the subject.

(d) Rotate aperture ring until meter needle in viewfinder moves into index mark O immediately above f/1.4
index mark. (See diagram) (Z).

(e) Shoot.
View original page 17Page 18 · Read text
ACCESSORIES

You can use your new Auto XTL Camera on microscopes, extension bellows, slide copiers, extension rings, and
copy stands. Use these accessories by following the " stop down " method of manual exposure meter reading
outlined above. Please refer to instructions enclosed with the accessories.


TROUBLE SHOOTING

Problem: FILM COMPLETELY BLANK WHEN PROCESSED, INDICATING NO EXPOSURE HAS
BEEN MADE.

Possible cause: Improper loading. Review the section on film loading and be sure you are loading the camera
correctly, with the film being securely attached to the take-up spool and winding in the CORRECT
DIRECTION, that is, UNDER the take-up spool. Film may not have gone through camera at all.

Problem: SELF TIMER DOES NOT OPERATE SHUTTER.
Possible cause: Timer not rotated full 30 degrees. Timer must be rotated to some point between 30 and 70
degrees.

Problem: FLASH PICTURES EITHER BLANK OR ONLY PARTIALLY EXPOSED.
Possible cause: Improper shutter speed for the type of bulb used.
Or improper cord receptacle used for the type of bulb or shutter speed. Check Flash Synchronization tables
carefully.

Problem: SHUTTER WILL NOT RELEASE.
Possible cause: Film Advance lever not advanced far enough. A full stroke is necessary for winding the shutter.
However, a ratchet incorporated within the advance mechanism will allow you to accomplish a full wind in a
series of short strokes.

If any problem listed above cannot be solved in the manner suggested, do not attempt to repair your camera.
Take it, or send it, instead, to your nearest service station. A minor problem could possibly be aggravated by
tampering.

HELPFUL HINTS
View original page 18
Page 19 · Read text
STORAGE: If the camera will not be used for an extended length of time, store it with the shutter un-wound.
This relieves tension on the spring. Lock the exposure meter " Off " and remove the battery. Never store in
areas where temperatures exceed 100 degrees F. or go below freezing (32 degrees F).
Protect against excess moisture by using silica gel or other desiccant.
Never expose the camera to direct sunlight for extended periods of time. Avoid areas where exposure to salt
water or salt air occurs.

CARE AND CLEANING: Use a blower or camel hair brush to clean film chamber and area around take up
spool before loading film into camera. Never use your own breath to blow out dust from a camera. Your breath
is full of moisture which will cause corrosion of the precise operating parts of your camera. Clean lens with
lens tissue and a good quality lens cleaning liquid only. Do not clean lens at all unless you notice that it needs
it. Avoid rubbing the surface of the lens if there is any loose grit or dirt present.

                    Don't use a handkerchief. Never touch the lens with your bare fingers.
 Never rub the surface of the reflex mirror. If there are foreign particles of any kind that cannot be removed by
                                              blower
            or camel hair brush, leave them alone until a factory approved serviceman is available.
                              Dirt on the mirror can have no effect on the picture.


                              SPECIFICATIONS

CAMERA TYPE:
35 mm Single Lens Reflex with automatic exposure control, manual exposure control and two built-in behind-
the-lens exposure systems, one for spot readings and one for average readings.

FILM SIZE AND CAPACITY:
35 mm perforated film in 20 or 36 exposure cartridges.

FILM FORMAT:
24 x 36 mm

STANDARD LENSES:
55 mm f/1.4, Mamiya/Sekor ES 7 elements 5 groups Fully automatic aperture control Angle of view: 43°
Lens accessory size: 52 mm

55 mm f/1.8, Mamiya/Sekor ES 6 elements 5 groups Fully automatic aperture control Angle of view: 43°
Lens accessory size: 52 mm

LENS MOUNT:
Mamiya/Sekor bayonet

SHUTTER:
Focal plane type with speeds from 1 to 1/1000 sec. and " B " for time exposures.

SELF-TIMER:
Built-in variable delay timer to 8 sec.

EXPOSURE METER:
Sensitive CdS exposure meter provides average or spot 6~ center reading. Light is measured at film plane.
View original page 19Page 20 · Read text
EXPOSURE CONTROL:
Automatic control. Set lens to " AUTO " (or green dot); camera will automatically select correct exposure or
lens may be manually set to aperture indicated in the viewfinder.. Metering system will also operate with
Mamiya/Sekor Praktica 42 mm lens mounts, preset lenses and other accessories by using lens " stop-down "
method.

EXPOSURE RANGE: (ASA 100)
f/1.4 lens: EV 3--18
f/1.8 lens: EV 3.7 - 18

EXPOSURE METER POWER SUPPLY:
1.5v silver oxide Eveready S-76 battery.
Battery ON/OFF switch and tester provided.

FILM SPEED RANGE:
ASA 25 to 3200 DIN 15 to 36

VIEWFINDER:
Penta-prism with Micro diaprism center surrounded by ground glass area on Fresnel field for rapid focusing.

VIEWFINDER MAGNIFICATION: At infinity..
With 55 mm lens: 0.95X

VIEWFINDER CONTROL CENTER:
Lower portion of viewfinder indicates shutter speed selection. Right side of viewfinder indicates Auto/Manual
setting; spot/ average meter system; under and over exposure warning, and f/stop.

REFLEX MIRROR:
Instant return type

FLASH SYNCHRONIZATION:
With focal plane bulbs: 1 to 1/1000 sec. With Class " M " bulbs: 1 to 1/30 sec. With Class " F " bulbs: 1 to 1/30
sec. With Electronic Flash " X ": 1 to 1/60 sec.

FLASH CONTACTS:
Two flash contacts provided--" FP " and " X "
Flash contact " X " built into accessory shoe on penta-prism.

FILM ADVANCE:
Ratchet type film advance.

FILM ADVANCE LEVER:
May be advanced in one stroke or several short strokes for a total of 150° rotation. Advance lever also contains
meter ON/OFF control and double exposure prevention system.

EXPOSURE COUNTER:
Progressive type from " S " (start) to 36. Counter automatically resets to " Start " when film compartment door
is opened.

DIMENSIONS:
Width: 5 7/8" (149.5mm)
View original page 20
Page 21 · Read text
Height: 3 3/4" (95 mm)
Thickness (without lens): 2 1/8" (54 mm)

WEIGHT:
1 lb. 9 oz. (710 grams)


                               This information was provided by a reader:


One way to use the Mamiya ZE "P" adapter with the Mamiya ZE-X without damaging the
ZE-X is to first attach an Osawa MC-4 ZE 2x teleconverter to the ZE-X camera body. Then
you can attach the ZE "P" adapter to the teleconverter in order to use lenses from
the DSX, MSX, DTL and TL series of cameras. Of course you will have then doubled your
focal length by two but at least you have the ability to use those M42 lenses with the ZE-X.

When used with the ZE-X, the Osawa MC-4 ZE 2x teleconverter will not allow a light
meter readout in the viewfinder from Mamiya M42 type lenses with ZE "P" adapter or
any E or EF type lenses without ZE "P" adapter. The MC-4 ZE 2x only gives a light meter
readout in the viewfinder with the ZE-2 camera, and set apertures will have no effect as
far as the light meter is concerned in the ZE-X. A hand-held light meter will be required for
the ZE-X so you can then set the aperture and shutter speed needed in fully manual
mode.

A correct exposure can then be obtained with the ZE-X/MC-4 ZE 2x combination. The ZE
"P" adapter alone, may also be used directly on Mamiya NC type cameras with lenses for
DSX, MSX, DTL and TL series of cameras. (Note: E and EF type lenses for the ZE, ZE-2
and ZE-X are not interchangeable with CS type lenses for the NC series of cameras and
vice-versa.)

The "P" Adapter permits the use of automatic or preset lenses using the universal thread
mount. In the case of lenses having an automatic diaphragm pin the "P" Adapter will allow
you to use these lenses in a semi-automatic fashion. that is, using the "stop down" method
of metering the Auto XTL through the "P" Adapter will activate the diaphragm pin during
exposure.
View original page 21Page 22 · Read text
Description of Parts


           Operating Instructions
               1. Attach the P Adapter to your Auto XTL
            camera by matching the red dots and
             turning clockwise until it clicks into
              position.

               2. Mount lens by screwing it into the
              adapter.

               3. Turn meter on and focus.

               4. Depress the Depth of Field preview
             button and rotate the aperture ring or shutter
            speed dial until meter needle in viewfinder
           moves into index mark ~ immediately
            above the f/1.4 index.

               5. Release the Depth of Field preview
             button and shoot. The lens will now
             automatically stop down to the proper
            exposure setting
View original page 22Related documents and language editions
From the M. Butkus archive. Original publisher and archive notices are retained.
Check the model and edition against your equipment.
PDF verified 2026-10-10.