Film cameras
Mamiya Single Exposure Attachment User manual
User manual for Mamiya Single Exposure Attachment. 5 pages in English. Read the original PDF, download or print a copy without registration.
5 pagesEnglish0.9 MB PDF
Loading your manual…Open PDF directly
Document details
- Brand
- Mamiya
- Model / document
- Mamiya Single Exposure Attachment
- Document type
- User manual
- Language
- English
- Pages
- 5
- File size
- 0.9 MB
- Category
- Film cameras
- Document date
- Not specified in catalog
Search available document text
Find a term, then jump to its page in the original PDF. Image-only pages may not be searchable; check the PDF for exact wording and diagrams.
Page 2 · Read text
www.orphancameras.com
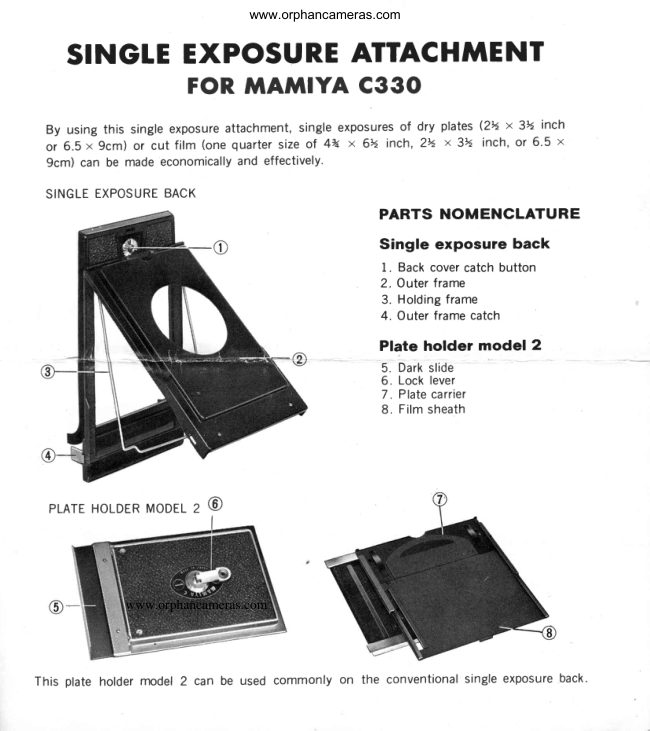
  SINGLEEXPOSURE ATTACHfrIENT
         FOR TTAftIIYA C33O

  By using this single exposure attachment, single exposuresof dry plates (2Y" x 3% inch
  or 6.5 x 9cm) or cut film (one quarter size of 4% x 6v, inch, 2y', x 3?" inch, or 6.5 x
  9cm) can be made economicallyand effectively.

 SINGLEEXPOSUREBACK
                                PARTS NOMENCLATURE
                                            Single exposure back
                                                                 1. Back cover catch button
                                                                2. Outer frame
                                                                 3. H olding f rame
                                                                4. Outer frame catch
                                                   Plate holder model 2
                                                              5. Dark slide
                                                                6. Lock lever
                                                      7 . Plate carrier
                                                              8. Film sheath


  PLATEHOLDERMODEL2 @


             www.orphancameras.com


This olate holder model 2 can be used commonly on the conventionalsingle exposureback.
View original page 2Page 3 · Read text
www.orphancameras.com

CHANGING THE BACK COVER
    Replacethe camera back cover with the single exposure
back.
Detaching  Method
    Releasethe back cover catch button and open the back
cover halfway.
     In  this condition, slide the back cover in the arrow
direction (as sho'wn in the photo) while pressing the back
cover hinge release'until the back cover is detached.When
replacingthe back cover with the tripod attached, it is easily
detached after fully opening the back cover by sliding it
horizontally,while pressing the tip of the back cover hinge
releasefrom the inner side of the back cover.
Attaching  Method
   When installingthe back cover, press the hinge release
with the hinge portion of the cover while insertingthe hinged
shaft of the back cover in the body receiver,sliding the back
cover in the reverse direction f rom detaching it. In  this
manner, the back cover can be simply installed.


                                                                                                                                                               Digitally signed by mike butkus
                                                                                                                       DN: cn=mike butkus,                      mike          o=orphancameras, ou=29,
                                                                                                                                 email=mike@butkus.org, c=US

                                                                                                                                                            -05'00'LOADING  THE  PLATE  HOLDER     butkus   Date: 2017.12.18 23:54:45
Using  Dry Plates
    At first, draw out the dark slide(5) from the plate hcllder
and raise the lock lever (6) located on the rear side of the
plate holder. By turning  it a quarter revolution, the plate
 carrier(7) will spring out.
   When using a dry plate,previouslyremovethe film sheath
(8) by sliding it horizontally.In this condition,gently insert
the dry plate into the plate carrier(7) from the lateralgroove.
When inserting the dry plate,always face the emulsion side
outward.
    After inserting the dry plate, pull out the lock lever and
fold  it upward after turning  it a quarter revolution, then
insert the dark slide (5).
Using  Cut  Film
   When using cut film, previouslyinsert the film into the
film sheath (8), then insert the film sheath into the plate
carrier in the same procedureas the dry plate.
View original page 3Page 4 · Read text
www.orphancameras.com

NOTE:                                                    F I L M S H E A T H
lnserting a dry plate(or cut  f ilm) into the plate holder must
be done in a dark room. Further, never expose the prate
holder containingthe dry plate or cut film to direct sunlight
or leave it in a bright room.
when the plate holder is not loaded, pull out the dark slide
(5) from the plate holder. By doing so, it can be immediately
determinedwhether or not a dry plate or cut film is inserted.
when using one quarter size of 4% x 6% inch cut film, use
the type J   f ilm sheath. To divide this  f ilm into four equal    TYPEJ     TYPED
parts under darkroom conditions, MAMIYA provides a con-
venient cutter. When using 2'2, x 3% inch or 6.5 x 9cm
film, use the type D film sheath.
  W hen inserting a dry plate or cut  f ilm,  if the lock lever
 is folded upward, a figure will appear in the lo.werwindow.
 Utilize this figure for a memo of the photographs. Figures
on plate holders, 1 to 3 are provided.


TAKING PICTURES
    Before insertingthe plate holder, always removethe spool
rn the camera, and install the prepared plate holder on the
single exposureback. Initially,when pressingthe outer frame
catches @) inside, while gripping them from the right and
left, the outer frame (2) can be opened. Fully open the outer
frameQ) and the holding frame(3), attachingthe plate holder
to the back cover. Close the holding frame (3) and the outer
frame (2)as they were while keepingthe plate holderin proper
position. Lock the both outer frame catches(a) while tightly
pressing both lower ends of the outer frame (2).
    After conf irming the catches lock on both sides, pull out
the dark slide (5).
View original page 4Page 5 · Read text
www.orphancameras.com

   When turning the lock lever(6) a quarter revolutionafter
raising it, the dry plateor cut film is shifted to the focal plane
bV spring action, and photographs can be taken in  this
condition.
   When  f inishing taking pictures, pull out the lock lever
 (6) and fold it downward after turning it a quarter revolution.
 With this operation, symbol E will appear, indicating "EX-
 POSED':Reinsertthe dark slide without fail.


CHANGING THE PLATE HOLDER
    Releasethe outer frame catches (4) by pressing them
inward, then open the outer frame. Next, raise the plate
holder approximately90" against the camera body by holding
the lower end of the plate holder, detaching it from the upper
portion first. Now the plate holder can be detached from the
holding frame.
   When replacingthe plate holder, if handled only by hold'
ing the dark slide, this method will cause light leaks. Pay
 atisi rilun io  titis Puii-ri.

NOTE:
The conventional single exposure back and plate holder for
 the MAMIYAC seriescan not be used with the C330. However,
 this plate holder M odel 2 can be used on the conventional
 single exposureback.


                                                                                                                                                                                                                                                                                                 , it,"n            ftlAftllYA   cAftrERA  CO., LTD.                                                                  r,j:..     ,"n
                                                                            Printedin Japan.
View original page 5From the M. Butkus archive. Original publisher and archive notices are retained.
Check the model and edition against your equipment.
PDF verified 2026-10-10.