Camera accessories
Mamiya Winder ZE User manual
User manual for Mamiya Winder ZE. 8 pages in English. Read the original PDF, download or print a copy without registration.
8 pagesEnglish0.7 MB PDF
Loading your manual…Open PDF directly
Document details
- Brand
- Mamiya
- Model / document
- Mamiya Winder ZE
- Document type
- User manual
- Language
- English
- Pages
- 8
- File size
- 0.7 MB
- Category
- Camera accessories
- Document date
- Not specified in catalog
Search available document text
Find a term, then jump to its page in the original PDF. Image-only pages may not be searchable; check the PDF for exact wording and diagrams.
Page 3 · Read text
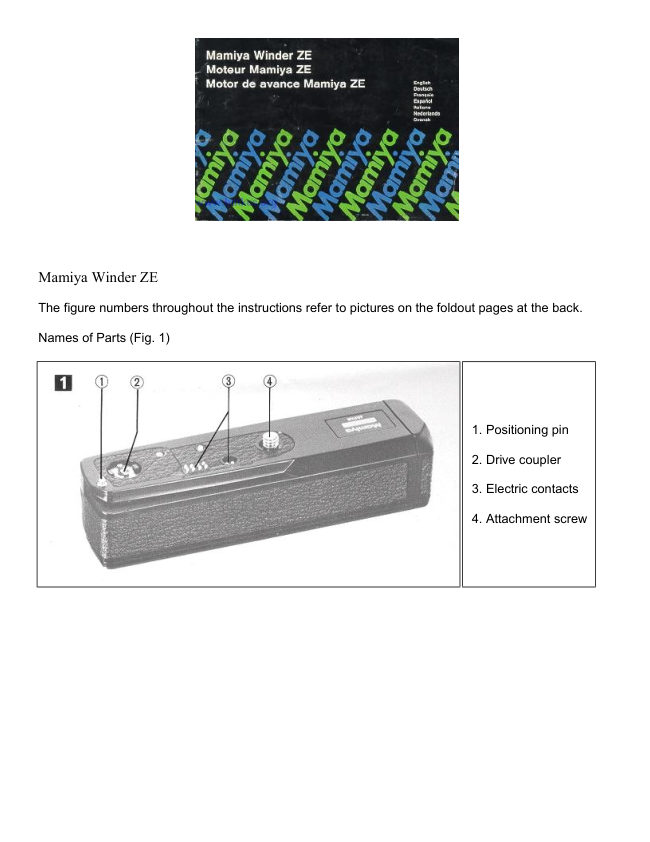
5. Battery chamber cap
                                                  9. Attachment screw key
6. Battery chamber lock slide
                                             10. Tripod socket
7. Pilot LED
                                             11. Rewind button
8. Power switch
View original page 3Page 5 · Read text
3. Turn the Attachment Screw Key to fasten
                                            the Winder to the camera. After turning on
                                            the Power Switch, the Mamiya Winder ZE is
                                        ready for use (Fig. 7).


When the camera is set at "AUTO" when used with the Mamiya Winder ZE, each frame will be
correctly exposed even  if light conditions change while shooting a sequence. AE Lock operation is
also possible. in this case, however, all frames will be exposed at the value determined for the first
frame. U# only as required.


Releasing the Shutter
The operation of the Mamiya Winder ZE is controlled by the shutter release of the camera. After the
shutter operates, the Winder automatically advances the film and winds the shutter for the next shot.

For single frame operation, remove the finger from the shutter release as soon as the shutter is
released. The Winder will advance the film one frame and stop automatically. If the shutter release
button is held down, the camera and Winder will continue operating for sequence photography at the
rate of approximately 2 frames per second.


Operation Indicator
Each time an exposure is made, the LED on the back of the Winder lights to indicate that operate is
normal. This indicator will flash each time an exposure is made.
View original page 5Page 6 · Read text
At the End of the Roll


                          Rewinding the Film


                                   1. Turn off the Power Switch and press the Rewind Button
                                    (Fig. 8).


                                   2. Rewind the film by turning the rewind crank of the
                          camera clockwise until you feel the crank begin to turn
                                        lightly (Fig. 9).


                     When the end of a roll of film is reached, both the camera
                         and Winder will automatically stop operating. And the pilot
                     LED will light constantly to indicate that the end of the film
                          has been reached.


                                 3. Remove the exposed roll of film by opening the back of
                              the camera and reload if desired.


Manual Operation
To operate the camera manually with the Winder attached, just turn off the Power Switch and use the
film advance lever of the camera as you would normally. There is no need to detach the Winder for
manual operation.


Detaching the Winder

1. Turn off the Power Switch.

2. Turn the Attachment Screw Key counter clockwise until the Winder is detached from the camera.
View original page 6Page 7 · Read text
Notes:

1. Be sure to turn off the Power Switch when using the #If-timer with the Winder ZE attached to the
camera; otherwise, the camera will continue to shoot several frames once the shutter is tripped by the
self-timer.

2. Be sure to turn the Power Switch off when detaching the Winder from the camera. And do not try to
operate the Winder by shorting the contacts directly when the Winder is detached from the camera.
This will damage the Winder, making it inoperable, because the internal fuse will be blown.


Specifications:

Applicable camera: Mamiya ZE

Operating speed: Up to approx. 2 frames per second, continuous or single frame.

Operational shutter speed range: 1/1000 to 1 sec. and B (Automatically switches to single frame
    operation at B.)

Shooting control: Using camera shutter release.

Operation indicator: Flashing pilot LED.

Film end indicator: Continuously lit pilot LED.

Power source: Four 1.5V AA-type alkaline manganese or Ni-Cad batteries.


Number of rolls: Using 36-exposure film at normal temperature

AA-type alkaline-manganese batteries: approx. 60 rolls or more.

AA-type Ni-Cad batteries: approx. 120 rolls or more


Dimensions: 139.5{W) x 36.5tD) x 32.51H) mm. - {5-1/2 x 1-7/16 x 1~9/32 in.)

Weight: 210 9. (7.4 oz.), without batteries.


· All specifications are subject to change without notice.
View original page 7Page 8 · Read text
Notes on Batteries:

1. Remove the batteries when the Mamiya Winder ZE is not to be used for an extended period
in order to prevent possible damage due to leakage.

2. Manganese batteries con also be used, but the number of rolls of film that can be exposed
per set is less.

3. Battery performance is less under low temperature conditions, so Ni-Cad batteries should
always be used fully charged. Alkaline-manganese batteries should be kept warm during use.

4. All four batteries should be replaced at the same time. Never mix new and old batteries, or
batteries of different brands, as leakage may result. 5. Battery fife varies depending on the
type of battery, the storage after manufacture, the amount of time that has elapsed since
manufacture, on whether usage is continuous or intermittent, the type of film used and the
ambient temperature.
View original page 8
From the M. Butkus Camera Manual Library. Original publisher and archive notices are retained.
Check the model and edition against your equipment.
PDF verified 2026-10-10.