Film cameras
Mamiya ZE-2 Quartz User manual
User manual for Mamiya ZE-2 Quartz. 22 pages in English. Read the original PDF, download or print a copy without registration.
22 pagesEnglish2.1 MB PDF
Loading your manual…Open PDF directly
Document details
- Brand
- Mamiya
- Model / document
- Mamiya ZE-2 Quartz
- Document type
- User manual
- Language
- English
- Pages
- 22
- File size
- 2.1 MB
- Category
- Film cameras
- Document date
- Not specified in catalog
Search available document text
Find a term, then jump to its page in the original PDF. Image-only pages may not be searchable; check the PDF for exact wording and diagrams.
Page 2 · Read text
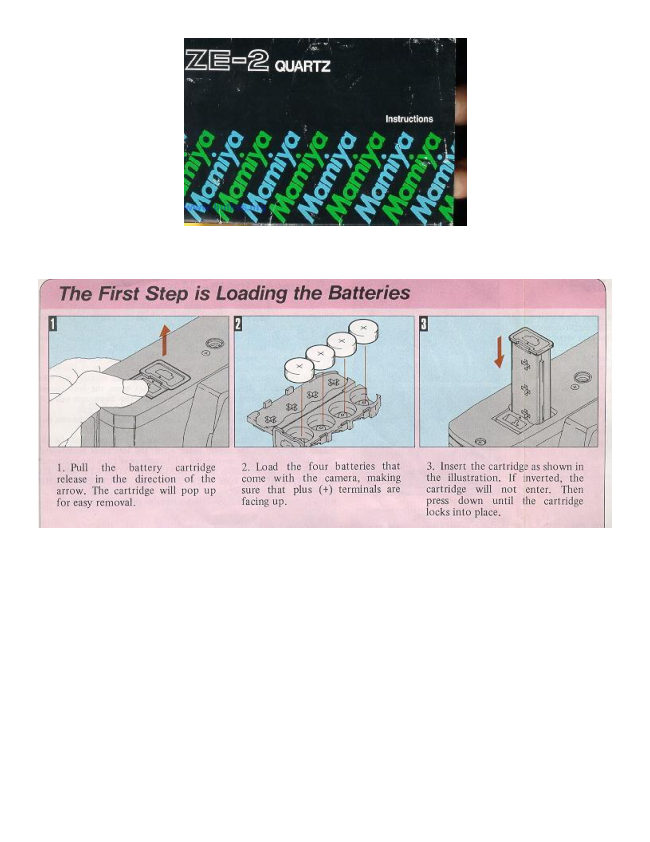
1, Pull the battery cartridge 2, Load the four batteries that 3. Insert the cartridge as shown in

release in the direction of the come with the camera, making the illustration. If inverted, the

arrow. The cartridge will pop up sure that plus (+) terminals are cartridge will not enter. ‘Then

for easy removal. facing up. press down until the cartridg
locks into place.
View original page 2
Page 3 · Read text
If the white button (A) is set at
the central index mark,
Pe ting cannot be turned. In
this case, rotate the aperture ring
away from the index mark while
depressing the white button.

Match the red dots on the lens
and camera body, then rotate the
lens in the direction of the arrow
until it clicks into position.

1. Open the back cover of the
camera by pulling up on the re-
wind knob. (Avoid direct sunlight
when loading or unloading film.
Stand in the shade or cast a
shadow with your own body.)

Load a film cartridge into the film
chamber of the camera and return
the rewind knob. to its original
position to hold the film in place,

2. Insert the end of the film into
the slot of the film take-up spool,

3. First advance the film by
operating the film advance lever;
then rotate the rewind knob in
the direction of the arrow to take
the slack out of the film. It is
important to make sure that the
both the upper and lower teeth of
the sprocket are engaged in the
perforations of the film.
View original page 3
Page 15 · Read text
SPECIFICATIONS

Type of camera:
35mm single-lens reflex (SLR), aperture priority "Quartz Timed" automatic exposure camera,
manual override.


Picture format: 24mm x 36mm.
Usable lenses: Mamiya-Sekor E series lenses with fully automatic diaphragm operation and
open-aperture metering. CS lenses for the NC cameras and thread mount lenses for other
Mamiya 35mm cameras also usable on AUTO with stopped-down metering.

Shutter:
Electronically controlled metal focal plane. Speed range from 1 sec. to 1/1000 sec. at AUTO
position; Manual speed from 1 sec. to 1/1000 sec. in one stop increment with click stop at each
nominal position, plus mechanical speeds of X (1/90 sec.) and B.

Slow shutter speed warning:
Buzzer sounds when shutter speed drops below the slowest safe speed for hand-held shooting
with the lens in use.

Self-timer:
Approx. 10-second delay.

Sync contact:
X-sync terminal and hot-shoe.

Metering system:
TTL center-weighted, open-aperture metering using SPD (silicon photo diode).

Metering range:
EV1.5—EV18 (ASA100, f/1.7 lens) EV2 - EV18 (ASA100, f/2 lens).

Exposure compensation:
+2 f-stops.
View original page 15
Page 16 · Read text
Film speed range:
ASA12-3200.

Viewfinder information display:
LED dot displays shutter speeds of 1/30 - 1/1000 sec., plus LT. Flashing LEDs warn of over-
and under-exposure and battery condition. LED dot flashes at "M" with dial set at manual
shutter speeds.

Viewfinder magnification ratio:
0.85X with 94% coverage of field of view (with 50mm lens at infinity).

Focusing screen:
Fixed-type with 45° split-image rangefinder spot, microprism and matte field.

Film advance:
Using film advance lever with 130° winding angle and 30° stand-off angle.

Exposure counter:
Additive type. Automatic reset to "S" mark when camera back is opened.

Film rewind:
Manual rewind with rewind lever.

Power source:
Four 1.5V silver oxide batteries SR44 (Eveready S-76, UCAR S-76, Ray O Vac RS-76 Mallory
MS-76, or equivalent). Four 1.5V alkaline manganese LR44 (same size as S-76, RS-76 or
MS76).

Power switch:
Shutter release button.

Flash synchronization:
Shutter speed automatically set to 1/60 sec. when the Mamiyalite ZE is fully charged. Other
electronic flash units usable at "X" position ( 1/90 sec.).

Winder coupling:
Electrical contact and coupler built-in for operation with the Mamiya Winder ZE.

Dimensions:
139.5mm(W) x 88.5mm(H) x 50.5mm(D)

Weight:
460g (body only)

Specifications and design are subject to change without notice.
View original page 16
Page 17 · Read text
ACCESSORIES FOR YOUR ZE-2

Filters
Mamiya filters are made of high quality optical glass to maintain the high performance of the
camera lens. They are available in the following five types: SY48 (Y2), S056 (02), SL39 (UV),
YG, and SL-I B (skylight).

Lens Hoods ZE
Mamiya lens hoods are an important accessory for getting the best possible performance from
the camera lens because they minimize the entry of stray light which can cause internal
reflection and lead to flare or ghost images. Always use the lens hood designed for the specific
focal length of the lens being used.


Diopter Correction Lenses ZE

Far- and near-sighted people sometimes find it difficult to focus a camera due to the optical
characteristics of the viewfinder system. This situation, however, can easily be remedied by
using a diopter correction lens and adapter.
These diopter correction lenses are available in six different strengths: +3, +2, +1, -1, --2 and -3.

Before purchasing a diopter correction lens at your Mamiya dealer, be sure to actually try
various strength diopter lenses and select the one that suits your eyesight.

1. Rubber Eye-cup ZE with Adapter
This adapter is required for attaching the diopter correction lenses to the camera. The rubber
eye-cup helps to prevent stray light entering the viewfinder while taking photographs.
To attach the diopter correction lens, first remove the mounting ring located inside the eye-cup
by turning it counter-clockwise; then put the lens in place and replace the ring.

2. Magnifier ZE
The magnifier is a useful aid for critical focusing as required in copy work, close-up
photography, and similar applications. The size of the image is doubled and only the center part
View original page 17
Page 18 · Read text
is visible for more accurate work. The magnifier also features diopter adjustment from -5 to +5.

3. Angle Finder ZE
The angle finder is useful when shooting at low angles and for copy work. Click stops are
provided every 90°, but full 360° rotation is possible for viewing even from the side or from
below. The angle finder also features built-in diopter adjustment from -4 to +4.

4. Mamiyalite ZE
The Mamiyalite ZE is a compact auto electronic flash with a Guide Number of 17 (ASA100,
meters) and contact for hot-shoe synchronization. Two auto ranges and manual operation are
available using the selector switch.
When used with the Mamiya ZE, the LED at the 60 position inside the viewfinder lights when
the flash unit is fully charged and the shutter speed is automatically set to 1/60 sec.
Angle of coverage: 45° vertical, 60° horizontal. Attaching the wide-angle diffuser provides
coverage for a 28mm wide-angle lens.
Batteries used: Four alkaline or Ni-Cad penlight batteries.

5. Mamiya Winder ZE
The Mamiya Winder ZE provides continuous sequence photography capability at speeds of up
to approximately two frames per second. Since there is no need to operate the film advance
lever, additional photographic opportunities can be captured because the subject can be
followed continuously without taking the eye away from the viewfinder.
Batteries used Four alkaline or Ni-Cad penlight batteries.

6. Close-up lens ZE
The close-up lenses ZE are convenient attachment lenses which screw directly to the filter
threads of the master camera lens enabling swift and easy conversion to close-up photography.

Two models are available: Close-up lens No. 1 having +2 diopters, and Close-up lens No. 2
having +4 diopters.

7. Auto Extension Rings ZE
A set of three extension rings are intended for close-up photography and mount between the
camera body and lens, directly coupling with the ZE camera metering system and the lens
automatic diaphragm. Three different lengths of the rings can be used individually or in
combination.

8. Auto Bellows ZE
This is an easy to operate, precision bellows type close-up attachment. Automatic aperture stop-
down coupling is possible using a double cable release. And the front standard can be swiveled
360°, permitting simple reversing of the lens for large magnification ratios with images that are
sharp to the very edges. Shift control also enables control of perspective. And the camera can
also be rotated at the back for a choice of vertical or horizontal format with easy operation. The
focusing rail allows the entire bellows unit to be shifted back and forth for sensitive adjustment
View original page 18
Page 19 · Read text
of distance . and focusing.

9. Slide Copier ZE
This device is mounted on the front of the Auto Bellows for making copies of slides.
Convenient film trays are provided for copying film strips The slide stage also moves vertically
and horizontally for easier cropping of 35mm slides.

10. Bellows Stand ZE
Used with the Auto Bellows, the Bellows Stand is used for copying small objects such as
stamps, coins, insects, etc.. Clips are provided for holding subjects on the platform. And the
platform rotates for precise positioning. The platform is also. finished to provide 18%
reflectance, convenient for measuring exposures. A clear glass platform is also included for
backlighting of subjects.

11. P-Mount Adapter ZE for Mamiya TL/SX Lenses:
This adapter is used for mounting Mamiya DSX, MSX, DTL and TL lenses on the Mamiya ZE
camera. Stopped-down AE exposure control is possible using this adapter.

<<<< Additional information not in the manual:
I just wanted to point out that not all Mamiya M42 lenses are safe to use with the P adapter for
the Auto-XTL. If you attempt to use the SX type lenses with the Auto-XTL P adapter, the
aperture sensing pin will dig into the P adapter face since it is not perfectly flush with the outer
surface edge of the SX lense. Furthermore, since the entire moving surface of the aperture ring
of the SX lense comes to rest against the P adapter face, it will lock down the aperture control
of the lense and make it impossible to turn, therefore preventing SX lens f-stop manipulation.

Mamiya M42 AUTO lenses seem to be safe choices as are M42 Yashica-Yashinon, M42
Meyer-Optik and M42 Zeiss MC Sonnar (S) lenses. Any aperture ring that rotates at the
extremity of a lens should be avoided. Of course the SX lens works perfectly well with the "ZE"
P adapter for Mamiya ZE series lenses which it was designed for. Lenses with Auto and Manual
switches like Zeiss MC Sonnar work well with the Auto-XTL P adapter in conjunction with its
Auto Aperture pin. Lenses that have no Auto Aperture and only manual control of aperture
appear to work equally well like Meyer-Optik Orestor M42.
Robert A. Genna, Connecticut teacher and photographer, 10-23-
04 >>>>>>


This info was provided by a reader:
<< In an added note, I have found that the "ZE" P adapter designed for use with the ZE and ZE-
2 Mamiya cameras will not work on the Mamiya ZE-X camera. Most references for the "ZE" P
adapter give the perception that it can be used on all ZE series cameras. This is not the case for
the ZE-X. If you attempt to use the "ZE" P adapter on the ZE-X camera the adapter will stop
cold at the gold dedicated EF camera/lens contacts of the ZE-X and if you force the installation
View original page 19
Page 20 · Read text
of the "ZE" P adapter onto the ZE-X it will damage those gold contact pins.

I have not seen a reference to this effect in any description of the ZE-X. Furthermore, I have
seen no references for the Mamiya ZM camera allowing adapters that permit the use of lenses
from the DSX, MSX, DTL and TL series of cameras. The ZM does allow 645 series lenses to
be used on "ZE" and "ZE-2" cameras utilizing their "645 adapter ZE". I have however installed
the Mamiya "ZE" P adapter to an Auto Mamiya-Sekor 1:1.8 f=55mm M42 mount lens with it's
f-stop aperture switch set in manual mode on the Mamiya ZM in auto shutter mode with good
operational results. >>

12. Eveready Case ZE

DON'T RUN SHORT ON BATTERIES
The Mamiya ZE has a built-in circuit that automatically gives a warning when battery power is
low this case, the LED corresponding to the correct shutter speed flashes at the rate of 4 times
per second when the shatter release button is lightly pressed.

· The batteries should be replaced as quickly as possible, although several exposures can still be
made. When the batteries go completely dead, the LEDs won't light at all.

               How to Take Pictures Without Battery Power

Set the shutter speed dial to "X". At this setting the shutter operates at the speed of 1/90 sec.
Reset the aperture according to the recommendation shown on the right.

Also, you can use a flash unit at the "X" settings, with or without batteries.

Batteries normally last for one year or more, but it is advisable to replace them once a year at
least. Those who take large numbers of photographs should replace the batteries more
frequently. Always be on the lookout for the flashing LED warning,

GETTING THE MOST FROM YOUR BATTERIES
· Batteries should always be removed when the camera is not to be used for an extended time.
Keep them in a cool, dry place. Leaving batteries in the camera for long periods may result in
leakage which could damage the internal mechanisms.

· When replacing batteries, use 1.5V silver oxide types (Eveready S-76, UCAR S-76, Ray-O-
Vac RS-76, Mallory MS-76, or equivalent. Although 1.3V mercury batteries are the same shape
and size, they will not operate the camera normally.

· Be sure to replace all four batteries at the same time. Do not mix new and old batteries or
batteries of different types or brands.

· When loading batteries into the battery cartridge, be sure the plus and minus terminals are
located properly. Before loading the batteries, be sure to wipe the terminals of the batteries and
View original page 20Page 21 · Read text
the cartridge with a dry cloth to remove any soiling or finger marks, etc.

· Never take apart silver oxide batteries, short them, or throw them into fire.

HANDLING CAUTIONS

* Be sure that the shutter release button isn't pressed down when carrying the camera or when
putting it away as the LED display will stay on and drain the batteries.

* The depth of the tripod socket is 2-3/16 in. (5.5 mml. If a tripod is used with a mount screw
longer than this, the internal mechanisms of the camera may be damaged. Do not use excessive
force when mounting the camera on a tripod.

* Avoid strong vibration and shock since this may cause adverse influence on the delicately
adjusted parts of the camera. Be careful not to drop the camera or allow it to strike against
objects.

* Do not keep the camera for extended periods where temperature is above 100°F (40°C) or
below 5°F (-15°C), or where there is excessive humidity or salt in the air. The camera
mechanism or film can also be damaged if the camera is left for a long time in a place where
there is napthalene or formalene gas. Always store color film at the designated temperature.

* Never touch the surface of the mirror or lens with the hands. Any dust should be blown off
with a blower or wiped off by lightly applying a soft cloth. Be especially sure to never rob the
surface of c mtrror.

* Always clean the camera carefully after photographing at the beach or other place where there
is salt in the air. Clean the many plastic parts by gently wiping with a soft, dry cloth. Never use
solvents when cleaning.

* Inspect the camera periodically when it is not being used. Be sure to inspect moving parts
before trying to take important photographs. This includes the film advance and shatter
operation, electronic flash synchronization, etc. Test shots should also be taken if possible to
discover any irregularities that may exist. (Incidental damage which results in this camera
malfunctioning will not be compensated)

* Do not try to repair or lubricate the camera if some irregularity is discovered. Leave this to
your Mamiya dealer.

When the shutter release button is lightly pressed, an LED lights inside the viewfinder to
indicate the correct shutter speed automatically selected by the camera in accordance with the
aperture setting.

* The 1/1000 LED flashes at the rate of 8 times per second to indicate overexposure. To obtain
View original page 21
Page 22 · Read text
correct exposure, turn the aperture ring until the LED stops flashing.

* The "LT" LED flashes and the buzzer sounds at the rate of 8 times per second to indicate
underexposure. Again, turn the aperture ring until the LED stops flashing. If it does not, use of
the Mamiyalite ZE is recommended.

* The "LT" LED also lights to indicate when the shutter speed is set in the range below 1/30
sec. down to I sec. To shoot at the slow shutter speeds indicated by the "LT" LED, it is
recommended to use either a tripod or the Mamiyalite ZE to prevent blurring.

* Flashing of any of the shutter-speed LEDs at the rate of 4 times per second indicates that the
batteries should be replaced.

* As long as the shutter release button is pressed, the LED display continues indicating the
same shutter speed after the exposure is completed for easy checking of whether or not
exposure was correct.

* The "M" LED flashes at the rate of 8 times per second to indicate the shutter dial is set at a
manual speed.


Slow Shutter Speed Warning
When the shutter speed automatically selected by the camera in the AUTO and AEL (AE Lock)
modes is too slow for hand-held shooting, a buzzer will sound at the rate of I time per second
warning you to set the lens to a wider aperture (giving you a faster shutter speed), or to mount
the camera on a sturdy tripod to avoid the possibility of blurred pictures.

The safe slowest shutter speed for hand-held shooting varies with the focal length of the lens in
use. The slow shutter speed warning stem automatically adjust for this variation when you
change lenses.
View original page 22
From the M. Butkus Camera Manual Library. Original publisher and archive notices are retained.
Check the model and edition against your equipment.
PDF verified 2026-10-10.