Flashes & lighting
Mamiyalite ZE User manual
User manual for Mamiyalite ZE. 8 pages in English. Read the original PDF, download or print a copy without registration.
8 pagesEnglish0.5 MB PDF
Loading your manual…Open PDF directly
Document details
- Brand
- Mamiya
- Model / document
- Mamiyalite ZE
- Document type
- User manual
- Language
- English
- Pages
- 8
- File size
- 0.5 MB
- Category
- Flashes & lighting
- Document date
- Not specified in catalog
Search available document text
Find a term, then jump to its page in the original PDF. Image-only pages may not be searchable; check the PDF for exact wording and diagrams.
Page 4 · Read text
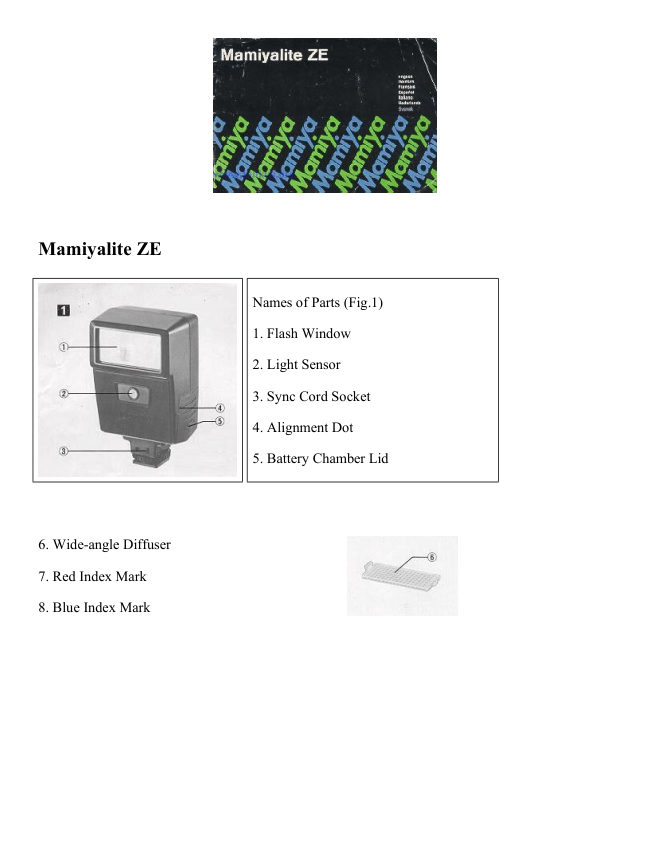
Mounting on the Mamiya ZE
Camera

First, turn off the Main Switch and
loosen the Fastening Ring of the Foot.
Next, slide the Foot into the camera
shoe until it stops and lock the
Mamiyalite ZE tightly into the shoe by
turning the Fastening Ring (Fig.4)


Setting Film Speed (Fig. 5-1)


                                  Align the ASA number of the film
                                   being used with the white ASA Index
                             Mark by sliding the Aperture Scale
                                      Slide right or left. The ASA number set
                                must be the same as the one set on the
                                   camera.


Setting the Aperture (Fig. 5-2)

After the ASA rating of the film has been set, the Aperture Scale will have a large aperture aligned
with the Red Aperture Index Mark and a small aperture aligned with the Blue Aperture Index
Mark. Either of these apertures may be set on the lens aperture ring to obtain correct exposure
automatically. Set the lens aperture ring to the desired aperture.

If the recommended apertures are between the marked numbers, set the lens aperture in the same
way.
View original page 4Page 5 · Read text
To select which of the two apertures to use choose the larger (smaller f-number) when the subject is
at a distance and the smaller when the subject is close, or when you need more depth-of-field.

After deciding which aperture to use, turn the Mode Selector Switch to the red or blue "A",
depending on the color of the Aperture Index Mark of your aperture (Fig.5-3).

Main Switch and Pilot Lamp
Turn on the Main Switch (Fig. 5-4). A few seconds later,-the Pilot Lamp will light to indicate that
the flash is ready to shoot. (Fig.5-5).

Regardless of the shutter speed to which the Mamiya ZE camera is set, it will automatically shift to
the flash sync speed when the Pilot Lamp lights. You can check the recycling of the flash without
looking at the Pilot Lamp each time by checking when the LED in the viewfinder shifts to "60"
because the Mamiya ZE stays in the normal automatic exposure mode when the Mamiyalite ZE is
not fully charged and the Pilot Lamp is not lit.


                                                  Using the Wide-angle
                                                        Diffuser (Fig. 6)

                                           You will find the Wide-
                                                         angle Diffuser in the pocket
                                                           of the vinyl case. To use,
                                                     snap it onto the Flash
                                           Window as shown in the
                                                                 picture. Proper exposure
                                                               will be obtained without
                                                     changing any settings when
                                                         using the automatic flash
                                                  mode. But note that the
                                                        automatic flash exposure
                                                       range becomes smaller, as
                                               shown on the Distance
                                                         Scale by the dots.


Manual Mode (Fig. 7)
Set the Flash Mode Selector Switch to the "M" in the middle. The Mamiyalite ZE always flashes at
full power in this mode. To find the proper aperture, first focus on the subject and read the distance
shown on the lens focusing ring; then read the f-number shown below the Distance Scale of the
Mamiyalite ZE for this same distance. This f-number is the one to which you should set the lens
aperture ring.

When using the Wide-angle Diffuser, set the aperture one f-stop larger than shown on the Aperture
Scale.
View original page 5Page 6 · Read text
Using the Mamiyalite ZE on a
                                    Camera Without a Hot-shoe

                                            Connect the Mamiya Sync Cord
                                   MSC-2 (sold separately) to the
                                                    socket. The hot-shoe contact on the
                                            bottom of the mounting foot will
                                                then retract to prevent misfiring.
                                            Connect the Sync Cord to the X-sync
                                                  terminal of the camera.


Specifications

Type: Automatic exposure control, dedicated electronic flash.

Coupling system: Hot-shoe with unique Mamiya ZE contact, regular hot-shoe or Mamiya Sync
Cord.

Guide number: 17 (ASA100, in meters): 12 with Wide-angle Diffuser. 56 (ASA100, in feet); 39
with Wide-angle Diffuser.

Angle of coverage: 45° vertical, 60° horizontal. Provides coverage for 28mm wide-angle lens with
Wide-angle Diffuser.

Recycling time: Alkaline-manganese AA-type: 6 sec. or less. Ni-Cad AA-type: 5 sec. or less.

Number of flashes: Alkaline-manganese: more than 300. Ni-Cad: more than 90.

Auto flash range selector switch: three-mode selection of two auto flash ranges using red and
blue to distinguish one automatic setting from another, plus a manual setting. (Using ASA100 film,
the red mark indicates f/2.8 and the blue mark indicates f/5.6.)
View original page 6Page 7 · Read text
Auto flash range: Two color-coded f-stop settings.

Red Index Mark:
  Normal 0.5 to 6.0 m (1ft. 8in. to 20ft.)
  Wide 0.5 to 4.3 m (1ft. 8in. to 14ft.)

Blue Index Mark:
  Normal 0.5 to 3.0 m (1ft. 8in. to Loft.)
  Wide 0.5 to 2.1 m (1ft. 8in. to 7ft.)

Film speed setting: ASA25 to ASA800. Dots for one-third step increments between marked
figures.

Shutter speed setting: When attached to the Mamiya ZE, the shutter speed is automatically set
when the unit is fully charged (except when the camera is set at X or B).

Power source: Four alkaline-manganese or Ni-Cad AA-type batteries.

Dimensions: 64 (W) x 45 (D) x 104 (H) mm (2-1/2 x 1-3/4 x 4-3/32 in,) Weight: 150 9. (5.3 oz.),
without batteries.

· All specifications are subject to change without notice.

Notes:

·The Guide Numbers given were measured with new batteries 30 seconds after the Pilot Lamp lit.

· Recycling Time is the shortest interval required between three consecutive flashes using fresh
batteries or fully charged Ni-Cad batteries.

· The Number of Flashes is the count found by discharging the flash continuously at 30-second
intervals until 30 seconds were required for the Pilot Lamp to light with a set of fresh batteries or
fully charged Ni-Cad batteries.

Notes on Batteries

1. Remove the batteries when the Mamiyaiite ZE is not to be used for an extended period in order
to prevent possible damage due to leakage.
2. Manganese batteries can also be used but the recycling time is longer and fewer flashes are
possible.
3. Battery performance is less under low temperature conditions, so Ni-Cad batteries should always
be used fully charged. Alkaline-manganese batteries should be kept warm during use.
View original page 7
Page 8 · Read text
4. All four batteries should be replaced at the same time. Never mix new and old batteries, or
batteries of different brands, as leakage may result.
5. Battery life varies depending on the type of battery, the storage after manufacture, the amount of
time that has elapsed since manufacture, whether usage is continuous or intermittent and the
ambient temperature.
View original page 8
From the M. Butkus archive. Original publisher and archive notices are retained.
Check the model and edition against your equipment.
PDF verified 2026-10-10.