Film cameras
Minolta the missing "multiple exposure" pages User manual
User manual for Minolta the missing "multiple exposure" pages. 6 pages in English. Read the original PDF, download or print a copy without registration.
6 pagesEnglish0.1 MB PDF
Loading your manual…Open PDF directly
Document details
- Brand
- Minolta
- Model / document
- Minolta the missing "multiple exposure" pages
- Document type
- User manual
- Language
- English
- Pages
- 6
- File size
- 0.1 MB
- Category
- Film cameras
- Document date
- Not specified in catalog
Contents
- Multiple exposures1
- Bright light sources3
- Temperature3
- Developer rollers3
- Lens3
- Helpful hints for using the camera’s special features3
- Programmed time exposures3
- Manual time exposures3
- Sequential pictures4
- Multiple exposures4
- Full lifetime warranty4
- Your warranty options4
- For information and help4
- Accessories5
- Light Lock Close-Up Lens5
- Close-Up Lens F1125
- Close-Up Stand5
- PhotoFile5
- Specifications6
- Aperture/shutter system:6
- Camera size:6
- Camera weight:6
- Film advance:6
- Film size:6
- Film speed:6
- Film type:6
- Lens:6
- Liquid crystal display:6
- Photocell:6
- Power source:6
- Programmed flash:6
- Self-timer:6
- Sonar autofocus system:6
- Viewfinder:6
- Viewfinder display:6
- Guide to better pictures3
Search available document text
Find a term, then jump to its page in the original PDF. Image-only pages may not be searchable; check the PDF for exact wording and diagrams.
Page 1 · Read text
Features 17


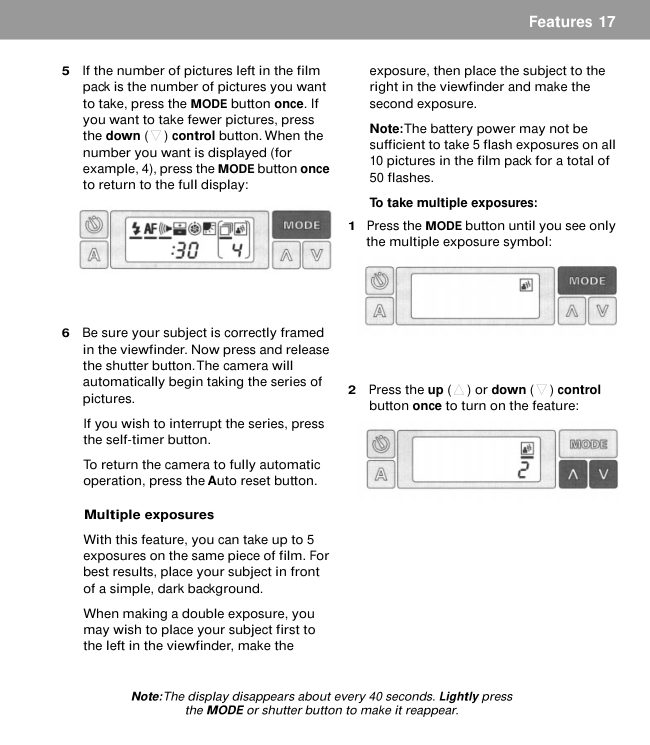
5   If the number of pictures left in the film       exposure, then place the subject to the
   pack is the number of pictures you want        right in the viewfinder and make the
   to take, press the MODE button once. If       second exposure.
   you want to take fewer pictures, press
                                              Note: The battery power may not be
   the down (X) control button. When the
                                                  sufficient to take 5 flash exposures on all
   number you want is displayed (for
                                             10 pictures in the film pack for a total of
   example, 4), press the MODE button once
                                           50 flashes.
   to return to the full display:
                                             To take multiple exposures:

                                    1  Press the MODE button until you see only
                                               the multiple exposure symbol:


6  Be sure your subject is correctly framed
    in the viewfinder. Now press and release
   the shutter button. The camera will
   automatically begin taking the series of
                                    2  Press the up (Z) or down (X) control
    pictures.
                                              button once to turn on the feature:
     If you wish to interrupt the series, press
   the self-timer button.

   To return the camera to fully automatic
   operation, press the Auto reset button.


   Multiple exposures

   With this feature, you can take up to 5
   exposures on the same piece of film. For
   best results, place your subject in front
    of a simple, dark background.

  When making a double exposure, you
  may wish to place your subject first to
   the left in the viewfinder, make the


          Note:The display disappears about every 40 seconds. Lightly press
                   the MODE or shutter button to make it reappear.
View original page 1Page 2 · Read text
18 Features


  3  Press the MODE button once. The number  5  Frame your picture in the viewfinder and
     2 will start flashing:                         press the shutter button to make the first
                                                 exposure. The film stays in the camera
                                          and the digital display shows how many
                                              exposures you have left to take.

                                                 Note: You can make changes (such as
                                              exposure adjustments, flash on or off,
                                                               etc.) before each additional exposure.

                                          Frame the next image in the viewfinder
  4  You must now decide how many           and press the shutter button again. Do
     exposures you want to make.                   this for each exposure. The camera will
                                                         eject the picture after you take the last
          If you want to make 2 exposures, press
                                                 exposure.
      the MODE button once more. The number
     2 will stop flashing and the camera will       To return the camera to fully automatic
      return to the full display. You can now         operation, press the Auto reset button.
     make 2 exposures.

          If you want to take more than 2
      exposures, press the up (Z) control
      button to increase the exposures to 3,4,
      or 5. Press the MODE button once to
      return to the full display.


                                              Caution:This camera is battery-operated.
                                                     Closely supervise children when camera
                                                                is operated by them or used in their
                                                    presence. To prevent electrical shock,
                                             camera should not be exposed to or
                                            immersed in water or other fluids,
                                                   disassembled, or operated if dropped or
                                             damaged. For repair information, contact
                                            a Polaroid Service Center.


                  Note:The display disappears about every 40 seconds. Lightly press
                          the MODE or shutter button to make it reappear.
View original page 2Page 3 · Read text
Features 19
               Guide to better pictures
Bright light sources                       Helpful hints for using the
If your subject is placed in front of a window  camera’s special features
in daylight, the camera’s photocell measures
the bright light, causing your subject to be    Programmed time exposures
too dark in the picture. Use the backlighting   To create the illusion of motion in your pictures
feature to illuminate your subject without    when photographing at night: Place the
changing the entire exposure.              camera on a steady support, turn off the
                                            flash, and program the exposure time for 2-5
When a bright source of light (lamplight,
                                           seconds. The lights of moving cars will
candlelight, etc.) is in the central part of the
                                         appear as streaks of light in your picture.
scene and in front of the subject, the
photocell measures the bright light, causing   To take a portrait by candlelight: Turn off the
the subject to be too dark. Move the source    flash. We suggest programming the
of light to one side of your subject.           exposure time from 5 to 10 seconds. The
                                                resulting portrait will be warm and pleasing.
Temperature
For better colors, avoid extreme             To photograph home interiors in average light:
temperatures. When the temperature is       Turn off the flash and start with a
below 55°F (13°C), keep the camera and film  programmed time exposure of 1 second.
warm. Above 95’°F (35°C), keep the camera
                                       To photograph floodlit buildings, fountains or
and film as cool as possible.
                                      monuments: Start with a programmed time
Avoid storing camera or film in hot places.    exposure of 2 seconds.
Keep developing pictures away from hot
                                       To photograph through glass or window
surfaces. As the picture develops, its image
                                                screens:Turn off the flash to reduce
area is dry because the development
                                      unwanted reflections in your picture. If the
process takes place inside the film. It is
                                              subject is well beyond the glass or screen,
important not to bend the developing
                                        use the manual focusing feature as well.
picture during this process.
                                       To photograph a nearby subject against a
Developer rollers
                                              scenic background at dusk, sunrise or sunset:The developer rollers inside the film door (i)
                                    Use flash to illuminate your subject properly.must be kept clean to avoid repeated spots
                               A timed exposure of about 2 seconds willor bar patterns on the pictures. Clean the
                                            give correct exposure of the background.rollers with a damp, lint-free cloth.

                                     Manual time exposures
Lens
                                        To photograph fireworks: Use the manualTo remove fingerprints, breathe on the lens
                                          time exposure feature. Press and hold theand wipe it gently with a clean, soft facial
                                               shutter button from the time the fireworkstissue. Do not use silicone-treated eyeglass
                                    go up until they burst in the sky.tissue.
View original page 3Page 4 · Read text
20 Features


   Sequential pictures                     Your warranty options
  To obtain multiple images of the same       Replacement: You can choose to receive a
   scene: Use the self-timed sequential          replacement camera at no charge. If the
   pictures feature for group portraits when       failure occurs within 90 days of the purchase
  you wish to obtain several photographs of     date, you can return the camera to any
   the same scene with one press of the shutter   participating Polaroid dealer and you will
   button. This feature allows you to be          receive a new camera. If the failure occurs
   included in the portrait.                          after that period, call Polaroid at the toll-free
                                      number listed and we will ship you a   Multiple exposures
  To take multiple exposures on the piece of    refurbished camera of equal or better value.
   film: It may be helpful to set the same        Replacement will be made 3-5 business
  exposure control towards darken, especially   days from the receipt of your camera.
    if the background is not dark enough.                                                 Repair: Call the number listed for the
   Note: Avoid subject movement while taking   address of the nearest authorized Polaroid
   pictures.                                       repair location. Please allow 5 to 7 days
                                         from the receipt of your camera for the
   Full lifetime warranty                         repair. The repaired camera will be returned
    If this camera proves to be defective, we       to you along with a reimbursement of your
   will, at your option either replace or repair it   postage cost. This warranty applies to new
   without charge for as long as you own the    cameras purchased in retail stores in the
  camera (original owners only). See Your       U.S.A.
   warranty options. This warranty does not
   cover damage caused by accident, misuse,   For information and help
   or tampering with the camera, and a charge     If you are unable to get good pictures,
   will be made for such repairs. To obtain       review this instruction book.
   warranty service, please call Polaroid toll-     Picture problems are often due to incorrect
   free at 1-800-343-5000, or write to the        use of the camera. If you need further help,
   Polaroid Customer Care Center, 201         and before you return your camera for
   Burlington Road, Bedford, MA 01730.           repair, please see your dealer or contact the
   This warranty gives you specific rights, and   nearest Polaroid office.
  you may also have other rights which vary       If you write, please explain the nature of the
  from state to state. This warranty excludes    problem and, if possible, enclose sample
    all consequential damages. Some states do   pictures. Include your return address.
  not allow the exclusion of consequential
  damages so the foregoing exclusion may
  not apply to you.
View original page 4Page 5 · Read text
Accessories 21
                 Accessories
Accessories

The accessories listed add to the versatility
of your camera and to your enjoyment of
your photographs.

For information on these and other
accessories, please contact your dealer or
the nearest Polaroid office.

Light Lock Close-Up Lens

The Polaroid Light Lock Non-Contacting
Close-Up Lens fits all Polaroid Spectra
cameras. The lens lets you take photographs
at 10 inches without making contact with the
object being photographed.

The lens attaches easily and securely to the
front of the camera and lets you take
pictures that are 50 percent the size of the
actual object (5 to 1).

Close-Up Lens F112

With the Polaroid Close-Up Lens, you can
photograph objects 10 inches from the
camera. The lens attaches easily to the front
of the camera and produces a picture that
shows an object at half its actual size,

Close-Up Stand

The Polaroid Close-Up Stand is designed for
use with all Polaroid Spectra cameras to
produce close-up photographs of small
objects and printed materials such as
stamps, coins or jewelry. The magnification
is approximately 1:1.

PhotoFile

Holds 20 Polaroid Spectra photographs.
View original page 5Page 6 · Read text
22 Specifications
                      Specifications
  Specifications                             Photocell:
                                                     Dual-filter, silicon photodiodes. Green
   Aperture/shutter system:                     filtered cell measures visible light; black
   Apertures: from f/l0 to f/45. Shutter speeds:
                                                 filtered cell measures infrared light for
  from 1/245 to 6 seconds in Auto mode.
                                                   better indoor flash exposures.
  Camera size:
                                      Power source:
   Length: 6.34 inches
                                 A fresh, 6-volt battery in each film pack
   Width: 5.63 inches
                                        powers all camera functions.
   Height: 2.96 inches closed;
          3.81 inches opened.              Programmed flash:
                                                       Built-in fill flash designed to be used indoors
  Camera weight:                        and outdoors.
  1 lb, 12 1/2 oz., without a film pack.
                                           Recharge time: from 0.1 to 2.8 sets
   Film advance:                               Flash duration: from 1/3000 to 1/20,000 of a
  Automatic film advance; motorized picture    second.
   ejection.                                   Indoor flash range: from 2 to 15 feet.

   Film size:                                     Self-timer:
  Outer border: 4 x 4.06 inches.                    Built-in self-timer; blinking LED and signal
  Image area: 3.60 x 2.90 inches.               time the 12-second countdown.

   Film speed:                             Sonar autofocus system:
   IS0 600/29° (approx.)                      Computerized autofocus system uses sonar
                                       waves to accurately measure the distance to
   Film type:
   Polaroid Spectra color film.                 your subject and set the lens. Sonar ranging
   Starts developing in seconds.                 time: from 10 to 50 thousandths of a second.
  Ten pictures per pack.                     Viewfinder:
                                     100% viewing (no parallax) at 6 feet - a
   Lens:
   Patented Quintic, three element, 125mm      popular picture-taking distance. Six lenses,
   coated glass lens system. Ten zone focusing   two prisms, and four mirrors provide sharp,
  from 2 feet to infinity.                          clear viewing. Viewfinder magnification:
                                                0.5x (subjects appear half life-size).
   Liquid crystal display:
   Features: automatic/manual distance        Viewfinder display:
   focusing; automatic program for manual      Display includes a digital read-out in feet
   time exposures; backlighting feature;        and a yellow “caution” or green “good
   sequential series of pictures; multiple         picture” symbol.
  exposures on one print; on/off flash and
  audio signals; exposure adjustment feature.
View original page 6Related documents and language editions
From the M. Butkus archive. Original publisher and archive notices are retained.
Check the model and edition against your equipment.
PDF verified 2026-10-10.