Film cameras
Nikon Auto Extension Ring User manual
User manual for Nikon Auto Extension Ring. 9 pages in English. Read the original PDF, download or print a copy without registration.
9 pagesEnglish2.7 MB PDF
Loading your manual…Open PDF directly
Document details
- Brand
- Nikon
- Model / document
- Nikon Auto Extension Ring
- Document type
- User manual
- Language
- English
- Pages
- 9
- File size
- 2.7 MB
- Category
- Film cameras
- Document date
- Not specified in catalog
Search available document text
Find a term, then jump to its page in the original PDF. Image-only pages may not be searchable; check the PDF for exact wording and diagrams.
Page 1 · Read text
Nikon
A7— bSY YFPK-1AM2/13
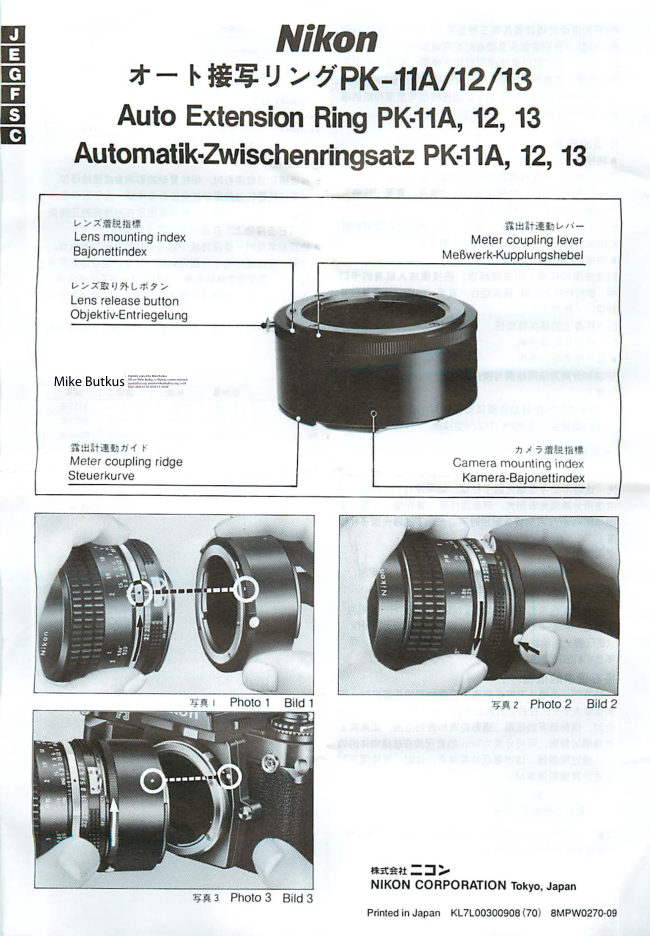
Auto Extension Ring PK-11A, 12, 13
Automatik-Zwischenringsatz PK-11A, 12, 13

be xem ut <—
Lens mounting index Meter coupling lever
Bajonettindex MeBwerk-Kupplungshebel

be xBU AL ae >
Lens release bution

Objektiv-Entriegelung

Mike Butkus

ns ome
Camera mounting index
Kamera-Bajoneltindex

mutans ©
} Meter coupling ridge
Steuerkurve

M2 Photo? Bild 2

axan o>
NIKON CORPORATION Tokyo, Japan

BRS Photos Bids

Printedin Japan KL.7L00300908(70) eMtPWO270-09,
View original page 1
Page 2 · Read text
‘The Auto Extension Ring PK consists of three rings—
PK-I1A, Pk12 and PK:13—which increase lensto-iim
distance. The rings provide extensions of 8mm, 14mm
‘and 27.5mm, respectively, and can be used singly of
in combination, Seven different extensions are possi-
ble in all. The rings couple directly with the automat-
ic diaphragm of Nikkor and Series E lenses with a
‘focal length of from 20mm to 300mm and with the ex-
posure meter of any Nikon camera,

Mounting the Rings
‘Attaching the ring to the lens

First, position the lens in the ring's bayonet mount,
with the lens's aperture index aligned with tne ring's
lens mounting index. Then twist he lens counterclock-
wise uni it clcklocks ito place (Photo 1).

To remove the ring trom the lens, press the lens
release button on the ring, and twist the lens clock:
wise while keeping this button depressed (Photo 2).
'§ Mounting the ring/lens assembly on the camera
Position the ring portion of the assembly in the
‘camera's mount, wth the mounting indices aligned
‘Then, twist the ringilens assembly counterclockwise
Unt it click-ocks into place (Photo 3)

To remove the ringilens assembly from the camera,
press the lens release button on the camera and twist
the assembly clockwise.

1 When more than one ring is used

‘The procedures for attaching and removing are the
ssame as those for a ringllens assembly.

Important!

The PRA, 12and 19 Auto Exelon ings can ony used
wih Altype lenses.

For nomAlsype lenses, use the PK, 2 and 3 ings.

Exposure Determination

I your camera has a meter coupling lever, full aper-

ture measurement is possible; there is no need to take

‘any exposure factor into consideration. If your camera

does not have a TTL meter and you're using a

separate light meter, exposure compensation is

necessary. (Check another attached sheet for ex-
posure factors for any Nikkor/Series E lens at any
aperture)

Notes:

1) When the rings used witha camera which does not have
a meter coupling lever (non), exposure must be meas-
lured by the slopdown method (Please reler 10 the
cameras instruction manual.

2) When the ring is used wth a camera having CPU contacts
without a meter coupling lever (such asthe Nikon
80 N80", FESINGS* or FECINGO"), camera's exposure
meter does not operate (ro exposure indication). To set
aperture, be sue to use the lens aperture ring, not the
camera's command dia

* The Nikon NBO, NBS and NBO aro sold exchuielyn the
usa

Ranges of Reproduction Ratio
The genera principles thatthe reproduction rat
larger than 1 when the lens-t-flm distance is larger
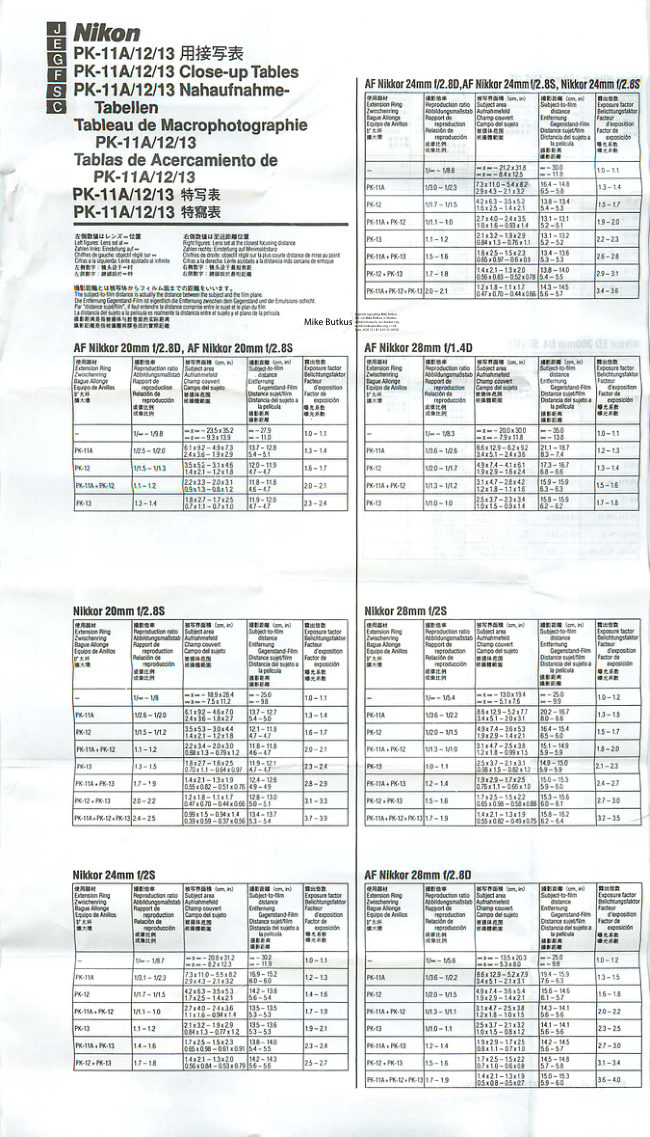
than the subjectto-tens distance. The tables on a
separate sheet show the reproduction ratio ranges,
focused distances and subject fields possible with
different lensiring combinations, When you need
a more accurate value, set a imm-graduated ruler
next to your subject, and read the farthest point in
focus through the viewfinder. You can then caleu-
late the reproduction ratio as follows (where
“M"= reproduction ratio):
36

M= farthest point (in mm)
Note: Wih cameras having viewlinder frame coverage of
ess than 100%, multiply the figure obtained bythe cam-
rs viewindr ame coverage,

ing combination
PRAIA,
PKAI2
PKAIA+ PKAD
PKS
PITA PAS
PRAZ+PKAS. |
TIA+P

Extension (ram)

Tips for Better Close-ups
* In closeup and macrophotography every camera
vibrations magnified many times. Even the slight
est camera movernent results in biurred images.
For best results, mount the whole setup on a rigid
tripod or support and use a cable release to trip the
shutter.
Al extremely close working distances, depth of field
decreases tothe actual focused distance. This can
be partially compensated for by stopping down the
lens. But at very close distances an extremely nar-
row depth of field is inevitable. Careful placement
‘of the subject, if t has depth, willbe necessary to
ensure that the important surfaces will be in the
‘same zone of sharpness.
+ For critical work, stop down the lens to at least 1/8
{or better depth of fel.

Specifications

Diameter
G4.amm
4.4mm
4.4mm,

tings] toa

170mm
3.0mm,
36 5mm

[PRAIA
[Peaa
[PKaa

[_amm
4mm
275mm
View original page 2Related documents and language editions
From the M. Butkus archive. Original publisher and archive notices are retained.
Check the model and edition against your equipment.
PDF verified 2026-10-10.