Film cameras
Nikon MF-25 User manual
User manual for Nikon MF-25. 6 pages in Spanish. Read the original PDF, download or print a copy without registration.
6 pagesSpanish1.5 MB PDF
Loading your manual…Open PDF directly
Document details
- Brand
- Nikon
- Model / document
- Nikon MF-25
- Document type
- User manual
- Language
- Spanish
- Pages
- 6
- File size
- 1.5 MB
- Category
- Film cameras
- Document date
- Not specified in catalog
Contents
Search available document text
Find a term, then jump to its page in the original PDF. Image-only pages may not be searchable; check the PDF for exact wording and diagrams.
Page 1 · Read text
a WORLD TIME DATA BACK
Nikon FECHADOR DE HORA MUNDIAL

MF-25

Instruction Manual
Manual de instrucciones

Nikon

NIKON CORPORATION

FUJI BLDG. 2-3, MARUNOUCHI 3-CHOME,
CHIYODA-KU, TOKYO 100, JAPAN
PHONE: 81-3:3216-5511

No rerecton in any form oft
manual. in whe on part excops for bret
‘uetation hi etealarles orev),

‘may be made without writen athonation

{TomninOn CORPORATION Sead

FAX: 819-9207 5855

NIKON CORPORATION

FUJI BLDG., 2-3, MARUNOUGH! 3-CHOME,
brave on ariculos ora aig 07652. CHIYODA-KU, TOKIO 100, JAPAN
Serrano PHONE: 673:92145311 TELEX: 122001 KON)

AX: B1-3-3201-5856,

Printed in Japan/impreso en Japon 98042-Ae12 (S566)

FOREWORD
INTRODUCCION

Thank you for your kind patronage of Nikon.
The Nikon Data Back MF-25 is exclusively designed to work with the Nikon F90-
Series/N90 camera. It will imprint your chosen display, either year/month/day.
day/hour/minute (24-hour clock), month/day/year or day month/year—-or leave the
film blank, with no imprint. For best results, before using your Data Back MF-25, be
sure to read this instruction manual thoroughly.

Le estamos agradecidos por sur amable preferencia de un producto Nikon.
El fechador MF-25 de Nikon esta disefiado exclusivamente para trabajar con la serie
Nikon F90/N9O. Este puede imprimir su imagen elegida, ya sea afio/mes/dia,
diafhora/minuto (reloj de 24 horas), mes/dia/ano o dia/mes/aho—o dejar la pelicula
sin impresion.

Para mejores resultados, antes de usar su fechador MF-25, asegiirese de leer
completamente este manual de instrucciones.

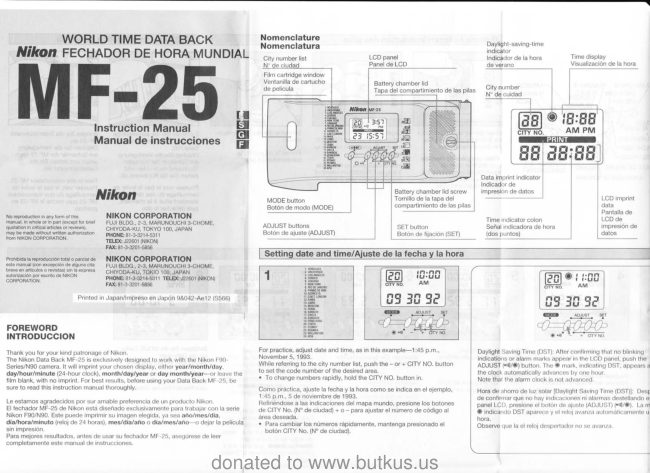
Nomenclature
Nomenclatura Dayigh-svingtime
City number list LCD panel Indicador de la hora Time display
N° de ciudad Panel de LCD do verano Visualzacion de a hora.
Fim cartridge window
Ventanila de cartucho Bitiorchamter ie
de pelicula of City number
fe pelicula parimiento de las plas Cit,number

Battery chamber lid screw
Tornillo de la tapa del
compartimiento de las pitas

MODE button
Botén de modo (MODE) _|

‘ADJUST buttons
Bot6n de ajuste (ADJUST)

SET button
Botén de fijacion (SET)

Data imprint indicator
Indicador de
impresion de datos |
- | LCD imprint
data
4 Pantalla de
Time indicator colon LCD de
Sefial indicadora de hora | impresion de
(dos puntos) dat

| Setting date and time/Ajuste de la fecha y la hora

a
Ht
a

inti

if

For practice, adjust date and time, as in this example—1:45 p.m.
November 5, 1993.

While referring to the city number list, push the ~ or + CITY NO. button
to set the code number of the desired area,

* To change numbers rapidly, hold the CITY NO. button in,

Como practica, aluste la fecha y la hora como se indica en el ejemplo,

1:45 p.m., 5 de noviembre de 1993,

Refiriéndose a las indicaciones del mapa mundo, presione los botones

de CITY No. (N° de ciudad) + 0 ~ para ajustar el numero de codigo al

area deseada.

* Para cambiar los nimeros répidamente, mantenga presionado el
botén CITY No. (N° de ciudad),

donated to www.butkus.us

7

a9 30 52

em oust, gr
Oa 20:0:05)
a ar

Daylight Saving Time (DST): After confirming that no blinking
indications or alarm marks appear in the LCD panel, push the
ADJUST (#i/@) button. The @ mark, indicating DST, appe
the clock automatically advances by one hour

Note that the alarm clock is not advanced

Hora de ahorro de luz solar [Daylight Saving Time (OST)|: Des
de contimar que no hay indicaciones ni alarmas destellando @
ppanel LCD, presione el boton de ajuste (ADJUST) (l/@), Lam
@ indicando DST aparece y el relo} avanza automaticamente U
hora,

Observe que la el relo| despertador no s«
View original page 1Page 2 · Read text
Hinge release
Liberacién de la bisagra

Imprint window
\Ventanilla de impresion

aving-time
de la hora Time display
Visualizacién de la hora
er

fad

Film pressure rollers
Rodillos de presion de la
pelicula

indicator

e datos
a LCD imprint
data
Pantalla de
ator colon LCD de Film pres
cadora de hora impresion de Placa
datos la peti

os)

ure plate
presion para

Signal contact pins
Clavijas de contacto
de sefiales

2. ANCHORAGE

‘HonoLuwu
S.CHICAGO:
7LCARACAS:

£8,R10 DE JANEIRO!
8.FERNANDO DE NORONHA

stalling batteries/Instalacién de

1P.AZORES IS,

Use coin to unscrew the battery Insert two 3V GI

a chamber ld screw, then remove lithium batteries
Kay the battery chamber id. facing up.

a Use una moneda para Inserte dos pila

froano | 21SYONEY destomnillar el tomillo de la apa CR-2025 de SV

ZWELLINGTON\ Ge compartininto de as plas, _positv (+) hack

luego saque la tapa del
‘compartimiento de las pilas.

® tog

o9 30 92

oo
ing Time (DST): After confirming that no blinking

F alarm marks appear in the LCD panel, push the

®) button, The @ mark, indicating DST, appears and
omatically advances by one hour

alarm clock is not advanced.

ro de luz Solar [Daylight Saving Time (DST)|: Después

que no hay indicaciones ni alarmas destellando en el
resione ol boton de ajuste (ADJUST) (M/@), La marca
DST aparece y el reloj avanza automaticamente una

la el reloj despertador no se avanza.

2

3 | ea)

ath ete]

ope

Tay

ow

ea i

Display should show Monthy
‘Day/Year, Day/MonthvYear,
‘Year/Month/Day or Day/Hour/
Minute as desired, For practice,
push MODE button and select
Month/Day/Year display.

La visualizacion deberia indicar
Mes/Dia/ANio, Dia/Mes/Afio,
/Mes/Dia 0 Dia/Hora/Minuto,
un se desee. Como practica
ppresione el boton de modo
(MODE) y seleccione la
visualizacion Mes/Dia/Ano.

| Imprinting data/Impresion de datos

d
G

Push the SET button until month,

day and year numbers start
blinking,

Presione el botén de fijacion

(SET) hasta que los numeros de

mes, dia y alo comiencen a
destellar.

Fije el mes.
Presione el botén de ajuste:
(ADJUST) de la izquierda para
fijar el mes correcto.

Set the month.
Push the left ADJUST button to
sset the correct month.

Sot the day. Set the year.
Push the center ADJUST button Push the right ADJUS
to set the correct day. set the correct year.

Fie el ano.
Presione el botén de é
(ADJUST) de la derec
‘ afio correcto.

Fije el cia.
Presione el bot6n de ajuste
(ADJUST del centro para fijar ot
dia correcto,

. | {Setting the alarm clock/Ajuste de rel
View original page 2From the M. Butkus archive. Original publisher and archive notices are retained.
Check the model and edition against your equipment.
PDF verified 2026-10-10.