Film cameras
Nikon MF-28 Pt. 2 User manual
User manual for Nikon MF-28 Pt. 2. 35 pages in English. Read the original PDF, download or print a copy without registration.
35 pagesEnglish5.8 MB PDF
Loading your manual…Open PDF directly
Document details
- Brand
- Nikon
- Model / document
- Nikon MF-28 Pt. 2
- Document type
- User manual
- Language
- English
- Pages
- 35
- File size
- 5.8 MB
- Category
- Film cameras
- Document date
- Not specified in catalog
Search available document text
Find a term, then jump to its page in the original PDF. Image-only pages may not be searchable; check the PDF for exact wording and diagrams.
Page 1 · Read text
www.butkus.us

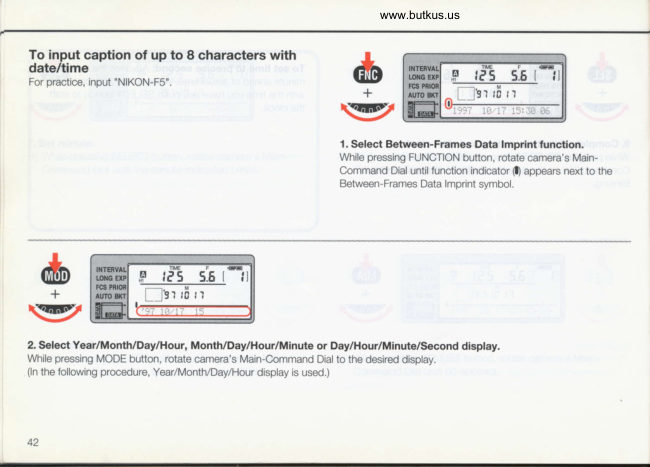
To input caption of up to 8 characters with
date/time
For practice, input "NIKON-FS".           &                                      +
                        \sgz

                                                                                 1. Select Between-Frames Data lmprint funetion.
                                                               While pressing FUNCTION button, rotate camera's Main-
                                                Command Dial until function indicator (l) appears next to the
                                                              Between-Frarnes Data lmprint symbol.
6+
\sgz

2. Select Year/Month/DaylHour, Month/DaylHour/Minute  or Day/Hour/Minute/Second display.
While pressing MODE button, rotate camera's Main-Command  Dial to the desired display.
(ln the following procedure, Year/Month/Day/Hour  display is used.)
View original page 1Page 4 · Read text
www.butkus.us
           &6+
\sg7                            +\y
5. Input next chancter.                                                6. Gomplete input of characters.
While pressing SELECT button, rotate camera's Main-             While pressing SELECT button, rotate camera's Main-
Command Dial so the blinking cursor shifts to where you want     Command Dial until no indications blink.
to input the ne).t character. Then, select a letter using the
ADJUST button and camera's Main-Command  Dial.
Input the remaining characters, alternately following steps 3 and
4 for each.
View original page 4Page 5 · Read text
To input caption of up to 22 characters
For practice, input'LOCATION lN CAUFORNIA".           6
                             +\y
                                                                                        1. Select Between-Frames Data lmprint function.
                                                               While pressing FUNCTION button, rotate camera's Main-
                                                Command Dial until function indicator !) appears next to the
                                                          Between-Frames Data lmprint svmbol.


                 www.butkus.us
6       6
+\y                   +\9
2. Select display for caption.                            3. Activate blinking cunsor.
While pressing MODE button, rotate camera's        While pressing SELECT button, rotate camera's Main-Command  Dial so
Main-Command  Dial until the caption display           blinking cursor appears where you want to input the first character.
                                                    o lf you have already input a letter, the letter and cursor will blink alternately.
View original page 5Page 6 · Read text
www.butkus.us
6+
{rg7
                                                                                                                                                 i;;.i.i..,;;....;,,:.i.1...:i;;,   ;'i"'i ";i  ...  ;; ;::....r.:i:.-i-  i....i i ; (DlanK)
4. Select desired character.
While pressing ADJUST button, rotate camera's Main-
Command Dial until the desired character appears.

                                E        :Japaneseatphabet
6+            &                                           +\92                        {3gz
5. Input next character.                                                                                           6. Complete input of caption.While pressing SELECT button, rotate camera's Main-Command  Dial so the                                                                 To complete, while pressing SELECT button,blinking cursor shifts to where you want to input the next character. Then,                                                                                         rotate the camera's Main-Command  Dial until noselect a letter using the ADJUST button and camera's Main-Command  Dial.
                                                                                          indication blinks.Input the remaining characters, altemately following steps 3 and 4 for each.


46
View original page 6Page 7 · Read text
To input caption of up to 18 characters with
four-digit year
For practice, input "(C) NIKON CORP. 1997".           6+
                  \92
                                                                                 1. Select Between-Frames Data lmprint funcrtion.
                                                               While pressing FUNCTION button, rotate camera's Main-
                                                Command Dial until function indicator 0 appears next to the
                                                          Between-Frames Data lmprint svmbol.
6+          6+
\sgz                    \Egz

2. Select display for caption with four-digit                          3. Activate blinking cursor.
  year.                                                        While pressing SELECT button, rotate camera's Main-
While pressing MODE button, rotate camera's                Command Dial so blinking cursor appears where you want to
Mdn-Command Dial until the four-digit year                           input first character.
indication appears at right of display.                                           .lf you have already input a letter, the letter and cursor will blink
                                                                                     alternately.
View original page 7Page 8 · Read text
www.butkus.us


                                                                                                                      --:   ....t...,.--.t.t--L.   --  t---:.li-        ..,...i,... .,...-J...'         i       i   -. --.-1.    :   .  |   --..    -1.
6+\ry
4. Seleqt desirsd char€ster.
While pressing ADJUST button, rotate camera's
Main-Command Dial until your desired character
appears.
                                E        :Japaneseatphabet
&            &
\rgz+                            +\ry
5. lnput next character.                                                               6. Complete input of characters.
While pressing SELECT button, rotate camera's Main-Command  Dial so the      While pressing SELECT button, rotate camera's
blinking cursor shifts to where you want to input the ne)d character. Then,       Main-Command  Dial until no indications blink.
select a letter using the ADJUST button and camera's Main-Command  Dial.
Input the remaining characters, alternately following steps 3 and 4 for each.


48
View original page 8Page 10 · Read text
Interval Timer Function                               www.butkus.us

The Interval Timer function lets you take a specified number of shots at specified intervals for a selected
number of shootings.
The maximum interval that can be set between shootings  is 99 hours 59 minutes and 59 seconds, and up
to 99 exposures can be taken at one shooting. (Because the limit of most film rolls is 36 frames, however,
the film may have to be changed before you can complete the shooting.) The maximum number of
intervals for one setting is 999. Data imprinting inside the frame and/or between frames is possible during
Interval Timer ooeration.

o Always be sure to advance film to frame 1 before you set (or reset) the Interval Timer.

For practice, set lnterval Timer function so that the Interval Timer starts at 16:00 on the 1 7th day of this or
next month and takes three shots every t hour 1 5 minutes and 30 seconds for 5 shootings.


  To imprint data during Interval Timer operation
  As described on pages 21 to 48, select desired data to           6+   be imorinted and set In-Frame and/or Between-Frames
   Data lmorint function.                       {sgz

                                                                                 1. Select Interval Timer function.
                                                               While pressing FUNCTION button, rotate camera's Main-
                                                Command  Dial until function indicator O appears ne)d to the
                                                                                  Interval Timer symbol (INTERVAL).


50
View original page 10Page 12 · Read text
www.butkus.us
6         6+\gz                   +\r9
6. Complete setting start tme.                                          7. Access interval time so shots ar€ taken every t hour 15
While pressing SELECT button, rotate camera's Main-              minutes and 30 seconds.
Command Dial so the start time appears without blinking.          While pressing MODE button, rotate camera's Main-Command
                                                                              Dial until INT and Hour/Minute/Second  appears.

6         &
+\y                        +\9
8. Access hour indication for'interual time.                        9. Set hour for Interval time.
While pressing SELECT button, rotate camera's Main-             While pressing ADJUST button, rotate camera's Main-
Command Dial until the hour unit blinks.                    Command Dial to set 1 for hour.


52
View original page 12Page 13 · Read text
6+
                  \92
10. Set minute and second.                                         11. Complete setting interval time.
Set minute to'15 and second to 30, following the same             While pressing SELECT button, rotate camera's Main-
orocedure used for the hour.                            Command Dial so the interval time appears without blinking.


                                                                                www.butkus.us
6+          6+
{92                   {r9z
12. Access number of shots per shooting/number ot            13. Access indication for number of shots.
   shootings so three shots are tak€n for five shootings.     While pressing SELECT button, rotate camera's Main-
While pressing MODE button, rotate camera's Main-Command    Command Dial until the digits for number of shots blink.
Dial until the indications for number of shots and number of
shootings appear.


                                                                                                           53
View original page 13Page 14 · Read text
www.butkus.us
6+          6+
                       {sgz\=u
14. Set number of shots.                                 15.Access indication for number of shootings.
While pressing ADJUST button, rotate camera's Main-             While pressing SELECT button, rotate camera's Main-
Command Dial to set 3 for the number of shots per shooting      Command Dial until the indication for number of shootings
                                                                                   blinks.

6         6
+\=z                      +\t2
16. Set number of shootings.                                        17. Complete setting number of shots per shooting and
While pressing ADJUST button, rotate the camera's Main-          numb€r of shootangs.
Command Dial to set 5 for the number of shootings.               While pressing SELECT button, rotate camera's Main-
                                                Command Dial so the number of shots per shootings and
                                                        number of shootings appear without blinking.


54
View original page 14Page 15 · Read text
d+
\sgz                                                                              . With this data confirmation display, you cannot change data.  lf
                                                            you want to change data or set the Data lmprint function, 18. Confirm data to be imprinted.                                                           change function mode from Interval Timer function to In-Frame lf you want to imprint data in Interval Timer operation and have                                                                    or Between-Frames Data lmprint function; while pressing
already set the Data lmprint function, access and confirm data                                                      FUNCTION button, rotate camera's Main-Command  Dial untilto be imprinted. While pressing MODE button, rotate camera's                                                                      the function indicator appears next to the In-Frame orMain-Command  Dial until the data to be imprinted appears.                                                            Between-Frames Data lmprint symbol. For instructions on
                                                                          selecting imprint data and setting Data lmprint function, see
                                                           pages 21 to 48.


19. Set Interval Timer function.                                              . Data to be imprinted can be changed or set after setting
Press SET/RESET button and confirm function set indicator (1          Interval Timer function. While pressing FUNCTION button,
appears ne)d to the Interval Timer symbol.                               rotate camera's Main-Command  Dial to select In-Frame or
                                                           Between-Frames Data lmprint function, then change/set data
                                                                 as desired. The function set indicator $ remains next to the
                                                                                    Interval Timer symbol.

                                                                                                            55
View original page 15Page 16 · Read text
www.butkus.us


  To cancel the Interval Timer function before
   operation
   Press SET/RESET button again. The function set
    indicator O next to the Interval Timer symbol will
   disappear. Ihls does not reset stan time, intqval time,
   number of shot/number of shootings you have set.
                                                                         20. Start Interval Timer operation.
                                                                  Press START/STOP button. The tunction set indicator (n next to
                                                                the Interval Timer symbol starts blinking to indicate the Interval
                                                             Tlmer function is active.
                                                               With each shooting, the number indicated decreases by one.
                                                                          After all exposures are taken,  it reverts to the most recent
                                                                              setting.

                                                                             o The first shooting will be taken at the set date and time, or
                                                                   immediately  if you set the date to - -.
                                                                 o During the intervals, you can take additional pictures in the
                                                                       ordinary way simply by depressing the shutter release button.
                                                        The Frame Count and Sequence Number increase
                                                                         accordingly.


56
View original page 16Page 17 · Read text
To stop the Interval Timer during operatlon
                                                                     Press START/STOP button. The Intelal Timer function
                                                                          set indicator (! stops blinking (and start time indication
                                                                              resets to - - once the first shooting is complete). To
                                                           resume operation, press the START/STOP button again.
21. After all exposures have been taken, the lnterval Timer
   function is automatically canceled and the function set
    indicator (( ) next to the Interval Timer symbol
   disappears.
r After all exposures have been taken, the start time indication
  will be reset to - -.


                                                                                                            57
View original page 17Page 18 · Read text
www.butkus.us                                                      I

. You can set the IntervalTimer function anytime the function indicator  (l) appears next to the
  IntervalTimer symbol except  in the following cases.
  r When number of shootings  is set at O, the indication blinks twice.
  o When interval time is set at 00:00:00, the indication blinks twice.
  o When "hul h" is set on the camera body but the MF-28's Long Timer Exposure function  is
   not set, "hxlh" blinks twice.
  o lf a Long Time Exposure has been set and the interval time is shorter than the Long Time
   Exposure duration + 2 seconds, pressing SET/RESET button will not set the Interval Timer;
      it makes the function set indicator (() next to Long Time Exposure symbol blink twice.
. When using a Nikon Speedlight with a standby switch, charging of the Speedlight begins 30
 seconds before the shooting time set. lf the interval time is shorter than 30 seconds, the
  Speedlight's standby function will not function.
o lf the total exposure time for any shooting extends beyond the interval time, the camera will
  skip that shooting and move on to the next shooting time.
. To ensure correct measurement with the camera's exposure meter, use the eyepiece
  shutter to prevent light from entering the viewfinder.
View original page 18Page 19 · Read text
Long Time Exposure Function

The Long Time Exposure function lets you set exposure
duration from one second to 999 seconds, one minute to gg9       To imprint data during Long Time Exposure
minutes. or one hour to 999 hours.                                 operation
Data can be imorinted inside the frame and/or between frames       As described on pages 2'l to 48, select desired data to
during Long Time Exposure shooting.                             be imorinted and set In-Frame and/or Between-Frames
                                                               Data lmorint function.

           6+
                  \92
1. Set camera's shutter speed to "but b" setting.             2. Select Long Time Exposure function.
Set camera to Manual exoosure mode and camera shutter         While pressing FUNCTION button, rotate camera's Main-
soeed to "bui. b".                                    Command  Dial until the function indicator 1Q appears next to the
                                                         Long Time Exposure symbol (LONG E(P).


                                                                                                            59
View original page 19Page 20 · Read text
www.butkus.us


                                                                               r  lf camera's shutter speed is not set at "but b", pressing
                                                SEVRESEI button does not set Long Time Exposure
3. Set Long Time Exposurc function.                                  function, but causes shutter speed indicators to blink.
Press SET/RESET button and confirm function set indicator (( )     o Data to be imprinted can be changed or set after setting the
appears next to the Long Time Exposure symbol.                  Long Time Exposure tunction. While pressing FUNCTION
                                                                          button. rotate camera's Main-Command  Dial to select In-
                                                            Frame or Between-Frames Data lmprint function, then change
                                                                    and/or set data as desired. Function set indicator (i will
                                                               remain next to the Long Time Exposure symbol.

                                                            Exp0sure duration  in hours Exposure duration  in minutes Exposure duration  in seconds&                                       .r*E 00 lh 5.5   t           's.5t  ,            ," 5.5 t
                                                                                                                   rE rr           'l                                                                                             ro rt                                                             16 n          flgr                                       flgr                                                                                   fltr
                                                         r-Jr   lr:t.ll   1,--.l,,.Irr, lb          1'.1:1i 1r1..'lT lE:trE1 th          1'"1:ri 1E1j1T lE:.-'rJ  li,+\9
4. Select unit for exposure duration.
While pressing SELECT button, rotate camera's Main-Command  Dial until hour (h), minute  (') or second  (") appears.


60
View original page 20Page 21 · Read text
6+
\@z

5. Set exposure duration,                                                      r When you select Shutter Speed/Aperture for Between-Frame
While pressing ADJUST button, rotate camera's Main-              Data lmprint function, the shutter speed indication in the LCD
Command Dial to set the desired exoosure duration.                 panel shows the exposure duration vou have set.
ffhe example illustration above shows 30-minute exposure
duration.)


5. Start Long Time Exposure operation.
After confirming composition and focus, fully depress the           During operation, the exposure duration counts down until itcamera'sMffishutter release button.                                 reaches 0. When the shutter closes to complete a Long Time
The function set indicator (j next to the Long Time Exposure       Exposure, exposure duration display reverts to your latest time
symbol blinks throughout the duration of the Long Time              setting and function set indicator $ next to Long Time
Exposure.                                                    Exposure symbol stops blinking.


                                                                                                                                       61
View original page 21Page 22 · Read text
www.butkus.us


  To stop exposurc before preset time
   Press START/STOP button and confirm that Long Time
   Exposure function set indicator (j stops blinking.


                                                                                 7. Gancel Long Time Exposure function.
                                                                  Press SET/RESET button and confirm function set indicator (1
                                                                   next to the Long Time Exposure symbol disappears.


62
                                                                                                          L
View original page 22Page 24 · Read text
www.butkus.us


                            F@
                     tolrc                             t    il                   FCS                                   FI   "+ t?5   5.5
            ano              r$ r,'                    fls.'


3. Set Freeze Focus (Focus Priority) function.
Press SET/RESET button and confirm that function set indicator      . Data to be imprinted can be changed or set after setting
(1 appears next to Freeze Focus (Focus Priority) symbol              Freeze Focus function. While pressing FUNCTION button,
                                                                            rotate camera's Main-Command  Dial to select In-Frame or
                                                           Between-Frames Data lmprint function, then change and/or
                                                                        set data as desired. The function set indicator (( ) will remain
                                                                    next to Freeze Focus (Focus Priority) symbol.


4. Rotate lens focus ring manually to set focus position at     5. Fully depress the shutter release button and hold down.
  desired distance.                           @ Shutter will be released when subject enters a preset focus
                                                                               position.
                                                      @While holding shutter release button, rotate lens focus rrng
                                                                                               until subject comes in focus.
View original page 24Page 25 · Read text
With camera's film advance mode set for single-frame          With camera's film advance mode set for continuous
shooting: Shutter will be released each time you depress the       shooting: Shots are taken continuously as long as the shutter          ffiffiffi
shutter release button and subiect is in focus.                         release button remains depressed and subject is in focus.


             ,F i?5 5.5 t ?l                     WithWith camera'scamera'sfocusfocusmodemodesetsetat SatforS Singleor C  Servo AF or
                                                 C for Continuous Servo AF, you cannot perform Freeze       ffiPf,d'iF;a
                                                             Focus function. Setting Freeze Focus (Focus Priority)
                                                                            function only gives focus priority so that you can release
                                                                            shutter only when the subject is in focus regardless of AF6. Cancel Focus Priority function.                                                            mode.Press SET/RESET button and confirm function set indicator (o
next to the Freeze Focus (Focus Priority) symbol disappears.


                                                                                                            65
View original page 25Related documents and language editions
From the M. Butkus archive. Original publisher and archive notices are retained.
Check the model and edition against your equipment.
PDF verified 2026-10-10.