Camera accessories
Old Kodak self-timer instructions User manual
User manual for Old Kodak self-timer instructions. 1 pages in English. Read the original PDF, download or print a copy without registration.
1 pagesEnglish0.5 MB PDF
Loading your manual…Open PDF directly
Document details
- Brand
- Kodak
- Model / document
- Old Kodak self-timer instructions
- Document type
- User manual
- Language
- English
- Pages
- 1
- File size
- 0.5 MB
- Category
- Camera accessories
- Document date
- Not specified in catalog
Search available document text
Find a term, then jump to its page in the original PDF. Image-only pages may not be searchable; check the PDF for exact wording and diagrams.
Page 1 · Read text
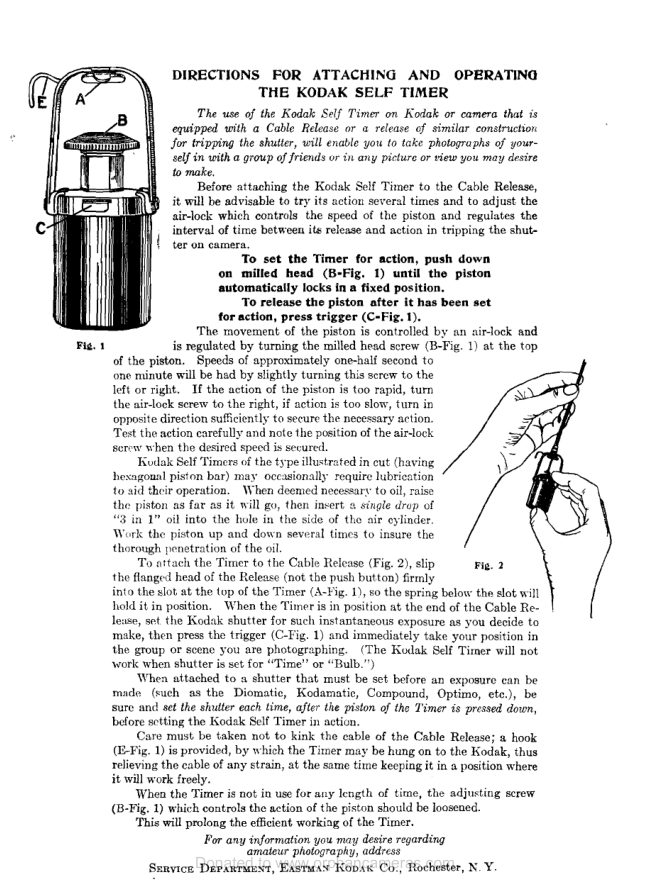
DIRECTIONS FOR ATTACHING AND OPERATINO
THE KODAK SELF TIMER
The use of the Kodak Self Timer on Kodak or camera that is
equipped with a Cable Release or a release of similar construction
jor tripping the shutter, will enable you to take photographs of your
selj in with a group of friends or in any picture or tiew yOll may desire
to make.
Before attaching the Kodak Self Timer to the Cable Release,
it will be advisable to try its action several times and to adjust the
air-lock which controls the speed of the piston and regulates the
interval of time between its release and action in tripping the shut
ter on camera.
To set the Timer for action, push down
on milled head (B·Fig. 1) until the piston
automatically locks in a fixed position.
To release the piston after it has been set
for action, press trigger (C·Fig. 1).
The movement of the piston is controlled by an air-lock and
Fi~. 1 is regulated by turning the milled head screw (B-Fig. 1) at the top
of the piston. Speeds of approximately one-half second to
one minute will be had by slightly turning this screw to the
left or right. If the action of the piston is too rapid, turn
the air-lock screw to the right, if action is too slow, turn in
opposite direction sufficiently to secure the necessary action.
Test the action carefully and note the position of the air-lock
scrrw when the desired speed is secured.
Kudak Self Timers of the type illw,trated in cut (having
hexagonal piston bar) may occasionally require lubrication
to aid their operation. 'Yhen deemed necessary to oil, raise
the piston as far as it 1\~ill go, then infert a ~illgle drop of
".3 in 1" oil into the hole in the side of thc air cylinder.
'Yurk the piston up and down several times to insure the
thorough penetration of the oil.
To Dttach the Timer to the Cable Release (Fig. 2), slip Fi~. 2
the flangE'd head of the Release (not the push button) firmly
into the slot at the top of the Timer (A-Fig. 1), so the spring below the slot will
hold it in position. When the Timer is in position at the end of the Cable Re
lease, set the Kodak shutter for such instantaneous exposure as you decide to
make, then press the trigger (C-Fig. 1) and immediately take your position in
the group or scene you are photographing. (The Kudak Self Timer will not
work When shutter is set for "Time" or "Bulb.")
When attached to a shutter that must be set before an exposure can be
made (such as the Diomatic, Kodamatic, Compound, Optimo, etc.), be
sure and set the shutter each time, after the piston of the Timer is pressed down,
before setting the Kodak Self Timer ill action.
Care must be taken not to kink the cable of the Cable Release; a hook
(E-Fig. 1) is provided, by 1\'hich the Timer may be hung on to the Kodak, thus
relieving the cable of any strain, at the same time keeping it in a position where
it will work freely.
When the Timer is not in use for allY length of time, the adju,ting screw
(B-Fig. 1) which controls the action of the piston should be loosened.
This will prolong the efficient working of the Timer.
For any information you may desire regarding
amateur photography, address
SERVICE DonatedDEPARTME~T,to www.orphancameras.comEASTMA" KODAK Co., Rochester, N. Y.View original page 1Related documents and language editions


From the M. Butkus archive. Original publisher and archive notices are retained.
Check the model and edition against your equipment.
PDF verified 2026-10-10.