Film cameras
Pentax 6x7 Shift User manual
User manual for Pentax 6x7 Shift. 5 pages in English. Read the original PDF, download or print a copy without registration.
5 pagesEnglish2.3 MB PDF
Loading your manual…Open PDF directly
Document details
- Brand
- Pentax
- Model / document
- Pentax 6x7 Shift
- Document type
- User manual
- Language
- English
- Pages
- 5
- File size
- 2.3 MB
- Category
- Film cameras
- Document date
- Not specified in catalog
Search available document text
Find a term, then jump to its page in the original PDF. Image-only pages may not be searchable; check the PDF for exact wording and diagrams.
Page 1 · Read text
rSMC PENTAX 6x7 SHIFT 75mm www.butkus.usF4.5
      Your SMC Pentax 6x7 75mm shift lens is of                   ture, precise results and the most pleasing
       great value for architectural, scenic and general                effects are obtained  if shifts are made with
      purpose photography as well. Corresponding                the lens perpendicular to the film plane or
      roughly to a 35mm lens in the 35mm format,                     tilted slightly upwards. For this reason, and
           it has the capability of correcting converging               due to the weight of the camera, use of a
        lines by making them perpendicular. lt features               tripod is recgmmended. The lens may be
         full 360' barrel rotation and offers a maximum             mounted either vertically or horizontally to
       shift of 2Omm, enabling creation of virtually an               the tripod but a sturdy model should be used
        infinite variety of perspectives. You not only                 to prevent camera movement which causes
      have the choice of correcting, but also of                   misalignment.
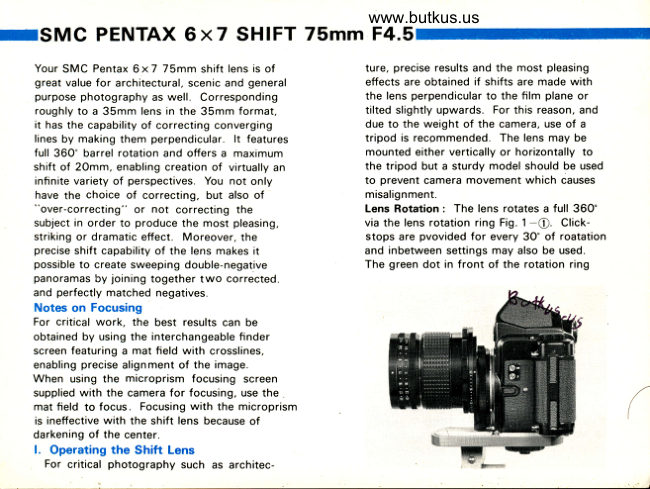
      "over-correcting" or not correcting the                  Lens Rotation : The lens rotates a full 360"
       subject in order to produce the most pleasing,                  via the lens rotation ring Fig. 1-@. Click-
       striking or dramatic effect. Moreover, the                   stops are pvovided for every 3O' of roatation
       precise shift capability of the lens makes  it                and inbetween settings may also be used.
       possible to create sweeping double-negative               The green dot in front of the rotation ring
      panoramas by joining together two corrected.
     and perfectly matched negatives.
     Notes on Focusing
     For critical work, the best results can be
      obtained by using the interchangeable finder
      screen featuring a mat field with crosslines,
      enabling precise alignment of the image.
    When using the microprism focusing screen
       supplied with the camera for focusing, use the    .
      mat field to focus. Focusing with the microprism
        iS ineffective with the shift lens because of
      darkening of the center.
        l. Operating the Shift Lens
       For critical photography such as architec-
View original page 1Page 3 · Read text
Fig. 1-@ indicates the direction in which the           graphing from the top of a tall building) lines
 lens will shift as you turn the ring. With the                will converge at the bottom ; when the
dot at the top, the lens will shift upward              camera is level lines will converge to the
 (simultaneously the image in the viewfinder                right or left in accordance with the direction
 will move downward) ; with the dot at the              the lens is moved off a perpendicular axis
bottom. the lens moves downward and the            from the subject.
image upward ; when the dot is located 90'            Whenever desiring to correct for converg-
to the left, the lens moves horizontally to the            ing lines, the lens must be shifted in the
left, etc.                                                   direction in which the lines converge.  lf the
Shifting : Because the lens rotates fully, two               lines appear to converge at the top as when
shift scales (with clickstops at 1 millimeter              photographing a tall building, for example,
intervals) are provided to facilitate checking             proceed as follows
the degree of shift. As you turn the shift ring           1.Turn the lens rotation ring so that the
(Fig.2-@) the amount of shift is indicated              green dot is facing upward (the same
by the white index dot on the shift scale (Fig.              applies whether the camera is mounted
2-@1. In Fig. 2, tor example, the camera is                horizontally or vertically on the tripod).
mounted horizontally to the tripod and the              2.Sight the subject through the viewfinder
lens is set for a maximum 2Omm shift, indi-             and slowly rotate shift ring counterclock-
cated by the white dot beside the 20 (al-                wise. As the shift ring is rotated, the lens
though not pictured, the white dot for the                     will shift upward and the image in the view-
other scale, 180' opposite the dot in the                  finder will simultaneously move downward.
photo,indicates the same). The position of                 3. Recenter the image in the viewfinder
the green dot (also not pictured) is now 90"               (you will find that the lines no longer
to the left of the white dot in the photo,                 converge to the same extent). Continue
thus, the lens is set to shift to the left.                       shifting the lens and recentering the image
ll. Correcting for Converging Lines                            until the lines appear perpendicular.
When set for zero millimeters shift, the shift            Notes: When the desired shift cannot belens will function as a normal 7Smm wide-                                                        obtained at maximum 2Omm shift. tilt theangle lens. Thus. when tilted upward, lines                                                camera upward so that the axis inclines
will converge at the top, conversely, when                                                              slightly; this will enable you to include thethe lens faces downward (as when photo-                                                           subject in the viewfinder, although lines
View original page 3
Page 4 · Read text
Digitally signed by mike butkus
                                                                                                 cn=mike butkus,                mike             DN:o=orphancameras,                                                                                                                    ou=29,               www.butkus.us
                                                                                                       email=mike@butkus.org, c=US
                                                                                                               Date: 2019.07.27 21:44:32 -04'00'                 butkus


Fig. 1                                         Fig.2                                                 Fig. 3
         will not be perfectly perpendicular.  lf                  aperture ring to the right until  it stops in
        greater correction is still desired, back                     line with the preset ring. Now, proceed
      away from the subject to the point where            by making a stopped down exposure
      where the desired correction can be                 measurement and taking the picture.
       obtained with the optical axis remaining             Note: Shifting up until the point of shutter
       perpendicular to the subject (excess can                 release should be carried out at open
       be trimmed later during enlarging).                     aperture. Because of the effects of
     Aperture Setting : Although the 6x 7 shift                shifting, shooting apertures when the lens
                                                                                                                                                                                                                                                         f /11 or      lens does not feature an automatic                             is stopped down should be  f /8 or
                                                    as near'to these as possible. Conversely,     diaphragm,  it features convenient open-
      aperture viewing by means of the com-                                if the lens is stopped down farther (to f/16,
     bined use of a special preset ring in                                                         f /22, etc.,) some loss of sharpness will result
     conjunction with the aperture ring. First,               because of defraction during shifting.
     preset the shooting aperture, t/11 for                 Exposure Measurement: Exposure will
     example, on the preset ring (Fig. 3-@) bV              vary in accordance with the extent and
      aligning f/11 with the aperture index dot                  direction of shift. Moreover, when the
     (Fig.3 @). Then, set the aperture ring (Fig.              lens is shifted, the sensitivity of the
    3-@t tof /4.5 for bright viewing. Next,               exposure needle differs slightly from                                                      normal. To compensate for this, with the      after focusing and composing, rotate the
View original page 4Page 5 · Read text
camera mounted horizontally, underexpose              from 6 x 7 to 6 x 14 are easily created with
    l stop ; conversely, with the camera                     the SMC Pentax 75mm shift lens. Panoram-
  mounted vertically, overexpose + stop.                        ics appear most attractive when made in the
  Another method is to frame the subject                     horizontal format ; thus, the camera should
   first and take the exposure reading. then                be mounted to the tripod horizontally. Also,
  make appropriate compensation  for                    keep the camera perfectly level if you desire
  shifting. Because shooting conditions vary                to keep lines from converging.
  from photo to photo, your own experience                   l.Shift the lens completely (2omm) to the
   will produce the best results in compensating                      left, and make the first exposure.
  for lens shift.                                                          2. Next, rotate the lens 180" so that the
lll.   " Emphasizing and Overcorrecting "               2Omm shift is on the right, and make the
In addition to correcting for converging                   second exposure (rotating the lens and
lines at the top by shifting the lens upward,                  advancing the film should be carried out as
the shift lens can also be shifted downward                     gently as possible to prevent camera
(reverse shift) to emphasize or exaggerate                   movement, which will result in mismatching
the degree to which lines converge ; for                       of the two photographs).
example, to apparently increase the height                        3. Prints can later be made from the two
of a tall building, or the length of a models                    negatives. The portions which overlap are
legs. Moreover, when an 8mm upward shift                 removed. forming two perfectly matched
is required to make the converging lines of a                    negatives which are joined together to
building appear perpendicular, an overshift                 make one panoramic view.
of 1Smm will cause the lens to converge in                     Filters
the opposite direction for different emphasis.                 In addition to accepting both 82mm screw-
By employing the various shifting techniques,                     in type and bayonet-type filters which fit over
one can create new perspectives in order to                  the front of the lens, the 6 x 7 shift lens also
achieve the most dramatic and pleasing effect.                features a gelatin filter clip at the rear
lV. Panoramics                                       which accepts gelatine filter squares, trimmed
Sweeping panoramics in which the picture                  to size and inserted.
format is effectively doubled horizontally                                                                         06431
View original page 5From the M. Butkus archive. Original publisher and archive notices are retained.
Check the model and edition against your equipment.
PDF verified 2026-10-10.