Film cameras
Pentax PC35AF-M SE Date User manual
User manual for Pentax PC35AF-M SE Date. 2 pages in English. Read the original PDF, download or print a copy without registration.
2 pagesEnglish0.5 MB PDF
Loading your manual…Open PDF directly
Document details
- Brand
- Pentax
- Model / document
- Pentax PC35AF-M SE Date
- Document type
- User manual
- Language
- English
- Pages
- 2
- File size
- 0.5 MB
- Category
- Film cameras
- Document date
- Not specified in catalog
Search available document text
Find a term, then jump to its page in the original PDF. Image-only pages may not be searchable; check the PDF for exact wording and diagrams.
Page 1 · Read text
www.orphancameras.com


                                               F i l m
                                                    o DX films with ISO ratingsfrom 64 to 1600 can
                                                be used. The film speed is automatically switched
                                                                in the dating unit.
                                                    o The only non-DX f ilm that can be used is one
                                                     with ISO 100.

                                         When shooting
                                                    o  lf the data printing sectionin the picture area
                                                                      is too bright, the recorded data may be difficult to
                                                     see. Frame the picture so that reflectionsor white
                                                     objects may not overlap the data printing section.
                                                    o The Year/Month/Dayand Hour/Minute data
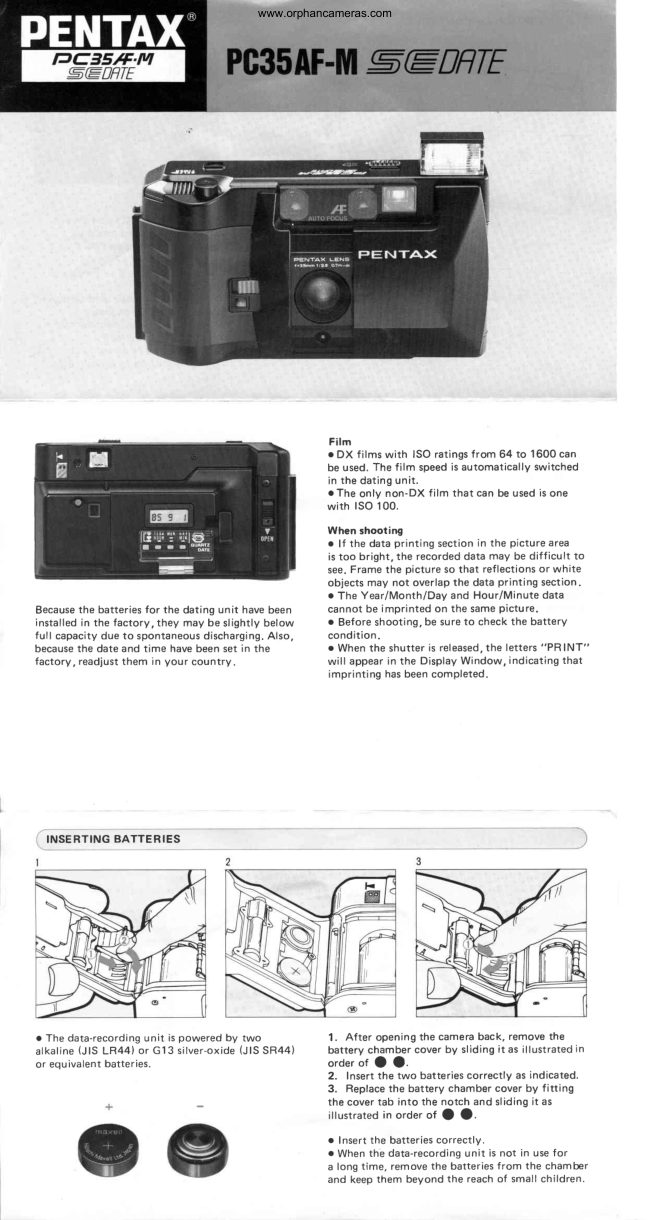
Becausethe batteriesfor the dating unit have been     cannot be imprinted on the samepicture.
installedin the factory, they may be slightly below      o Before shooting, be sure to check the battery
full capacitydue to spontaneousdischarging.Also,      condition.
becausethe date and time have been set in the          o When the shutter is released,the letters"PR lNT"
factory, readjustthem in your country.                    will appearin the DisplayWindow, indicatingthat
                                                     imprinting has been completed.


  INSERTING BATTERIES


o The data-recordingunit is powered by two               1. After opening the camera back, remove the
a l k a l i n e( J l S L R 4 4 ) o r G 1 3 s i l v e r - o x i d (eJ I S S R 4 4 )      battery chambercover by slidingit as illustratedin
or equivalent batteries.                                order of O O
                                                              2.  Insert the two batteriescorrectly as indicated.
                                                              3. Replacethe battery chamber cover by  f itting
                                                     the cover tab into the notch and slidingit as
                                                         illustratedin order of O  O.

                                                    o Insert the batteriescorrectly.
                                                    o When the data-recordingunit is not in use for
                                                    a long time, remove the batteriesfrom the chamber
                                             and keep them beyond the reachof small children.
View original page 1Page 2 · Read text
www.orphancameras.com                                                                                                                                                           4{{
                                                                                                                                                                                      I
                            (g                                                                                                                                                                                                                                                    II              {ass,t

                                                        Battery Check
                                                      Button

                                            Re d L a mp
                                            -Oo isp la y   Win dow

                                         Mo d e S e le ctor
                                                      Button                                                                                                                                                                                                                                t{,i:l
                                   -Osetting            Button                                                                                                            r When the LCD (Liquid Crystal                                            Cover
                                                                Display)is exposedto a high
                                                           temperatureof around 60'C,  it
                                                    may blacken, but 'dhen the
                                                     _-setting             temperaturefalls, it will return to                                                            Button
                                                             normal.
                                                                 o The LCD may also tend to slow
                                                     down in responseat lower
                                                               temperatures.lt is characteristic
                                                                           of the LCD, not a fault.
                                                                 o The unit works perfectly at
                                                                  the temperaturesof approx. 50o-
                                                             oo c.


                                                                                                                                                                                                                                                                                  :&;r.             ., ri{".:r--*1**::t

1 serirruc

o When the (D Battery Check Button is depressed,      2. Presstfre O Setting Button and set the year
the   Red Lamp will glow. lf not, make sure that       to "84" in the DisplayWindow.
the batteriesare correctly inserted,or replacewith        3. Pressthe O Setting Button and set the month
fresh batteries.                                           to "5"  in the DisplayWindow.
o When the batteriesare properly loaded. the data        4. Presstne O Setting Button and set the day to
w i l l a p p e a ri n t h e O D i s p l a yW i n d o w ( t C O ) . l t r e           " 3 1 "   i n t h e D i s p l a yW i n d o w .
samedata will be recordedon the f ilm. Se the          o Note that unlessthe "Hour-Minute" mode is set
desireddata on the display according to the             correctly,the "Year-Month-Day"mode will not
respectivemode.                                 be set correctly.
o Open the O Setting Button Cover with your          Setting the "Hour-Minute" Mode
 f ingernail.                                                         [iJ f:TS*l     (half past three in the afternoon)
o Three modes: Year/Month/Day,Hour/Minute,         1. Pressthe Mode SelectorButton until the             ,fl
and "-----"     (blank)are consecutivelydisplayed     "Hour-Minute" mode is set in the DisplayWindow.
when the O MoAe Selector Button is depressed.        2. Presstfre O Setting Button and set the second
Stop depressingthe Button when the desired mode     accordingto the announcementof time or your
is displayed               " indicatesthe mode when       watch. The Second"-"  will be set to zero,although
no data printout is required.                                             it will just keep f lickeringin the DisplayWindow.
o Depressingthe Setting Button O   , O or @ once      3. Pressthe O Setting Button and set the minute
will advancethe displayedf iguresone at a time.          to "30" in the DisplayWindow.
For rapid advance,keep depressingthe button,           4. Pressthe G) Setting Button and set the hour to
and within a secondor two the f igurewill              "15" in the DisplayWindow. The 24-hour clock
increaseconsecutively.                             designationis usedfor the time indication.
 Setting the "Year-Month-Day"                         o Note that the second "-"    f lickers every second,
            (september1, 1e85)              and if you releasethe shutter while it is appearing,trg--T.--T]
 1. Pressthe Mode Selector Button until the "Year'              i t w i l l b e i m p r i n t e do n t h e f i l m .
Month-Day" mode is set in the Display Window'
                                                                                                                         {

  '
  PC3SAF-M SE DATE Specifications                                                                                                     )

Type: All-automatic35mm leaf-shuttercamerawith built-in flash and auto dating unit.
Data RecordingSystems: An internal recording lamp records information onto the reverseside of
       f ilms, utilizing6-digit liquid crystal characters.
Data lmprinting Mode: Push buttons to set unit to any of three modes; "Year/MonlDay," "Hour/
    i\,4in,"or            (Ulant<).The year, leap year, and month (odd or even numbereddays) are
   a u t o m a t i c a l l y a d j u s t e d . Y e a r / M o n / D a y m oY de ea :r ( " 8 0 " 1 o " 1 9 " - 1 9 8 0 1 o 2 0 1 9 ) ; M o n t h    ( " 1 "
    to "21"); Day ("1" to "31") Hour/Min modes: Hour ("0" to"23"1: Minute ("00" to "59")
   Blank mode: "-----"     (no data imprinted).
                                                 batteries.                                    silver-oxide                                   or           Two 1.5V alkaline      Source:Power                                         Window to indicate data have been recorded.                 {q                      "PRlNT"                              appears                                                   in Display          Confirmation: Recording
                                                normally,                     Approx.                             5,000 recordings;          of Recordings:Number                                                  one year's operation.                                 {                                            1600)                                    (lSO 64 -                            switching            Setting: Automatic Film Speed
S i z e & W e i s h t : 1 2 9 ( W x) 6 9 ( H ) x 5 1 . 5 ( D ) m m ( 5 . 1 x 2 . 7 x 2 i n . | , 3 4 5 9 1 1 2 . 2 o 2 . ) w i t h o u t b a t t e r i e s .


             Asahi Optical Co., Ltd. C.P.O. 895, Tol:yo 10O-91,JAPAN
            Pentax Europe n.v. Weiveldlaan3'5, 193O Zaventem Zuid-7, BELGIUM
             Pentax Handelsgesellschaft mbH Postfach 54 0169, 2000 Hamburg 54, WEST GERMANY
            Pentax U.K. Limited Pentax House, South Hill Avenue, South Harrow, Middlesex H,A2 OLT, U.K.
            Pentax France S.A. Z.l. Argenteuil, 12, Rue Ambroise-Croizat.95100 Argenteuil, FRANCE
            Pentax (Schweiz) AG Industriestrasse2,8305 Dietlikon ZH, SWITZERLAND
            Pentax SvenskaAB Box 650, 5-751 27 Uppsala,SWEDEN
            Pentax NederlandSpinveld25,4a15 HR Breda,THE NETHERLANDS
            Pentax Norge A/S Stenersgt.18, Oslo 1. NORWAY
            Pentax Corporation 35 InvernessDrive East, Englewood, Colorado 80112, U.S.A'
            Pentax Canada Inc. 1 760 West 3rd Avenue, Vancouver, B.C. V6J 1 K5, CANADA
             Asahi Optical Brasileira Ind. e Com. Ltda. Rua Capiteo Antonio Rosa 376, Sala 121 Ed. PBK, 56o Paulo. BRASIL

                                                                                                              2/ 8 6 Printed in Japan
View original page 2From the M. Butkus archive. Original publisher and archive notices are retained.
Check the model and edition against your equipment.
PDF verified 2026-10-10.