Film cameras
Pentax Spotmeter III User manual
User manual for Pentax Spotmeter III. 10 pages in English. Read the original PDF, download or print a copy without registration.
10 pagesEnglish1.5 MB PDF
Loading your manual…Open PDF directly
Document details
- Brand
- Pentax
- Model / document
- Pentax Spotmeter III
- Document type
- User manual
- Language
- English
- Pages
- 10
- File size
- 1.5 MB
- Category
- Film cameras
- Document date
- Not specified in catalog
Search available document text
Find a term, then jump to its page in the original PDF. Image-only pages may not be searchable; check the PDF for exact wording and diagrams.
Page 3 · Read text
www.butkus.us


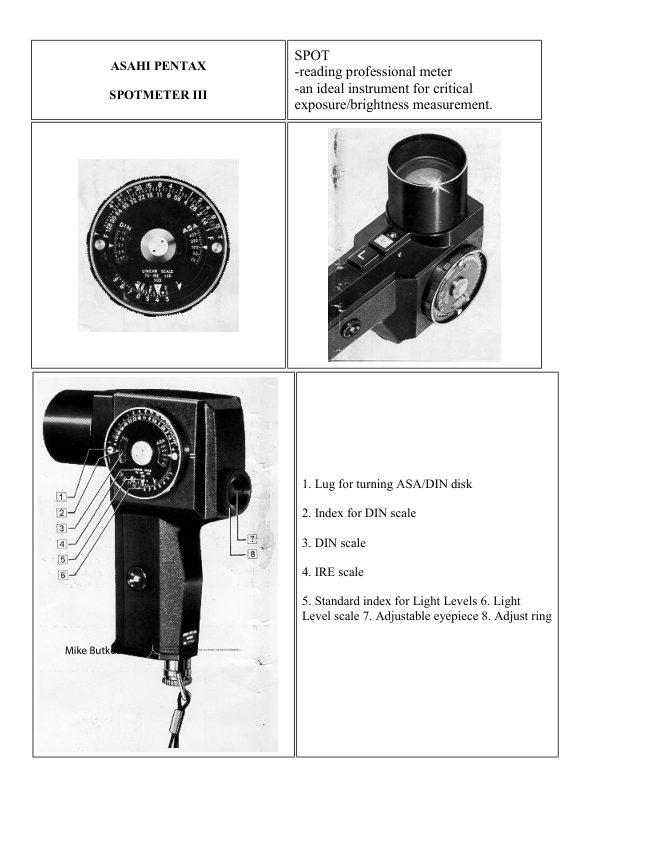
                                                         9. Shutter speed scale
                                                   10. f/ number scale
                                                   11. Index for ASA scale
                                                   12. ASA scale
                                                   13. Hand strap retainer

                                             14. Objective lens

                                                   15. Zero adjust screw

                                                   16. Battery checker button

                                                   17. "L" switch button for low-light range

                                             18. Scale illuminator button


SPECIFICATIONS

Type of measurement SPOT-reading reflected light meter which reads high-light range with the
lens cap off, and low-light range with the "L" button depressed.

Distance of measurement 1m - 00

Light Level range 3~18 ;

ASA/DIN film speed range ASA 6~6400/DIN 9~39

Diaphragm range f/1~f128

Shutter speed range 4 minutes~1/4000 second

Viewing Eye-level pentaprism finder (magnification 1.5x) with adjustable eyepiece (0~1.5Dptr.)

Viewing angle 12° (vertical) /17° (horizontal) / 21° (diagonal)
View original page 3Page 4 · Read text
Angle of acceptance of CdS photo conductor 1°

Scale illuminator Scale illuminator glows, for dark area reading, when the illuminator button is
depressed.

Power source One 1.3V mercury battery (Mallory RM640, Eveready E640 or equivalent)--for
high-light range.

See this link on a Wein Air replacement battery.

One 9V dry battery (Mallory M-1604, Eveready 216 or equivalent)--for low-light range.

IRE scale IRE scale for television filming and other special readings.

Battery checker Battery checker mark on Light-Level scale; battery checker button on grip.

Dimension Height 164mm x Width 62mm x Length 127mm.

Weight 475 g.

Accessories Soft leather case + hand strap.

SHORT OPERATING INSTRUCTION


                     A Set the ASA scale to the correct film speed rating of the
                                   loaded film.

                       B Hold the meter in your right hand (with viewing ocular
                                      close to your eye), and direct the meter toward the
                                   photographic subject.

                     C Looking through the viewfinder, center the small circle
                                       (center of the scale glass) on the area of prime picture interest.
                                  (Turn the adjust ring (8) until you can clearly see the
                                    viewfinder scale.) Observe on the H scale of the viewing
                                    screen the Light-Level (L.L.) number at which the needle
                              comes to rest. If the level is less than 10 on the H scale and/or
                                      the needle is not deflected, then press the "L" button down
                                and observe the L.L. number on the low range indicated by L
                                         scale.

                     D Set this observed number below the green standard index
                              mark on the meter calculator by turning the knurled outer
                                          ring.

                       E Select the shutter speed and f/stop combination desired
                                  (from the two top scales of the meter calculator), and transfer
                                           this data to your camera.
View original page 4Page 5 · Read text
www.butkus.us


                         IRE* SCALE (*Institute of Radio Engineers)
                           IRE units are used for percentage wise comparison of energy.
                           They are used in wireless communications for comparison of
                                    signal voltage. In the Asahi Pentax Spotmeter an IRE scale is
                                  incorporated for comparison of the energy of light under
                               exposure measurement. The brightest spot in the high light area
                                          is rated at 10 (100 percent IRE) and other areas are compared
                                with this brightest spot in percents.

                           The index 10 (100 percent IRE) shows the maximum brightness
                                    in the high-light detail reproducible on color film. ("White
                                   Level.")

                           The index 1 (10% IRE) shows the maximum darkness in the
                            shadow detail reproducible on color film. The other indices from
                            2 to 9 (20 percent ~ 90 percent IRE) show the percentage wise
                              comparison of the brightness based on the "White Level."

                           The large green triangle index between the indices 3 and 4 (not
                              marked) is the standard index which shows the average of
                           optimum exposure range.


Colored indices        Index 8.             Yellow

                     Index 5            Red

                      Standard index        Green

                   Dot between 2 and 3   Blue


The figure "1:32" on the calculator indicates the contrast ratio between IRE scale 1 and 10. The IRE scale from
1 to 10 covers 5 EV ranges; hence the contrast ratio is 1:32. In television broadcasting, the contrast ratio of the
picture is limited to 1:30; therefore, the illumination for television filming is so adjusted that the contrast ratio is
kept within 1:30.

Viewing screen with high/low light scale calibrations, battery checker mark and 1° center spot.
View original page 5Page 6 · Read text
Various Methods of Exposure Readings


1. General Method
Center the small circle (seen through the viewfinder) on the half-tone spot in the area of prime picture interest.
Set the observed Light-Level (L.L.) number below the standard index, and get the shutter speed and f/stop
combination desired.

2. Averaging Method
Read the high light and low-light areas, and get the average L.L. by dividing the total added L.L. numbers by
the number of spot readings. Set the divided L.L. number below the standard index.

For black-and-white films, the difference (contrast ratio) between high-light and low. light areas can be about
6~7 L.L. numbers; for color films, this difference should be kept below 5 L.L. numbers. If the contrast ratio
exceeds these L.L. numbers, the picture area outside of these L.L. ranges will be over- and/or under-exposed.

3. High Light Reading Method
Developed for television 'filming, this method can be also applied to still photography. As stated earlier, the
reproducible contrast ratio for color films is about 1:30 (5 L.L. numbers ~ 5 E.V.), same as in television filming.
For black and-white, this ratio is about 1:100 (6~7 L.L./6~7 E.V.).

Read the high-light spot white spar, for instance) in the picture area. Set the observed L.L. number below the
IRE index 10. This will give you an optimum exposure based on the high-light spot.

In this case, however, the details in the picture area reproducible on color films are those areas giving L.L.
number readings covered by the IRE scale from 10 to 1. The shadow details in the picture area giving L.L.
number readings not reaching the IRE index 1 will not be reproduced on the film.

Therefore, such shadow areas should be additionally illuminated so that the L.L. reading will exceed the IRE
index 1, as in television filming.
View original page 6
Page 7 · Read text
www.butkus.us

4. Shadow Reading Method
Contrary to the high-light reading method, this method reads the low-light spot to determine optimum exposure,
such as when you wish to properly reproduce shadow details, based on the shadow area.

Read the shadow spot in the picture area. Set the observed L.L. number below the IRE index 1. This will give
you an optimum exposure based on the shadow area. (In this case, you will have to read the L scale by
depressing the L" switch button).

5. Special Color Reading Method
This method can't be recommended as a strict reading method; but as you get accustomed to this, you will find
it highly efficient.

Please don't let colors misguide you!

One of the important points you should bear in mind when using this SPOT meter is the color in the picture
area. Reading any color spot in the picture area will not give you correct exposure unless you use the various
indices properly.

The reflection of light greatly differs from one color to another:

LIGHT REFLECTION OF 7 COLORS


Purple        Indigo      Blue        Green       Yellow      Orange      Red

6~12%     6~12%      15~21%    18~26%    65~75%     35~45 %     15~21%


Yellow has the highest reflection among the 7 colors. Therefore, if you spot read a yellow area and use the
standard index to determine exposure, the picture will be under-exposed. To get proper exposure according to
the color of the picture area, set the observed L.L. numbers below the following indices:


L.L. READING OF:               USE FOLLOWING INDICES:

White spot                               Index 10 (white)

Yellow spot                              Index 8 (yellow)

Orange spot                              Index 6~7

Red spot                                 Index 5 (red)

Green spot                                Standard index (green)

Blue (dark) spot                         Blue dot between 2 and 3
View original page 7
Page 8 · Read text
Other Uses

When taking black-and-white pictures of a colored subject, you know that the areas adjacent to each other
having little difference in light reflection, although different in visible colors, will not be reproduced on the film
in proper contrast. In such a case, a proper filter is selected and used to properly reproduce the contrast.

It is difficult, however, to select a proper filter to be used for that purpose. The Asahi Pentax Spotmeter helps
select proper filters. Put the filter over the objective lens of the Spotmeter and read the difference in the L.L.
readings.. . use different filters until the difference in the L.L. readings (contrast) of the picture areas in question
will become greatest. Select that filter which gives the greatest difference in the L.L. readings to properly
reproduce the contrast.

The Spotmeter will also help correct illumination not only in color but also in black-arid-white photography.
The reproducible contrast of a picture area is limited within a certain range as stated earlier. The Spotmeter
readings of the various important picture areas will indicate which areas should be additionally illuminated.

                                 Battery Checker and Replacement


            The battery checker button (l7) checks the life of the 9V dry battery. Look
              through the viewfinder, and depress the battery checker button. If the needle
            moves to the black mark between the figures 7 and 8, the dry battery is still
                 active. If it does not move to this mark, replace the battery.


The mercury battery usually lasts for about a year, and when it is not active, the needle will not
move rapidly against bright light. It should usually be replaced after one year's use. When replacing
batteries, use a correct replacement battery. (need a Wein Air replacement for the mercury battery)

For replacing the mercury battery, unscrew the battery housing cover with a coin. When inserting a
new battery, be sure that the (+) side is UP.
View original page 8Page 9 · Read text
www.butkus.us

For replacing the dry battery, remove the retainer (A) of the strap by unscrewing it, and turn the
lever (B) to the direction of the arrow, and the whole housing of the mercury battery will spring up.
Open it as illustrated, and drop the dry battery from inside the meter's grip. When inserting a new
dry battery, make sure that it makes correct contact with the ( + ) and ( - ) terminals.


Cine Index
Between 30 and 60 on the shutter speed scale is a red index. This is the index for 24/fps cine speed.
For 18/fps cine speed, use the calibration 30 (1/30 sec.). Use the f/stop number facing this red index
(for 24/fps) or the calibration 30 (for 18/fps).


ASA & DIN Scales
The DIN scale (3) is calibrated in green from DIN 9 to 39, with every third number fully indicated
(9, 12, 15, etc.), and the balance are indicated by markings. The ASA scale (12) has the following
calibrations in red. (The figures under a dash are merely indicated by markings).
View original page 9
Page 10 · Read text
Zero Adjustment
After the mercury battery is taken out, the needle should rest at the zero point of the light-level
scale. If the meter's needle is off the zero point, turn the zero adjustment screw (16) with a screw-
driver to bring the needle to the zero point. When making this adjustment, the mercury battery must
be removed from its housing.

Color Correction
Your Spotmeter contains an optical. system consisting of an objective lens, reflex viewing system
including a pentaprism (the same pentaprism as used in the Asahi Pentax camera), and an eyepiece.
The reflex viewing system and the CdS cell have a special coating which properly corrects the
color sensitivity of the light-sensitive element, making your Spotmeter highly accurate in critical
color photography.

ASAHI PENTAX SPOTMETER MODEL "FL"


                             The Model "FL" Spotmeter is identically same as
                                     the Model III in mechanical and optical
                                     construction with the exception of the viewfinder
                                      scale and the calculator. The viewfinder scale
                                        directly reads Foot/Lamberts; the inside scale of
                                     the calculator on the side of the meter is the
                                  Foot/Lamberts calibration, and the outside scale
                                      indicates luminance ratio.  If, for instance, the
                                            brightest spot in a given area reads 1000ft/L and the
                                          darkest spot reads 2 ft/L: Set the 2 ft/L calibration (inside
                                            scale) of the calculator below the luminance ratio 1:1
                                           (outside scale), as illustrated. Observe the luminance ratio
                                  number (outside- scale) matching the 1000 ft/L
                                            calibration (inside scale). You will note that the
                                     luminance ratio is 500:1.
                                        The operation of the Model "FL" is identically same as the Model III.
View original page 10From the M. Butkus archive. Original publisher and archive notices are retained.
Check the model and edition against your equipment.
PDF verified 2026-10-10.