Flashes & lighting
Promaster FT 1700 flash User manual
User manual for Promaster FT 1700 flash. 3 pages in English. Read the original PDF, download or print a copy without registration.
3 pagesEnglish0.6 MB PDF
Loading your manual…Open PDF directly
Document details
- Brand
- Promaster
- Model / document
- Promaster FT 1700 flash
- Document type
- User manual
- Language
- English
- Pages
- 3
- File size
- 0.6 MB
- Category
- Flashes & lighting
- Document date
- Not specified in catalog
Search available document text
Find a term, then jump to its page in the original PDF. Image-only pages may not be searchable; check the PDF for exact wording and diagrams.
Page 2 · Read text
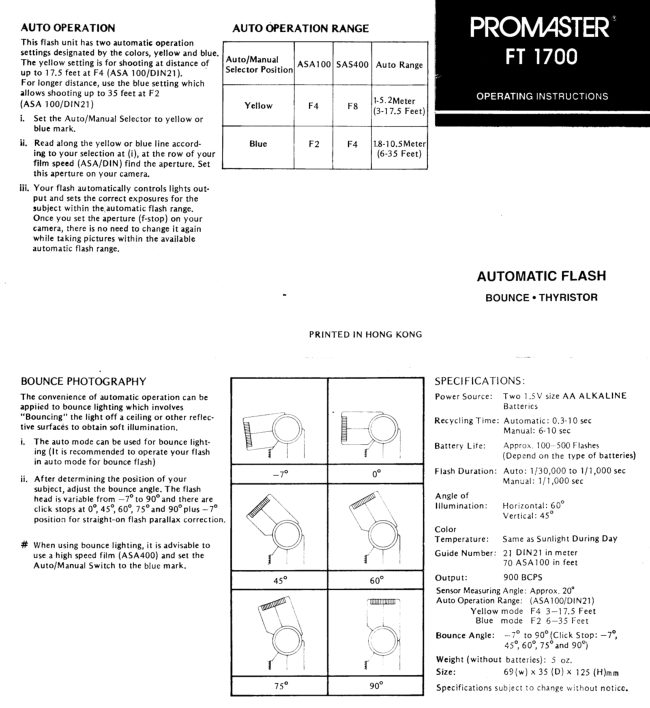
AUTO OPERATION

AUTO OPERATION RANGE

This flash unit has two automatic operation
settings designated by the colors, yellow and blue.
The yellow setting is for shooting at distance of
up to 17.5 feet at F4 (ASA 100/DIN21),

For longer distance, use the blue setting which
allows shooting up to 35 feet at F2

{ASA 100/DIN21)

J, Set the Auto/Manual Selector to yellow or

‘Auto/Manual

Selector Posi

ition

'ASA100| SAS400

Auto Range

5.2Meter

blue mark.

Ji, Read along the yellow or blue line accord-
ing to your selection at (i), at the row of your
film speed (ASA/DIN) find the aperture, Set

Yellow Fa | Fe Qa Eeer)
Blue F2 | F4 |18-10.sMeter|
(6-35 Feet)

t
—

|

|

this aperture on your camera,
iii,

Your flash automatically controls lights out-
ut and sets the correct exposures for the
‘subject within the,automatic flash range.
‘Once you set the aperture (f-stop) on your
‘camera, there is no need to change it again
while taking pictures within the available
automatic flash range,

BOUNCE PHOTOGRAPHY

The convenience of automatic operation can be
applied to bounce lighting which involves
“Bouncing” the light off a ceiling or other reflec:
tive surfaces to obtain soft illumination,

J. The auto mode can be used for bounce light-
ing (It is recommended to operate your flash
in auto mode for bounce flash)

ji, After determining the position of your
subject, adjust the bounce angle, The flash
head is variable from —7° to 90°and there are
click stops at 0°, 45°, 60°, 75°and 90° plus ~ 7°
position for straight-on flash parallax correction,

# When using bounce lighting, it is advisable to
Use a high speed film (ASA400) and set the
‘Auto/Manual Switch to the blue mark.

PRINTED IN HONG KONG

PROMASTER
FT 1700

OPERATING INSTRUCTIONS

AUTOMATIC FLASH
BOUNCE + THYRISTOR

SPECIFICATIONS,

Power Source: Two 1.SV size AA ALKALINE
Batteries

Automatic: 0.310 sec

Manual: 6-10 sec

Approx. 100-500 Flashes
(Depend on the type of batteries)

Recycling Time:

Battery Lite:

Flash Duration: Auto: 1/30,000 to 1/1,000 sec

Manual: 1/1,000 sec
Angle of
Mlumination: Horizontal: 60°
Vertical: 45°
Color
‘Temperature: Same as Sunlight During Day
Guide Number: 21 DIN21 in meter
70 ASA100 in feet
Output: 900 BcPs

Sensor Measuring Angle: Approx. 20"

Auto Operation Range: (ASA100/DIN21)
Yellow mode F4 3~17.5 Feet
Blue mode F2 6-35 Feet

7° t0,30° (Click Stop:
45°, 60°, 75° and 90°)

Weight (without batteries): 5 oz
Size. 69(w) x 35 (D) x 125 (H)mm

Specifications subject to change »

Bounce Angle:
View original page 2Page 3 · Read text
BOUNCE

FLASH HEAD—

BATTERY COMPARTMENT COVER

BOUNCE ANGLE INDICATOR.

EXPOSURE CALCULATOR 7

60, ]
45

oO

— \
S
AUTO/MANUAL LOCK RING A
READY INDICATOR LAMP/
SELECTOR | MANUAL TEST BUTTON
L-compurer MOUNTING — |
SENSOR Foor

ATTACHING FLASH UNIT TO YOUR
CAMERA

Loosen the fock ring,insert the flash unit,
into your camera's accessory shoe, then
tighten the flash unit with the lock ring.

ii. Slide the ON-OFF switch to the ON position
(A red mark will show) and you will hear a
humming sound indicating the flash unit is
‘operating. In a few seconds, the ready indi-
cator lamp lights up, showing that the
flash unit is ready to flash,

iii, Set the shutter speed of your camera to the
Droper setting for electronic flash use or 1/60
second,

(Read your camera owner's manual for

details on the flash synchronization)

‘ON-OFF swiTCH

MANUAL OPERATION

‘Set the AUTO/MANUAL Selector to white
mark,

Focus on your subject and note the flash-
to-subject distance.

Read the Exposure Calculator chart which
determines proper exposure. Example: In
case of film speed ASA100 (DIN21) and
S.2meter (17.5 feet) distance, the proper
aperture is F4.

+
wm [1a]19]26|38|52]75 [osm
FT [4 | 6 [asfiagi79 25| 95 [Fr
ASA iin
bored 11] @ [58/4 [2a] 2 va] 18
woo[ te] ir} 8 [So] « 2a] 2 fat
200 [22] 16]11| 8 [56] 4 [28] 24
400} _[a2}e]irfe [56] 4 [27
i000] zzfie} i] 8 [ss[ar

www.orphancameras.com

BATTERY OPERATION

i, Open the battery Compartment cover.

i. Insert two 1.5V penlight batteries following.
the (+) (—) signs as indicated inside and replace
the cover.

© FOR BEST RESULTS USE ALKALINE
BATTERIES

© USE FRESH BATTERIES REGULARLY

‘© THE BATTERIES SHOULD BE INSERT-
ED IN CORRECT POSITION

Calculation of F-stop without use of
EXPOSURE CALCULATOR.

Guide Number (G.N.)

Fstop
Distance

Guide Number Table:

Fim $a4°% | 25 | s0 | 100] 200] 400|1009
Guide Number

(inmeter) | 10 | 15 | 21 | 30 | 42 | 65
wie pean) | 35 | $0 | 70 | 100] 140] 215
View original page 3
From the M. Butkus archive. Original publisher and archive notices are retained.
Check the model and edition against your equipment.
PDF verified 2026-10-10.