Film cameras
Regua Variant 740 CTX / 736 CX User manual
User manual for Regua Variant 740 CTX / 736 CX. 5 pages in English. Read the original PDF, download or print a copy without registration.
5 pagesEnglish0.4 MB PDF
Loading your manual…Open PDF directly
Document details
- Brand
- Regua
- Model / document
- Regua Variant 740 CTX / 736 CX
- Document type
- User manual
- Language
- English
- Pages
- 5
- File size
- 0.4 MB
- Category
- Film cameras
- Document date
- Not specified in catalog
Search available document text
Find a term, then jump to its page in the original PDF. Image-only pages may not be searchable; check the PDF for exact wording and diagrams.
Page 1 · Read text
Provided free to www.orphancameras.com


                                                                                                                for Julia :-)

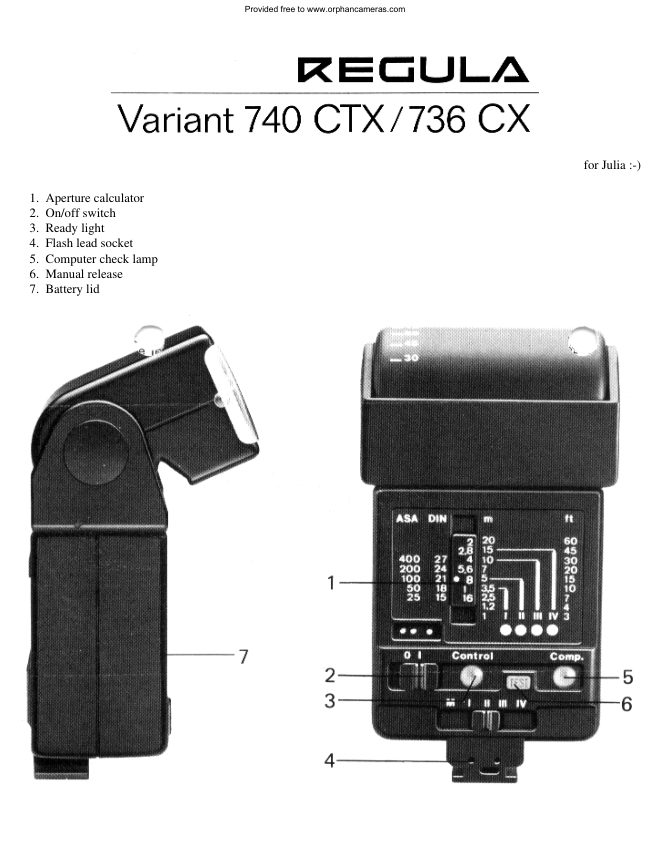
1. Aperture calculator
2. On/off switch
3. Ready light
4. Flash lead socket
5. Computer check lamp
6. Manual release
7. Battery lid
View original page 1Page 2 · Read text
Provided free to www.orphancameras.com

Fitting batteries: Push the lid (7) downwards as shown by the arrow. Insert four size AA alkaline cells of 1.5 volts each
(never any other voltage). Check correct polarity as marked in the battery compartment. Slide in lid and close it.

Changing batteries: If the ready light (3) takes more than 40 seconds to light up, the batteries are spent and need
replacement. Always replace them as a complete set. To avoid corrosion damage never leave spent batteries in the flash
unit.

Camera mounting: Place the flash unit vertically on the camera and push the foot into the accessory shoe. If the latter is a
hot shoe, this directly connects the flash unit to the camera. With cameras equipped with a normal PC socket, plug the
synchronizing lead info the synchronizing socket (4) of the flash unit and the other end of the lead info the PC socket on
the camera. On cameras with adjustable synchronization, set the latter always to X. Check usable shutter speed for flash
from the camera instructions (usually this is 1/60 second). Expose at the fastest usable speed for flash.

The Vario-Computer

1. Select the aperture

Set the film speed on the Aperture slide. To the left of the four arrow-heads (CTX 740) or three arrow-heads (736 CX) you
then read off the available working apertures. Choose these according to whether you need a greater flash range or
extended depth of field. Set this aperture on the camera.

 2. a) Setting the Computer — 740 CTX

Set the computer selector switch as required. A distance signal lights up underneath the selected aperture. This indicates
the maximum distance range for the setting being used. The following five settings are available:

I = Smallest aperture, hence greatest depth of field. Flash distance range 0.5 to 3.3 metres (20 inches to 10 feet)

II = Next larger aperture, with slightly reduced depth of field. Distance range is now 0.5 to 4.5 metres (20 inches to 15
feet)

III = Aperture opened by two further stops, yields extended flash range from 0.9 to 10 metres (40 inches to 33 feet) IV —
Largest aperture, minimum depth of field; greatest flash range from 1.5 to 14 metres (60 inches to 46 feet)

M = Manual setting — see section on manual Operation.

2. b) Setting the Computer — 736 CX

The instruction in section 2 a) apply similarly to the model 736 CX. This however has no luminous distance range
indication and a choice of only three apertures:

I = Small aperture, great depth of field; flash range 0 to 4 metres (20 inches to 13 feet)

II = Next larger aperture, with slightly reduced depth of field. Distance range 0.5 to 6 metres (20 inches to 20 feet)

III = Large aperture, reduced depth of field; greater flash range from 0.5 to 8 metres (20 inches to 26 feet)

3. Computer check — 740 CTX
View original page 2
Page 3 · Read text
Provided free to www.orphancameras.com

The Computer check lamp (5) permits a check before a shot whether subject Conditions will yield a correct exposure. For
such a Check, mount the flash unit on the camera and point it at the subject, with the Computer set to I to IV. Wait for the
ready light (3) to light up, then operate the manual release. It the flash power is sufficient, the Computer check lamp lights
up for about 2 seconds. In that case take the picture from this viewpoint. It the distance is greater than the available flash
range (see section 2) the check lamp does not light up. In that case choose a higher Computer setting (e.g. IV) if available.
Note: The check lamp does not light up with the M setting.

4. Computer with series thyristor circuit — 740 CTX

The series thyristor Circuit preserves the excess flash energy that Is discharged with a normal Computer flash. This
therefore permits much shorter recycling times, especially with close-up shooting. The nearer the subject, the shorter the
recycling time and the greater flash capacity of a set of batteries.

Flash shots:

Direct flash with computer

Switch on the unit (2). As soon as the ready light (3) lights up, the unit is ready for shooting. Set the reflector to 0° (i.e.
horizontally). Set the computer switch to the Optimum setting for the subject (see paragraph 2 of “Vario-computer“
section). Set the corresponding aperture on the camera. Focus the camera. If necessary, check the exposure with the
computer check lamp (5) on operating the manual release (6) (only on model 740). Wait until the ready Light (3) lights up
again. Then press the camera release.

Bounce flash:

With the tilting and rotating reflector you can point the flash at a reflecting surface (ceiling, wall etc.) for particularly soft
illumination.

a) With a horizontal camera hold:

Tilt up the reflector to the required angle — 0 to 90° with engagement stops at 150 intervals.

b) With an upright camera hold:

Set the reflector to 0° and turn it sideways along its longitudinal axis to point upwards. With bounce flash with the model
740 CTX preferably make an exposure check with the computer check lamp (5) Apart from that, the flash unit and camera
are used in exactly the same way as for direct flash.

Manual Operation

Set the computer switch to M. The aperture scale (1) does away with all guide number calculations: move the slide to bring
the white index dot opposite the speed of your film and directly read off opposite each distance the aperture you have to set
on your camera. To establish the lens aperture for manual bounce flashing, count the distance from the flash unit to the
reflecting surface plus from there to the subject.

Cameras with automatic flash control:

Set the correct guide number on your camera (see technical data) and set the reflector tilt to 0°. The Computer selector
View original page 3
Page 4 · Read text
Provided free to www.orphancameras.com
switch must be at M.

Automatic charging control:

The built-in automatic Charging control reduces the current drain on the battery. But after a shooting session remember to
switch oft the flash unit. Otherwise even the reduced current consumption will unnecessarily drain your batteries.

Rechargeable accumulators

You can equip your flash unit at any time with rechargeable nickel cadmium accumulators (nicads). An NC Set 4 is
available for this purpose from your photo dealer and consists of 4 nicads and a charger. During charging, switch off the
flash unit. With the charger flashes can be taken directly from the mains.

IMPORTANT: Only NC accumulators (NiCads) are rechargeable —
never try to recharge other AA cells.

Maintenance:

If the unit is out of use for a length of time, remove the batteries. Keep .the battery terminals and contacts in the battery
compartment lid clean.

Maintenance of the flash capacitor:

If the unit is not in use for longer periods, switch it on some time before you want it and let it run for a few minutes. Better
still — if the unit is used only intermittently — switch it on for about five minutes every two to three months. That keeps
the flash capacitor at its full efficiency.

Technical data:

 Guide numbers: ASA                          25  50  100  200   400
 Guide numbers: DIN                          15  18   21   24   27
 Variant 740 CTX: metres                       20  28   40   56   78

 Variant 740 CTX: feet                        65  91  130  184  256
 Variant 736 CX: metres                       18  26    36   50   70
 Variant 736 CX: feet                         60  85  118  164  230

Flash duration: 1/1000 to 1/50,000 second

Recycling time:

            Approx. 10 seconds (model 736)
            Approx. 0.5 to 10 seconds (model 740)

Color temperature: 5600° K
View original page 4Page 5 · Read text
Provided free to www.orphancameras.com
Lighting angle: approx. 60°

Power source:

     G  a) four alkaline size AA cells (1.5 volts) Or:
     G  b) tour nickel-cadmium cells (e.g. Varta 501 RS)
     G  c) mains operation via LG 31 mains adapter and charger

Camera connections: hot shoe contact or synchronizing lead


Flash Light REGULA Variant 740 CTX / 736 CX
View original page 5From the M. Butkus archive. Original publisher and archive notices are retained.
Check the model and edition against your equipment.
PDF verified 2026-10-10.