Film cameras
Ricoh 260p User manual
User manual for Ricoh 260p. 7 pages in English. Read the original PDF, download or print a copy without registration.
7 pagesEnglish0.3 MB PDF
Loading your manual…Open PDF directly
Document details
- Brand
- Ricoh
- Model / document
- Ricoh 260p
- Document type
- User manual
- Language
- English
- Pages
- 7
- File size
- 0.3 MB
- Category
- Film cameras
- Document date
- Not specified in catalog
Search available document text
Find a term, then jump to its page in the original PDF. Image-only pages may not be searchable; check the PDF for exact wording and diagrams.
Page 2 · Read text
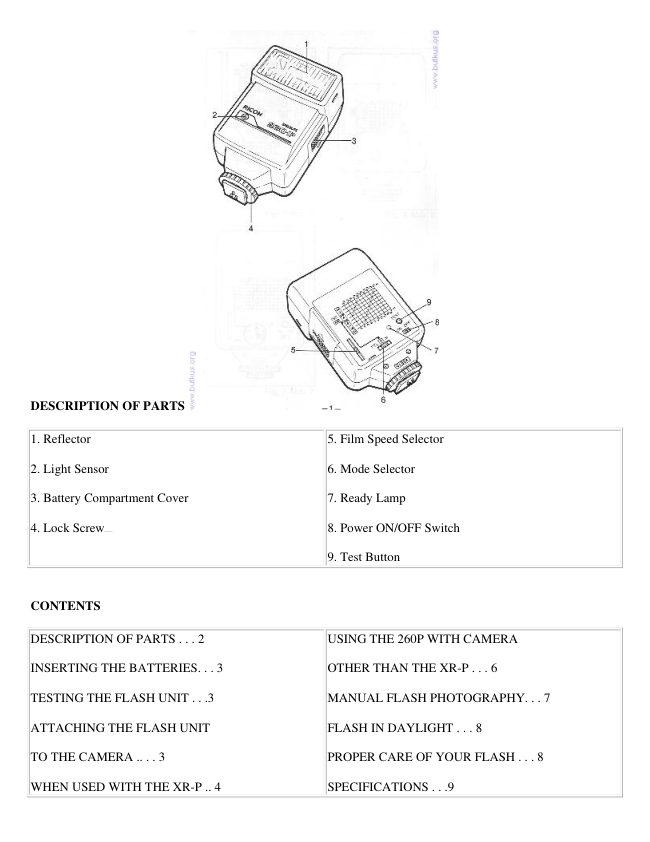
DESCRIPTION OF PARTS

1. Reflector                                                 5. Film Speed Selector

2. Light Sensor                                              6. Mode Selector

3. Battery Compartment Cover                             7. Ready Lamp

4. Lock  Screw4www.butkus.org                                             8. Power ON/OFF Switch

                                                              9. Test Button


CONTENTS

DESCRIPTION OF PARTS . . . 2                USING THE 260P WITH CAMERA

INSERTING THE BATTERIES. . . 3            OTHER THAN THE XR-P . . . 6

TESTING THE FLASH UNIT . . .3            MANUAL FLASH PHOTOGRAPHY. . . 7

ATTACHING THE FLASH UNIT               FLASH IN DAYLIGHT . . . 8

TO THE CAMERA .. . . 3                    PROPER CARE OF YOUR FLASH . . . 8

WHEN USED WITH THE XR-P .. 4               SPECIFICATIONS . . .9
View original page 2Page 3 · Read text
INSERTING THE BATTERIES -

                                                               1. Slide the battery compartment cover in the direction
                                                         of arrow to open. (Fig. 1)

                                                               2. Insert four penlight (M size) batteries in accordance
                                                     with the polarity diagram shown inside the battery
                                                   compartment. (Fig. 2)

                                                               3. Close the battery compartment cover by sliding it
                                                       back.

                                               * Generally, the performance of batteries drops in cold
                                                           conditions. When the flash is used at a temperature
                                                    lower than 0°C (32 F) warm the batteries and insert
                                               them just before shooting.

                                               * When the flash unit is not used for a long period of
                                                          time, unload the batteries.


TESTING THE FLASH UNIT
1. Turn ON the power with the ON/OFF switch. (Fig. 3)

2. The ready lamp lights up about 6 sec. later. (Fig.   3)4www.butkus.org

3. Push the test button and make sure that the flash unit operates. (Fig 4)
View original page 3Page 5 · Read text
(ISO/ASA 100 film)


* You can check the automatic flash range for any combination of f-stop and film speed by flashes built-in
"FLOATING" scale.

4. When the flash is fully charged, the ready lamp lights up, and the flash ready light in the finder of the camera
lights up.

(APERTURE-PRIORITY AE FLASH PHOTOGRAPHY)

With the XR-P, the TTL direct auto flash is available with all fstop numbers for total creative depth of field
control. Use wider lens opening (F2.0, F2.8) to take a distant subject or to reduce flash charge time. Use smaller
lens opening (F11, F16) to increase depth of field.

1. Set the desired f-stop number.

2. Set the shutter dial to "A".
Automatic Flash Range at Each F-stop Number

                          Automatic Flash Range at
F-Stop
                        Each F-Stop Number
F 1.4                          10.5' - 62'
2                                7.9' - 42.6'
2.8                              5.2' - 30.5'
4                                3.9' - 21.3'
5.6                          2.9 - 15'
8                                2.9' -10.5'
11                               2.9' - 7.9'
16                               2.9' - 5.2
22                           2.9 - 3.9'

(ISO/ASA 100 film)
* The shutter speed can be changed to manual shutter speed (1/1 25 sec. or slower). If faster speed than 1/125 sec.
is selected, the shutter speed is automatically set to 1/125 sec. at the moment the flash is fully charged.

* When you use the TV mode to take TV images, the camera should be set to the proper TV mode photography
according to the instruction booklet of XR-P. Turn OFF the power ON/OFF switch because TV images can not be
taken if the flash unit is used.


USING THE 260P WITH CAMERAS OTHER THAN THE XR-P
The 260P can be used with cameras other than XR-P as an auto flash, however, auto flash control is done by the
sensor on the flash unit and direct off the film metering is not available.4www.butkus.org

1. Set the Mode selector to "A".

2. Set the F-stop referring to the following table.

3. Set the shutter speed to the synchronizing speed of your camera. (Ricoh, KR-10 Super, XR-7, can be used with
shutter dial set to "A" and XR-20SP/KR-30SP to "P" or "SP".)
View original page 5Page 6 · Read text
MANUAL FLASH PHOTOGRAPHY
1. Set the Mode selector to "M". (Fig. 7)

2. Set the shutter speed to 1/125 sec. or lower depending upon the cameras recommended flash synchronization
speed.

3. Focus on the subject, and read off the distance from the camera to subject.

4. Calculate the correct f-stop using the following formula. Guide Number 26 (85) Distance 6.5m (21.3ft)

For example, when the distance is 6.5m (21.3ft) and ISO/ASA 100 is used, the correct f-stop is 4.

Guide number changes according to the speed of film


FLASH IN DAYLIGHT
When the subject has strong background lighting, dark pictures (faces, etc.) may be produced. Properly lit pictures
can be obtained by using flash even in daylight. This is known as "fill-flash". When the 260P is used on the XR-8
pro daylight flash can be easily accomplished even by beginners.

1. Set the Shutter dial to "A".

2. Turn the F-stop number to position the Shutter speed indicator at 1/125 sec.

3. When fully charged, the flash ready indicator lights in the camera viewfinder and shutter speed is set
automatically to 1/125 sec. Then, the f-stop number is displayed in the viewfinder. Now you can shoot if you don't
see an overexposure mark.

* The shutter speed dial set to "A" can be changed to manual shutter speeds (1/1 25 sec. or lower). Use longer
manual speed to give correct exposure to the background in a room or other dark condition.4www.butkus.org

PROPER CARE OF YOUR FLASH

* Even if you do not use the flash for an extended period of time, it should be tested from time to time in order to
properly maintain the condenser.

* A high voltage is generated in the circuitry. It is very dangerous to take it apart or to touch the inside of the
flash unit. It should be taken to a camera dealer or a recognized Ricoh service station for all repairs.

* Avoid exposing the flash unit to dust, humidity, rain, seawater, etc.

* Do not leave it in hot or humid condition such as direct sunlight, as this will cause malfunction of the flash unit.

* Clean the body of the flash unit with a dry soft cloth. Never use solvent such as thinner, benzine, etc.
View original page 6
Page 7 · Read text
SPECIFICATIONS

Type: Thyristorized TTL direct automatic flash unit with nonTTL automatic capability

Attachment System: Clip on type

Camera Contact: Cordless direct contact via hot shoe

Guide No.: ISO 100-26 in meters; 85 in feet

Flash Modes: TTL direct automatic, non-TTL automatic and manual (automatically set by the camera to be used)

Camera Control:
[Program AE Model] Both shutter speed and F-stop is automatically set at 1/125 see, F5.6/lSO 100
[Aperture Priority AE Mode] Shutter speed is automatically set at 1/125 see, set F-stop manually at any F-stop
(F1.4-F22 for TTL direct, and at F5.6/ ISO 100 for non TTL strobe AE camera)4www.butkus.org

Automatic Flash Range-ISO 100

F-stop Distance (ISO100)

1.4 3.2-1 9m (10.5-62.5tt)

5.6 0.9-4.6m (2.9-15ft)

22 0.9-1.2m (2.9-3.9ft)

Angle of Light Received: [1TL Direct] Angle of the lens used. Non TTL 18°

Number of Flashes: [full power in manual mode]

About 200 with Alkaline batteries

About 90 flashes with Nickel Cadmium batteries

About 55 flashes with Manganese batteries

Recycling Time: About 6 sec. with Alkaline batteries in manual mode

Color Temperature: Same as daylight, suitable for color film

Angle of Coverage: 45° vertically, 60° horizontally (to cover 35mm wide angle lens)

Batteries: Four (4) penlight batteries (Alkaline batteries are recommended, Ni-Cd batteries can be used)

Others: Flash ready signal contact, TTL direct contact, flash test button

Dimensions: 66 (W)x110 (H)x49 (D)  mm4www.butkus.org

Weight: 170g without batteries
View original page 7
From the M. Butkus archive. Original publisher and archive notices are retained.
Check the model and edition against your equipment.
PDF verified 2026-10-10.