Film cameras
Ricoh Auto 35 User manual
User manual for Ricoh Auto 35. 12 pages in English. Read the original PDF, download or print a copy without registration.
12 pagesEnglish1.4 MB PDF
Loading your manual…Open PDF directly
Document details
- Brand
- Ricoh
- Model / document
- Ricoh Auto 35
- Document type
- User manual
- Language
- English
- Pages
- 12
- File size
- 1.4 MB
- Category
- Film cameras
- Document date
- Not specified in catalog
Search available document text
Find a term, then jump to its page in the original PDF. Image-only pages may not be searchable; check the PDF for exact wording and diagrams.
Page 2 · Read text
The RICOH AUTO 35 is a completely AUTOMATIC CAMERA.

According to the amount of light entering the CIRCULAR LIGHT WINDOW, the built-in
electronic brain automatically computes and adjusts the camera for correct exposure in a split-
second. This characteristic of consistently correct exposure makes the RICOH AUTO 35 virtually
order made for the exacting demands of color photography.

No focusing is required because the RICOH AUTO 35 has a FIXED FOCUS giving sharp images
at any point between 5 feet to infinity. The FIXED FOCUS gives you more speed and versatility in
high speed photography.

The compact and chic design makes it an ideal accessory for all occasions. The body is also
constructed to stand up under long and continuous use.

No time-consuming exposure and focusing worries make this the ideal camera for the beginner.

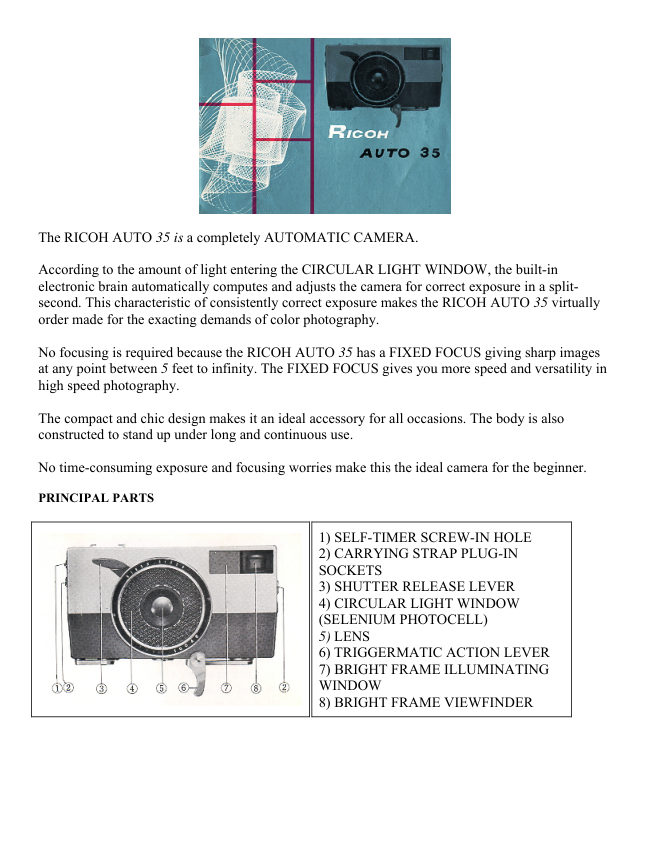
PRINCIPAL PARTS


                                               1) SELF-TIMER SCREW-IN HOLE
                                               2) CARRYING STRAP PLUG-IN
                               SOCKETS
                                               3) SHUTTER RELEASE LEVER
                                               4) CIRCULAR LIGHT WINDOW
                                 (SELENIUM PHOTOCELL)
                                               5) LENS
                                               6) TRIGGERMATIC ACTION LEVER
                                               7) BRIGHT FRAME ILLUMINATING
                           WINDOW
                                               8) BRIGHT FRAME VIEWFINDER
View original page 2Page 4 · Read text
24) VIEWFINDER EYEPIECE


                                       25) FILM GUIDE TABLE


IMPORTANT POINTS TO REMEMBER


                          * For daylight photography, always set the FLASH
                   PHOTOGRAPHY DISTANCE SCALE LEVER at
                      "AUTO" . (Fig. 1 )

                          * The CARRYING STRAP is attached as fallows: First,
                           match up the CARRYING STRAP PLUG blue cats with
                                the blue half circles on the CARRYING STRAP PLUG-
                         IN SOCKETS. Then, push in the plugs. To remove the
                                plugs, turn the CARRYING STRAP PLUGS until the
                              blue dots coincide with the red half circles and then pull
                              out the plugs. (Fig. 2)

                          * If there is no film in the camera, the TRIGGERMATIC
                     ACTION LEVER will not wind the shutter nor will the
                      FILM COUNTER register.
View original page 4Page 5 · Read text
LOADING THE FILM


                  Avoid direct sunlight. Use 3Smm films In
                        cartridges, 20 or 30 frames.

                          J) The back cover will snap open when the
             BACK

              COVER PULL RELEASE is pulled. (Fig. 3)


                                 2) Raise the RAPID REWIND CRANK to vertical
                                  position and pull until it stops.

                                 3) Load the film cartridge (Fig. 4) and push in the
                       RAPID REWIND CRANK. Make sure both the film
                                   cartridge axle end and the REWIND SPINDLE are
                                properly engaged with each other.

                                 4) Insert the exposed film tip firmly into the TAKE-UP
                      SPOOL SLOT. (Fig.5) Pull down the trigger and work
                                  the TRIGGERMATIC ACTION LEVER until the
                       TAKE-UP SPOOL SLOT appears at the top.

                                 5) When the shutter is wound, the TRIGGERMATIC
                      ACTION LEVER cannot be moved. Therefore, release
                                  the shutter first.

                         As you work the TRIGGERMATIC ACTION LEVER,
             www.butkus.us             make doubly sure the film perforations are firmly and
                                properly engaged with the FILM SPROCKET teeth.
                                    (Fig. 6)

                                 6) Wipe off any particles of dust or fingerprints that
                        may be on the FILM PRESSURE PLATE with a soft
                               brush or gauze.
View original page 5Page 6 · Read text
7) Make sure again that the film
                                                  perforations are properly engaged and
                                               then close the back cover GENTLY but
                                   FIRMLY.

                                                 8) At this point, the letter "S" can be
                                              seen in the FILM COUNTER. (Fig. 7)
                                                  Pull the TRIGGERMATIC ACTION
                                LEVER as far as it will go. This winds
                                          one frame and automatically winds the
                                                       shutter. Pull down the SHUTTER
                                RELEASE LEVER and repeat these two
                                                   steps again.


                  When you pull the TRIGGERMATIC ACTION LEVER the
                            third time, the number "1" appears in the FILM COUNTER.
                            (Fig. 8)

                    Now, the camera is ready to take photographs.


SETTING THE FILM GUIDE
View original page 6Page 7 · Read text
Adjust the FILM NUMBER according to the FILM GUIDE TABLE given on the camera back
cover. Far example, if the film in your camera is DAYLIGHT SUPER ANSCOCHROME, adjust
the FILM NUMBER at "5". (Fig. 9, 10)

"M" is used in flash photography. "B" is used when making time exposures. The shutter will
remain open as long as the SHUTTER RELEASE LEVER is pulled down.

TAKING THE PHOTOGRAPH

                             1. Point the camera at the subject to be taken. Look through the
                 BRIGHT FRAME VIEWFINDER and completely frame the
                           subject within the bright frame outline. Any subject within the
                          distance from 5 feet to infinity that can be seen within the frame
                            will be photographed. When taking a photograph at about 5 feet
                        use the inside markings within the bright outline. The marking
                          are corrected for parallax. (Fig. 11) For taking subjects closer
                         than 5 feet, a special close-up adaptor must be attached.


                            2) You will find a red colored line zone at the bottom of the
                             bright frame outline. That is "UNDEREXPOSURE MARK".

                    When a vertical needle appears in this zone, light levels are
                           not suitable for shooting, and additional light, either natural or
                                   artificial, is required. (Fig. 12)

                    When the needle cannot be seen inside the zone, everything is
                                   all right far shooting good photographs. (Fig. 13)

                    www.butkus.us


In case of color photography, RICOH ND FILTER gives you better results under the strong
sunlight, far instance, an the beach or on the summit of mountains etc....

3) Make sure again the subject is properly aligned in the bright frame outline. GENTLY pull down
the SHUTTER RELEASE LEVER.
View original page 7Page 8 · Read text
4) When using the RICOH SELF-TIMER (7-
                                     15 seconds), screw-in the self-timer into the
                                      camera SELF-TIMER SCREW-IN HOLE.

                                            5) The SELF-TIMER SCREW-IN HOLE
                                        can also be used for attaching a cable release.


HOLDING THE CAMERA
The importance of holding the camera rack steady cannot be emphasized enough. Always steady
the camera an a part of the face and, circumstances permitting, hold the breath as the shutter is
released. For the beginner, the best assurance against any camera movement, is to make full use of
a tripod.

TRIGGERMATIC ACTION LEVER IN RAPID SEQUENCE PHOTOGRAPHY


The unique TRIGGERMATIC ACTION LEVER is especially outstanding when speed and continuous shots are
required. Split-second film winding enables photography at the rate of 10 shots every 10 seconds.
View original page 8Page 9 · Read text
UNLOADING THE FILM


                     When the film has been completely exposed, the
                    TRIGGERMATIC ACTION LEVER will stop midway and
                           can be moved no further. EXCESSIVE PULLING OF THIS
                   LEVER MAY TEAR FILM PERFORATIONS AND EVEN
                      SPOIL THE LAST PART OF THE FILM. So, go easy on
                              the LEVER after reaching exposures 20 or 36.

                      To rewind the exposed film, flip up the RAPID REWIND
                    CRANK. While pushing the REWIND RELEASE
                    BUTTON, carefully turn the RAPID REWIND CRANK in
                              the direction of the arrow.

                     When the film has been completely rewound, the CRANK
                                will suddenly become very light. After you feel absolutely
                              sure the film has been completely rewound, pull the BACK
                  COVER PULL RELEASE and open the back cover.
                  UNLOAD FILM IN SUBDUED LIGHT.

                               Pull out the FILM REWIND CRANK to disengage the
                  REWIND SPINDLE from the film cartridge axle and take
                             out the film.


FLASH PHOTOGRAPHY


                      When taking fast or still objects at night or indoors, it is
                               necessary to use a flash producing additional light. In
                                other words, when the vertical needle appears in the red
                            zone of the BRIGHT FRAME VIEWFINDER an
                                 additional light source is required.

                          The RICOH AUTO 35 is provided with a CORDLESS
                     FLASH CONTACT on the ACCESSORY SHOE so if the
                                exclusive RICOH FLASH UNIT BC-605 is used NO
                   CORD will be necessary. This RICOH FLASH UNIT has
                              a built-in contact point so that mere engagement in the
                            camera ACCESSORY SHOE is all that is necessary. NO
                    DANGLING CORD, NO BULB FAILURES DUE TO
                    FAULTY CONNECTIONS.
View original page 9Page 10 · Read text
The RICOH AUTO 35 is fully synchronized with the M type flashbulbs. The kind of M flashbulbs
is determined by the film used. The following table gives the combinations between films and
flashbulbs.


FILM                BULB

Kodachrome             No 5B

Anseochrome Daylight
Ektachrome Daylight        M5B, M25B
Kodacolor

Super Anscochrome        2MB

All-weather Pan
Verichrome Pan          2M
Tri X


                         Once the proper flashbulb has been selected for the film
                               used, all that is necessary is to set the EXPOSURE
                     GUIDE SCALE at M (Fig. 14) and the distance from
                           camera to subject on the FLASH PHOTOGRAPHY
                     DISTANCE SCALE. (Fig. 15)

                        Now, all that remains to be cane is to release the shutter.
                         The flashbulb and shutter will fully synchronize and no
                               matter how dark the place good photographs can be taken
                                    just as good as in broad daylight.
View original page 10Page 11 · Read text
EXCLUSIVE RICOH AUTO 35 ACCESSORIES

A number of accessories have been especially designed and made for the RICOH AUTO 35.

RICOH LENS HOOD (46 mm., Screw-in)
A lens hood has the important function of cutting off unwanted light or glare that may spoil a
photograph. The hood is kept in a neat and handy leather case when not in use.

RICOH FILTERS (46mm., Screw-in)
RICOH FILTERS give photographs the proper tone and texture. The exclusive filters are ND, UV,
Y1 and Y2 filters. The ND FILTER tones down excessive light without any effect on color
rendition whatsoever. The UV FILTER absorbs invisible ultra-violet rays so that distant scenery
and subjects under strong sunlight will turn out clear. It also absorbs excessive blueness so it is
ideal for average color photography. The Y1 and Y2 FILTERS absorb ultra-violet rays, bluish-
purple and a part of blue but admits red and yellow. It darkens the sky and makes the white clouds
more prominent. They are used most often when taking scenery with a blue sky background,
human subjects and in snap photography. Without this filter, the clouds will disappear and the
whole sky will become white.


THE CARE OF THE CAMERA
The camera is a precision-built instrument and requires the best of care.

1 ) The lens are the heart of the camera so require the most delicate handling. Brush lightly with a
lens brush and wipe fingerprints off with soft chamois, soft bleached cotton or gauze daubed with a
little alcohol applied with a circular motion beginning at the center and working outward.

2) If a camera is suddenly bought into a warm place from a cold place the lens will cloud up. Wait
until the lens warm up and the cloud will gradually disappear on its own accord.

3) When you have taken photographs by the seaside or in wet weather, always wipe the camera
thoroughly before putting it away.

4) Never leave the camera shutter wound over long periods of time as this will weaken the delicate
shutter mechanism spring.

5) When putting away the camera, put it in a box and store in a dry, cool place. A bag of silica gel,
a drying agent, should always be placed in the box with the camera.

6) Always place cap aver lens to protect both lens and CIRCULAR LIGHT WINDOW from any
damage.

7) Never place the camera near a magnetic field such as radios, TV sets and other electric
appliances because it might affect the sensitive exposure meter mechanism.

8) Make it a practice to keep the camera in the case to preserve its finish.
View original page 11
Page 12 · Read text
9) Make a note of the camera body and lens number and keep it in a safe place. This information
will be of great help if the camera is last or stolen.


SPECIAL INSTRUCTION FOR EXPOSURE-SETTING
The RICOH AUTO 35 is a full AUTOMATIC CAMERA. Any correct, and desirable exposure is
automatically available.

If you want, proper exposure can also be set in conventional manner of adjusting shutter speed and
diaphragm by FILM NUMBER and FLASH PHOTOGRAPHY DISTANCE SCALE. The figures
given in the following table will show you the proper combination of FILM NUMBERS and
shutter speeds, and of F.P-D. SCALE NUMBERS and diaphragms, respectively.


  FILM
             SHUTTER SPEED
NUMBER
   B            TIME
  M                 1/ 25th sec.
    2                 1/ 25th sec.
    3                 1/ 32th sec.
    4                 1/ 50th sec
    5             1 /100th sec
    6               1/160th sec.


   F.P.D. SCALE
               DIAPHRAGM
   NUMBER
        25                   F/ 4
        12                  F/8
        8                  F/20
View original page 12From the M. Butkus archive. Original publisher and archive notices are retained.
Check the model and edition against your equipment.
PDF verified 2026-10-10.