Film cameras
Ricoh auto half User manual
User manual for Ricoh auto half. 11 pages in English. Read the original PDF, download or print a copy without registration.
11 pagesEnglish2.0 MB PDF
Loading your manual…Open PDF directly
Document details
- Brand
- Ricoh
- Model / document
- Ricoh auto half
- Document type
- User manual
- Language
- English
- Pages
- 11
- File size
- 2.0 MB
- Category
- Film cameras
- Document date
- Not specified in catalog
Search available document text
Find a term, then jump to its page in the original PDF. Image-only pages may not be searchable; check the PDF for exact wording and diagrams.
Page 2 · Read text
RICOH AUTO HALF is a fully automatic electric-eye half-size camera with automatic spring winding.

* Electric-eye meter eliminates exposure setting trouble Micro spring motor eliminates winding trouble Uni-
focus lens eliminates focusing trouble


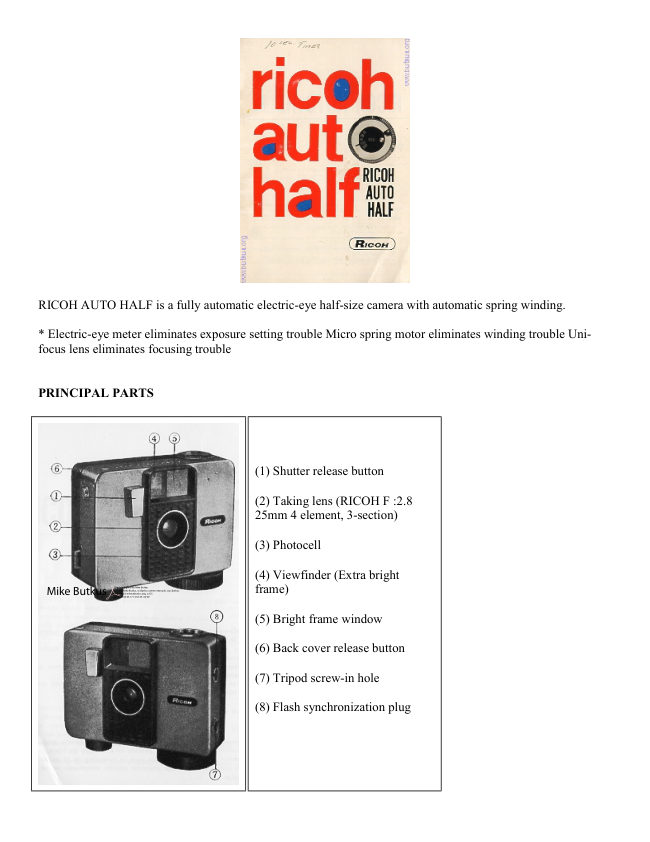
PRINCIPAL PARTS


                                            (1) Shutter release button

                                            (2) Taking lens (RICOH F :2.8
                           25mm 4 element, 3-section)

                                            (3) Photocell

                                            (4) Viewfinder (Extra bright
 Mike Butkus        Digitally                                                         DN:org,Date:cn=Mikeemail=mike@butkus.org,2023.05.17signedButkus,by14:53:39Mikeo=ButkusButkus-04'00'c=UScamera manuals, ou=butkus.             frame)

                                            (5) Bright frame window

                                            (6) Back cover release button

                                            (7) Tripod screw-in hole

                                            (8) Flash synchronization plug
View original page 2Page 3 · Read text
www.butkus.us


(9) Manual exposure setting
dial

(10) Film speed adjustment
dial

(11) Strop fitting

(12) Film rewind knob

(13) Film counter

(14) Film rewind release
button

(15) Spring motor wind knob
View original page 3
Page 5 · Read text
www.butkus.us


AVOID DIRECT SUNLIGHT WHEN LOAD AND UNLOAD THE CAMERA


                          1 ) Remove the back cover by pushing the
                         Back Cover Release Button in the direction of
                              red arrow to "O" (Fig. 1)


                               2) Pull out the Film Rewind Knob, and place
                                the film cartridge in the chamber. (Fig. 2)


                                     3) Push in the Knob by turning it so as
                                        to engage the Rewind Spindle
View original page 5Page 6 · Read text
4) Insert the film tip into the Take-up
Spool Clip firmly. (Fig. 4)


     If the Take-up Spool Clip is not in proper
     position, turn the

    Take-up Spool by keeping the Film Rewind
    Release Button pressed.

     (Fig. 5)


                         5) Make sure the film
                          perforations are
                           correctly engaged to the
                SPROCKET TEETH
                         (Fig 6)

                           (6) Wind the SPRING
               MOTOR WIND KNOB
                           in the direct on of white
                       arrow (Fig. 7) then
                           release the shutter once
                         or twice
View original page 6Page 9 · Read text
www.butkus.us


                                             (2) In the center of viewfinder frame, you
                                             will see yellow dot when the light is
                                              sufficient This dot is on alarm signed for
                                        under-exposure. When the dot disappears, the
                                               light is not enough to take good photograph,
                                       so flash or artificial lighting is desired.

                                            Fig. 13A - Correctly exposed

                                       Fig 13B - Under exposed


                                    (3) The lens is of high resolving power with F/2. 8
                             and focal length of 25mm, and is of specially
                               designed Uni- Focus. Any subject within the distance
                             from 1.5m (5 ft) to infinity will be photographed
                                 sharply and clearly

                                    (4) Release the shutter
                                      (a) Hold the camera firmly not to let it hove even a
                                      slight movement. Then press the Shutter Release
                               Button gently as far as it stops.

                                    (b) When you leave your finger from the Release
                                 Button, the film is advanced automatically by one
                              frame with the sound "Z-E-E".


CAUTION


                        The Shutter Release Button cannot be pressed in the
                             following cases

                                (1) During the film being advanced, which is identified by
                              the sound "Z-e-e"

                                (2) When the spring motor is released. Wind the Spring
                         Motor Wind Knob

                                (3) When the Bock Cover Release Button is in the
                               position of "L" (locked)

                            This locks shutter release. When you carry the loaded
                    RICOH AUTO HALF with you, it is advisable to set the
                        Bock Cover Release Button at "L" in order to prevent any
                               accidental shutter release. (Fig. 14)
View original page 9Page 10 · Read text
UNLOADING THE RICOH AUTO HALF


                             When the film has all been exposed, indicated
                                  by the Film Counter, unload the camera
                                       according to the following instructions.


(a) Press the Film Rewind Release Button. which releases spring motor.

(b) Pull out the Film Rewind Knob half step, and turn it in the direction of "R" with keeping the Film Rewind
Release Button pressed. (Fig, 15)

(c) After the film is completely rewound, when Rewind Knob turning becomes light, open the back cover by
setting the Back Cover Release Button at "O". Then pull out the Rewind Knob as far as it stops, and take the
cartridge out of the chamber.


CAUTION
(1) Avoid direct sun light
(2) Do not press The Shutter Release Button while rewinding the film.
{3) If the spring cannot be released even when the Rewind Release Button is pressed, turn the sprocket counter
clockwise after taking off the cartridge, then release the shutter.

FLASH PHOTOGRAPHY


                            Under poor light condition, when you cannot see
                              yellow dot in the centre of the viewfinder frame, use
                      FLASH or artificial lightings. The RICOH AUTO
                     HALF fully synchronizes to M-class bulbs and
                                      electric flash equipment.

                                  In flash photography, the aperture number and the
                                  distance between camera and subject hove close
                                    relations each other. These relations are represented
                           by the Guide Numbers which ore particular to each
                               bulb type, film speed etc.

                                 (1 ) Equip the RICOH FLASH UNIT BC-605D with
                                  the RICOH AUTO HALF by using an exclusive
                      RICOH bracket.

                                 2) The shutter :peed is automatically set at 1/30
                                second, then set the Manual Exposure Setting Dial at
                                  the number equal or near to the figure given by the
                                  division of Guide Number by the distance. (Fig. 17)
View original page 10Page 11 · Read text
www.butkus.us


MAINTENANCE

Camera is a precision machine which requires careful usage and maintenance.

(1) Always keep the lens clean.
Brush lightly with a lens brush and wipe fingerprints or dirts off with soft chamois, cotton or gauze. If possible,
apply alcohol.

2) When you have used the camera by the seaside or in wet weather, never fail to clean the camera thoroughly
before you replace it in the case.

(3) Whenever you do not take photograph, place lens cap over the lens part to protect both the lens and the
photocell.

4) Never leave the camera spring charged. Release the spring motor by pressing the Film Rewind Release
Button when you leave the camera unused long.

5) When you carry the camera loaded, lack the shutter by setting the Back Cover Release Button at "L" in order
to prevent any accidental shutter release.

6) Never leave the camera by any magnetic equipment.

7) Keep car note of the camera body and lens serial numbers.
View original page 11
Related documents and language editions
From the M. Butkus archive. Original publisher and archive notices are retained.
Check the model and edition against your equipment.
PDF verified 2026-10-10.