Film cameras
Ricoh FF-3AF camera User manual
User manual for Ricoh FF-3AF camera. 13 pages in English. Read the original PDF, download or print a copy without registration.
13 pagesEnglish1.4 MB PDF
Loading your manual…Open PDF directly
Document details
- Brand
- Ricoh
- Model / document
- Ricoh FF-3AF camera
- Document type
- User manual
- Language
- English
- Pages
- 13
- File size
- 1.4 MB
- Category
- Film cameras
- Document date
- Not specified in catalog
Search available document text
Find a term, then jump to its page in the original PDF. Image-only pages may not be searchable; check the PDF for exact wording and diagrams.
Page 2 · Read text
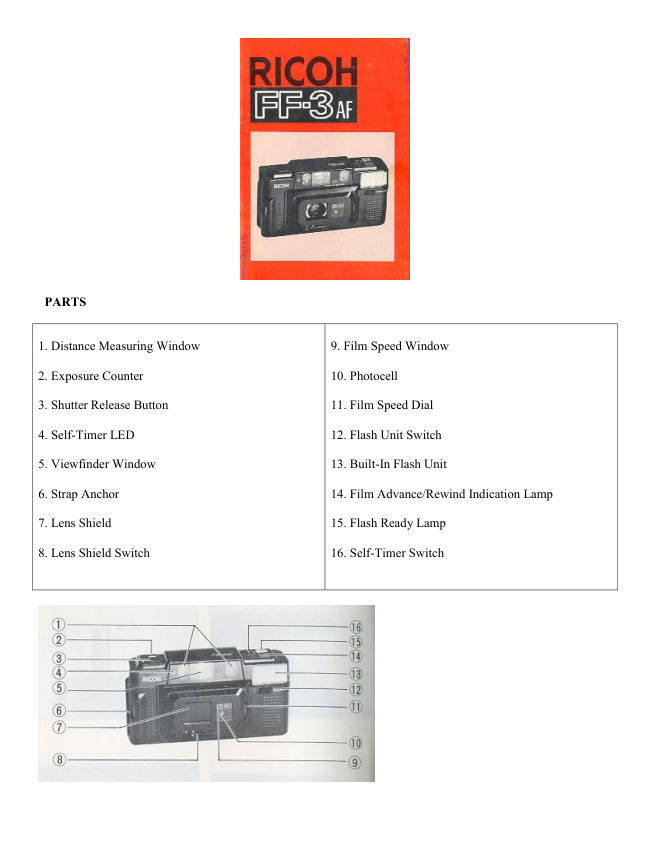
PARTS


1. Distance Measuring Window                           9. Film Speed Window

2. Exposure Counter                                   10. Photocell

3. Shutter Release Button                               11. Film Speed Dial

4. Self-Timer LED                                     12. Flash Unit Switch

5. Viewfinder Window                                 13. Built-In Flash Unit

6. Strap Anchor                                        14. Film Advance/Rewind Indication Lamp

7. Lens Shield                                         15. Flash Ready Lamp

8. Lens Shield Switch                                  16. Self-Timer Switch
View original page 2
Page 3 · Read text
www.butkus.us


17. Viewfinder Eyepiece                               24. Sprocket

18. Film Rewind Shaft                                 25. Film Take up Spool

19. Battery Compartment Cover                        26. Film Check Window

20. Film Chamber                                      27. Finger Rest

21. Tripod Socket

22. Film Rewind Switch

23. Film Guides


               Mike Butkus         Digitally                                                                                                                      DN:org,Date:cn=Mikeemail=mike@butkus.org,2023.05.17signedButkus,by14:47:43Mikeo=ButkusButkus-04'00'c=UScamera manuals, ou=butkus.


We are most gratified that you have selected the RICOH FF-3AF. Before using the camera, please be sure to
read these instructions carefully.


INSERTING THE BATTERIES


The camera will not operate unless the batteries are installed. It is important to ensure that the batteries are
inserted correctly.
1. Push the Battery Compartment Cover in the direction of the arrow to pull open. (Fig. 1)
View original page 3Page 4 · Read text
2. Insert two bakeries, checking that the 33 and (3 on the batteries are lined up correctly according to the
polarity diagram inside the battery compartment. (Fig. 2)

3. Close the Battery Compartment Cover by pushing it in the direction of the arrow. (Fig. 3)

Batteries for Use


Two Alkaline penlight bakeries, or two Manganese penlight batteries.
* Do not use Nickel Cadmium batteries.

* Please remove the batteries from the camera when you do not use the camera for a long period of time.

OPENING THE LENS SHIELD


1. Open the Lens Shield by sliding the Lens Shield Switch in the direction of the arrow. (Fig. 4) (Fig. 5)

* When the Lens Shield is closed, a safety mechanism operates to prevent the Shutter Release Burton from
being pressed down.

* You can only use the camera when the Lens shield is completely open.

* If the Lens Shield is opened while the Shutter Release Button is pressed down, a frame will be exposed.

CHECKING THE BATTERIES
View original page 4
Page 5 · Read text
www.butkus.us

1. Cover the Photocell with your hand and press the Shutter Release Button in halfway. (Fig. 6)

2. If the red Camera Shake Warning Signal ~ in the Viewfinder blinks, then the batteries are in working order.
(Fig. 7)

In normal temperature (at 20°C, with new Alkaline bakeries)

Without using the Flash Unit: About 70 rolls of 36 exposure film can be taken.
Using the Flash Unit repeatedly: about 7 rolls of 36 exposure film can be taken.

Please change both batteries to new ones of the same kind in the following cases:

A. The red Camera Shake Warning Signal ~ does not blink when you have covered the Photocell with your
hand and the Shutter Release Button is pressed in halfway.

B. The shutter cannot be released (part from when the Lens Shield is closed).

C. The Flash Ready Lamp takes more than 30 seconds to light up.

D. The Film Advance or Film Rewind does not operate.

E. The batteries have been in the camera for more than one year. (Even without using the camera, the batteries
will run down naturally).

* Generally in cold conditions, the capacity of the batteries decreases, and in some cases, the camera may not
operate correctly. You should either warm the batteries or keep a spare set in your pocket, inserting them just
before you use the camera. Incidentally, if the capacity of the batteries has decreased in cold temperatures, it
will regain full capacity in normal temperatures, so do not throw the batteries away.

SETTING THE FILM SPEED
1. The film speed is indicated on the outer packaging of the film: e.g. ASA 100 (ISO 100/21°) ASA 400 (ISO
400/27°) (Fig. 8)


2. Turn the Film Speed Dial to set the speed of the film you are using in the center of the Film Speed Window.
(Fig. 9) (Fig. 10)

* Please be careful when you take a picture with ASA 1000 film in bright sunlight, the picture may be
overexposed.

* Please set the Film Speed Dial only to click-stop positions. Do not use mid-way positions.
View original page 5
Page 6 · Read text
LOADING THE FILM


1. Push the back cover lever downwards in the direction of the arrow to open. (Fig. 11)

2. Load the film in the Film Chamber and pull out the film leader, placing it over the Film Take up Spool. (Fig.
12)

3. Please ensure that the film is within the Film Guides. (Fig. 13)

4. Press the back cover shut so that the back cover lever returns to its original position. Press the Shutter Release
Button to advance the film until the number "1" appears in the Exposure Counter Window. (Fig. 14)


5. If the green Film Advance/Rewind Indication Lamp on the top of the camera flickers rapidly on and off, then
the film is advancing correctly.

If the lamp glows steadily, the film has not advanced correctly, so please reload the film. (Fig. 15)


* Always avoid direct sunlight when loading the film.

* The Film Check Window is to confirm whether a film is loaded or not.
View original page 6
Page 7 · Read text
www.butkus.us

VIEWFINDER
1. Field of View Frame
The subject such as people or scenery that you wish to take should be set within this frame.

2. Parallax Correction Marks
When taking a picture of a subject that is between 1 - 1.2m (3.3 - 4 ft.) away from the camera, it should be
positioned within these marks. Anything outside the marks will not be included in the picture even though you
can see it through the viewfinder.

3. Auto-Focus Frame
The Auto-Focus Frame focuses automatically on the subject that appears within it.

4. Zone Marks
These marks indicate the focusing distances. When the single figure mark blinks, then the subject is too close to
the camera. You should move further away from the subject.

5. Camera Shake Warning Signal
If this signal blinks when the Shutter Release Burton is pressed halfway, you should change to flash
photography. (Fig. 33)


AUTO-FOCUS SHOOTING

1. Set the subject you wish to take within the Auto-Focus Frame in the center of the Viewfinder. (Fig. 16)

2. When you press the Shutter Release Button halfway, the Zone Mark will light up to indicate the focusing
distance. If the; mark blinks, you should move back a little as the camera is too close to the subject. (Fig. 17)

3. If the Camera Shake Warning Signal does not blink, gently press the Shutter Release Button in fully to take
the picture. The film will advance automatically as soon as the shutter has been released. (Fig. 18)
View original page 7
Page 8 · Read text
* Please be careful not to cover the Distance Measuring Window at the front of the camera accidentally, as this
will result incorrect focusing.

* Please keep the Distance Measuring Window clean so that the focusing is accurate. If it gets dirty, it should be
wiped clean with a soft cloth.

* There may be rare cases where the subject cannot be well-focused.

(For instance, subjects that do not reflect the light well, glossy subjects, or subjects taken through glass.)
In these cases it is best to use the pre-Focus to "lock" the focus on more "normal" subject at the same distance.
While holding focus, turn the camera to the original subject and shoot.

Shooting Distances: For subjects that are less than 1 m away from the camera, it is not possible to obtain sharp
focus.

PRE-FOCUS SHOOTING

When the main subject you wish to focus on is outside the Auto Focus Frame, or if the subject is difficult to
focus on, then you should use pre focus shooting.

When the subject is outside the auto focus frame:


1. If you want to photograph two people, there may be cases where neither of them can be set within the Auto
Focus Frame in the center of the Viewfinder. If you release the shutter then, only the background will be in
focus, and the people which are the main subject will be out-of focus. ( Fig. 19)

2. Move the camera so that one of the people is within the Auto Focus Frame.

Press the Shutter Release Button halfway so that the Zone Mark lights up and the focusing distance is indicated.
Hold your finger in that position on the Shutter Release Button. (Fig. 20)
View original page 8
Page 9 · Read text
www.butkus.us

3. Now return the camera to its former position so that both people are in the Field of View Frame again, then
press the Shutter Release Button fully to take the picture. (Fig. 21) (Fig. 22)


When the subject is difficult to focus on:

1. When you take subjects that are difficult to focus on, find another subject at about the same distance from the
camera. You can use that subject in the same way as described above.

* When you remove your finger from the Shutter Release Button, the prefocused condition is cleared, so that
you can Pre-Focus again as many times as you wish.

REWINDING THE FILM


After the end of the film has been reached, an electronic sound will be emitted, and the Film Advance/ Rewind
Warning Light will remain lit. Please to wind the film immediately.

1. Push the Film Rewind Switch underneath the camera, in the direction of the arrow. ( Fig. 23)

2. As the film is being rewound, the Film Advance/Rewind Warning light will flicker on and off. (Fig. 24)

3. When the film is fully rewound, the Film Advance/Rewind Warning light will remain lit, and an electronic
sound will be emitted. Slide the Film Rewind Switch back in the direction of the arrow ~ You can now open the
back cover to unload the film. (Fig. 25)

* If you fail to rewind the film when the electronic sound is emitted and the Film Advance/ Rewind Warning
Light remains lit, indicating that the end of the film has been reached, the batteries will wear down quickly,

* When the voltage of the batteries is low, the electronic sound may not be emitted.
View original page 9
Page 10 · Read text
FLASH PHOTOGRAPHY


Change to f lash photography when the Camera Shake Warning Signal in the Viewfinder blinks as the Shutter
Release Button is pressed halfway.

1. Slide the Flash Unit Switch out in the direction of the arrow, and the power source will be on. (Fig. 26)

2. Check that the Flash Ready Lamp is lit, then take the picture. (Fig. 27)

3. When you have completed flash photography, please be sure to slide the Flash Unit Switch back. If the Flash
Unit Switch is left on, the batteries will wear down quickly. (Fig. 28)


Flash Photography Distance:

Shooting Range: 1m--4m (3.3 - 13.3 ft.) ASA 100

1 m--7m (3.3 - 23.3 ft.) ASA 400

1.4m--10m (4.6 - 33 ft.) ASA 1000

* If the Shutter Release Button is kept pressed halfway before the Flash Ready Lamp comes on, the Flash Unit
will not be charged.

* Be careful not to put your finger in front of the flash window.

* If the Shutter Release Button is pressed before the Flash Ready Lamp lights up, the picture will be under-
exposed.

* You can use the Flash Unit as a fill-in light for daytime photography too.
View original page 10
Page 11 · Read text
www.butkus.us

USING THE SELF-TIMER


1. Slide the Self-Timer Switch fully in the direction of the arrow. Then the Self-Timer LED on the front of the
camera blinks on and off with an electronic sound. The shutter will be released about 10 seconds later. ( Fig. 29)
(Fig. 30)

* If you wish to clear the Self-Timer once it has started, close the Lens Shield to clear it.

* When using the self-timer with flash photography, put the Self-Timer Switch on after the Flash Ready Lamp
is lit.

* When using the Self-Timer with pre-focus shooting, measure the distance by pressing the Shutter Release
Burton halfway. Without removing your finger from the Shutter Release Button, slide the Self Timer Switch on,
and the Self-Timer will operate. Pre-Focus will be held automatically until the picture is taken.

ATTACHING THE STRAP


1. Slide the black plastic part towards the strap while pressing the click plate with your nail. (Fig. 31)

2. Hook the end over the strap rod on the side of the camera, then slide the black plastic part back towards the
camera with your finger. (Fig. 32}
View original page 11
Page 12 · Read text
* The strap cannot be fitted back-to front.

PROPER CARE OF YOUR CAMERA

* If there is dirt on the lens or Distance Measuring Window, do not touch directly with your fingers. Use a
blower to blow the dust away, or wipe the surface gently with a soft cloth.

* Camera malfunction can be caused by shock, humidity, salt etc. After using the camera at the beach or places
where there are chemicals, wipe it particularly carefully.

* Take care not to expose the camera to sudden changes in temperature, as they may cause malfunction.

* Do not expose the camera for a long period of time in extremely high temperatures, such as in your car or on
the beach, as this may cause malfunction.

* When using a tripod, do not try to force a long screw into the socket. (The screw length should be less than
5.7mm, JIS 5.5mm.)

* Do not place the camera near equipment that has strong magnetism such as television or radio.

* Remove the batteries before storing the camera, and keep the camera in a place that is free of dust and
humidity.

* Avoid keeping the camera in a closet etc. where the camera may be affected by mothballs, insecticides etc.

MAJOR SPECIFICATIONS

Type: 35 mm lens shutter type with automatic focusing

Lens: 35 mm f3.2 Rikenon lens, 5 elements, 5 groups

Focusing: Automatic focusing with pre-focus facility.
Distance measuring (shooting) range 1 m (3.3 ft.) ~ or.
Distance less than 1 m (3.3 ft.): out-of-focus warning; blinks.

Shutter: Programmed AE type electronic shutter
View original page 12
Page 13 · Read text
www.butkus.us

Self-Timer: Built-in electronic type. Operating delay of approx. 10 sees.

Viewfinder: Albada type with bright-frame viewfinder (with parallax correction marks). Magnification x 0.46
Field of view 84%.

Viewfinder information: Field of View Frame, Parallax Correction Marks, Auto-Focus Frame, Zone Marks,
Camera Shake Warning Signal

Exposure Adjustment: With Cds Photocell, Exposure Coupling Range EV6--EV17 (ASA 100)

Film Sped Range: ASA 25-- ASA1000

Film Advance/Rewind: Electric motor with Film Check Window

Film Loading: RICOH Auto-Load system

Exposure Counter: Additive, automatically resets to zero when the camera back is opened

Built-in Flash: Flash photography by turning the Flash Unit Switch on.

Guide Number: 12 (ASA 100) m. Exposure adjustment through flashmatic system.

Interval between flashes: about 7 seconds

Number of shots possible: with new Alkaline batteries (under normal temperatures of--200C)

without using the flash unit: more than 100 rolls of 24 exposure film:

when using the flash unit repeatedly: more than 10 rolls of 24 exposure film

Power Source: 2 penlight Alkaline batteries or 2 penlight Manganese batteries
(Nickel Cadmium batteries cannot be used)

Dimensions: 130mm(L) x 70mm(H) x 41mm(D)

Weight: 29.0g (without batteries)

* Specifications and appearance of this camera are subject to change without notice.
View original page 13
From the M. Butkus archive. Original publisher and archive notices are retained.
Check the model and edition against your equipment.
PDF verified 2026-10-10.