Film cameras
Ricoh RC-5 User manual
User manual for Ricoh RC-5. 10 pages in English. Read the original PDF, download or print a copy without registration.
10 pagesEnglish0.8 MB PDF
Loading your manual…Open PDF directly
Document details
- Brand
- Ricoh
- Model / document
- Ricoh RC-5
- Document type
- User manual
- Language
- English
- Pages
- 10
- File size
- 0.8 MB
- Category
- Film cameras
- Document date
- Not specified in catalog
Search available document text
Find a term, then jump to its page in the original PDF. Image-only pages may not be searchable; check the PDF for exact wording and diagrams.
Page 3 · Read text
Before using this Remote Control Unit, please read this manual carefully, and be sure to follow its
instructions.

· Do not put the Remote Control Unit in your back pocket, or subject it to shocks by dropping or
bending.

· Do not leave the Remote Control Unit in a hot or humid place, or where it is likely to come into
contact with water or dust. Be especially sure not to allow the transmitter to become dirty.

· Do not push down hard on the LCD Display Panel.

· If you encounter problems with the unit, please contact your Ricoh dealer. Do not attempt to take it
apart yourself.

· Sometimes if a title is imprinted where there is something orange or white in the photograph, the title
may not be clearly visible.

BEFORE USING (WHEN USING FOR THE FIRST TIME
1. Removing the Battery Protective Film To prevent waste of battery power a protective film has
been inserted in the battery holder at time of shipment.

2. Setting the date and time
This unit has a built-in timer which operates together with a world timer. Once the timer is set, the
timer continues to function even when the power is switched OFF. See "World Timer "Correction" for
details.


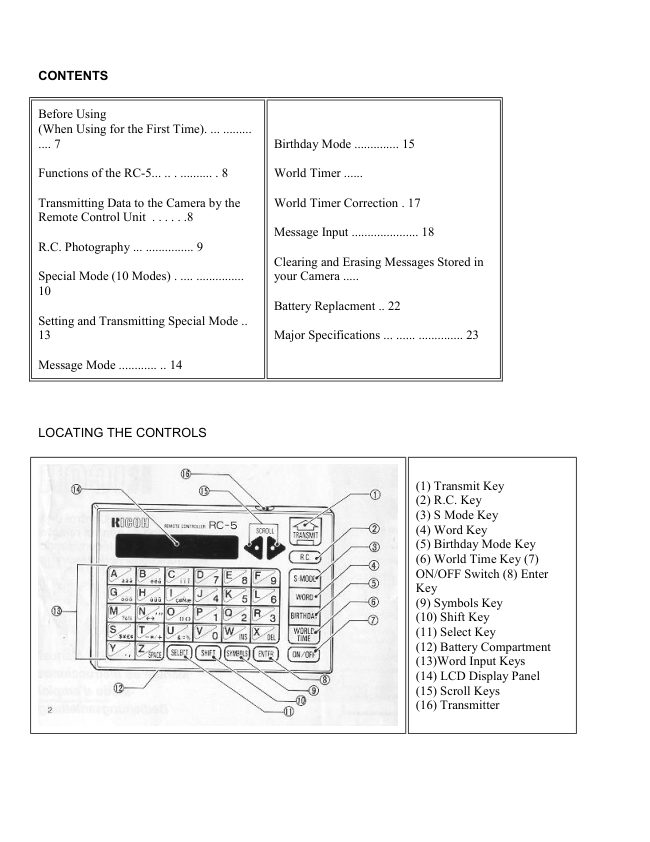
FUNCTIONS OF THE RC-5

1. R.C. PHOTOGRAPHY MODE

2. SPECIAL MODE (10 modes)

3. MESSAGE MODE

4. BIRTHDAY MODE

5. WORLD TIMER

Auto Power OFF
If this Remote Control Unit is left unoperated for about 3 minutes or more, the power automatically
switches OFF This is to prevent waste of battery power.
View original page 3
Page 4 · Read text
TRANSMITTING DATA TO THE CAMERA BY THE REMOTE CONTROL UNIT


                                               1. Set the function and data by the Remote
                                        Control Unit.

                                               2. Press the R.C. Key at the back of the
                                     camera to display the RC symbol [ | ] on the
                                           display

                                               3. Aim the transmitter of the Remote Control
                                        Unit towards the camera, and press the
                            TRANSMIT Key. When the signal has been
                                            received, the LED at the front of the camera
                                           stops blinking and lights steadily.


R.C. PHOTOGRAPHY


1. Press the ON/OFF Switch to turn the
power ON.

2. Press R.C. Key to display the message.

3. Press TRANSMIT Key to transmit data.


* To continue photographing by the Remote Control Unit, repeat step 3.

SPECIAL MODE (10 modes)
The modes below can be selected, transmitted to the camera and stored by the camera This function
can add 10 Special creative modes to the camera. Select one of those modes and transmit It to the
camera. The transmitted mode shall be stored and control camera operation.

These 10 modes are displayed in the following order

1. Double Self-timer Mode: 1. W. SELF
Setting this mode enables you to take two Self-timer photographs in succession.
Double Self-timer photographs can only be taken by pressing the Self-timer button

2. Auto Zoom Mode: 2. AUTO ZOOM. Even if the distance from the subject changes, the camera
zooms to take a picture of the subject at a fixed size. This fixed size IS preset to provide half-length
shots of human subjects.

· R.C. and Self-timer photography are also possible in this mode 3. Continuous Shooting Mode: 3.
CONT.
View original page 4Page 5 · Read text
While you press and hold the Shutter Release button continuous shooting is possible
Continuous shooting is not possible with R.C. Photography.

4. Multi-Exposure Mode: 4. ME 2 or more exposures can be superimposed on a single frame. R.C.
and Self-timer photography are also possible.

5. Interval Timer Mode (1 min) :5. INT. (1 min)

6. Interval Timer Mode (10 min): 6. INT. (10 min)
After the Shutter Release Button is pressed, your camera takes a picture every minute (5) or every
10 minutes (6), until the Mode is changed or the film is finished.

The Self-timer LED on the front of the camera blinks while this Mode is in use. This Mode can also
be started from the Remote Control Unit or by using the Self-timer.

If the switches or buttons of your camera are operated during Interval Timer Mode (except

Self-timer and Shutter Release Buttons), this Mode is interrupted.   If the Shutter Release Button is
pressed, Interval Timer Mode starts again

7. Backlight Control Mode (+1.5 EV): 7. BLC+1.5

8. Backlight Control Mode ( - 1.5 EV): 8. BLC--1.5 In this mode, exposure compensation is possible
to brighten shadows or create a dark dramatic silhouette effect.
R.C. and Self-timer photography are also possible

9. Color Slide Film Mode: 9. SLIDE FILM Use this Mode for shooting with color slide film.

· Camera stays in Color Slide Film Mode until the film is finished or MODE CLEAR is performed, even
if the camera power is switched OFF

10. Auto Bracket Mode: 10. AUTO BRACKET 3 pictures are taken in succession with 3 different
exposure levels in the following order: normal +1.0 EV and--1.0 EV.

· Mode Clear: MODE CLEAR
When this message is displayed and transmitted to your camera, the Special Mode currently stored
can be cancelled.


1. Press the ON/OFF Switch to turn the
power ON.

2. Press the S * Mode Key to display the
mode you wish to select, e.g. select
AUTO ZOOM

3. Press TRANSMIT to transmit data to
camera.
View original page 5
Page 6 · Read text
· After selecting the Mode in step 2, press ENTER Key to enter the Mode The next time you press S
MODE Key this Mode will be displayed first.

· The sequence in which the Modes are displayed is the same as in the section on Special Mode:

1. W. SELF--2. AUTO ZOOM--3. CONT. - 4. ME--5. INT (1 min) - 6 INT (10 min)
MODE CLEAR _ 10. AUTO BRACKET ~ 9. SLID FILM ~ 8. BLC--1.5 ~ 7. BLC+1.5


MESSAGE MODE
Any message you like can be imprinted with up to 20 characters.


1. Press the ON/OFF Switch to turn the
power ON
2. Press WORD Key to make input
possible Or, press WORD Key again to
display the memories Messages entered in
step 3 can be stored in one of these
memories.
3. Enter the message you wish using the
Word Input Keys.
4. Press ENTER Key
5. Press TRANSMIT Key


· See "Message Input" for details

· If the blinking cursor does not disappear, even when the ENTER key is pressed, you cannot
transmit data.

· To change/correct the message you have entered, move the blinking cursor (M) by pressing the
scroll keys < >

· If your message is already stored in one of the memories M1 -M3, you can proceed directly step 3
and step 5.

· If the camera does not receive the message, press TRANSMIT Key again.
View original page 6
Page 7 · Read text
BIRTHDAY MODE


1. Press the ON/OFF Switch to turn the
power ON
2. Press BIRTHDAY Key to make input
possible Or, press BIRTHDAY Key again
to display the memories Messages entered
in step 3 can be stored in one Or these
memories.
3. Enter names using the Word input
Keys.
4. Press ENTER Key
5. Enter birthdays using Word input Keys
0-9 (4 digits of year and 2 digits of
month/day can be input.).
6. Press ENTER Key. The blinking cursor
disappears and the name appears.
7. Press TRANSMIT Key


When this mode is stored in the camera, the subject's age at the time you took the picture can

· If your message is already stored in one of the memories B1 -B3, you can proceed directly step 3
and step 7. See notes, "Message Mode", for other operating instructions.


WORLD TIMER
World time display and transmission


Operation
1. Press the ON/OFF Switch to turn the
power ON
2. Press WORLD TIME Key
3. Enter the time zone from 01-24 by
pressing the Word Input Keys (See Time
Zone numbers on the back of the Remote
Control Unit).
4. Press TRANSMIT Key


If you press TRANSMIT Key while the camera is in REMOTE CONTROL Mode, the time on the
camera will change. Press TRANSMIT Key only if you need to change the time on the camera. · If
you press ENTER Key after step 3, the time in the time zone selected will be displayed the next time.

For countries which have daylight saving time, press S on the Word input Keys to move the time
ahead 1 hour.

Each time you press the WORLD TIME Key, the display changes between hour/minute/ second and
year/month/day.
View original page 7
Page 8 · Read text
WORLD TIMER CORRECTION


MESSAGE INPUT
When you press ON/OFF Switch, WORD Key or BIRTHDAY Key, [ - CAP] is displayed and capital
letters can be entered.

1. Display on the LCD Panel
When   is lit: The top characters of the Word Input Keyboard can be entered.

(Press SELECT Key to cancel    )

When   is not lit: The bottom characters of the Word Input Keyboard can be entered.

(Press SELECT Key to light up    )

When [CAP] is lit: The characters can be entered as capital letters. (Press SHIFT Key to cancel CAP)

When [CAP] is not lit: The characters can be entered as small letters. (Press SHIFT Key to light up
CAP)

Cursor: Characters and numbers will be input where the blinking cursor appears.

Scroll Keys:
· Up to 15 characters can be displayed on the display panel at one time. If more than 15 characters
are entered (maximum 20 characters), the display is scrolled automatically.

· The blinking cursor can be moved by pressing the Scroll keys. Each time you press the left or right
Scroll Key, the blinking cursor moves one space.
View original page 8
Page 9 · Read text
2. Message Input


Input "Do you y me?" here as an examPle.


3. Message Correction
3 types of message correction are available: Change, Insert and Delete. Move the blinking cursor to
the place you wish to correct. If blinking cursor is not visible, it is not possible to make a correction.
Press the Scroll keys to display the blinking cursor. then make changes.


CLEARING AND ERASING MESSAGES STORED IN YOUR CAMERA

1. Clearing
· Messages stored in your camera in Message Mode and Birthday Mode are cleared b releasing the
shutter of the camera, or by turning the power OFF using the ON/OFF witch or the Auto Power OFF
function. When messages are cleared, the A on the LCD Panel of the camera disappears.
View original page 9
Page 10 · Read text
· To clear stored messages from your camera, press the Mode Button to clear the A on the MEMO W
or MEMO B display of the LCD Panel (Mode OFF).

· To erase messages stored in the camera (MEMO W or MEMO B) press the WORD or BIRTHDAY
Key on the Remote Control Unit to display the message again. To enter a blank space, or nothing,
press the ENTER Key ([CAP] or [CAP name:] is displayed). Press the TRANSMIT Key to erase the
message currently stored in the camera When you remove the batteries from the camera, messages
stored in MEMO · W and MEMO · B are lost, and the timer returns to its initial settings. Enter the
timer settings an messages again if necessary.


BATTERY REPLACEMENT

If [BATTERY] appears on the Display Panel when you press the ON/OFF Switch, replace the battery
as follows.

1. With the Display Panel facing up, pull the Battery Holder out with your fingernail by the groove on
the back

2. Place the new battery in the Battery Holder with the (+) side facing down.

· Make sure the batteries are placed with the correct polarity.

· Sometimes in cold temperatures the battery power may become weak and some functions may not
work properly, or the display be dim.

MAJOR SPECIFICATIONS

Transmission method: Infrared pulse system

Operation distance: Approx. 3.5 m (RC photography) Approx. 1 m (other features)

Display: LCD Display Panel

Timer Accuracy: +90 sec./month (at 20 C i 5°C)

Initial timer settings: 1 990Y01 M01 D 00:00 00

Timer Range: Until 2099Y 12M 31D 23:59 59

Auto Power OFF: Approx. 3 min.

Battery: CR1220(3V) x2
View original page 10
From the M. Butkus archive. Original publisher and archive notices are retained.
Check the model and edition against your equipment.
PDF verified 2026-10-10.