Film cameras
Ricoh Shotmaster AF User manual
User manual for Ricoh Shotmaster AF. 11 pages in English. Read the original PDF, download or print a copy without registration.
11 pagesEnglish1.3 MB PDF
Loading your manual…Open PDF directly
Document details
- Brand
- Ricoh
- Model / document
- Ricoh Shotmaster AF
- Document type
- User manual
- Language
- English
- Pages
- 11
- File size
- 1.3 MB
- Category
- Film cameras
- Document date
- Not specified in catalog
Search available document text
Find a term, then jump to its page in the original PDF. Image-only pages may not be searchable; check the PDF for exact wording and diagrams.
Page 3 · Read text
www.butkus.us


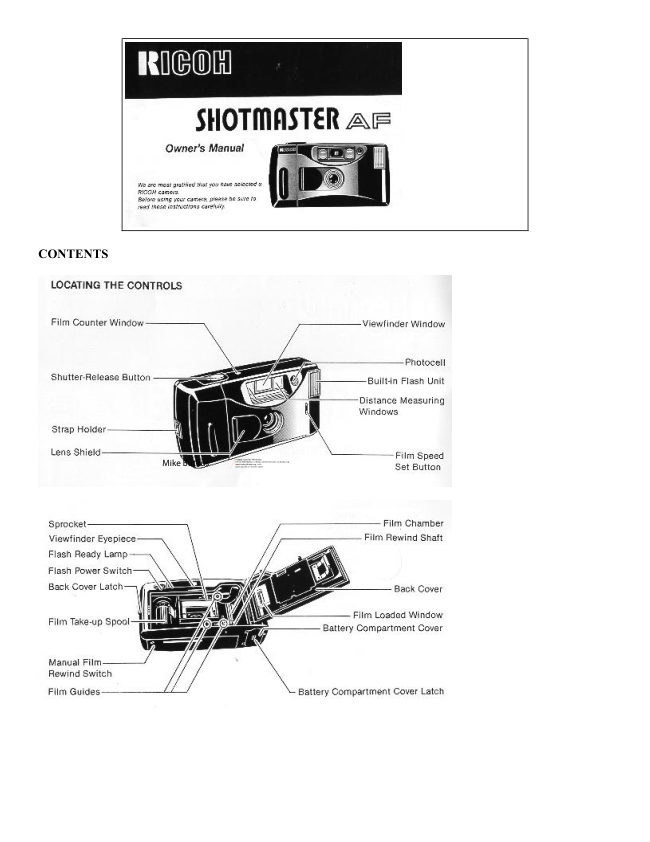
Locating the controls 2

Using the strap 5                          Viewfinder 14

Inserting the battery 6                      Auto-focus shooting 15

Opening the lens shield 8                    Pre-focus shooting 17

Checking the battery : 9                  Rewinding the film (Auto reverse) 18

Loading the film 10                        Flash photography : 19

Setting the film speed 12                   Proper care of your camera 20

Holding your camera 13                      Specifications 22


USING THE STRAP
Attaching the strap

1. Insert the small loop at the end of the Strap under the Strap Holder. (Fig. 1)

2. Insert the other end of the Strap through the loop to tie the Strap onto the Strap Holder. (Fig. 2)

INSERTING THE BATTERY


                      The camera will not operate unless the battery is installed. It
                                  is important to make sure that the battery is installed
                              correctly.
                              1. Use a pen to push the Battery Compartment Cover Latch
                             in the direction of the arrow and pull open the cover. (Fig. 3)

                              2. Insert the 3 volt lithium battery or 2 AA-size alkaline/
                       manganese batteries, checking that + and - on the battery are
                            lined up correctly according to the polarity diagram inside
                            the battery compartment. (Fig. 4)

                              3. Close the Battery Compartment Cover by pushing it in the
                             direction of the arrow. (Fig. 5)

                       * When replacing the battery, do so as quickly as possible,
                       and avoid having film inside the camera.

                       * Please remove the battery from the camera when you do
                          not use the camera for a long period of time.
View original page 3Page 4 · Read text
Battery for use

Lithium battery (3V) (Panasonic CR-123A, Duracell DL-123A) or 2 Alkaline penlight batteries or 2 Manganese
penlight batteries (Nickel Cadmium can not be used.)


OPENING THE LENS SHIELD


                              1. Slide the Lens Shield in the direction of arrow to open.
                             (Fig. 6)

                       * You can only take pictures when the Lens Shield is
                         completely open.

                       * To avoid tripping the shutter inadvertently and wasting
                            battery power, always keep the Lens Shield closed when you
                            are not taking pictures.


* Opening the Lens Shield while pressing the shutter release will release the shutter.

CHECKING THE BATTERY


                              1. Cover the Photocell with your hand and press the Shutter
                         Release Button down halfway.

                              2. If the Low Light Warning LED lights, then the battery
                       power is sufficient. (Fig. 7)

                              3. If the Low Light Warning LED does not light, the battery
                                  is insufficient or the battery is not inserted correctly into the
                           Battery Compartment. Replace the battery, or re-insert the
                            battery according to the polarity diagram inside the Battery
                        Compartment.


* Generally, in cold conditions, the capacity of the battery decreases, and in some cases, the camera may not
operate correctly You should either warm the battery or keep a spare in your pocket, inserting them just before
you use the camera. Incidentally, if the capacity of the battery has decreased in cold temperatures, it will regain
full capacity in normal temperatures, so do not throw the battery away.

* If the battery voltage is insufficient, the shutter may not release or the film may not advance completely. In
the following cases, replace the battery.

a. The shutter cannot be released (apart from when the Lens Shield is closed).

b. The Flash Ready Lamp takes more 30 seconds to light up. c. The Film Advance or Film Rewind does not
operate.
View original page 4Page 5 · Read text
www.butkus.us


LOADING THE FILM


                      Always avoid direct sunlight when loading the film.

                              1. Push the Back Cover Latch downward to open. (Fig. 8)

                              2. Load the film cassette into the Film Chamber and pull out
                       enough film leader to extend over the mark of the film leader
                             position. (Fig. 9)

                              3. Make sure the film is within the Film Guides (Fig. 10) and
                                  is not slack. (Fig. 11)


                              4. Press the Back Cover shut so that the Back Cover Latch
                            returns to its original position. The film is automatically
                        advanced until number "1 " appears in the Film Counter
                     Window. (Fig. 12)

                              5. If number 1 does not appear in the Film Counter Window,
                            the film has not advanced correctly The motor does not stop.
                        Reload the film by following steps 1-4 shown above.

                       * Whether there is film in your camera or not can be
                         confirmed by the Film Loaded Window. (Fig. 13)

                       * Do not use special-purpose films such as 35mm Instant
                          Reversal Film, etc. because your camera may not be able to
                             transport and expose them properly.

                       * You can load film in your camera with the Lens Shield
                            closed.
View original page 5Page 6 · Read text
SETTING THE FILM SPEED
DX-coded Films are provided with black-and-silver patterns corresponding to film speeds which the camera
reads and automatically sets. Check whether the film you're using is DX-coded. (Fig. 14)

DX-coded Film with ISO 100-400: Setting the film speed is not necessary. Your camera automatically makes
the correct film speed setting.

Film without DX-code: Your camera will automatically set itself to ISO 100.

* When using a film with ISO 1000, manually set the film speed to ISO 1000.

* It's recommended that you use the negative film. If you use the reversal film in very bright light, the
photograph may be over exposed.

HOLDING YOUR CAMERA
1. Always use both hands to steady your camera. (Figs. 15,16)

* When holding the camera vertically, always position it with the flash at the top.

* Be careful not to place your fingers over the lens, flash or focusing windows. (Fig. 17)


VIEWFINDER (Fig. 18)


                                                      (1) Field-of-View Frame
                                         The subject (such as people or
                                                  scenery) you wish to photograph
                                               should be positioned within this
                                                 frame.

                                                      (2) Parallax Correction Marks
                                   When taking a picture of a subject
                                                        that is between 1 -1.2m (3.3 ~ 4 ft.)
                                        away from the camera, the subject
                                               should be positioned within these
                                               marks. Anything outside the marks
                                                      will not be included in the picture
                                             even though you can see it through
                                                    the viewfinder.


(3) Auto-Focus Frame
The Auto-Focus system focuses automatically on any subject that appears within this small frame.

(4) Low Light Warning LED
If the Low Light Warning LED lights when you press the Shutter Release Button halfway, the flash is required
due to insufficient light. Turn on the Flash Unit by sliding the Flash Switch.
View original page 6Page 7 · Read text
www.butkus.us


AUTO-FOCUS SHOOTING


                                            1. Position the subject you wish to take within
                                         the Auto-Focus Frame in the center of the
                                      Viewfinder. (Fig. 19)

                                            2. When you press the Shutter Release Button
                                      halfway, the subject is focused. (Fig. 20)

                                            3. Gently press the Shutter Release Button to
                                        take the picture. The film will advance
                                        automatically as soon as the shutter has been
                                          released.

                                 * Avoid pressing the Shutter Release Button
                                       too abruptly to minimize camera shake or
                                        possible mix-operation.

                                 * Do not accidentally cover the Distance
                                   Measuring Windows at the front of your
                                     camera, as this will cause incorrect focusing.

                                 * Keep the Distance Measuring Windows clean
                                           to ensure act curate focusing. If the windows
                                         get dirty, they should be wiped clean with a
                                            soft cloth.


* There may be rare cases when accurate focusing is difficult or impossible. (For instance, with dark subject
that do not reflect light well, glossy subjects, or subjects taken through glass.) In these cases, it is best to use the
Pre-Focus technique to "lock" the focus on a more "normal" subject at the same distance. While holding focus,
turn your camera back to the original subject and shoot. (See PRE-FOCUS SHOOTING for more details.)
View original page 7Page 8 · Read text
PRE FOCUS SHOOTING


                            When the subject you wish to focus on is not
                                        located within the Auto-Focus Frame, you
                                     should use Pre-Focus Shooting.

                                            1. If you want to photograph two or more
                                        people, there may be cases where none of your
                                 main subjects can be within the Auto-Focus
                                 Frame in the center of the viewfinder. If you
                                          release the shutter then, only the background
                                           will be in focus, and the people, who are the
                                 main subject, will be out-of-focus. (Fig. 21)

                                            2. Move the camera to one side so that one of
                                         the people is within the Auto-Focus Frame.

                                       Press the Shutter-Release Button halfway so
                                            that the focus locks. Hold your finger in that
                                         position on the Shutter Release Button. (Fig.
                                     22)

                                            3. Now return the camera to its original
                                         position so that your main subjects are in the
                                      Field-of-View Frame again, and press the
                                        Shutter Release Button fully to take the picture.
                                           (Fig. 23)
View original page 8Page 9 · Read text
www.butkus.us


REWINDING THE FILM (AUTO REVERSE)


                                            1. After the end of the film has been reached,
                                         the film is automatically rewound.

                                            2. As the film is being rewound, the Film
                                    Counter gives a subtractive reading.

                                            3. When the film is fully rewound, the motor
                                        stops automatically and "S" is seen in the Film
                                      Counter. You can now open the Back Cover to
                                     unload the film. (Fig. 24)

                                 * If you wish to rewind the film before the end
                                        of roll is reached, slide the Manual Film
                                Rewind Switch with a ball point pen, etc. (Fig.
                                     25)

                                 * You can close the Lens Shield when the film
                                                  is being rewound.

                                 * When removing film, the rewind mechanism
                             may occasionally operate briefly as the Back
                                  Cover is opened. This is not abnormal.
View original page 9Page 10 · Read text
FLASH PHOTOGRAPHY


                                       Activate the built-in flash when the Low Light
                                 Warning LED in the viewfinder lights up as the
                                        Shutter Release Button is pressed halfway.

                                            1. Slide the Flash Power Switch in the direction
                                        of arrow to turn the Flash Unit on. (Fig. 26)

                                            2. Check that the Flash Ready Lamp is lit, then
                                        take the picture. (Fig. 27)

                                            3. When you have completed your Flash
                                      Photographs, be sure to turn the Flash Switch
                                               off. (Fig. 28)

                                 * Shooting Range (Flash Distance): 1m - about
                                 3.6m (3.3 -11.8 ft.

                                 * Do not press the Shutter Release Button
                                       before the Flash Ready Lamp lights up. If the
                                          shutter is released before the lamp is lit, the
                                    photograph may be under exposed.

                                 * Be care that the shutter can be released even
                                                      if the Flash Ready Lamp is not lit.

                                 * Do not put your finger in front of the flash
                                 window.


MAJOR SPECIFICATIONS

Type: 35 mm lens shutter type with automatic focusing.

Lens: 35 mm f3.9 Ricoh lens, 3 elements, 3 groups.

Focusing: Automatic focusing with Refocusing facility. Distance measuring (shooting) range: 1 m (3.3 ft)--00.

Shutter: Mechanical shutter, 1/125 sec.

Viewfinder: Reverse Galilean viewfinder. Magnification 0.53X. Filed of view 84%.

Low light warning: With CdS photocell.

Film speed: ISO 100--400 (auto set) & 1000 (manual set).
View original page 10Page 11 · Read text
www.butkus.us

Film loading: Ricoh auto-load system.

Film advance: Electric motor with film transport monitor.

Film rewind: Automatic rewind at end of roll.

Exposure counter: Additive, automatic resets to "S" when the camera back is opened.

Built-in flash: Electronic flash.

Flash recycling time: About 6 sec.

Flash shooting range: 1 m (3.3 ft)--about 3.6 m (11.8 ft).

Dimensions: 132 mm/5.2 in. (W)x68 mm/2.7 in. (H)x50 mm/2.0 in. (D).

Weight: 230 g (81/16 oz.) (without battery).

*Specifications are subject to change without notice.
View original page 11
From the M. Butkus archive. Original publisher and archive notices are retained.
Check the model and edition against your equipment.
PDF verified 2026-10-10.