Film cameras
Ricoh XR-10 User manual
User manual for Ricoh XR-10. 35 pages in English. Read the original PDF, download or print a copy without registration.
35 pagesEnglish4.4 MB PDF

Loading your manual…Open PDF directly
Document details
- Brand
- Ricoh
- Model / document
- Ricoh XR-10
- Document type
- User manual
- Language
- English
- Pages
- 35
- File size
- 4.4 MB
- Category
- Film cameras
- Document date
- Not specified in catalog
Search available document text
Find a term, then jump to its page in the original PDF. Image-only pages may not be searchable; check the PDF for exact wording and diagrams.
Page 1 · Read text
www.butkus.us


    owner'smanuat      >@-n@


Vle are mosl g ratified thal you have selected a RICOH
Before uslng youcamera, pleasebe sure to read lhese
tnslruclton s c arci u 11y.
View original page 1Page 2 · Read text
cn=Mike Butkus, o,Mike                       DigitallyDN:ou=Butkus.org,signed by Mike Butkus
Butkus             email=mike@butkus.org,Date: 2026.01.10 19:52:52c=US-05'00'
View original page 2
Page 3 · Read text
www.butkus.us
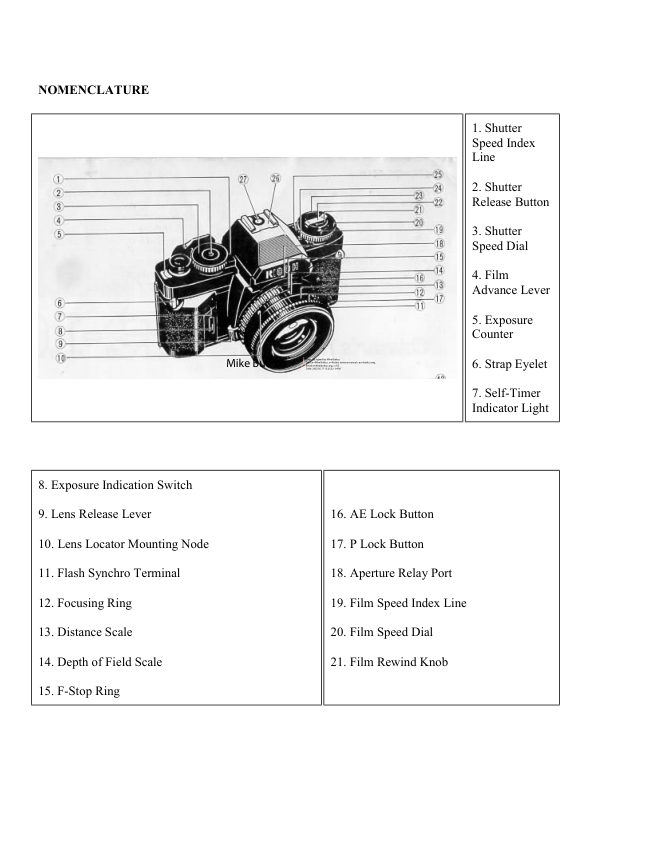
NOMENCLATURE
  1. Shutter Speed lndex Line                27. Flash Ready Signal Contact
  2. Shutter Release Button                   28. Viewfinder Eyepiece
  3. Shutter Speed Dial                       29. Film Rewind Shaft
  4. Film Advance Lever                      30. Film Chamber
  5. Exposure Counter                        31. Battery Compartment Cover
  6. Strap Eyelet                              32. PG-4 Contact Point
  7. Self-Timer lndicator Light                 33. Tripod Socket
  8. Exposure lndication Switch               34. Winder Contact
  9. Lens Release Lever                       35. Film Rewind Release Button
10. Lens Locator Mounting Node             36. Winder Coupler
1 1. Flash Synchro Terminal                    37. Winder Positioning Hole
12. Focusing.Ring                            38. Film Pressure Plate
13. Distance Scale                           39. Back Cover
14. Depth of Field Scale                      40. ASA/DIN Conversion Table
15. F-Stop Ring                              41. Film Take-up Spool
16. AE Lock Button                          42. Sprocket
17. P Lock Button
18. Aperture Relay Port
19. Film Speed lndex Line
20. Film Speed Dial
21. Film Rewind Knob
   (Back Cover Lock Release Knob)
22. Film Rewind Crank
23. Exposure Compensation Dial
24. Self-Timer Switch
25. Exposure Compensation lndex Line
26. Hot Shoe
View original page 3
Page 5 · Read text
www.butkus.us
                        ATTACHING THE VIEWFINDER CAP AND STRAP
                                Viewfinder Gap
                                 For instructions on how to use the Viewfinder Cap, read the section
                      on Self-Timer Photography and Usage of the Viewfinder Cap.
                                     (Fig. 1)


                              Fig. 1
                              1. Slip the Viewfinder Cap on to the Strap. (Fig. 2)


                         Fig.2
                              Put the Strap Eyelet and adjust it to the correct length.
                                           (Fig. 3)


l                             Fig.
View original page 5Page 6 · Read text
Venmo @mike-butkus-camera  Ph. 2083
PayPal Name  Lynn@butkus.org      www.PayPal.me/lynnbutkus
View original page 6
Page 7 · Read text
CHANGING LENSES
       To remove the lens from the camera
        1. Keep the Lens Release Lever pressed in, and turn the lens in
           the direction of the arrow. (counterclockwise)  (Fig. a)


Fis.4
       To mount the lens on the camera
        1. Align the red dot on the lens with the red dot on the camera.
              (Fig. 5)


Fig.5
           2. When the lens has engaged, turn  it in the direction of the arrow
              until it clicks into place. (clockwise) (Fig. 6)
            For convenience when mounting the lens in the dark, you can
             line up the Lens Locator Node with the Lens Release Lever.


Fig.6
View original page 7Page 8 · Read text
www.butkus.us
                        INSERTING THE BATTERIES
                          The exposure meter and shutter of this camera are powered by
                                    batteries, so it is important to insert the batteries correctly for
                                correct operation.
                            1. Remove the Battery Compartment Cover by turning  it counter-
                                 clockwise with a coin. (Fig. 7)

                         Fig.7
                             2. Place two batteries in the battery holder of the Battery Compart-             O                               ment Cover according to (+) and (-) shown outside the holder.
                                            (Fig. 8)                         eo
             e          Batteries for use                        Two LR-44 Alkaline batteries; life-span about 6 months under
                              normal use.
                            Two SR-44 Silver Oxide batteries; life-span about 12 months under
                              normal use. (Mallory MS76. Eveready 576 or equivalent)                         Fig.8     @6B        One CR-1/3N 3V Lithium battery
                          *  Since dirt or skin oils on the batteries may cause a bad contact,
                                  wipe the batteries clean with a dry cloth before inserting them.
                          * When you camera is not used for a long period of time, remove
                                  the batteiies.


I
i
View original page 8Page 9 · Read text
WARNING
Keep batteries out of the reach of babies and small children!
lf a battery is swallowed, IMMEDIATELY contact a Doctor, as
the battery material is harmful to the body!
*  Generally, in cold conditions, the voltage of the batteries
   decreases and this will impair the functioning of the shutter and
   exposure meter. ln these cases, either warm up the batteries
   or keep a spare set of battbries warm in your pocket ready
   to insert just before shooting.
*   lf no batteries are inserted, if they are incorrectly inserted, or
       if they are worn out, the camera will not operate.  lf the camera
    will not operate, check that the batteries are installed correctly.
      lf they are, the batteries are probably dead. Replace them with
  new batteries.
* When the voltage Of the batteries is getting low, the BAT (Battery
  Low Warning Signal) in the Viewfinder will blink on and off.
   Please change the batteries without delay.
View original page 9Page 10 · Read text
www.butkus.us
                    INSERTING THE FILM
                        (Always avoid direct sunlight when inserting the film.)
                        1. Pull up the Film Rewind Knob until the Back Cover snaps open.
                                    (Fig. e)


                      2. lnsert the film in the Film Chamber and push the Film Rewind
                      Knob down to its former position. (Fig. 10) You may have to
                                rotate the knob slightly to push it down completely.


                       3. lnsert the film leader into the slit on the Film Take-up Spool.
                                   (Fig. 11)


  a  aa
tatatrtatoot!a
View original page 10Page 11 · Read text
4. Advance the film, making sure that the sprocket holes on the
                                 film are fully engaged on the Sprocket Teeth. (Fig. 12)

  tt    I  I  I  I  I  I  r o 0 r


                 OI
 taaaattat00t


                                  5. Close and press the Back Cover firmly to lock it. Unfold the Film
                          Rewind Crank and turn it gently in the direction of the arrow
                                     until the possible slack in the film has been taken up. (Fig. 13)
                                                                                 3                                  6. Advance the film and press the Shutter Release Button 2 -                           times until the number "1" appears in the Exposure Counter.
                                   (Fig. 1a)
                        As you advance the Film Advance Lever, the Film Rewind Knob
                               rotates indicating that the film is properly advancing.                  Fig.13
                      When inserting the film,  it is more convenient to set the Shutter
                        Speed Dial to a high speed rather than A (Auto) while advancing
                              the film to the number 1 position, to avoid a slow shutter speed
                               (the slowest is 16 seconds). When you are ready for shooting,
                       be sure to set the Shutter Speed Dial back to A (Auto).
                     When inserting the film in cold conditions, the Film Leader may
www.butkus.us               become hard and brittle. Keep the leader warm in your hand
                            before insertion.
View original page 11Page 12 · Read text
www.butkus.us
       SETTING THE FILM SPEED
        The film speed is the basic element for determining the exposure,
         so please be sure to set the film speed correctly. The film speed or
       ASA/DIN is listed on the film box.
             1 . Pull the Film Speed Indicator outer ring up, and set it against the
              film speed number you are using. (Fig. 15)
            For example, if the film speed is ASA 100, set the indicator onFig.15
           the Film Speed Dial to 100.

      EXPOSURE INDICATION SWITCH
       The Liquid Crystal Display such as Shutter Speed lndicator etc..
        appears in the Viewfinder either by pressing Exposure lndication
         Switch or by releasing the shutter. After shooting, the power source
            will cut off automatically after 8 minutes in order to preserve the life
         of the batteries. (Fig. 16)
Fis.16
View original page 12Page 14 · Read text
www.butkus.us
 3. Shutter Speeds
 4. Exposure Adjustment
 5. Bulb
 6. Manual
 7. Overexposure
 8. Shutter Speed lndicator
 9. Slow Shutter
10. Long Time Exposure
1 1. Underexposure
12. Battery Low Warning Signal
13. Flash Ready LED Light

The Shutter Speed, Slow Shutter and Long Time Exposure indi-
cations are always present in the Viewfinder. The information
shown by the activated (Meter-ON) liquid crystal relates to
exposure data for the existing lighting conditions.
*  ln cold conditions the response speed of the liquid crystal
   may get slower. This is due to the nature of the liquid crystal,
  and not to any camera malfunction.
* When using a polarizing filter, depending on the angle of
    rotation, there may be cases in which you cannot see the liquid
   crystal indicators.


                                                                  11
View original page 14Page 15 · Read text
AE (AUTOMATTC EXPOSURE) PHOTOGRAPHY
                        Your XR-10 enables you to use automatic exposure where the
                          shutter speed is automatically selected, or manual 'exposure
                       where you may select the shutter speed yourself.
                         1. Set the 'A" on the Shutter Speed Dial against the Shutter
                       Speed lndex Line. (Fig. 17)

                   Fig.17
                       2. Use the F-Stop Ring to set the desired f-stop number against
                             the lndex Line. (Fig. 18)


                    Fis.18
                        3. When you press the Exposure lndication Switch, the correct
                              shutter speed for automatic exposure, will be shown by the
                              Shutter Speed lndicator in the VieMinder. (Fig. 1g)


www.butkus.us
                      Fig. 19
View original page 15Page 16 · Read text
www.butkus.us
            4. When the Shutter Speed lndicator is within the orange band,
              this means a slow shutter speed. You should either select
          a different f-stop setting, or pay particular attention to camera
            shake. (Fig.20)
            5. When the A Overexposure mark or the V Underexposure
          mark appears, you should select another f-stop number, as
            the exposure is incorrect. (Fig. 21)
          You can release the shutter without pressing the ExposureFis.20              Indication Switch,  if you don't have to confirm the exposure
             information before releasing the shutter.

       F.STOP REFERENCE TABLE

                                                       F-stop                         Lighting Conditions                                           Number
                    lndoors                            t/2,2.8
 Fig. 21                   Outdoors, cloudy                  t/4,5.6
                   Outdoors, sunshine                  tl8, 11
                 Beach in mid-summer and                                                          tl11. 16                 snow-scenes
                       .                  With film speed ASA 100


                                                                13
View original page 16Page 17 · Read text
MANUAL PHOTOGRAPHY
         Manual shutter speed is precisely controlled by a quartz oscillator,
         the most accurate method of controlling the shutter speed ever.
         1. Set the Shutter Speed Dial to the desired shutter speed.
             (Fig.22)
         2. The letter "M" in the Viewfinder will pulsate to indicate Manual
           mode. (Fig. 23)
Fig. 22   3. lf the A Overexposure mark or the Y Underexposure mark
             pulsates, you should select another f-stop number as the ex-
            posure is incorrect.  lf the A or the V marks do not disappear,
          even after selecting a different f-stop number, you should
              select a different shutter speed. When both A and V disappear,
            the exposure is correctly adjusted. (Fig. 24)
      SHUTTER SPEED REFERENCE TABLE

Fis.23                                                       Shutter                         Lighting Conditions                                             Speed
                    lndoors                        1/30,1/60
                   Outdoors, cloudy               1/60, 1/125
                   Outdoors, sunshine           1/125,1/250
                 Beach in mid-summer,                                             1/250,1/1000                snow scenes
Fis.24
View original page 17Page 18 · Read text
www.butkus.us
        HOLDING THE CAMERA
           Holding the camera correctly when shooting is very important.
              (Fig. 25)
          1. The camera should be positioned on the palm of your left
             hand so that you can use your fingers to turn the Focusing Ring
               of the lens easily.
          2. This index linger of your right hand should rest lightly on the
               Shutter Release Button, while your right hand holds the camera
            body lightly.
          3. Your right arm should be in a comfortable position.
         4. Keep your left arm resting lightly against your body, and the
             camera should just touch your forehead when. you look through
              the VieMinder.
         *   lt is important to shoot with the correct body posture, to avoid
              blurred or tilted shots.
Fig.25


                                                                     15
View original page 18Page 19 · Read text
FOCUSING
                          Look through the Viewfinder to compose your picture and focus
                         by turning the Focusing Ring.
                          You can focus by using the center Split-image Spot. (Figs. 26,271


                     Fis.26
                              Split-image Focusing
                      When the split image in the Split-image Spot forms a single image,
                            the subject is in focus.


                     Fis.27


16
View original page 19Page 20 · Read text
www.butkus.us
           REWINDING THE FILM
             (Always avoid direct sunlight when unloading the film).
                After the last picture on the roll of film has been taken, rewind
                        film.    o6    the
f      ]        1. Push-in the Film Rewind Release Button on the bottom of the
                camera, and it will remain locked into position. (Fig.28)
             2. Unfold the Film Rewind Crank and turn it in the direction of the
     Fis.28       arrow. When the film has been completely rewound, the tension
                   of the Film Rewind Crank is released and  it will revolve freely.
                     (Fig. 29)
            3. Pull up the Film Rewind Knob to its fullest extent and the Back
                 Cover will open. (Fig. 30) Remove the film, push the Film Rewind
             Knob back into position and close the Back Cover.
           *  Never open the Back Cover during rewinding, as light will get in
              and ruin your film.
           *   lf you wind the film beyond the set number of frames the
     Fis.29                 Film Wind Lever sometimes gets stuck midway and the Film
               Rewind Release Button cannot be locked in the down position.
                          lf this should happen, rewind the film by keeping the Film
              Rewind Release Button pressed down with your finger.


     Fis.30
                                                                    17
View original page 20Page 21 · Read text
AE LOCK SYSTEM
                             This camera has an AE Lock system. When shooting against the
                                    light on automatic exposure, the difference in the brightness of
                             the background and the subject means that you cannot obtain a
                              correct exposure of the subject. In this case, you should use the
                      AE Loek which retains the exposure of the subject regardless of
                              the changes in the background lighting conditions. The exposure
                                    will not change until you cancel the AE Lock.
                            1. Move up close to the subject to measure the exposure, and
                                 press the AE Lock. The Shutter Speed lndicator in the Viewfin-
                                  der will pulsate to indicate that the exposure is locked onto the
                                     object. (Fig. 31)
                           2. Compose the picture and shoot. The AE Lock is then automati-
                                     cally cancelled.
                          3.  lf you wish to cancel the AE Lock before pressing the Shutter
                             Release Button, press the AE Lock Button again.


18
View original page 21Page 22 · Read text
www.butkus.us
       EXPOSURE ADJUSTMENT SYSTEM
        According to shooting conditions, the camera may be affectedU        more by the background  light than the light of the subject itself.
         This will result in under (or over) exposed pictures.
            ln these cases, you should use the Exposure Adjustment system.
        You can also use the system when you wish to create a deliberate
          effect of over (or under) exposure.
         1. Turn. the Film Exposure Compensation Dial to set the re-Fis.32
             quired number against the Exposure Compensation lndex Line.
             (Fis.32)

                                               Exposure                            Subject                                                 Adjustment
                 Scenery with a lot of sky      +1-+2                    Figure against the light
                    Figure with a snowscape                                                    +1                    or seascape background
                    Spot-lighted figure           -1 --2
         The Exposure Compensation Dial can be set to click stop
             positions,(1/3 steps) between the numbers indicated.
         Be sure to set it back to the 0 position after use.


                                                                        19
View original page 22Related documents and language editions
From the M. Butkus archive. Original publisher and archive notices are retained.
Check the model and edition against your equipment.
PDF verified 2026-10-10.