Film cameras
Ricoh XR-240 User manual
User manual for Ricoh XR-240. 6 pages in English. Read the original PDF, download or print a copy without registration.
6 pagesEnglish1.1 MB PDF
Loading your manual…Open PDF directly
Document details
- Brand
- Ricoh
- Model / document
- Ricoh XR-240
- Document type
- User manual
- Language
- English
- Pages
- 6
- File size
- 1.1 MB
- Category
- Film cameras
- Document date
- Not specified in catalog
Search available document text
Find a term, then jump to its page in the original PDF. Image-only pages may not be searchable; check the PDF for exact wording and diagrams.
Page 2 · Read text
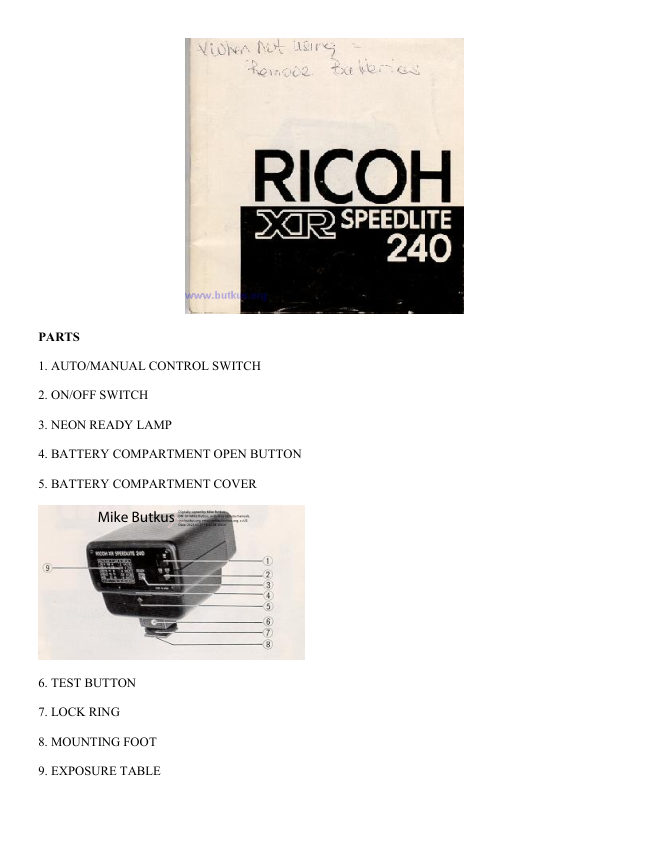
PARTS

1. AUTO/MANUAL CONTROL SWITCH

2. ON/OFF SWITCH

3. NEON READY LAMP

4. BATTERY COMPARTMENT OPEN BUTTON

5. BATTERY COMPARTMENT COVER


                                                                                                       Digitally signed by Mike Butkus
                                                                             DN: cn=Mike Butkus, o=Butkus camera manuals,
                                                                                      ou=butkus.org, email=mike@butkus.org, c=US        Mike Butkus  Date: 2023.05.17 15:26:28 -04'00'


6. TEST BUTTON

7. LOCK RING

8. MOUNTING FOOT

9. EXPOSURE TABLE
View original page 2Page 3 · Read text
www.butkus.us

10. SYNCHRO CORD SOCKET

11. FLASH WINDOW

12. ELECTRIC EYE


13. HOT SHOE CONTACT

14. FLASH READY SIGNAL CONTACT

15. SYNCHRO CORD


When using the XR Speedlite 240 with the XR-2s, set the shutter-speed to “Auto”. When the flash is charged
and the Neon Ready Lamp is lit, the shutter-speed is automatically synchronized at 1/90 second. This avoids the
trouble of having to set the speed yourself or of badly exposed photographs. With the XR-1s and XR-2s, the
Flash LED on the viewfinder eyepiece lights up red to indicate the flash is charged, so that you need not take
your eye off the viewfinder to check the flash unit.

INSERTING THE BATTERIES

1. Open the Battery Compartment Cover by pushing the Battery Compartment Cover Open Button (4) up.
 (Fig. 1)

2. Insert 4 penlight (M size) batteries according to the polarity diagram inside the Battery Compartment, then
close the battery Compartment Cover (5). (Fig. 2)
View original page 3
Page 4 · Read text
TESTING THE FLASH UNIT

1. Set the ON/OFF Switch (2) to "ON", and the Neon Ready Lamp will light up with a charging sound in about
10 seconds. (Fig. 3)

2. If the flash unit flashes when you press the Test Burton (6) it is
functioning correctly. (Fig. 4)

TIPS FOR BETTER RESULTS

* If there is no charging sound when you set the ON/OFF Switch to "ON", check the baneries for correct
insertion. if the baneries are correctly inserted, change the baneries.

* If the Neon Ready Lamp (3) does not light up within 30 seconds of seeing the switch to "ON" the baneries are
worn out, and all baneries should be changed to new ones of the same kind.

* If the flash is not going to be used for a period of 2 weeks or more, remove the baneries.

MOUNTING THE FLASH UNIT ON TO THE CAMERA

1. Loosen the Lock Ring (7) and engage the flash unit fully onto the Camera Hot Shoe, then tighten the Lock
Ring (7) (Fig. 5)

TIPS FOR BETTER RESULTS

* For cameras without a hot-shoe attachment, use the Synchro-cord (15) supplied to connect the Flash Unit to
the camera.

* Do not use the Flash with other makes of cameras that have a special signal pin, as this will result in incorrect
exposure or may even damage the camera circuitry.

AUTOMATIC FLASH SHOTS

The range for automatic flash shots is for distances from 1 meter (3.3 ft)
to 4.3 meters (14.3 ft) with ASA 100 film.

1. Set the Auto/Manual Control Switch to 'A' (Fig. 6)

2. Set the shutter speed to a synchronizing speed according to the table below.
View original page 4
Page 5 · Read text
www.butkus.us


CAMERA  SYNCHRONIZING SPEED
XR-2s       Auto(1/90),B,X,4~1/125
XR-1s       B. 1~1/125
Others       Refer to instructions with the camera


3. To obtain the correct exposure for the ASA/DIN film you are using, check the table below for the F-stop
seeing. With ASA 100 film, the F-stop seeing should be at F5.6. (Fig 7)


   Film    ASA    25   50   100   200    400
   Speed     DIN    15   18    21     24    27
   F-Stop      F      2.8   4     5.6     8     11

4. Set the ON/OFF switch (2) to "ON", and when the Neon Ready Lamp (3) is lit, the flash is ready for use.
With the XR-1s and XR-2s the Flash LED on the viewfinder eyepiece will light up red indicating that the flash
is ready for use. Just focus on the subject and release the shutter (Fig. 8).

TIPS FOR BETTER RESULTS

* For distances outside the range of automatic flash shots which cannot be exposed by the flash unit, set the
switch to "Manual" and consult the exposure calculation table to obtain the correct F-stop.

MANUAL FLASH SHOTS

1. Set the Auto/Manual Switch to "M" (Fig. 9).

2. Set the shutter speed to a synchronizing speed according to the instructions
with the camera.

3. Focus on the subject and read off the distance from the camera to subject.

4. Set the correct F-stop according to the distance and the film speed, using
the exposure calculation table. For ASA 100 film and the distance of 3 m ( 10 ft)
to subject, set the F-stop to 8.
View original page 5
Page 6 · Read text
5. After checking that the flash is ready for use, press the Shutter Release Button to take the picture.

* For cameras with a built-in flash-matic system, set the Auto/Manual Switch to 'M'. For further details consult
the instructions with the camera.

PROPER CARE OF YOUR FLASH

* Even if you do not use the flash for an extended period of time, it should be tested from time to time in order
to properly maintain the condenser.

* A high voltage is generated in the circuitry. It is very dangerous to take it apart or to touch the inside of the
flash unit. It should be taken to a camera dealer or a recognized Ricoh service station for all repairs.

* Avoid exposing the flash unit to dust, humidity, rain, seawater, etc.

* Do not leave it in hot or humid conditions such as direct sunlight, as this will cause
 malfunction of the flash unit.

* Clean the body of the flash unit with a dry soft cloth. Never use solvents such as thinner, benzine, etc.

Specifications: Rlcoh XR Speedlight 240

Form: Thyristorized automatic flash unit

Guide number: 24 (ASA 100 in meters) 80 (ASA 100 in feets)

Automatic flash coupled range: 1~4.3 meters at f5.6 (ASA 100)

Flash duration: 1/750~1/30,000 sec.

Recycling time: 8 sec.(with alkaline batteries) (Manual)

Coverage angle: 45~ on vertical and 65° on horizontal

Color temperature: Same as daylight

Number of flashes: About 150 flashes with alakaline batteries
          About 70 flashes with nickel cadmium batteries
          About 40 flashes with manganese batteries

Power source: Four penlight (AA size) batteries 1.5V
                 or 1.2V (Nickel cadmium batteries)

Test circuit: Open flash test button built in

Accessory: Synchro cord

Dimensions: 77.5 (width) x 75.0 (height) x 85.3 (depth) mm

Weight: 230 g (without Batteries)
View original page 6From the M. Butkus archive. Original publisher and archive notices are retained.
Check the model and edition against your equipment.
PDF verified 2026-10-10.