Film cameras
Ricoh XR-X 3000 User manual
User manual for Ricoh XR-X 3000. 44 pages in English. Read the original PDF, download or print a copy without registration.
44 pagesEnglish2.2 MB PDF
Loading your manual…Open PDF directly
Document details
- Brand
- Ricoh
- Model / document
- Ricoh XR-X 3000
- Document type
- User manual
- Language
- English
- Pages
- 44
- File size
- 2.2 MB
- Category
- Film cameras
- Document date
- Not specified in catalog
Search available document text
Find a term, then jump to its page in the original PDF. Image-only pages may not be searchable; check the PDF for exact wording and diagrams.
Page 2 · Read text
Posted on 6-20-02

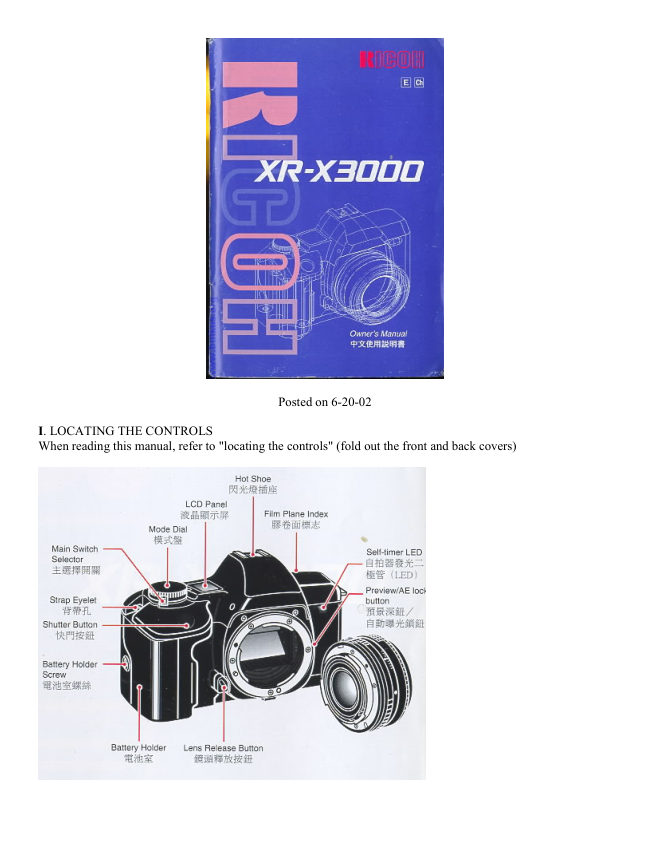
I. LOCATING THE CONTROLS
When reading this manual, refer to "locating the controls" (fold out the front and back covers)
View original page 2
Page 6 · Read text
Reading the Exposure Indicator The exposure indicator is displayed in the viewfinder display and the
exposure compensation value is displayed on the LCD panel in the following conditions:

· In Manual operation
· When the exposure compensation has been set.
· When the exposure compensation is being set.

In Manual operation or for exposure compensation, the exposure indicator in the viewfinder display indicates
the difference between the correct exposure value (EV) and the current exposure compensation setting.
View original page 6
Page 7 · Read text
The * mark flashes when the value exceeds -1 EV or +1 EV.

Exposure compensation can be set within the range of +/- 4 EV in 0.5 EV increments. The shutter speed in the
viewfinder display flashes when the current exposure setting is beyond the exposure metering range. However,
the overexposure or underexposure can still be taken deliberately to capture a particular creative effect.
Nevertheless, to avoid incorrect exposure, select a larger or smaller aperture, select a faster or slower shutter
speed, or use a flash unit as necessary.

IV. QUICK GUIDE IN AUTO OPERATION

The following is a quick overview of the Auto Operation. For more detailed information, refer to "A (AUTO)
AND M (MANUAL) OPERATIONS" on page 17.
View original page 7
Page 9 · Read text
V. CONTENTS

1. LOCATING THE CONTROLS 3

2. FUNCTION MAP 4

3. LCD INFORMATION 6

  Viewfinder Display 7

  Reading the Exposure Indicator 7

4. QUICK GUIDE IN AUTO OPERATION 8

5. CONTENTS 10

6. ATTACHING THE STRAP 12

7. INSERTING THE BATTERIES 12

8. MOUNTING AND REMOVING THE LENS 13

9. MAIN SWITCH SELECTOR ; 14

10. MONITORING THE CONDITION OF THE BATTERIES 14
View original page 9
Page 10 · Read text
11. LOADING THE FILM 15

12. SETTING THE FILM SPEED AUTOMATICALLY 16

 DX Films 16

  Non-DX Films 16

A (AUTO) AND M (MANUAL) OPERATIONS

13. MAIN SWITCH SELECTOR--UA/M 17

  Auto Power Off Function 18

14. A (AUTO) OPERATION 18

15. M (MANUAL) OPERATION 19

  Bulb Function 20

16. HOLDING THE CAMERA 21

17. FOCUSING 22

  Types of Focusing 22

18. SHOOTING 23

19. REWINDING THE FILM 24

  Midroll Rewind 24

MODES

20. SETTING THE MODES 25

21 SELF-TIMER MODE 26

22. MULTI EXPOSURE MODE 27

23. AUTO BRACKETING MODE 28

24. CONTINUOUS SHOOTING MODE 28

25. NORMAL MODE 29

26. EXPOSURE METERING USER SETTING MODE 29

27. PREVIEW/AK LOCK USER SETTING MODE 30

28. ISO USER SETTING MODE 32
View original page 10
Page 11 · Read text
29. EXPOSURE COMPENSATION 33

  Shooting in Backlit Conditions 33

  Dominantly White Subjects 34

  Dominantly Dark-colored Subjects 34

FLASH PHOTOGRAPHY

30. FLASH PHOTOGRAPHY WITH SL-303P, SL-403P 36

31. FLASH PHOTOGRAPHY WITH FLASH UNITS OTHER THAN RICOH 37

  OTHERS

32. INFRARED FILM 38

33. DIOPTRIC LENSES 38

34. INTERCHANGEABLE VIEWFINDER SCREENS 39

35. RELEASE SWITCH 39

36. CARE OF BATTERIES 40

37. DATA BACK 7 40

38. PROPER CARE OF YOUR CAMERA 44

39. MAJOR SPECIFICATIONS 45
View original page 11
Page 12 · Read text
VI. ATTACHING THE STRAP


                                  1. Remove the battery holder by turning the battery holder screw
                              counterclockwise with a coin. (Fig. 1)

                                  2. Slip the viewfinder cap and shoulder pad onto the strap. (Fi 9. 2)

                                  3. Run the strap through the strap eyelet as shown. (Fig. 3)


                                  4. Secure the battery holder to the camera body by turning the
                                battery holder screw clockwise with a coin. (Fig. 4)

                                  5. Adjust the strap length as desired.

                                VII. INSERTING THE BATTERIES

                                  1. Remove the battery holder.

                                  2. Insert four new M-size alkaline batteries and make sure that the +
                           and - on the batteries are aligned according to the polarity diagram
                                inside the battery holder. (Fig. 5)
View original page 12Page 13 · Read text
<<< update - I have been told a Olympus eyecup and other accessories will work on XR cameras >>>

                                    3. Secure the battery holder to the camera body by turning the
                                 battery holder screw clockwise with a coin. (Fig. 6)

                             Notes on Batteries
                                        · The condition of the batteries should be monitored frequently. For
                          more information, refer to "MONITORING THE CONDITION OF
                     THE BATTERIES" on page 14.

                                        · Be sure to replace all four batteries at once. Replace with the
                          same brand of batteries.

                                        · Do not use AA-size lithium batteries.


                               VIII. MOUNTING AND REMOVING THE LENS

                                    1. Remove the camera body cap. (Fig. 7)

                                    2. Align the red dot on the camera with the red dot An the lens and
                          mount the lens on the camera. (Fig. 8)


                                     3. Turn the lens in the direction shown by the arrow until it clicks
                                   into place. (Fig. 9)

                                         · If the lens is to be removed from the camera for a certain period
                                 of time, use the camera body cap to avoid dust and foreign
                                    particles from entering your camera. Likewise, use the front and
                                    rear lens caps to protect your lens also.

                                     4. To remove the lens, press the lens release button, then turn the
                                  lens in the direction shown by the arrow. (Fig. 10)

                                         · For best results, use Ricoh lenses only. Optimum performance of
                                  the camera may be compromised by using other lenses.
View original page 13Page 14 · Read text
VVI. MAIN SWITCH SELECTOR

1. Set the main switch selector to A (Auto) or M (Manual). (Fig.
11 )

· If the camera is left unattended for about 30 seconds, the power
switches off automatically and the display on the LCD panel
disappears. The Auto Power Off function prevents unnecessary
waste of the battery power. The current information contained in
the camera memory is retained.

Lightly press the shutter button to turn on the power and update
the LCD panel. For maximum battery life, always set the
mainswitch selector to L (Lock) when the camera is not used.


X. MONITORING THE CONDITION OF THE BATTERIES

When the main switch selector is set to A (Auto) or M (Manual),
the battery condition is displayed on the LCD panel.

1. Batteries are in good condition when the I symbol appears on
the LCD panel. (Fig. 12)

2. When the batteries are nearly exhausted, the a symbol is
displayed on the LCD panel. (Fig. 13) Replace with four new M-
size alkaline batteries.

3. When the batteries are virtually exhausted, the n symbol
appears on the LCD panel. Replace with four new AA-size
alkaline batteries. (Fig. 14)

· In extremely cold temperatures, the n symbol may appear on the
LCD panel. (In cold temperatures, the battery voltage is reduced.)
You may be able to use the camera if you remove and warm up
the batteries.
View original page 14
Page 15 · Read text
XI. LOADING THE FILM

                           Always avoid direct sunlight when loading the film.

                                     1. Press the back cover lock release button and slide the back
                               cover latch down to open the back cover. (Fig. 15)

                                     2. Load the film cassette into the film chamber and pull out the
                                 film leader so that it extends past the film leader index. (Fig. 16)

                                         · If the film leader is pulled out more than necessary when
                                  loading, the total number of exposures may be reduced.

                                     3. Make sure that the film stays within the film guides, and that
                                  the upper sprocket edge is under the guide plate. (Fig. 17)


The film may not load properly if the film leader does not lie flat. Make sure that the film lies flat as shown.
(Fig. 18)
View original page 15Page 16 · Read text
4. Close the back cover so that the back cover latch snaps shut
and returns to the original position. (Fig. 19) If the film has been
properly loaded, the film speed appears on the LCD panel for
about 2 seconds. Then, the exposure counter displays "1". (Fig.
20)

· If the display on the LCD panel disappears, lightly press the
shutter button to turn on the power and update the LGD panel.

· The ISO setting on the LCD panel can be checked by looking
through the film loaded window on the back cover of the
camera (applicable when the Data Back is not attached). The
current ISO setting can be determined also by turning the mode
dial to select the ISO User Setting mode.

5. If the film has not advanced properly or is not taken up onto
the film take-up spool, the exposure counter flashes "0". The
shutter will lock also to prevent you from taking a picture until
the film is loaded properly. (Applicable for DX coded films
only.) Reload the film by repeating steps 1-4 as described
above. (Fig. 21)

· If non-Ding films are loaded in this camera, no LCD warnings
will appear and the shutter can be released. (The film speed
must be set manually also. If not, non DX films will be set to
the default 100 film speed setting.)

XII. SETTING THE FILM SPEED AUTOMATICALLY

DX-coded films have black-and-silver patterns corresponding to
film speeds that the camera reads and sets automatically. Your
camera accepts DX films with speeds ranging from ISO 25-
5000. (Fig. 22)

DX Films
The film speed and the "ISO" indicator are briefly displayed on
the LCD panel.

For advanced applications, you may wish to raise or lower the
ISO speed of a DX-coded film. You can override the automatic
ISO setting manually between ISO 12 to 6400.

Refer to "lSO USER SETTING MODE" on page 32.

Non-DX Films

Non-DX films must be set manually. If not, the film will be set
to the default 100 film speed setting. For more information on
loading non-Ding films, refer to page 32.
View original page 16
Page 17 · Read text
A (AUTO) AND M (MANUAL) OPERATIONS

XIII. MAIN SWITCH SELECTOR--L/A/M

1. Set the main switch selector to the desired operation.
(Fig. 23)

L (Lock)
Locks the operations and turns off the camera. Set to L

(Lock) when the camera is not used.

A (Auto ~ P. 18)

Selects optimum shutter speed automatically according to the user-selected aperture for creative control of the
depth of field.

M (Manual ~ P. 19)

Enables manual user-selected aperture and shutter speed settings for individual creative effects or difficult
lighting conditions.

· The LCD panel and the viewfinder display operate when A (Auto) or M (Manual) is selected.

· If there is a film loaded in the camera, the film speed will be displayed for the first 2 seconds.

2. Check the batteries.

· Refer to "MONITORING THE CONDITION OF THE BATTERIES" on page 14.

· If the main switch selector is set to L (Lock), the power will be completely cut off. The LCD panel and the
viewfinder display will not operate.

· The following modes will be canceled when the main switch selector is set to L (Lock).

· AE Lock setting (in the Preview/AE Lock User Setting mode)

· Self-timer mode

· To prevent unnecessary battery depletion, set the main switch selector to L (Lock) when you are not using the
camera.
View original page 17
Page 18 · Read text
Auto Power Off Function
If the camera controls. are not operated or camera operations** are not performed for about 30 seconds, the
display will disappear on the LCD panel. At this time, if the shutter button is pressed lightly halfway, the
display will appear again. ~ All buttons, mode dial, and main switch selector. ** Shooting, film loading, and
film rewinding.

· The mode settings selected before the display disappears, will not be canceled.

· When the Auto Power Off function operates and the display disappears on the LCD panel, only the following
can be operated so that the display will appear again: shutter button, manual rewind button and the main switch
selector. To set or change the mode settings, press the shutter button halfway to operate the LCD panel.

· If the camera is not operated for about 10 seconds, the display inside the viewfinder will disappear. By
pressing the shutter button halfway, the display will appear.

XIX. A (AUTO) OPERATION


                           The camera is set to A (Auto) operation when the following
                                 viewfinder display appears. Note that the viewfinder display may
                                vary slightly according to the current shutter speed and settings
                                               (i.e., AE lock, exposure metering, flash, bulb, and exposure
                               compensation settings). (Fig. 24)

                                          · If the LCD panel or viewfinder display is not operating, press
                                   the shutter button halfway and the display will appear.

                                      1. Set the main switch selector to A (Auto). (Fig. 25)

                         Make sure that the mode dial is set to either Self-timer

                                Multi Exposure, Auto Bracketing, Continuous Shooting, or
                            Normal mode.

                                      2. Set to the desired lens aperture. (Fig. 26)

                                          · If the aperture is set to "P" or "A", turn the aperture ring while
                                  pressing the ~ P" or "A" lock pin.
View original page 18Page 19 · Read text
3. Check the LCD panel and look through the viewfinder and
                          make sure that the viewfinder display is operating. (Fig. 27)

                                          · The shutter speed appears in the viewfinder display.

                                          · The shutter speed flashes in the viewfinder display when the
                                   subject is underexposed or overexposed. Under certain
                                   conditions, a subject may be underexposed even when the
                                 slowest shutter speed (i.e., 32 seconds) is set. "L32" flashes in
                                   the viewfinder display. Use a flash unit, the Bulb function, or
                               simply select a larger aperture (smaller number aperture setting)
                                  as necessary. Likewise, a subject may be overexposed even when
                                   the fastest shutter speed (i.e., 1/2000 th second) is set. "2000"
                                    flashes in the viewfinder display. Use a neutraldensity filter or
                               simply select a smaller aperture (larger number aperture setting)
                                  as necessary. (Fig. 28, 29)


XV. M (MANUAL) OPERATION


                           The camera is set to M (Manual) operation when the following
                                viewfinder display appears. Note that the viewfinder display may
                               vary slightly according to the current shutter speed and settings
                                              (i.e., AE lock, exposure metering, flash, bulb, and exposure
                              compensation settings). (Fig. 30) Make sure that "M" is displayed
                                   in the viewfinder display and that the lens aperture is not set to
                              "P" or "A".

                                     1. Set the main switch selector to M (Manual). (Fig. 31)

                        Make sure that the mode dial is set to either Self-timer,

                               Multi Exposure, Auto Bracketing, Continuous Shooting, or
                           Normal mode.
View original page 19Page 20 · Read text
2. Press the up/down buttons to display the shutter speed you wish
to set. (Fig. 32)

3. Look through the viewfinder and adjust the aperture setting by
turning the aperture ring. To change the shutter speed, press the
up/down buttons. The exposure indicator appears in the
viewfinder display. Look at the exposure indicator when setting
the aperture and shutter speed. When the dot (a) of the exposure
indicator is under the "O", the correct exposure is set. (Fig. 33)
The subject is underexposed when the dot (O) of the exposure
indicator is towards -1. Likewise, the subject is overexposed when
the dot (O) of the exposure indicator is towards +1. For
underexposed pictures, set a larger aperture (smaller number
aperture setting) or slower shutter speed. For overexposed
pictures, set a smaller aperture (large number aperture setting) or
faster shutter speed.

· If the viewfinder display is not operating, press the shutter
button halfway and the display will appear.

· Naturally, exposure compensation cannot be set in Manual
operation because the desired compensation can be deliberately
selected by looking at the exposure indicator when setting the
aperture and shutter speed.


 Bulb Function

 If the shutter speed is set to "bulb" in Manual operation, the
 shutter will remain open for as long as you keep the shutter
 button pressed. This is referred to as bulb photography. Bulb
 photography is used for shooting night scenes, or other images
 with long exposure times.

 1. Set the main switch selector to M (Manual) (Fig. 34) Make
 sure that the mode dial is set to either Multi Exposure, or Normal
 mode.
View original page 20
Page 21 · Read text
2. Press the up/down buttons to display "bulb" on the LCD

Panel. (Fig. 35)

· The Self-timer and Auto Bracketing modes are not applicable
when the shutter speed is set to "bulb".

· The "B" mark is also displayed in the viewfinder display.

3. Set to the desired lens aperture.

· If the aperture is set to "P" or "A", turn the aperture ring while
pressing the "P" or "A" lock pin.

4. Keep the shutter button pressed for as long as you wish the
shutter to remain open. (Fig. 36)

· If you remove your finger from the shutter button, the shutter
will close

· The exposure counter on the LCD panel will display the time
(in seconds) that the shutter has been open.

· To avoid camera shake, use a tripod and a release switch.

· If the battery runs out of power, the shutter may prematurely
close.

XVI. HOLDING THE CAMERA

To prevent camera shake, be sure to hold the camera properly
when shooting. Support the camera on the palm of your left hand
so that you can turn the focusing ring'with your fingers. (Fig. 37)

With your right hand lightly grasp the grip and place your index
finger lightly over the shutter button. When pressing the shutter
button, grasp the grip firmly. Place your elbows against your
body.when shooting with the camera in a horizontal position, or
place your left elbow against your body when shooting with the
camera in a vertical position. (Fig. 38)

Place your forehead against the camera and look through the
viewfinder.
View original page 21
Page 22 · Read text
XVII. FOCUSING


                               Focusing is achieved with the Split-image, Microprism or Matte
                                 focusing screen in the viewfinder. The viewfinder image is
                                     crucial for accurate focusing of the lens, and therefore greatly
                                   influences image sharpness. Different photographic applications
                                  often require different focusing screens. The optimum type of
                                 focusing depends on the subject and the lens being used. (Fig. 39,
                                40)


                             While looking through the viewfinder, focus by turning the
                                 focusing ring. (Fig. 41)

                             Types of Focusing
                             A. Split-image The area inside the central circle is the split
                                image. When both images in the split-image area form a single
                                    clear image, the subject is in focus. The split-image helps you
                                 focus quickly and easily on subjects with clear lines or contours.
                                     (Fig. 42)
                               B. Micropasm The area inside the outer circle is the microprism.
                        When the image stops "flickering" and is sharp and clearly
                                       visible, the subject is in focus. The microprism allows fast and
                                   precise focusing on subjects without recognizable lines or
                                  contours. (Fig. 42)


C. Matte screen
The area outside the microprism is the matte screen. Focusing is done by sight and requires practice as the
transition from unsharp to sharp is gradual rather than abrupt. The matte screen helps you focus precisely with
lenses of longer focal lengths as well as in the macro range. (Fig. 42)

· When you use a small aperture (large number aperture setting) with a lens such as a zoom lens, half of the split
image becomes dark. In this case, use the matte screen to focus.
View original page 22Page 23 · Read text
XVIII. SHOOTING


                                    1. Press the shutter button halfway. (Fig. 43)

                                        · The LCD panel and viewfinder display operate.

                                        · The shutter button can be pressed in two ways. If it is pressed
                               halfway, the LCD panel and the viewfinder display operate. If it is
                               pressed fully, the shutter is released.

                                        · If the camera is not operated for about 10 seconds, the display
                                 inside the viewfinder will disappear. By pressing the shutter button
                               halfway, the display will appear.

                                        · If the camera is not operated for about 30 seconds, the display on
                                 the LCD panel will disappear. By pressing the shutter button
                               halfway, the display will appear.

                                    2. Confirm that the viewfinder display is operating. (Fig. 44)

                                  Fig. 44 indicates the viewfinder display in Auto operation.

                          The number denotes the current shutter speed. Note that the
                               viewfinder display may vary slightly according to the current
                                operation (i.e., Auto or Manual) and settings (i.e.,
                    AE lock, exposure metering, flash, bulb, and exposure
                             compensation settings).

                                        · When a slow shutter speed has been set, use a tripod to prevent
                            camera shake.

                                    3. Press the shutter button. (Fig. 45)

                                        · The film advances when the shutter is released.
View original page 23Page 24 · Read text
XIX. REWINDING THE FILM


                                        1. When the film has reached the end, the film rewinds to
                                 completion automatically while the exposure counter counts
                              down. (Fig. 46)

                                             · When the film is completely rewound, the exposure counter
                                     displays "E". (Fig. 47)

                                        2. While pressing the back cover lock release button, slide the
                                back cover latch down and open the back cover.

                                        3. Remove the film.

                                             · When you are in a quiet location and the noise produced
                                  during film rewinding is disturbing, set the main switch
                                       selector to L (Lock) to turn off the power. Rewinding will be
                                   temporarily stopped. When the main switch selector is set to A
                                  (Auto) or M (Manual), the film will resume rewinding.

                                             · If the manual rewind button is pressed while the film is
                                   rewinding, the film leader will not be rewound completely so
                                        that a portion of the film leader protrudes from the film
                                        cassette.

                                Midroll Rewind

                                   Press the manual rewind button. (Fig. 48)

                                             · When removing the film, be careful not to touch the shutter
                                  with your fingers or with the edge of the film.

                                             · The shutter cannot be released when "E" is displayed on the
                       LCD panel.

                                             · It is sometimes possible to take more exposures than the
                                     specified number indicated on the box of the film. However,
                                    these "extra" exposures may be overlapped or cut off.
View original page 24Page 25 · Read text
MODES

XX. SETTING THE MODES


                            Use the mode dial to select the desired mode (i.e., Self timer,
                                 Multi Exposure, Auto Bracketing, Continuous Shooting,
                               Normal, Exposure Metering User Setting, Preview/ AE Lock
                               User Setting, and ISO User Setting modes). Press the up/down
                                  buttons to select the desired setting (i.e., Exposure Metering
                               User Setting, Preview/AE Lock User Setting, and ISO User
                                     Setting) and to set the shutter speed in Manual operation or
                                exposure compensation in Auto operation. A For a brief
                                   explanation, refer to the "FUNCTION MAP" on pages 4-5.

                                For more information on modes and settings, refer to the
                                   appropriate sections for each mode.

                            The settings are displayed on the LCD panel. (Fig. 49)

                                            · If the LCD panel or viewfinder display is not operating, press
                                    the shutter button halfway and the display will appear. The
                            modes cannot be set when the display is not operating

                                       1. Turn the mode dial to select the mode you wish to set. (Fig.
                                 50)

                                       2. Press the up/down buttons and set or adjust the value of the
                          mode you have selected. (Fig. 51 ) For more information, refer
                                     to "Up/Down Buttons Operations" on page 5.

                             XXI. SELF-TIMER MODE

                                       1. After focusing, slip the viewfinder cap attached to the

                                     strap over the viewfinder eyepiece as necessary. (Fig. 52)

                                            · The viewfinder cap is used to avoid incorrect exposure due to
                                     stray light which may enter the viewfinder eyepiece. This is to
                                 ensure that the metering system is not adversely affected.

                                            · The Self-timer mode is not only useful for self-portraits but
                                    also for shake-free exposures with slow shutter speeds.
View original page 25Related documents and language editions
From the M. Butkus archive. Original publisher and archive notices are retained.
Check the model and edition against your equipment.
PDF verified 2026-10-10.