Film cameras
Rolleiflex SL66 User manual
User manual for Rolleiflex SL66. 35 pages in English. Read the original PDF, download or print a copy without registration.
35 pagesEnglish2.2 MB PDF
Loading your manual…Open PDF directly
Document details
- Brand
- Rollei
- Model / document
- Rolleiflex SL66
- Document type
- User manual
- Language
- English
- Pages
- 35
- File size
- 2.2 MB
- Category
- Film cameras
- Document date
- Not specified in catalog
Search available document text
Find a term, then jump to its page in the original PDF. Image-only pages may not be searchable; check the PDF for exact wording and diagrams.
Page 2 · Read text
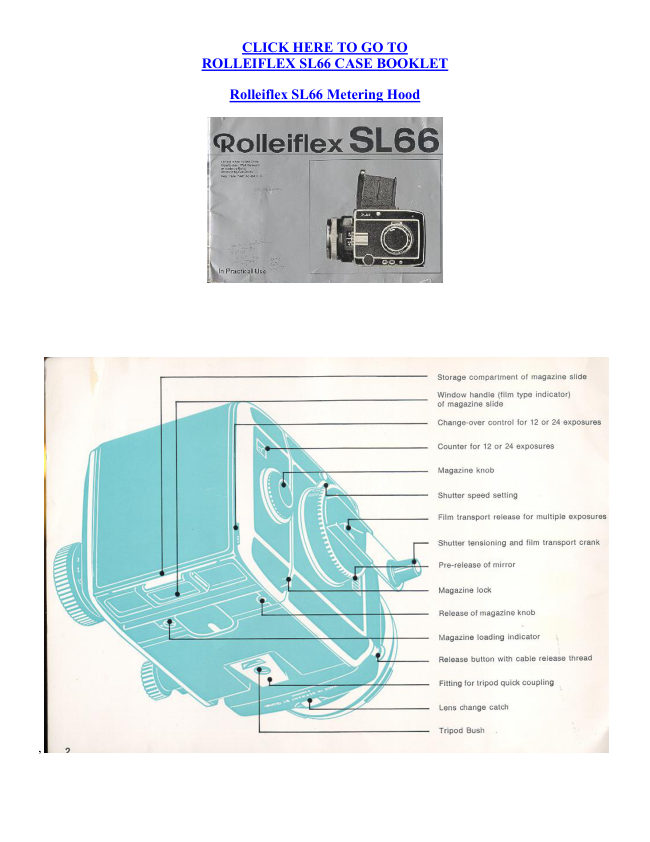
CLICK HERE TO GO TO
                 ROLLEIFLEX SL66 CASE BOOKLET

                                 Rolleiflex SL66 Metering Hood


,
View original page 2Page 3 · Read text
www.butkus.us


                                                          Digitally signed by Mike Butkus
                                           DN: cn=Mike Butkus, o=Butkus camera manuals,
                                                ou=butkus.org, email=mike@butkus.org, c=USMike Butkus Date: 2023.02.08 17:08:53 -05'00'


     Rolleiflex SL 66

   A camera for experts, designed for you: we congratulate you on your choice

   We take it for granted that as an owner of the SL 66 you know all about the basic technicalities of photography.
    So we have kept the instructions concise. Taking, the extended scope of the camera and interchangeable
     components are covered in three chapters. The tabular sections sum up all important data to show you at a
     glance the facts about the range of focal lengths and camera extensions.

   We are sure of your photographic success with the Rolleiflex SL 66. If you have any further photographic or
     technical queries, your Rollei Dealer - you can recognize him by the blue/grey Rollei service placard - or our
    own technical service is fully at your disposal.

     Page


      5. Your First Rule                           1

       Shooting Practice                             12. Extended Depth

      6. Loading the Magazine                          12. Pre-releasing the Mirror
View original page 3Page 4 · Read text
7. Checking for Readiness to Shoot                13. Multiple Exposures

8. Shooting                                       13. Flash Shots

9. Film Transport and Shutter Tensioning          14. Exposures with Filters

9. Unloading the Magazine                        14. Exposures with the Lens Hood

Further Scope                                   14. Tripod Quick Coupling

10. Distance Scale                                14. Accessory Shoe

11. Scale of Reproduction                         15. Neck Strap

11. Depth of Field                                15. Film Type indicator


Interchangeable Components

                                                  22. Subject Distances, Subject Fields and Scales
16. Lens Changing
                                                  of Reproduction

16. Changing the Focusing Hood
                                                  22. Normal or Reversed Lens Mounting?

17. Changing the Magnifier
                                                  23. Focusing Correction for Infra-red

17. Changing the Focusing Screen
                                                  24. Focusing Ranges Summed up

18. Changing the Magazine
                                                  26. The Depth Tilt Indicator

19. Loading the Spare Magazine
                                         30 .Care of the Camera

Tables and Data Summaries                                                  30. The Rolleiflex SL 66 and Accessories

20. Interchangeable Lenses
                                                  31. Handling Faults and Remedies

21. Scales of Reproduction, Lens Extensions,

Exposure Factors
View original page 4Page 5 · Read text
www.butkus.us

Your First Rule


                                      Before you load or unload a film, before you remove or
                                                          fit the magazine, before you press the release--always
                                     cheek that the crank is unfolded and blocked.

                                     For this purpose swing the crank fully forward as far as it
                                            will go (1) and back again to its stop (2).

                                       This tensions the shutter. It also sets up the automatic
                                           safety interlocks to prevent film waste during film
                                      changing or magazine changing. Accidental double
                                         exposures, blank frames and overlapping pictures are
                                         impossible.

                                 Once the crank locks, you know immediately c that the
                                    camera is ready for correct operation.


Shooting Practice

You will find everything on the next four pages: from loading the fresh film to unloading the exposed film.

You can also practice the individual steps a a camera without film. For this the came' must be in its standard
shooting state - with the magazine attached and the slide pulled out (push it into the storage compartment I the
back).
View original page 5Page 6 · Read text
Loading the Magazine


                                 The procedure for loading the magazine is the same whether it
                                                    is on the camera or off the camera. When only one magazine is
                                            in use, there is no need to remove it from the camera. In this
                                        case the magazine slide remains permanently in the storage
                                    compartment in the rear of the magazine.

                                       Basic rule: Unfold the crank (1) and turn it forward and
                                    backward until it locks.

                               To open the magazine: Unlock the back (2) and swing open
                                                 (3). This also makes the magazine knob (4) jump out; the
                                      exposure counter (5) now indicates No. 1. Grip the film insert
                                  by the central bar (6) and swing it out of the magazine.

                                           Setting the film counter to 12 or 24 exposures: Switch over the
                                             setting lever (7). The film counter (5) shows by its number - 12
                                          or 24 - whether the magazine is set for No. 120 or 220 roll
                                             film.

                              You can switch over even when the magazine is closed, as
                                       long as the film counter still shows No. 1.

                                    Loading a roll film: Swing open the spool holder (8). Remove
                                          the seal of the roll film (9) and fit the spool between the fixed
                                    and the hinged shaft pins so that the black inside surface of the
                                      backing paper (10) faces outwards. Run the backing paper
                                     round the film insert and thread it into the slot (11) of the
                                  empty spool. With one or two turns of the gear wheel (12)
                                            tighten the paper leader firmly well. This will keep the
                                           distances between the exposures sufficiently small to avoid a
                                          possible loss of the 12th or 24th exposure (film transport
                                           control may be interfered by film windings being too loose).
View original page 6Page 7 · Read text
www.butkus.us


Checking for Readiness to Shoot


Grip the film insert by its centre bar and slide it into the
magazine with the take-up spool first, so that the gear
wheels on the insert and inside the magazine engage (13).
Check the film advance by a short turn of the magazine
knob (14). Then swing the magazine back closed (15)
and check that it locks.

Advancing the film to exposure No. 1: Turn the
magazine knob until it locks and then push in (16). The
backing paper is now spooled up and the film feeler
mechanism has locked any further film transport: the film
is ready for the first exposure. For subsequent exposures
the crank advances the film.

Releasing the magazine knob. On depressing the release
(17) with a pointed object the magazine knob springs out.
Thus the film can be wound off and unloaded after any
shot-- even with the magazine removed from the camera.

The loading indicator (18) in the underside of the
magazine shows a dot and a dash in line like an
exclamation mark: "The magazine is loaded!'. When the
magazine is empty, the dash is at right angles to the dot.

The Rolleiflex SL 66 is now ready to shoot.


If in doubt, it is possible to check with the crank lock even after loading the film whether the camera is correctly
set: push the lever (19) in the direction of the crank handle and at the same time try to turn the crank. If the
crank is not locked, swing it down, let 9 of the lever (19) and complete the crank movement forward and back
again. The camera is now ready to shoot.
If you notice that you forgot to wind the crank only when pressure on the release has no effect, the same
procedure still avoids wasting a film frame.
You can lose the first picture - and in fact wind the film through completely - only if the cranking movement
was not complete an the crank is not pointing forward. While this in no way harms the camera, you can avoid it
by making a habit of checking the locking of the crank before loading the camera.
View original page 7
Page 8 · Read text
Shooting


                                    Turn the lens cap to the left and remove. Open the focusing
                                   hood (1). To close, push in the side panels.

                               To raise the magnifier press the key (2). To fold it back again,
                                          press down the magnifier frame between magnifier and the
                                            front of the focusing hood (3) until it engages.

                                              1. The Shutter Speed

                                    Turn the knob (4) to engage the appropriate shutter speed. The
                                            figures 1000 to 1 are fractions of a second, B is the setting for
                                       time exposures of any duration. Intermediate speeds cannot be
                                                   set.

                                          Shutter speeds for flash: see page 13.

                                     Exposure value correction: see pages21 and 25.

                                              2. The Aperture

                                    Turn the aperture ring (5). It engages at full and half stop
                                               settings.

                                 The 40 mm, 50 mm, 80 mm, 120 mm, 150mm and 250 mm
                                          lenses have a fully automatic spring loaded iris diaphragm.
                                 The lens remains fully open until the moment of exposure. The
                                          aperture closes down to the pre-selected value only on pressing
                                          the release.

                                      For other lenses: see page 20

                                              3. Focusing

                                    Turn the focusing knob (6) until the picture appears sharpest
                                   on the screen (7).

                                  With lenses of very long focal length and when using extreme
                                       depth tilt the mirror may cut off a strip near the top of the
                                         screen image. The film in every case still records the full
                                            picture area.

                                        Distance scale: see page 10. Depth of field: see page 11.

                                   Depth tilt: see page 12.
View original page 8Page 9 · Read text
www.butkus.us

4. Releasing

Unlock the release button (by turning) and press (8). When the red dot is visible from above, the release is
locked. When the red dot is not visible from above, the release is free.

Time exposures at the B setting: Press down the release button for the duration of the required exposure time or
keep it in the depressed position by the locking collar. The shutter only closes on unlocking or letting go of the
release.

The release button incorporates a cable release thread.

Film Transport and Shutter Tensioning


After every exposure unfold the crank and turn it fully
forward and back again until it locks (9). The forward
swing tensions the shutter while the return swing to its
final position advances the film. The camera is then
ready for the next exposure. During shooting the crank
may remain unfolded for immediate operation.

Unloading the Magazine

After the last exposure the magazine knot springs out
when you turn the crank - an audible and visible sign that
the film is finished. First complete any started crank
movement (10) swing fully forward and back. Then keep
turning the magazine knob (11) until the remainder of the
backing paper is spooler up and the knob turns freely
without resistance.

Open the magazine (12) remove the insert Swing away
the spool pin and take out the exposed roll.
Transfer the now empty feed spool to the take-up end
from which the exposed spool was removed. This now
becomes the take-up spool for the next film.


Film transport principles summed up: To advance the film from exposure to exposure always use the crank--
but wind up backing paper leaders and trailers always with the magazine knob.
View original page 9
Page 10 · Read text
Further Scope


Distance Scale

At every subject distance the Rolleiclear focusing screen
with central micro prism provides a direct and precise
check on the image sharpness.

The distance scale on the focusing knob is normally used
only for depth of field estimation, for zone focus settings
and when using flash.

The figures on the distance scale apply only to the first
complete turn of the focusing knob (with the lens
mounted the right way round). The distances are
measured from the film plane to the subject.

To adapt the scale to the interchangeable 50, 80, 150 and
250 mm lenses the focusing knob contains stored in it
four distance scales. The focal length corresponding to
the scale in use is shown on the face of the knob. For
changing the scale see page 16.

The bellows extension of 2 inches (50 mm) can be
further increased by extension tubes of 40 and 80 mm
used either singly or in combination. This yields still
nearer focusing distances with all lenses.

With the lens mounted in "retro" position subject distance
can be further reduced for (reversed, front element facing
the film) the I still larger scales of reproduction.

Focusing ranges: see page 25.
View original page 10
Page 11 · Read text
www.butkus.us

Scale of Reproduction


                                           In close-up work the scale of reproduction is more important
                                         than the subject distance. With the aid of the scales (for three
                                            focal lengths) on the bellows rail you can set the camera
                                              directly to the required scale of reproduction. In this case the
                                            best way of getting the subject sharp is to bring the camera
                                          nearer to or farther away from it.

                                        Explanation of the scale (1):

                                  The four scales apply to the focal lengths of 80, 150 and 120
                       mm (normal mounting) and 80 mm fitted back-to-front
                                              ("retro" mounting). The triangular marks indicate the
                                             orientation of the aperture setting index on the lens when the
                                                   latter is mounted normally (2) and back-to-front (3).

                                  The magnification factor to the left of the horizontal setting
                                  mark indicates the scale of reproduction on the film (image
                                             size/subject size), e. 9. 0.4 = 0.4 :1. The required exposure
                                           correction is indicated above the bar (for instance - = reduce
                                           the exposure value by 1 step).

                                  The figures are set and read off along the common scale limit
                                             (the degree scale).

                                  The centre line indicates the length of the bellows extension in
                                            millimeters. For the scales of reproduction with different
                                       bellows extensions for all focal lengths, including the use of
                                         extension tubes, see page 21.

                                  The contra line also acts as the index for the degree scale when
                                                   tilting the lens (depth tilt: see page 12).


Depth of Field
You can check the extent of the depth of field directly on the focusing screen or indirectly on the focusing knob.

1. For lenses with spring loaded iris diaphragm press the stopping-down key (4). This can be locked by
inclining it and released the same way. The lens then stops down the pre-selected value. The ground glass
screen is particularly suitable for this check on the final image appearance.

2. Opposite the distance scale index lines with appropriate aperture figures show the extent of the depth of field
(for a circle confusion of 56 microns or 0.0022 inch). Either estimate the actual subject distances measure by
accurate focusing of the screen Image.
Beyond the first full turn of the focusing knob or when using the depth tilt the figures act index values for the
measured distances.
View original page 11Page 12 · Read text
At increased extensions the effective aperture of the lens changes. When the bellows tension is more than half
the focal length, the effective aperture (which is what matters for the exposure and the depth of field) no lone
corresponds to the f-number engraved on the lens scale. For actual depths of field under these conditions see
page 25.

Extended Depth


                               You can gain extended depth by tilting the lens axis
                                when the subject is confined to one plane at an angle to
                                           the camera. By tilting the camera and in addition tilting
                                           the lens axis it becomes possible to extend the zone of
                                        sharp reproduction over a large distance range even at
                                                   full aperture. You can increase this zone further by the
                                       depth of field gained on stopping down.

                                          Tilting the lens: Release the locking knob (1) by turning
                                             to the left. Press down the lever (2) and raise or lower
                                           the lens to set the centre line of the scale (3) to the
                                          required value on the degree scale. Then tighten the
                                         locking knob (1) again.

                                  The lever (2) engages at the two maximum tilt positions
                                          as well as in the centre position of 0°. The locking knob
                                       should however also be tightened when the camera is
                                      used normally with zero tilt.

                                   At the infinity setting no tilt is possible; on turning the
                                         focusing knob forward through half a turn the full tilt of
                                    +8° becomes available.
                                     Important: When turning the focusing knob back with
                                           the tens tilted, the movement limit of the bellows
                                         extension is reached before the infinity position.
                                  Never force the focusing knob past this limit.


"Schelmptiug Indicator". Extended depth by tilting depends on three parameters:
1. The distance setting to the centre of the field;
2. The vertical height of the camera above the object plane, and
3. The angle of tilt of the lens.
In practice you can determine these three values in every case with the aid of the indicator (see page 26).
View original page 12Page 13 · Read text
www.butkus.us

Pre-releasing the mirror

The movement of the instant return mirror is mechanically and pneumatically braked during releasing. The
mirror starts to swing slowly, accelerates and then slows down again. The gentle conclusion of the swing
movement helps to keep the camera steadier.
In addition you can pre-release the mirror, for example when using a not very rigid tripod, for shots with long
focal lengths or in the extreme close-up range.

To pre-release the mirror: Press down the sliding key (4). Release the shutter in the usual way. After the
exposure the mirror returns into its viewing position.

To bring the mirror back again without taking a picture, cover the lens with the lens cap, release the shutter and
retension it with the film transport disengaged (see Multiple Exposures, page 13).

Multiple Exposures


                                          After the first exposure press the lever (5) inside the
                                        unfolded crank in the direction of the crank handle and
                                                 at the same time start turning the crank. Let go off the
                                            lever (5) and complete the normal to-and-fro crank
                                    movement.

                                        This tensions the shutter without advancing the film. As
                                        a check, note that the magazine knob does not turn.

                                        This procedure can be repeated after every exposure to
                                 make any number of exposures on the same film frame.

                                      Flash Shots

                                         All types of flash can be used. The flash cable plugs into
                                           the outlets X and FP. To release the Rollei flash cable
                                            plug, push the button (6) to the right and pull out the
                                            plug.

                                     X-Synchronization

                                           In a focal plane shutter two blinds run down one after
                                           the other. With flashes of very short firing delay the
                                               entire image is exposed only if both blinds fully uncover
                                           the film. Therefore such flashes can only be used up to a
                                              certain shutter speed. At unsuitable speed settings (i. e.
                                        1/60 to 1/1000 second) the flash does not fire either.
View original page 13Page 14 · Read text
Shutter Speeds for X-Synchronization
Electronic flash: 1/30 to 1 second and B. Flash bulbs (such as AG 3 B. XM 1 B. PF 1 B. FB 1 B. M 3 or
similar): 1/15 to 1 second and B.

FP-Synchronization
Long peak FP (focal plane) flash bulbs are available specially for focal plane shutters. They yield a uniform
light output over a longer period. These flash bulbs can be synchronized with the fastest shutter speeds. Their
maximum light output is utilised at about 1/60 second.

Shutter Speeds for FP-Synchronization
FP bulbs (such as XM 6 B. PF 6 B or similar): 1/1000 to 1/60 second.


Exposures with Filters

The 50 mm, 80 mm, 120 mm, 150 mm, 250 mm, and 1000 mm (Tele-Tessar) lenses have the same size VI
bayonet mount and use the same filters.

To tit the filter: Insert the filter in the inner bayonet ring of the lens and secure by turning fully to the right.

The 500 mm Tele-Tessar uses its own screw in filter.

The 1000 mm Tele-Tessar uses filters of bayonet size VI inside the lens body (see separate instruction manual).

The 1000 mm Mirotar requires special filters which are inserted from the side in the optical path of the lens.

The filter mounts carry, where applicable, a correction value for the exposure value (for example --1.5 for the
medium yellow filter). This correction value is deducted from the measured exposure value.

Exposures with the Lens Hood

The same lens hood fits lenses of 80, 120 150 and 250mm.

A special hood is used for the 50 mm lens, a retractable hood is part of the 500 mm lens. An integrated hood
belongs to the 1000 mm Tele-Tessar. The 30 mm and 40 mm lenses as well as the 1000 mm Mirotar are used
without any lens hood.

To tit the hood: Place the lens hood in any position over the outer bayonet ring and secure by turning to the
right.
View original page 14
Page 15 · Read text
www.butkus.us


Tripod Quick Coupling


                                 The camera can be mounted on a tripod or on the bracket
                                         of an electronic flash either via the tripod bush or - still
                                  more conveniently - with the tripod quick coupling. This
                                                utilizes the dovetail guide in the camera base.

                              To prepare the quick coupling: Screw the coupling unit
                                            to the tripod or to the bracket of the electronic flash and
                                           turn the knob (1) fully to the left. The locking latch (2) is
                              now swung out of the way and the dovetail guide
                                         unobstructed.

                                 Mounting the camera: Place the camera in the dovetail
                                          guide, push forward and then tighten the knob (3) by
                                          turning to the right. This swings up the locking latch and
                                          presses the camera firmly into the dovetail guide.

                               To remove the camera proceed in the reverse order, first
                                          turning the knob (1) fully to the left.

                                     Caution: The tripod quick coupling is unsuitable in
                                       connection with the Polaroid magazine and/or the
                                        focusing slide for the extension bellows.
View original page 15Page 16 · Read text
Accessory Shoe

The accessory shoe in the left side panel takes small light-weight accessories - e. g. an exposure meter or spirit
level.


Neck Strap

To hang the camera round
the neck, hook the broad     Film Type Indicator
snap hooks of the neck
strap (4) into the two strap   To mark the film type
eyelets at the side of the      loaded in the magazine,
camera.                        tear off the tab of the film
                            box, fold it in half and
The eyelets rotate freely, so   push sideways into the
that the camera can swing    window handle of the
in any shooting direction     magazine slide (6). This
and also hangs down          direct indication of the
naturally when carried over   film packing, featuring
the shoulder.                both its lettering and
                                characteristic colour,
To release the neck strap     avoids mix-ups when
press the spring lock and     switching between several
push obliquely underneath    magazines.
the eyelet. The snap hook
comes free on pressing
against the camera side.
View original page 16Page 17 · Read text
www.butkus.us

Interchangeable Components


                                  Lens Changing

                                  The instructions for lens changing apply equally to lenses
                                   mounted normally and reversed, and also for the Luminar
                                          adapter and the extension tubes.

                              To remove the lens: Press the key (1) and at the same time
                                            turn the lens to unlock it from its bayonet mount and lift off.
                             When using extension tubes, press the corresponding key on
                                           the extension tube.

                              To fit a lens: Line up the red marks on the lens and on the
                                            lens panel opposite each other (2), insert the lens in the
                                       bayonet mount and turn to secure until it engages with an
                                          audible click.

                                      For shots with the lens reversed (in the retro position), fit the
                                             front bayonet mount of the lens into the camera mount. In this
                                         case line up the red mark on the front mount of the lens with
                                           the mark on the camera. With the lens mounted in this way,
                                    and also when using extension tubes, the automatic
                                     diaphragm control is disengaged and you have to set the
                                           apertures by hand.

                             When using the Mirotar mirror lens or the 1000 mm Tele-
                                        Tessar follow the instructions enclosed with this lens.

                              To change the distance scale: Fully pull out the focusing
                                   knob and turn it in this position (3) until the required focal
                                          length appears in the cut-out window (50, 80,120 and 150
                                 mm). The easiest way of changing the focal length is to turn
                                           the pulled-out knob to the right when set to the infinity stop.

                                  Changing the Focusing Hood
                                  The focusing hood and focusing screen can always be
                                     changed irrespective of the operating state of the camera.


To remove the focusing hood: Press the two buttons (4) at the side with the thumb and second finger of the
hand while holding the latter over the closed hood from the front. At the same time lift the rear edge of the hood
with the index finger.

To fit the hood: Insert the hood (with the magnifier release at the back) and engage it by pressing home.

The folding focusing hood can be changed against other special hoods. These are fitted and removed in the
same way.
View original page 17Page 18 · Read text
Changing the Magnifier


                                     Changing the Focusing Screen

                                                    First remove the focusing hood.

                                 To remove the frame with the focusing screen:
                                           Raise the two retaining springs (6) at both sides,
                                        push the frame forward and lift out.

                                 To remove the focusing screen itself: Press the two
                                            shiny retaining springs at the rear edge of the
                                            focusing screen in succession against the frame and
                                                 pull the focusing screen out of its guides. Hold the
                                             screen by the edges only avoid touching the
                                            underside of the Rolleiclear with its embossed
                                                   pattern.

                                     The focusing screen can be changed against various
                                                special screens, which are all inserted in the same
                                        way. The embossed (rough) side of the screen being
                                                inserted must face the camera.

                                 To refit the frame: Drop in the frame against the
                                   name plate, press down the frame along both ledges
                                                     at the side and pull it backwards (7) until the
                                                retaining springs engage.

                                          Available Alternative Screens:

                                                Rolleiclear with central micro prism. A bright central
                                              area serves for checking the image sharpness.

                                                Rolleiclear with prism rangefinder for specially
                                               precise observation of the sharpness of the vertical
                                       image lines.

                                                Rolleiclear with full area micro-prism pattern.
                                     Ground glass screen with very fine grain for
                                               universal application.

                                     The line grid aids in leveling the camera.


If You Wear Glasses:

For sharp focusing without glasses you can replace the magnifier in the folding hood by alternative magnifiers
to suit individual eyesight defects within a range of +3 and - 3 dioptres (to match the spectacle prescription).
View original page 18Page 19 · Read text
www.butkus.us

Press the magnifier backwards from the front edge of the mount and lift (5). Push the replacement magnifier
backwards into the magnifier frame and press down to secure.

Changing the Magazine


                                 The magazine on the camera is firmly locked to the body
                                     once the slide is pulled out. To avoid double exposures
                                    and blank frames it can only be removed or fitted when
                                          the shutter is tensioned (after working the crank) and the
                                              slide pushed in. Automatic interlocks ensure that the
                                    magazine can only be changed under the correct
                                           conditions.

                                Removing the Magazine

                                  Check that the crank is locked (if not, swing it fully
                                      forward and back).

                                           Pull out the slide from its storage compartment (1) and
                                             fully push it in its guides from above (2). The magazine
                                        lock (button 3) is now free.

                                         Press the button (3) and at the same time lift off the
                                      magazine.

                               As a safety measure, the slide cannot be pushed fully
                               home if the crank was not fully tensioned. If this
                                       happens, pull out the slide halfway and operate the crank.


Attaching the Magazine

Check that the crank is locked (if it is not, fully swing it forward and back).

Hook in the magazine from above (4) and press it against the back (5) until it engages and locks.

Pull out the slide and store in the rear compartment.
View original page 19Page 20 · Read text
Safety interlocks:

1. The magazine will not go on if you omitted to tension the crank. Remedy: Remove the magazine again and
swing the crank fully forward and back.

2. With the magazine in place and the slide pulled out, the release button is locked if you did not fully tension
the crank. Remedy: Before turning the crank, push the slide in again, remove the magazine and complete the
crank movement.

To change over to a different film type, you can switch two loaded magazines at any time and irrespective of
the position of the film counter on either magazine. Since pulling out the slide at the same time double locks the
magazine on the camera, it is best to close the magazine with the slide only when it is to be removed.


Loading the Spare Magazine


                                        Separate magazines are supplied with a protective cover.
                                       This is always used on the free magazine. To fit the
                                    magazine to the protective cover or to detach it, proceed
                                          as with the camera (6).

                             When the magazine is off the camera it is closed light-
                                               tight by the slide; you can load it in the same way as a
                                    magazine on the camera (releasing the magazine knob --
                               > page 7 7).

                                                     If you have pulled out the slide of a spare empty
                                    magazine and accidentally moved the outer cog wheel of
                                          the magazine, the slide will not go in fully. Remedy: half
                                            pull out the slide (7), turn the cog wheel in the direction
                                         of the arrow (8) until it locks, and push back the slide.

                                   Important note: To ensure reliable operation of the film
                                              feeler system, the film insert of the magazine must not be
                                          interchanged. Always check that the serial number of the
                                    magazine (on the mating surface for the camera) is the
                                  same as that on the film insert (at the left hand side).
View original page 20Page 21 · Read text
www.butkus.us

Tables and Data Summaries


Interchangeable Lenses

+ Diaphragm Systems:

A--Fully automatic spring-loaded diaphragm. The iris is always fully open. When you release, it closes down to
the pre-selected aperture just for the duration of the exposure.

V -- Pre-selector aperture. The diaphragm closes down to the pre-selected value when you rotate the setting ring
to its stop.

E -- Geometric aperture scale, shown in relative exposure factors. With the Luminar lenses the scale starts at 1
for the full aperture engraved on the lens; each succeeding value corresponds to an exposure interval of one lens
stop. The factors indicated facilitate the calculation of the exposure increase over the exposure at full aperture.

The Mirotar mirror optical system has no diaphragm and is always used at its full aperture of f/5.6. Here the
exposure may be controlled by altering the shutter speeds or if necessary by fitting special neutral density
filters.

* With diaphragm shutter

* Luminar lenses: The data apply in every ease to the Luminar without adapter. The Luminar lenses 16, 25, 40,
63 mm use the same adapter with microscope thread.
View original page 21
Related documents and language editions
From the M. Butkus archive. Original publisher and archive notices are retained.
Check the model and edition against your equipment.
PDF verified 2026-10-10.