Sewing machines
Royal Electric / Free Westinghouse (1929) — User manual
User manual for Royal Electric / Free Westinghouse (1929). 30 pages in English. Read the original PDF, download or print a copy without registration.
30 pagesEnglish3.1 MB PDF
Loading your manual…Open PDF directly
Document details
- Brand
- Free
- Model / document
- Royal Electric / Free Westinghouse (1929)
- Document type
- User manual
- Language
- English
- Pages
- 30
- File size
- 3.1 MB
- Category
- Sewing machines
- Document date
- Published 1929
Search available document text
Find a term, then jump to its page in the original PDF. Image-only pages may not be searchable; check the PDF for exact wording and diagrams.
Page 1 · Read text
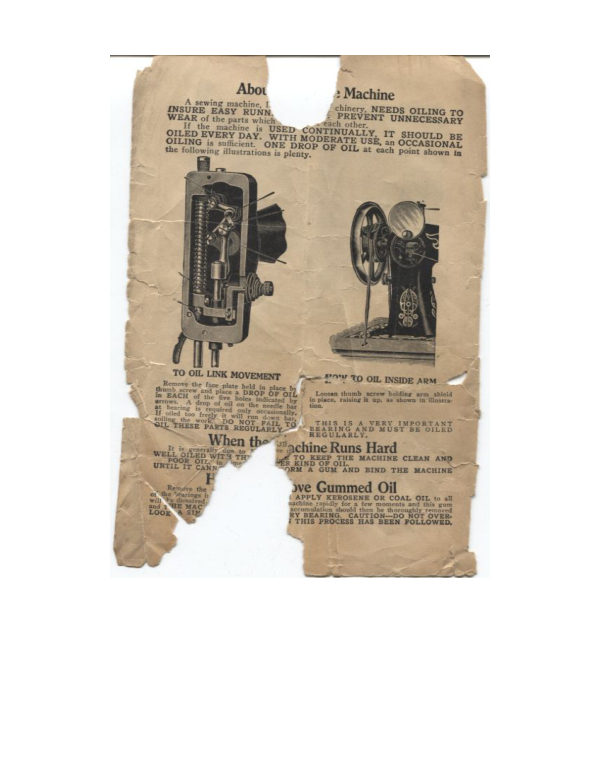
Abot        A sewing machine,       Machine
  INSURE EASY RUNN.
    WEAR of пеthe parts which         PREVENTNEEDSUNNECESSARYOILING TO
                                    each other.
  OILED EVERY DAY. USED CONTINUALLY, IT SHOULD BE
    OILING is suiticient. ONE DROP OF OIL at each point shown in
   the fo lowine illustrationsWITHis DientY.MODERATE USE, an OCCASIONAL


   TO OIL LINK MOVEMENT

                               #O' TO OIL INSIDE ARM

                                         Loosen thumb screw holdine arm shield
rEacEt " *но Расе hoPRoi

                   will fun
              NOT
SHE THESE PARTS   PAIL TOBEARINGDIMLINSANDANDERUSTEORIANE
       When the
                Pachine Runs HardWELL
  POOR
UNTIL                  He TENS GUMOF STIRAND MACHINEBIND THECLRANMACHINEAND

                 ›ve Gummed Oil
                             APPLY KEROSENE OR COAL OIL to

                        IT BEATING                OVER-
                           THIS PROCESS
View original page 1Page 2 · Read text
Winding the Bobbin
     Hold the hand wheel with the weft hand.and with the right hand
 release the clutch, turning it half-way around. This will permit the loose
  pulley to                     winder       UNTIL
 SMALL PULLEY7 WHEELPull the bobbin.(1) COMES IN CONTACT WITH THE
 BELT. TURN THE MACHINE UNTIL THE DISTRIBUTING
 LEVER (2) IS AS FAR TO THE RIGHTAS IT WILL GO. Place
 GUEST01 408 00001


   NOTE Place.


                                       WOUND
   BE SURE TO
   TIENTERES      ТРИНЕ ТОРАЗУ ВРЕМО, WHEON


     When through winding the hobbin,
  t locks the               three with, the let hate             DORTANT PART
   WINDING THE BOBBIN CORRECTL
     MING A PERFECT STITCH.
                                            ONE ThAT
PARTY HOLED WELL BESPE WIPINS
View original page 2Page 3 · Read text
How to Thread the Machine
    Place the spool of thread on spool pin (A), then draw the thread
through guide (B) at top of face plate, them down to the right of a
 BETWEEN THE TWO TENSION DISCS (C), which also brings the
 thread into position against the automatic thread controller or check
soring (D) (SEE ABOVE), then up through the slot in end of takeup
lever (E), then down through the thread zuide (F), near bottom of fi
 plate, then through the thread guide (G) on bottom of needle bar, then
  1г011011he eye of the needle from left to right.
   IF THE MACHINE IS NOT THREADED EXACTLY RIGHT,
  it will not- sew pertectly.
        To Remove the Shuttle
  Draw out the front slide. Tarn the handwheel toward you until the
shuttle isshuttleas far forwardejector astowardit willyougo.with a quick movement. This will
 throw the shuttle out of the carrier, bringing the large end in a position
 so that you can easily grasp it with the thumb and finger of the
                              WITH
       LIFT*STRUMENTTHE SHUTTLEOF ANYOUTKIND.OF THESt NOTCANLas_ THE
            THE SPRING.
               shuttle race MUST BE KEPT CLEAN AND FREE
View original page 3Page 4 · Read text
Threading the Shuttle


                                              FIG. 1


     With the fore finger of the left hard hold the bot
revolving too freely. Lead the thread
slot in side of shuttie unt at appears tr
exactly as shown inFig. 2.
View original page 4Page 5 · Read text
With a circular movement of the right hand, draw the thread slightly
  to the left and upward until it is on the outside of shuttle barrel but
 under the guide on shuttle spring, being sure it is under the point o
  spring exactly as shown in pi       Pull the thread to make sure that the
 bobbin rent lIves FREBLI IN THE SHUTTLE. Break of the thread
  so that about 4 inches hangs from the shuttle, then place shuttle in ma-


             To Set the N
             EEDLE BAR TI   TIGHEST POINT, and
   RAISE THE N                  medle betsee, the thumb and                 o screw. loosen        the           needle clamy   and pass the shariwof the needle up through first                                 with the FLATSIDE
                 THE NEEDLE BA  "ST AG THERIGHTTa guisefingerSHANKonofthetheTOWARDS                 boleftttomhandof THE NEEDLE MUST
        THE END OF VHICH F  ISIBLT
 THE NEEDLE STOP PINWE THETEEDLEBAR GROOVE JUST ABOV Te
          Then clamp the nee
View original page 5Page 6 · Read text
To Draw Up the Under Thread


   Raise the presser foot, HOLD THE END OF THE UPPER
THREADSLACK WITH THE LEFT HAND.Turn the hand wheel
 one: around towards you until the needle moves down, then up again
 to its highest point. The       thread has been carried arousd
    under thread, and can be drawn up through the hole in the needle plate
y the upper thread.Draw tire ends of both threads back under the DreSSeT foot towards the ba ck of the machine; the upper thread through
 the opeming in the foot.

  NOTEBe sure the under thread runs straight from the prong on
 shuttle spring to the hole throngh, which the needie passes
 0005. TO1          ad slot in side of shuttle

               Thread to Use

 ANDLOWERTHE BESTthreadsRESULTSareAREtheOBTAINEDSAME SIZEwherAND QUALITY.obt the UPPER
                                          40BETTERar. No. RESULTS50 thread shouldARE  COMMON MISTAKE to thr
OBTAINEDORused in orderBYtoUSINGforth stringNOMBERstitch,SIXTY   SEVENTY (70)
    EIGHTY (80) THREAD.

          The material instead


                                                      dat the!
View original page 6Page 7 · Read text
Tensions
                 WHAT TENSION MEANS
     Tension means pressure on the thread, which prevents the machine
     Hawing of more thread than ne
    CICALESE       on thread? by placing it between the thumb and
 fore finger, pressing firmly upon it, and v. th the other hand drawing it
 through the fingers. The harder the pressure, the greater the tension.
herefore.
 sion like thatbothformedupperbyandpressinglower threadthe fingersmustfirmlybe controlledupon the thread.by the
                   SHUTTLE TENSION
   NOTE. -We would not advis. changing the shuttle tension unless
                       so, as adjustment is rather
 Shonda be necessary to change the shuttle tension, do so
 shuttie out of the machine.                    in see ni the point of
 he screw driver injuring the shutth: carrier or scratching the point of

    The tension in the shuttle is governed by the pressure of the spring
on the shuttle BETTERadjusted by the mall screw which holds the spring
        shuttle. THESESCREW §AIRNS TO THE RIGHT
 TIGHTEN, TO THE LEFT
   IF UNABLETO    SUR gLENTPOSEN.TENSION BY ADJUST.
ING THE SCREW IN THE SHITLE, there may be a PIECEOF
 THREAD, Or a COLLECTION _ LINT,
 ing the spring from bearing on the al      under the spring, prevent-QUEENSITE
    # TE
                Tf                   still                         unabl                               to get                                      sufficient                                                 tension,                                                          remove                                                                 the                                                                     spring
aid                                  directly                                           over                                                the                                                    point                                                          where                                                                the tread draws outto               haveof                    themore                        shuttle.pressure                                                                  the                                                                      ten-                                 after                                       replacing                                                 spring,                                                                shoulId
 sion be tco tent when the        is below the surface,the soring
 SIDELITEbeen bent too much: in other we res, the pressure is too great. The
                              smallest screy driver, orving the spring up gently.
                       HUTTLE TENSION SCREW
 MUST BE BELOW THE Story     OF THE SHUTTLE or the
thread will catch on the head off    ww.ale sewing.
                                     lily and not too , full. The sameSize Thethreadbobbinshouldmustbe beusedwoundin theseare            Ust one kind and
size of thread only on each bobbin,
                  UPPER  NSION
    Tension on the upper thread is formed by the thread passing be-
intweenconnectionthe tensionwith discssame.or plates, and is regulated by the nut or screw
   BE SURE
(READ    THE MACHINE IS CORRECTLY THREADED
 have theTHEright THREADINGsize needle for theINSTRUCTIONSthread.)     CAREFULLY and
   HOW TO TELL WHEN TENSION ON THE UPPER AND LOWER
            THREADS ARE CORRECTLY ADJUSTED
     When the shuttle tension has been correctly adjusted according to
the
    instructions and placed in the shuttle carrier, and the needle has
been threaded, hold the end of the needle thread slack with the left hand,
turn the hand whre towards vou once around BITT draw up-the under
            illustration,page
View original page 7Page 8 · Read text
Lower the pressure foot. (REMEMBER, THE UPPER TEN.
SION IS ENTIREL      ASED WHEN PRESSER FOOT IS UP.
THEREFORE, MUST BE DOWN ONTHEFEEDWHEN
TESTING TENSIONS.) stain tie miner tarcadorotonen the erreron
the needle to the right with the right hand, and the under thread through
 the opening In the presser foot to the left with the left hand, pulling
both threads at the same time. You will them be able to tell when both
 threads pull alike.
     Adjust the upper tension by turning tension nut (C) to the left to
loosen and to the right to tighten.
   When both tensions are properly adjusted, both threads are drawn
 into the fabric, thus:


        If shuttle thread is too tight, or upper thread too loose, the thread
on the under side will be straight,


 because there is not sufficient upper tension to draw the under thread in.
        contrary, if the shuttle thread draws off too easily, or the upper
 thread is too light, the under thread will draw up through the
 and the upper thread will lay straight, thus:


           SKIP STITCHES
     Skip stitches are more often caused by an imperfect needle or needle
 mot correctly set. or not the right neede for the machine
     In setting the needle, be sure that the flat side of the needle shank is toward
the needle bar and up high as it will go. In case the needle does not go in
 freely, it must be forced up high enough to strike the needle stop screw.
illustration, page     The needle stop screw is plainly visible in the slot on
left side of the needle bar, directly above the needle clamp
View original page 8Page 9 · Read text
The needle should pass down through the hole in the needle plate
  slightly to the right of center.
  securely clamped to the needle barWhenthe eyetheofneedlethe needleis correctlyshould set and
     TUTTED inch below the shuttie Domt. Trace its muon snowing the
  correct relative position of the shuttle point to the eye of the needle
  on page 15.)
    BEWARE OF CHEAP OR BOGUS NEEDLES. They are not
         _he location of the eye varies, consequentlythe needle pre
  will not be the right distance from the shuttle point when the shuttle
  is ready to pass through the loop.

     Cheap thread or basting cotton is also a common cause for skipped
 stitches, Buy and Base On u the best spool cotton. I the needle is
  fine for the thread the thread will not pass through the eye of the needle
 freely, interfering with the formation of the loop. [Refer to instruc,
  tions on needle and thread sizes on page 13.)

     The presser foot and attachments should be set back on the presser
 bar as far as they will go and securely fastened. If the
 or attachments are not correctly attached to the machine, he needicot
 thread may strike o 17 11107800 00011118.2190011ET CA11SI110
  skipped stitches,

      Dirt or lint in the needle well, under the needle plate, will also cause
 slipped sutches.

              The Belt

     The machine works best with the belt tight enough only to keep it
From slipping onthe pulley.   the belt
 machine to run harde

    If necessary to replace an old belt, be sure that it passes over the
 center brace, running direct from the hand wheel through the hole in
 She back of the table and around the large wheel. Open all three drawers
part way, noung that                    1.01 ThEcenter brace.

    To remove the belt from the large drive wheel on stand, turn the
wheel around until you fnd a slot cut in theFLEER Force the
  this slot, turn the wheel once around and it is unbelted.he same
 process will belt the machine below.
                                IT MAKES IT SLIP
ON KEEPTHE PULLEY,PULL BE ANDANDREEALSO SORROTST.ROTS IT.
View original page 9Page 10 · Read text
To Remove the Work

THE LITER CRANK WHICH AUTOMATICALL PORE
 THE UPPER TENSION.      THE WORK DIRECTLY BACK
OF THE NEEDLE, CUT THE THREAD CLOSE TO THE GOODS.
 caving the chus unacr the presser fOOt.

   To Change the Pressure of the Presser Foot

    Turn the large thumb screw• at top of arm directly over presser
    to the right, or down, to make the pressure heavier.
                         The pressure should be HEAVY
           ONLY to prevent the material rising with the needle and
 to insure that the feed moves the goods along evenly.
                         MAKES THE MACHINE RUN
pressure is ÄNBof  MAY INJURETHE GOODS.

          Sewing Over Thick Seams

     hi the pressure on the presser foot is too great, the feed will not
 catch in the goods suiticiently enough to force an extremely y thick sear
  between the foot and the feed, so that it will e carried through.
 NOT PULL ON THE MATERIAL in your effort to make it feed
  through, as this will pall theTHEREMEDYneedle out of line, causingTO it to strikeTHEthePRESSERFOOT SLIGHTLY AND RUIN THEMACHINE
 SLOWLYuntil the seam has passed into the feeding surtaces. This
 as only necessary in cacrcane casta,


    To Change the Length of Stitch

     The feed regulating thumb screw which adjusts the length of the stitch

 is directly over the bobbin winder, and when this thumb screw is turned to the
 leftChCOthe Adjuststitch thisis shortened.thumb screwWhento ittheisdesiredturned positonto the rightaccordingthe stitchto the isclasslengthof


              To Turn a Corner

     Stop the machine, with the NEEDLE STILL IN THE GOODS,
 RAISE THE PRESSER FOOT    TURN
 THE DIRECTION DESIRED, USING THE NEEDLE AS A PIVOT.

             Flannel or Bias Seams

     Use a SHORT STITCH and LIGHT TENSION, so that thereWill
  be sufficient thread in the seam to allow the goods to stretch.
View original page 10Page 11 · Read text
Relative Sizes of Needle and Thread

  SIDE OF
                     CLASS OF WORKTE SELF            SIZE OF THREAD
                                                             OR SILK

                                                     100 to 150 Colton
              Very Thin Muslins Cambrics, Linen, etc.

                                                  30 to 100 Cotton B      Very Fine Calicoes, Linens, Shirtings, Fine
                         Silk Goods, etc.                  Silk Twist

                   firtings, Sheetings, Ble ached Calicoes,     60 to 80 Colton            Muslins, Silk, General Domestic Goods, and
                 All Classes of Gei neral Domestic Work     A and B Silk Twist

              All Kinds of Heavy Calico's, Light Woolen     40 to 160 Cotton
                                                     C Silk Twist
            Coods, Heavy Silk, Seamie. Stitching, etc.
             Tickings, Woolen Goods, Trousers, Boys     30 to 40 Cotton
                  Clothing, Corsets, Cloaks Mantels, etc.        D Silk Twist

           Heavy Woolens, Tickings, B + Heavy Coats,    24 to 30 Cotton
                                                         E Silk Twist
                                            les Generally.


     The market is full of needie
 We cannot guarantee satisfact    inferior,restles trquality,a cacap,madeinterorto sellgradecheag,
 needles are used.
    Skip stitches an proken a id are almost always due to a poor
 needle.Therefore, be sure told gentine needles, which you can get
 from the dealer from whom you irchased this machine, or
ToTHETHE NEEDLEEXTREMEIS MEASUREDTOP     FROM THE TOP OF EYE                 OFTHE SHANK IN case you are
obligedillustrationto buyto substitutesee that it heedles.is correctbetterlength. lay the needle


     When sewing two thicknesses of calico, shirting or ordi-
   nary work, No. 70 thread and No. ¼ needle will produce a
   beautiful stitch which is very firm and is strong enough

    for this class of work.
View original page 11Page 12 · Read text
To Adjust the Automatic Lift

     When the machine is open the head should be level and even with
                  If the head should sag below the surface of the table at the
    edge of the head, this can De         as shown in the musta
tion, by turning to the right just a little the automatic11 MILESTi    пП р
and     10g 1    the lower or lock nul.

                Caution

     The leverage of the lid on he automatic lift is powerful and the
 adjustment very sensitive; therefore, if the above adjustment
                                          Move the adjusting nut a little
too much the lift chain will be broken.
a 139     and after changing the adjustment r aise the head to sewing
 Dosition, that vou may see _TRISTITE adiustment is not too tigal
View original page 12Page 13 · Read text
Important Instructions

     Things You Should Not Do


 FIRST      Do not make unnecessary adjustments.

 SECONDDon't tamper with the adjustments or allow
               repairers or others to attempt to repair
               your machine, unless you are sure they are
                capable.

 THIRD    Don't run the machine when it is threaded
                without cloth under the presser foot.

 FOURTH Do no pull on the cloth in your effort to help
               the machine feed faster. It will cause the
              needle to be broken. Let the machine do
                its own feeding.

 FIFTH    Don't try to use the attachments until you
               are thoroughly familiar with plain sewing
             and can handle the machine easily.

SIXTH     Don't buy cheap imitation needles and ex-
                pect to do nice work.


  SEVENTH Don't think that cheap basting cotton will
               produce as good work as good thread.

 EIGHTH Don't use poor oil on your machine.
View original page 13Page 16 · Read text
Narrow Hemming


     Remove the presser foot and insert in its place the foot hemmer.
 Raise the presser bar lifter. Clip off the right-hand corner of the cloth
 and turn up the edge about one-quarter of an inch, so as to enable it
 to pass easily into the scroll of the hemmer. Push it forward to the
needle. Let the hemmer down and start the machine. Gently hold
 back on the work and keep it smooth and allow the edge of the goods
 to pass between the thumb and forefinger of the right hand while it is
 being hemmed (see illustration above), keeping the goods rolled up
 on the edge as it passes into the hemmer. Should the edge of the goods
begin to run out of the hemmer, move the hand to the right. It too
 much cloth turns in, them carry it to the left.


     In hemming a curve on flannel or very elastic goods, draw gently
 on the edge being hemmed, resisting the feed slightly and guiding the

 work accordingly.
View original page 16Page 17 · Read text
Felling


     To make a felled seam, stitch two pieces of cloth together, the under
one projecting ¼ inch beyond the upper; sew as closely to the upper
 edge as security permits; then open the work flat, draw the wide edge
of the seam into the scroll of the hemmer and feller.Proceed as in
 ordinary narrow hemming, taking care to keep the fold smooth.

               French Seam


     This is made by sewing the edges of two pieces of cloth together,
 making a hem in one and sewing the edge of the second piece securely
 within it.

    French seam is either made with the smallest hemmer or the foot
hemmer. The hem is formed as described for these two attachments.
 Before lowering the presser bar, the second piece of cloth is inserted
 in the hem well inside the line of stitching, but not far enough to be
 folded over with the hem.ower the presser bar and procced to sew,
 keeping the edge of the two pieces of cloth parallel.
View original page 17Page 18 · Read text
Hemming and Sewing On Lace

                      One Operation


     The hemmer and feller which accompanies this machine is made
 with a slot for the needle to pass through instead of a round hole, as
in most of the attachments.This slot is to enable the operator to make
a hem and sew on lace at the same time. Proceed as follows: First
 start a narrow hem, and when the goods are well under control and
passing smoothly into the hemmer, stop the machine, raise the hemmer
 WIll DESSE bar lifter, raise the meedle to its highest point, and then
 carefully pass the end of the lace through the slot in the side of the
 hemmer,carrying it under the back ot the hemmer andon ton of tha
       Then lower the hemmer and proceed as it ordinary     TIE TO TE
 bide the lace over the front of the hemmer, keeping it well in the slot
   that the needle will catch it every time it passes into the goods,
View original page 18Page 19 · Read text
To Sew On and Gather with Piping


     Remove plate (D) from bottom of ruffler and substitute shirring
 plate shown on page 20, in place of front slide. Insert piping (B) in
 gauge attached to upright back of needle. Fold material (C) to be


 stitched ¼ inch full length of piece and insert in open slot above piping.
 Goods (A) to be gathered is inserted between blade on ruffler and shir-
ring plate and extends to the right of attachment


     Operate machine slowly, guide work with both hands, so piping wit
be evenly laid between wober goods and ruffle
View original page 19Page 20 · Read text
Wide Hemming


    Substitute the wide hemmer in place of the presser foot. Raise the
needle to its highest point, insert the goods into the hemmer, draw it
back and forth until the hem is formed, stopping with the end under the
      Lower the presser foot and commence to sew, being careful to
guide the cloth so as to keep the hemmer full
View original page 20Page 21 · Read text
The Tucker

     When attaching the tucker, be careful to have it pushed backOn
 the bar as far as it will go, noting that it is securely clamped by the
 nut that holds it in place.
    A test should be made by turning the hand wheel slowly towards
                               isses through the hole in the attachment
foot without interferine. It the needle should happen to rub the attach-
 ment in passing the hole, it would probably cause skipping or
stitches or broken thread.
               of the tuck is determined by the gauge on the tucker frame


            To Operate the Tucker

   Make the first fold in the usual manner by hand. Pass the folded
edge under the spring on the marking plate, wits the part that 1s. to De
             top. raw toMATTE right until the edge      2441151
           and from you until it covers the feed. Lower the079334
foot and sew as usual, being careful to keep the folded edge against
 the guide. Fold carefully the crease in making substituting tucks and
 proceed as before. After the first tuck has been made, the edge of each
 preceding tuck should pass under the small prong on the tucker directly
undernesth the marker.     placing the cloth in this position
 not be necessary to guide the work
    WHEN MAKING THE LAST TUCK, the lever, upon which the
 needle clamp strikes, should be turned up and back,
View original page 21Page 22 · Read text
Quilting


   Insert the quilter through the small hole in the lower end of the
 presser bar. Move the quilter guide as far from the needle as the dis-
 tance required between the rows, raising the guide high enough to allow
the goods to pass under freely, then fasten frmly, with THE SMALL
setQUESTS

               To Quilt

    Let the quilter guide follow the edge of the goods, a straight crease
 or a chall line, as the case may be, for the first row of stitching; all suc-
ceeding rows are made straight and at a uniform distance by keeping the
     steadily under the guide
View original page 22Related documents and language editions
From the ISMACS International. Original publisher and archive notices are retained.
Check the model and edition against your equipment.
PDF verified 2026-10-11.