Camera accessories
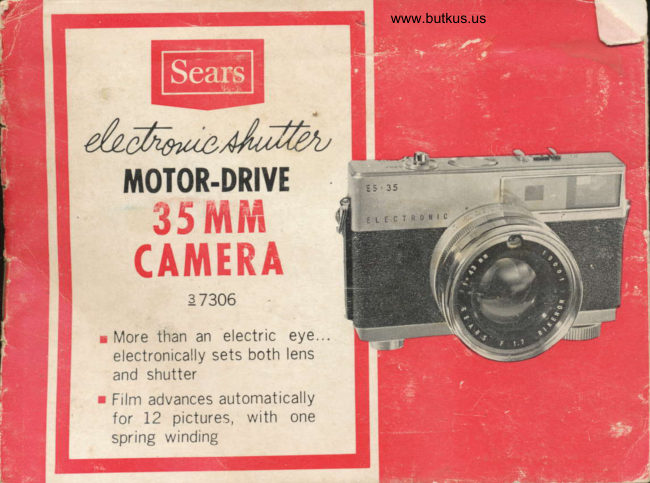
Sears ES 35 User manual
User manual for Sears ES 35. 13 pages in English. Read the original PDF, download or print a copy without registration.
13 pagesEnglish4.8 MB PDF
Loading your manual…Open PDF directly
Document details
- Brand
- Sears
- Model / document
- Sears ES 35
- Document type
- User manual
- Language
- English
- Pages
- 13
- File size
- 4.8 MB
- Category
- Camera accessories
- Document date
- Not specified in catalog
Search available document text
Find a term, then jump to its page in the original PDF. Image-only pages may not be searchable; check the PDF for exact wording and diagrams.
Page 1 · Read text
www.butkus.us

/2ffi^bMrfu,,
   MOIOR.DRIVE
   35 mm
  CAMERA
                3 7306
  r More than an electric eYe...
     electronically sets both lens
   and shutter
  r Film advances automat ically
    lor 12 pictures, wtth one
    spring winding
View original page 1Page 2 · Read text
I


                                                                                                                     $
                                                                                                                                               I

                                                                                                                                 tt11@frt&,&frs,.oc:
                                                                                               I
                                                                                 Ii
       Automatic GDS Electric Eye sets both lens and shutter to give sparkl.
          ing, beautifully exposed slides and prints
       Spring-powered Film Advance.  . . take 12 pictures with just a single
        winding
       High-speed F:L.7 Goated Lens lets you shoot in a broad range of
        Lighting conditions, and gives crisply detailed photos
       Bright, Easy-to-use Coupled Rangefinder in center of viewfinder
        helps you capture picture details you want
      Automatic Exposure Gounter resets itself to start after each  roll,
        automatically counts each exposure as you take it
       Flash Exposures Set Automatically Too !  Merely set the guide num.
       ber of the flash bulbs you use and lens and shutter are set automatically
       as you operate rangefinder
View original page 2Page 5 · Read text
Mike Butkus Digitally DN:email=mike@butkus.org,Date:cn=Mike2024.02.27signedButkus,by11:25:45Mikeo=ButkusButkusc=US-05'00'camera manuals, ou=butkus.org,View original page 5
Page 8 · Read text
www.butkus.us

 I

II


   i

  :


J      film loading
I        Always load camera in shade, never in
           bright or direct sunlight. Use Sears or other
           good quality standard 35mm (ZO or 36 exposure)
              fllm, color or black and white.
         Push down Back Cover Latch (M) and swing
          open camera back. pull down Rewind Knob (y)           to clear Film Chamber (X). place fllm cartridge
            into Film Chamber and push Rewind Knob UaEX           into closed position...be certain Rewind Knob
           engages film cartridge.
              Pull tapered end of film across back of camera and engage one of the-            lead fllm sprocket hotes onto the tooth of the rate.uisioor (z).   ii           tooth is not accessible rotate spring wind Knob (J) untii fllm'can be
            easily attached. Rotate spring wind Knob to takd up fllm slact<...cnelt<-           to see that fllm sprocket hores have properly engabed boftL seis  ot            Sprocket Teeth (AA).
           close camera back and snap                                                   _it strut. wind Spring wind Knob  f ully,          depress                   Exposure                          Button                                    (c)                                           times                                            and Exirosu-re                                                             countei-isl                                                                                                            *iri         be set to                                            for^ your                                               picture.                         " 1 " ready                                                   flrst^3                                                              spring irii,uiirc                                             Eich full
           permits you _to take 12 pictures without further windih!, Eacrr llmE          you depress Exposure Button one picture is taken.
View original page 8Page 9 · Read text
the electric eye
                          The lens and shutter will be correctly set for pictures
                               without flash by the Electric Eye when Auto- Ring (N) is
                                set to " AUTO'; position and Film Speed Rinb (P) is set                                                         I                                  for the fllm you are using. For procedure with flash see
                                          " Flash Pictures " Page 4.                                                                                                           I
                        To set your camera tor automatic exposures with electric                I                                 eye, rot-ate Film Speed Ring (P) until red indicator line
                               id opposite the ASA speed of the fllm you are_using...                                  check- instruction sheet packed with your fllm for this
                     ASA number. Rotate Auto Ring (N) until " Auto " ap-                               pears opposite red indicator line, camera is now set for
                            use with electric eye.

                   holding tke camera
                          When you are ready to take your picture, be certain knurl'
www.butkus.us            ed Exposure Button Lock (W) is in " shooting " position                                  (rotate ring so that black dot is opposite black line).
                           Hold the camera steady and gently press the Exposure
                               Button (C) all the way down. Always be certain neck-
                                strap and flngers are not blocking Electric Eye Window
                              (CC) or Lens (K). Camera may be held either in a vertical
                              or horizontal position.
View original page 9Page 12 · Read text
GUIDE NUM BERS      f or popular   f ilms and flash bulbs                                           www.butkus.us
                       ASA Film Spged
   Bulb Type       to       25      64      ,   t25     250
   Flash Cube    32       55      75     IOO     t40
   AG-IB         3a       60      85       t20      170
   M2E}         42        -70      95      140     r90
   5B            65      foo    r50    200    290
unloading film
 Always unload your camera in the shade, never in
 bright lightr  Alter last picture has been taken, press Rewind But'  ton (T) (the remaining spring power will be discharg'
   ed), ind lift up crank on Rewind Knob (Y) and rotate
   crank clockwise until entire roll of film has been re'
   wound...tension on crank will decrease noticeably'
r Open camera back, pull out Rewind Knob and remove  the film cartridge. Push in Rewind Knob and return
   crank to closed position.
FOR FAST, DEPENDABLE SERVICE, USE SEARS PHOTO.
FINISHING.AVAILABLE AT YOUR SEARS RETAIL STORE
OR FROM SEARS CATALOG
exposure button safetY lock
                                                      yourTo prevent the accidental taking of a picture,camera is equipped with a safety'lock feature. Rotate knurled Exposure Button Lock (W) until black dot is op-
 posite " Lock "...Exposure Button now cannot be released'
 When taking pictures, be sure to rotate Exposure ButtonLock so thJt'black dot is aligned with black indicator
 line.
View original page 12Page 13 · Read text
a
  cnmera      and care       ttp+                   /

       T  Read the instruction booklet carefully'
           I  Before you go on a trip or photograph a special event, shoot a practice
              roll of film.
             I  Keep fingers and camera straps away from lens and electric eye window
             I  Replacing Battery :   lf lamp in viewfinder does not light when pressing
          gattery Check Bution (BB), battery should be replaced...normal battery
                rii" ir i  to  t % years. Replace with Mallory RM'1R, Eveready E1 or Burgess                                                                                 counter'          Hg.lR mercury battery. Unscrew knurled Battery cap (D) in a
           clickwise dirlction,  tltt on cap and battery will slide out freely' When                                                   be up. ReplaceBattery Cap'             inserting new oatt,eiy, positive (+) end should
           t   Clean lens with soft, lintless tissue'
       T  Do not place camera near obiects with magnetic properties....'.
           automatic mechanism can be harmed'
                                                                 necessary, return         Do not attempt to repair your camera. lf service is
                   it to the camera deparimenl of your nearest Sears Retail Store or Catalog
          Order Plant.
          I  Keep cap on lens when camera is not in use'
     Replacement batteries are available
                                         /twdw                      A!-,^n pW6!Na#, de"&|!@| W
         SEARS, ROEBUCK AND CO,, U.S.A ANd SIMPSONS.SEARS  LIMITED. MAdE iN JAPAN
View original page 13From the M. Butkus archive. Original publisher and archive notices are retained.
Check the model and edition against your equipment.
PDF verified 2026-10-10.