Light meters
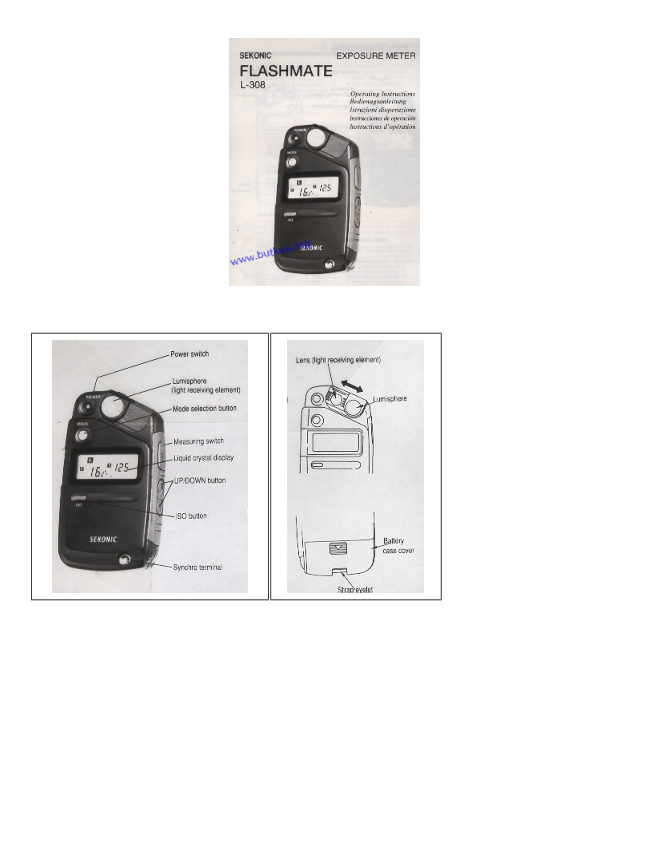
Sekonic Flashmate User manual
User manual for Sekonic Flashmate. 9 pages in English. Read the original PDF, download or print a copy without registration.
9 pagesEnglish1.7 MB PDF
Loading your manual…Open PDF directly
Document details
- Brand
- Sekonic
- Model / document
- Sekonic Flashmate
- Document type
- User manual
- Language
- English
- Pages
- 9
- File size
- 1.7 MB
- Category
- Light meters
- Document date
- Not specified in catalog
Search available document text
Find a term, then jump to its page in the original PDF. Image-only pages may not be searchable; check the PDF for exact wording and diagrams.
Page 4 · Read text
Switching between the incident or reflected light
                                     method of measurement
                                             Slide the lumisphere to the a orb click position. (Figs. 1
                                       and 2).

                                     * Hold down and move the knurled part to move the
                                          lumisphere (Fig. 3).


Incident Light Method Measurement
Place the exposure meter at the position of the subject to be photographed with the lumisphere facing the
camera lens for measurement (Fig. 4).


                 Reflected Light Method Measurement

                        • Place the exposure meter at the position of the camera or in the same direction as
                     the camera with the lens facing the desired part of the subject to be photographed for
                 measurement (Fig. 5).

                        • If the exposure meter is placed at the position of the camera for measurement, the
                   average value for the overall subject is obtained.

                        •  For partial measurement, place the exposure meter as close as possible to the
                    desired part of the subject.

                 * Be careful not to allow the exposure meter shadow or other object to affect the
                  measured part.
View original page 4Page 5 · Read text
www.butkus.us

4. Preparation for Measurement


                         (1) Inserting the battery

                     Use a 1.5-V "AA" battery (UM3 dry, LR-6 or R-6).
                             1. Slide the battery case cover in the direction of the arrow to remove it (Fig.
                              6).
                             2. Insert the battery into the battery case, observing the (+) and (-) indications
                      on the inner surface of the case. Insert the (
                       end first, then push the battery in toward the (-) side.
                             3. Slide the battery case cover along the unit to close it. Check that the cover is
                          securely closed.
                             4. Press the power switch to turn ON the power. "b.c" and bar symbols
                           indicating the battery capacity appear on the liquid crystal display (Fig. 7), then
                           the meter is switched to the measurement mode.
                      * When the remaining battery capacity is low, the "b.c" display flashes or
                           disappears.
                      * If the meter is left ON, the auto-off function is activated, automatically
                         switching off the display in about four minutes.
                      * To use the meter again after auto-off, turn ON the power.
                      * The mode setting is held even after power OFF or auto-off.
                      * Ni-cd or lithium batteries cannot be used.


Preparation for Measurement

(2) Setting the measurement mode
1. Every time the mode selection button is pressed, functions (mode) cycle as follows:


                                              * You can switch the EV or F value display by
                                                       pressing the mode selection button while
                                                     holding down the ISO button in the ambient
                                                               light measurement mode (Figs. 8 and 9).
View original page 5Page 6 · Read text
(3) Setting the film speed (ISO)
                                  1. Press either side of the UP/DOWN button while holding down the ISO
                              button to set the film speed (Fig. 10).
                         * The ISO value is continuously changed by keeping either side of the
                   UP/DOWN button held down for more than 1 second while holding down
                               the ISO button.

                             (4) Setting the shutter speed (T)
                                  1. Press either side of the UP/DOWN key to set the shutter speed (Fig.
                                11).
                                  2. After "1/8000" appears, the cine scale is displayed. The cine scale is
                            based on a 180° shutter blade opening. (Fig. 12)
                                  3. In the flash light measurement mode, the shutter speed of "1/75",
                               "1/80", "1/90" then "1/100" are displayed after "1/500" (Fig. 13).


5. Ambient Light Measurement (EV or F value)


                                  1. Press the selection key to set the   ambient light measurement mode.

                                  2. Set the film and shutter speeds.

                                  3. Press the measuring switch to display the measured value.

                                    •  In the ambient light measurement mode, light measurement is
                             continuously conducted
                               while the measuring switch is set to ON.
                                    •  After measurement, measured values are automatically calculated by
                            changing the ISO or T (time) setting.
                                    •  Switching between EV and F value display. Press the mode selection
                             switch while
                               holding down the ISO key. The above 2 illustrations refer to switching
                           between EV or F value. (Figs. 14 and 15).
                                    •  Each bar symbol on the liquid crystal display expresses 1/10 of the F
                                value.
                              For example, Fig. 15 expresses F2.0 + 3/10 stop.
                                    •  If the measuring range is exceeded, the digital F-stop number is
                              replaced with either mark of E.u. (underexposure) or E.o. (overexposure).
View original page 6Page 7 · Read text
www.butkus.us


6. Flash Light Wireless Measurement

Measurement without using the synchro cord

1. Press the mode selection key to set the wireless measurement mode.

2. Set the film and shutter speeds.


                                3. When the measuring switch is pressed, the   mark starts flashing,
                              indicating the waiting state.

                                4. When the meter receives a flash burst, the F value is displayed (Fig.
                              16).


• Even after light measurement, the   mark continues flashing, indicating the waiting state. When the meter
receives another flash, the previous F value is replaced by the new F value.
• The   mark continues flashing for about 90 seconds.
•  Light cannot be measured unless the   mark is flashing.
• If the meter does not detect a light in the wireless measurement mode even if a flash occurs, switch to the
wired measurement mode. (The meter may not sense when flash light is less bright than surrounding light.)


                                  • If the shutter speed setting (T) is changed after measurement, the
                         measured value is erased and the F value displayed as "0".
                                  • If the measuring range is exceeded, the digital F-stop number is
                            replaced with either mark of E.u. (underexposure) or E. o.
                            (overexposure).


7. Flash Light Wired Measurement
Measurement using the synchro cord


                                1. Press the mode selection key to set the   wired measurement mode
                               (Fig. 17).

                                2. Set the film and shutter speeds.

                                3. Connect a flash unit to the synchro terminal of the meter using the
                          synchro cord (Fig. 18).

                                4. Press the measuring switch to produce a flash and display the F value
                               (Fig. 19).
View original page 7Page 8 · Read text
5. To measure another flash, press the measuring switch again and a
                     new F value is displayed.

                                 •  Set the shutter speed after checking the synchronization range of the
                             flashbulb.
                                 •  Connecting the synchro cord to the synchro terminal or switching
                   ON/OFF
                              causes some flash units to fire.
                                 •  Before setting the shutter speed, check and confirm the
                           synchronization range of the camera.  When time conversion is made
                               after measurement, the F value become "0".
                                 •  If the flash unit does not fire, measure light in the wireless
                        measurement mode.


• Synchro cord (used for   wired measurement) is sled separately.
This 5-m-long cord has three plugs for synchronizing the exposure meter and your flash unit or your camera and
the flash unit (Fig. 20). This is very convenient since it eliminates cord re-connection prior to photography. The
terminal on the exposure meter is also equipped with a locking mechanism to securely connect the cord.
8. Precautions on Handling
Since the Sekonic Flashmate L-308 is a precision electronic instrument consisting of many electronic parts,
observe the following points:

8. Precautions on Handling

1. Never drop it or apply impact to it.

2. Do not keep in a high-temperature or humid place.

3. Keep the lumisphere and lens surfaces clean and free from dust, foreign particles and scratches.

4. Wipe off dirt with a soft or silicon cloth. Never use solvent such as thinner or benzine.

5. To prevent battery wastage, keep the power OFF as much as possible when not in use.

6. If the meter does not operate normally, remove the battery, wait for about 10 seconds, then re-insert the
battery.

7. Remove the battery if the meter is not to be used for a long time.

In the case of failure, take the meter to the nearest dealer or send it to the service center. If mailing the meter,
wrap it in 3-cm or thicker shock-absorbing material, then pack it in a corrugated cardboard box.
View original page 8Page 9 · Read text
www.butkus.us


9. Specifications * The specifications and appearance are subject to change without notice due to improvements


Measurement               • Incident and reflected light methods

                               •  Digital exposure meter for ambient and flash lights

Measuring range
                               • Ambient light: EV1 to 19 :*t" (19.9)
(ISO100)

                               •  Flash light: F2 to 90 - (F90 + 0.9 stop)

Repeat accuracy            • ±0.1 EV or less

Light receiving section    • Incident light: Lumisphere

                               •  Reflected light: Lens (light receiving angle of 40`)

Light receiving element   • Silicon photo diode

Calibration constant       • C = 340, K = 12.5

Display range               • ISO (film speed): 3 to 8,000 (unit: 1/3 SV)

                               • T (shutter speed) : Ambient light: 60 sec to 1/8,000 sec. (unit: 1 TV)

                                f/s (cine scale)   : 8, 12, 16, 18, 24, 25, 30, 32, 64 or 128

                      Opening angle   : 180°

                         Flash light   : 1 sec to 1/500 sec. (unit: 1 TV) plus 1/75, 1/80, 1/90 or 1/100
                            sec.

                               • F (stop): 0.5 to 90

                               • EV (exposure value): -4 to 26 ' ' -

                               •  Fractions of For EV value:. , (0.1) to (0.9)

Other display               • Measuring range E.u (underexposure) and E.o (overexposure)

                               •  Measurement mode

                               •  Battery check: b.c to -

Battery used                • One "AA" battery (UM3 dry R-6, LR-6), 1.5 V

Operating temperature
                               • 0°C to 40°C
range

Storage temperature
                               • -20°C to 60°C
range

Standard accessories       • Strap, soft case and dry battery (one)

Size and weight            • 110 x 63 x 22 mm

                               •  Approx. 80 g (excluding the battery)
View original page 9From the M. Butkus archive. Original publisher and archive notices are retained.
Check the model and edition against your equipment.
PDF verified 2026-10-10.