Film cameras
Stereo Colorist User manual
User manual for Stereo Colorist. 13 pages in English. Read the original PDF, download or print a copy without registration.
13 pagesEnglish1.7 MB PDF
Loading your manual…Open PDF directly
Document details
- Brand
- Stereo
- Model / document
- Stereo Colorist
- Document type
- User manual
- Language
- English
- Pages
- 13
- File size
- 1.7 MB
- Category
- Film cameras
- Document date
- Not specified in catalog
Search available document text
Find a term, then jump to its page in the original PDF. Image-only pages may not be searchable; check the PDF for exact wording and diagrams.
Page 2 · Read text
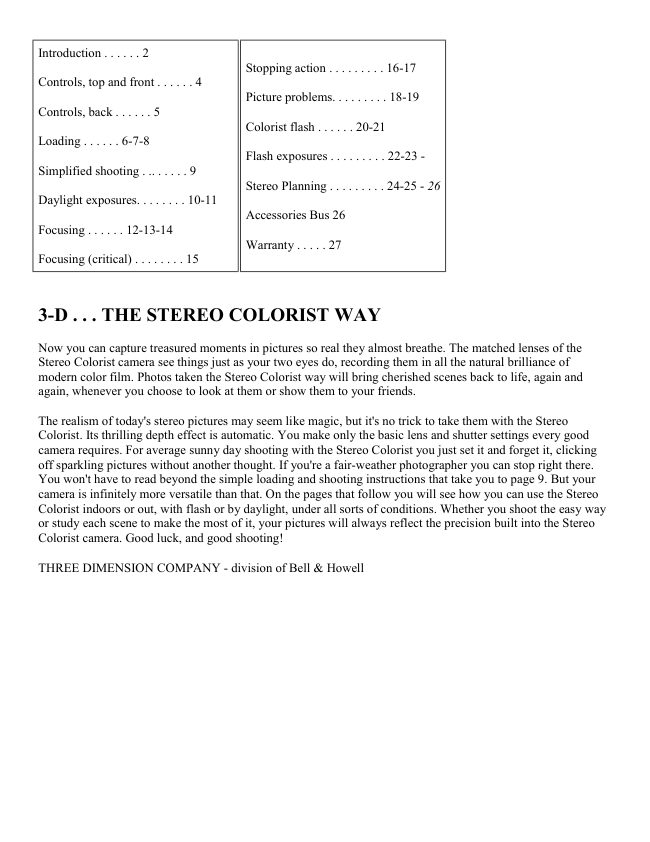
Introduction . . . . . . 2
                                    Stopping action . . . . . . . . . 16-17
Controls, top and front . . . . . . 4
                                        Picture problems. . . . . . . . . 18-19
Controls, back . . . . . . 5
                                        Colorist flash . . . . . . 20-21
Loading . . . . . . 6-7-8
                                      Flash exposures . . . . . . . . . 22-23 -
Simplified shooting . .. . . . . . 9
                                      Stereo Planning . . . . . . . . . 24-25 - 26
Daylight exposures. . . . . . . . 10-11
                                      Accessories Bus 26
Focusing . . . . . . 12-13-14
                                  Warranty . . . . . 27
Focusing (critical) . . . . . . . . 15


3-D . . . THE STEREO COLORIST WAY

Now you can capture treasured moments in pictures so real they almost breathe. The matched lenses of the
Stereo Colorist camera see things just as your two eyes do, recording them in all the natural brilliance of
modern color film. Photos taken the Stereo Colorist way will bring cherished scenes back to life, again and
again, whenever you choose to look at them or show them to your friends.

The realism of today's stereo pictures may seem like magic, but it's no trick to take them with the Stereo
Colorist. Its thrilling depth effect is automatic. You make only the basic lens and shutter settings every good
camera requires. For average sunny day shooting with the Stereo Colorist you just set it and forget it, clicking
off sparkling pictures without another thought. If you're a fair-weather photographer you can stop right there.
You won't have to read beyond the simple loading and shooting instructions that take you to page 9. But your
camera is infinitely more versatile than that. On the pages that follow you will see how you can use the Stereo
Colorist indoors or out, with flash or by daylight, under all sorts of conditions. Whether you shoot the easy way
or study each scene to make the most of it, your pictures will always reflect the precision built into the Stereo
Colorist camera. Good luck, and good shooting!

THREE DIMENSION COMPANY - division of Bell & Howell
View original page 2Page 3 · Read text
www.butkus.us


                                                       Digitally signed by Mike Butkus
                                         DN: cn=Mike Butkus, o=Butkus camera manuals,
                                              ou=butkus.org, email=mike@butkus.org, c=USMike Butkus  Date: 2023.05.18 09:45:00 -04'00'
View original page 3Page 4 · Read text
1. LIFT rewind knob as far as it will go and insert film cartridge
                                  with leader at bottom.

                                        2. Activate shutter by turning sprocket to right until it stops. This
                                      ordinarily is done as film


3. HOLD DOWN rewind                                                  5. TRIP SHUTTER and
                                  4. TRIP SHUTTER. Turn winding
release lease while turning                                     wind a second time.
                          knob in direction of arrow until it
take-up spool until film slot
                                 stops. If film is engaged properly,
is up. Insert leader securely;                                               6. TRIP SHUTTER and
                               film counter dial will rotate.
close back.                                                 wind a third time.
View original page 4Page 5 · Read text
www.butkus.us


                           7. SET EXPOSURE COUNTER for first picture, placing dot "." opposite
                       arrow. Now you are ready to take pictures. You get 20 with a stereo film
                         load, 16 with a 20-exposure roll and 29 with a 36-exposure cartridge. When
                       counter reaches number of shots for a given film load, last picture is in
                        taking position After snapping it, film must be rewound into cartridge.
                 CAUTION: Do not force wind knob in an attempt to get an extra exposure.
                               If film pulls loose from spool it will be necessary to remove it in a
                      darkroom.

                           8. TO REWIND film press rewind release and lift rewind knob. Keep
                      rewind depressed and rewind in direction of arrow Winding knob will turn
                     backwards as film is rewound. When it stops, give rewind knob about four
                    more turns, open camera back, and remove film cartridge. CAUTION: If
                      rewind release is pressed by accident before roll is finished no harm will be
                       done. Just turn winding knob to take up slack. Keep turning it until it comes
                          to a firm stop. Then you can wind the shutter and advance film for next
                          picture.


On bright days, you can pre-set the Stereo Colorist and shoot ,without worrying about exposure. The
settings shown below are for average subjects which contain about equal amounts of light and dark
colors, in direct sunlight. (this is Kodachrome 25 ASA film, faster film will require different
settings. An inexpensive light meter should be purchased. Slide film has very little latitude for
forgiveness.)

1. Turn the shutter dial to place 50 (1/50 second) next to the diamond index point above the right
lens of the camera.

2. Set the lens dial halfway between f/5.6 and f/8. This is f/6.3 - the best aperture to use in bright
sunlight.

3. Turn focusing dial to align 24 (24 feet) with index point above left lens. Everything beyond 12
feet from camera will then be in focus.

4. Sight your picture through viewfinder. Make sure camera is not tilted to right or left. Hold camera
steady, elbows drawn in against sides and gently depress release button until shutter clicks.
View original page 5Page 6 · Read text
DAYLIGHT EXPOSURE GUIDE (ASA 25 film)


*Exposures longer than 1/25 second require use of a tripod and cable release to avoid blur due to camera
movement

Any combination of shutter and lens setting found in given column can be used when you have the light
condition for that column. This guide is based on average subject matter, containing equal portions of light and
dark areas. For scenes that are predominantly light or dark, see next page.

If you want to catch an action scene, select a relatively fast shutter speed. If you want depth of focus in a scene
use a small lens opening (high f/ number). More detailed instructions can be found in sections on Stopping
Action and Focusing in the following pages. This exposure guide is computed for the Stereo Colorist camera
and Kodachrome film, daylight type, or Kodachrome film, Type A, using daylight conversion filters.

TYPES OF SUBJECTS


                   AVERAGE SUBJECTSLIGHT SUBJECTS (the                       DARK SUBJECTS including
                                 contain things of medium
beach, snow or water scenes)                                    people in dark clothing, dark
                                   brightness, or approximately
require less exposure. For less                                         foliage, animals, and buildings
                                equal parts of extremely light
exposure, use the next highest                                      require more exposure (smaller f
                             and dark colors. The basic
f/ number for shutter speed                                  number) than average subjects. If
                              exposure guide is for material
you choose in exposure guide                                   average scene calls for 1/50 at f/6.3
                                 of this type. Use it whenever
on page 10. Example: 1/50 &                                   dark scene in same light will
                            you are in doubt about how a
f/8 instead of 1/50 & f/6.3.                                          require 1/50 at f/4.5.
                               scene should be crossed.


Exposures for average subjects are provided in the guide on the previous page. Light subjects require less
exposure. Dark ones call for more.
NOTE: If the exposure selected in the guide happens to fall on an aperture number that is marked on the lens
dial, compensate for a light subject by using the next higher marked number, for a dark one by using the next
lower marked number. If it falls between marked numbers, use the next higher or lower space between numbers.
View original page 6Page 7 · Read text
www.butkus.us

FOCUSING


The Stereo Colorist has f/3.5 Rodenstock Stereo-Trinar lenses -- famous for taking critically sharp pictures.
When you focus the camera for objects at a given distance they come out brilliantly clear. Things much nearer
the camera and farther away appear sharp, too. You can get great depth of focus whenever you desire.

To help you make best use of this lens quality the Stereo Colorist is equipped with a depth of sharpness (depth
of focus) scale. When you have focused the camera on a given object, this scale shows at a glance the nearest
and farthest objects that will appear sharp in the picture.

The illustration below shows how the depth of sharpness scale indicates what will appear sharp in a picture
taken with the sunny-day settings--lens midway between f/5.6 and f/8, shutter at 1/50 second and focusing dial
at 24 feet. Examples covering other picture situations are shown on the pages that follow.


The illustration below shows how to obtain sharpness from 6 feet to infinity. The lens is set at f/11, and the
focusing dial is set at 12 feet. All the different distances between 6 feet and infinity on the focusing dial fall
between the two f/11 marks on the depth of sharpness scale. This means that everything from 6 feet to infinity
will appear sharp in the picture. Small lens openings call for slow shutter speeds and it is advisable to use a
tripod in order to avoid blur sometimes caused by camera movement. If a scene does not require great depth of
focus, you can use relatively large lens openings and still have a sharp picture. This is a good trick to use when
you don't have a tripod handy, or don't want to use a slow shutter speed because of possible subject movement.
View original page 7
Page 8 · Read text
Here the scene contains subject matter from 6 to 12 feet that you want sharp, and we assume that you will use
the basic, handheld camera settings of 1/50 at f/6.3 for average subjects on sunny days. The problem is to set the
focusing dial so everything will be sharp from 6 to 12 feet. The way to solve it is to turn the focusing dial until 6
feet is aligned midway between f/5.6 and f/8 on the depth of sharpness scale. We know the sharpness range
includes everything in the picture. If you want more distant objects in focus, a smaller lens opening must be
used. If the range of distances is less than that provided by the lens opening selected, it should be centered
within the depth of sharpness available as shown on the next page.

FOCUSING - FOR THE CRITIC


If you use the depth of sharpness scale and keep subject matter within the range it indicates you will get pictures
that are superbly sharp. If you want to gild the lily, the Stereo Colorist's Stereo-Trinar lenses will give you even
better results. Just focus so as to use only the central portion of the depth of sharpness indicated on the scale.

This procedure is desirable whenever the exposure settings you choose provide more depth than the scene
requires. In the example, a lens opening of f/8 provides more sharpness than the scene needs. At one extreme
you could place infinity on the focusing dial opposite f/8 on the depth of focus scale, to provide depth from
infinity to about 7 feet. At the other extreme you could place 12 feet opposite f/8 to get depth from 12 feet to
infinity. The best solution, as shown, is to center the focus setting between these two extremes. Pictures made
this way will satisfy even the most severe critic. To perfect this technique, use your own camera and experiment
with the different possible setting for this picture situation.
View original page 8
Page 9 · Read text
www.butkus.us

STOPPING ACTION


The Gauthier shutter of your Stereo Colorist provides a wide range of speeds. Moving things may be blurred in
pictures if your shutter speed is not fast enough. On the other hand, it is undesirable to shoot faster than
necessary. High shutter speeds require wide lens openings to obtain sufficient exposure. On preceding pages we
have seen that smaller lens openings provide greater depth of sharpness. The photographer must weigh the
advantages of fast shutter speeds against small lens openings to see which are more important in each picture
situation. At right are the speeds possible with the Stereo Colorist.

CAMERA MOVEMENT causes more blurred pictures than anything else. Don't jar the camera as you trip the
shutter. Use 1/25 second or faster, press elbows in against sides, and hold your breath for an instant as you
gently squeeze down the shutter release. Never jab at it sharply.

TIMING and angle are as important as a fast shutter. Shoot movement to or from the camera, not right across
in front of it. Watch for moments when action pauses as at the peak of a dive or a dancer's leap into the air, and
try to time your picture to capture these peaks.

PICTURE PROBLEMS
The Exposure Guide on page 10 shows that several different combinations of lens opening and shutter speed
will give exactly the same exposure under any given set of lighting conditions. Which should you use? Small
lens openings (larger f/ numbers) give greater depth. Fast shutter speeds stop movement, but they also limit the
depth of sharpness, because they require a large lens opening. So if you want speed you can't have great depth
of focus, and vice versa. These examples are planned to help you decide when to favor one or the other and
when to compromise between them.
View original page 9
Page 11 · Read text
www.butkus.us


STEREO COLORIST FLASH


                      You are free to take pictures at any time or place, day or night,
                             indoors or out, with a Stereo Colorist flash unit mounted on your
                            camera. It is scientifically designed to avoid the "pink eye" effect
                          sometimes observed in stereo pictures of people, made with other
                                flash equipment. Its test lamp glows when you insert a flashbulb,
                          showing at a glance that the lamp is o.k. and the batteries have
                             proper strength. You will find your flash unit of great use in
                              eliminating undesirable facial shadows on bright sunny days.

                                 1. Mount the unit on your camera by slipping the shoe on its base
                                into the flash mount. Seating the shoe the mount automatically
                         makes the necessary electrical connection. Set the shutter dial at 1/50
                             second.

                                 2. Insert the flashbulb, pressing it firmly into the socket.

                                 3. Align the subject in the camera viewfinder, moving backward or
                            forward to take in as much area as you want to straw in the picture.


4. Estimate the distance from camera to subject. If you are photographing a group or covering a deep area,
select a paint halfway between the nearest and farthest important subjects. Set the focusing dial for this distance,

5. Use the table on the next page to determine what lens opening to use for the distance at which the picture will
be taken. Set the lens dial accordingly.

6. Take the picture by aligning the subject in the viewfinder and pressing the shutter release in the usual
manner. Remember to hold camera straight and steady.

CAUTION: Flashbulbs have a transparent plastic coating designed to keep them from breaking I when fired. If
this coating becomes damaged in handling they may shatter. For protection, use of a plastic flash shield over the
reflector is recommended. Several types, all inexpensive, can be purchased from your photo dealer.

FLASH EXPOSURE

                                      FLASH TABLE
The table at the right is for SM and SF bulbs used with
                                        FEET          LENS
Kodachrome Type A, and for 5B and 25B bulbs used
with Daylight Kodachrome. It is based on average       3                    f/16
subjects, photographed in a room whose walls and
                                                4                    f/11ceiling reflect an average amount of light. Pictures of
dark subjects taken outdoors at night, or in very large                                                6                      f/8
rooms, or rooms with dark walls, will require larger lens
openings to compensate for the lack of reflected light.    8                      f/5.6
Pictures of very light subjects in small rooms with light                                                12                     f/4
walls call for smaller lens openings.
                                                15                     f/3.5
View original page 11Page 12 · Read text
NOTE: Things at distances indicated will be properly exposed, but the light penetrates much farther. Nearer
objects will appear somewhat light, farther ones darker than normal. To avoid wide differences in lighting it is
best to keep important subjects fairly close to the same distance from the camera.

These lamps (SM-SF) and Kodak chrome Type A film provide the ideal combination for most flash pictures.
They require no filters. The lamps give an instantaneous flash, burning so fast that they provide the equivalent
of 1/200 second shutter speed even though the shutter dial itself is actually set at 1 1/50.

These blue tinted lamps (5B-25B) are made for use with Day light Kodachrome film and require no filters
when employed with it. They can be used as the sole light source for indoor and night pictures, or as "fill-in"
light to illuminate shadows in pictures taken by sunlight.

WHICH FILM IS BEST?
That depends on what you want to do. If you plan on taking outdoor photos, with only an occasional flash shot,
load the camera with Daylight type film. Then you can use blue bulbs when you need flash. If you expect to
take a lot of flash shots, load with Type A film and use SM or SF bulbs. To take daylight pictures while the
camera is loaded with Type A film, place a pair of Type A Filters (No. 85) over the camera lenses.

STEREO PLANNING


                                Taking pictures in 3-D differs little from ordinary
                                 photography except that it is easier to get breath-taking
                                           results. These points will help you take superb pictures:

                       LEVEL the camera for every shot, paying particular attention
                                       to vertical lines such as trunks of trees or sides of buildings.
                              The camera can be pointed up or down, but do not tilt it.


                                FOCUS sharply. The beautiful realism of
                                                      stereo is more convincing when pictures are
                                                     razor-sharp. Use the depth of sharpness scale to
                                       make sure entire scene will be sharp. And hold
                                            camera steady so it doesn't move when you trip
                                                    the shutter.


Pictures that are not too deep project best on a big screen. Most pictures project well when properly mounted.
But, if you want your slides to conform to critical standards plan your pictures to fall within the distance ranges
covered by projection mounts:

Normal - 7 feet to infinity
Medium - 4 to 18 feet
Close up - 21/2 to 6 feet
View original page 12Page 13 · Read text
www.butkus.us


LIGHTING should be flat and from the front for most
effective stereo Shots, and of course, sparkling sunlight is
best. Shoot with the sun behind you, shining over your
shoulder. Avoid back lighted subjects, deep shadows' and
large shadow areas.


FOREGROUND material gives depth effect. Show a
person or object somewhere within 7 to 20-foot distance
range of every picture' even if the main subject is much
farther away. Overhanging branches, archways and big
rocks are just some of the foreground objects you can use.
View original page 13
Related documents and language editions
From the M. Butkus archive. Original publisher and archive notices are retained.
Check the model and edition against your equipment.
PDF verified 2026-10-10.