Camera accessories
The Practical Accessories for Rolleiflex cameras instruction booklet User manual
User manual for The Practical Accessories for Rolleiflex cameras instruction booklet. 28 pages in English. Read the original PDF, download or print a copy without registration.
28 pagesEnglish2.1 MB PDF
Loading your manual…Open PDF directly
Document details
- Brand
- Rollei
- Model / document
- The Practical Accessories for Rolleiflex cameras instruction booklet
- Document type
- User manual
- Language
- English
- Pages
- 28
- File size
- 2.1 MB
- Category
- Camera accessories
- Document date
- Not specified in catalog
Search available document text
Find a term, then jump to its page in the original PDF. Image-only pages may not be searchable; check the PDF for exact wording and diagrams.
Page 2 · Read text
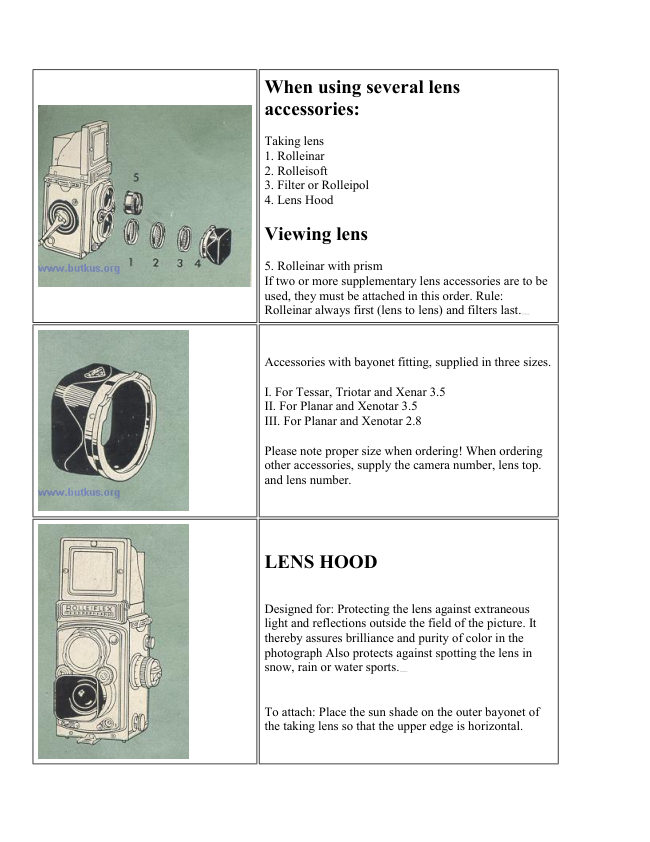
When using several lens
accessories:

Taking lens
1. Rolleinar
2. Rolleisoft
3. Filter or Rolleipol
4. Lens Hood

Viewing lens

5. Rolleinar with prism
If two or more supplementary lens accessories are to be
used, they must be attached in this order. Rule:
Rolleinar always first (lens to lens) and filters last. 4www.butkus.org


Accessories with bayonet fitting, supplied in three sizes.

I. For Tessar, Triotar and Xenar 3.5
II. For Planar and Xenotar 3.5
III. For Planar and Xenotar 2.8

Please note proper size when ordering! When ordering
other accessories, supply the camera number, lens top.
and lens number.


LENS HOOD


Designed for: Protecting the lens against extraneous
light and reflections outside the field of the picture. It
thereby assures brilliance and purity of color in the
photograph Also protects against spotting the lens in
snow, rain or water sports. 4www.butkus.org


To attach: Place the sun shade on the outer bayonet of
the taking lens so that the upper edge is horizontal.
View original page 2
Page 3 · Read text
ROLLEIGRID

(Not necessary when using Rolleikin)
Designed for: Brightening the corners of the ground glass
image in unfavorable light.

To install: Place the Rolleigrid, small beveled edges
upward, on the ground glass screen. Let it slide forward
under the retainer tab, then close the rear edge and fasten by
means of the push-button at the rear of the focusing hand
(see also p. 13, B s). The condensing lens must be placed an
the ground glass with the grooved side dawn.
To Remove: Turn the camera over, push the button, letting
the Rolleigrid fall out of the hood.
To clean the Rolleigrid:
Use only a wad at cotton and a mild water and soap or
detergent solution, squeezed almost dry. 4www.butkus.org


EXTENSION HOOD


Designed for: Extending the focusing hood to normal
viewing level; minimizes light reflection from top of
ground glass; allowing observation of image without
distraction.

To use: Slip over the opened focusing hood so that the
upper rounded edge rests on the forehead and the inner
raided 'breath guard. rests an the bridge of the nose.
View original page 3
Page 4 · Read text
ROLLEINARS 1 and 2

                     Designed for: Close up shots at distances closer than 1 meter,

                      Use: With the two Rolleinar sets 1 and 2, the Rollei is converted for a focusing
                       range from 39 1/2--17 3/4 (18 1/2) in. and 19 3/4 --12 1/8 (12 1/2) in., see page a.
                     Each set is composed of two optically matched frontal lenses with different
                      mounts. The Rolleinar with the thicker mount is for the viewing lens (Heidasmat)
                     and contains a built-in prism for parallax correction. As a result the field of view
                          in the ground glass coincides with the photograph even at very short distances. A
                        red dot an the mount indicates the uppermost side of the lens for correct
                         positioning in  use.4www.butkus.org


The same instructions apply to the Rolleinars with bayonet size I (see page 2) using a separate Rolleipar
parallax corrector for each set. Here too the Rolleipar is always attached to the viewing 1ens Rolleinar red dot
up.

Focusing is accomplished as usual an the ground glass screen. The depth of field being rather limited at close
range, considerable stopping down is advisable with Rolleinar lenses. The depth of field table indicates the most
advantageous stops for the 25 1/4 X 2 1/4 - and 1 X 1 1/2 inch size.

The advantage of a large reproduction should not mislead to indiscriminate shortening of the camera-to-subject
distance with close-ups, as this practice would entail danger of distortion. It is less great with objects having a
shallow depth of field. For the same reason portrait heads should, if possible, not be taken at distances closer
than 40 in.

Rolleinar Lenses require no increase of exposure.
To install: First attach the taking lens Rolleinar and then the viewing lens Rolleinar with prism in front. Insert
into the inner bayonet and turn to the right until they click into position. The red dot on the viewing Rolleinar
must be  up!4www.butkus.org

Distances are measured from lens board to subject. The figures given in the tables are, for all practical purposes,
usable with both 75 and 80 mm. lenses. Permissible circle at confusion = approx. 1/1000 of the focal length at
75 and 80 mm. respectively.

* Figures given in parenthesis apply to a focal length of 80 mm.
View original page 4Page 5 · Read text
ROLLEI FILTERS


                                      A. Filters for black and white photography

                        Designed for: Enhancing the contrast and separation at colors, correction at
                            film sensitivity to the various colors and, at times, the elimination of certain
                           undesirable portions of the spectrum.

                         Explanation: By elimination or modification of certain portions of the
                          spectrum, the particular complimentary color darker. Colors which show little
                            or no difference in brilliance are thus rendered with a greater black and white
                             contrast or tone separation. Thus with two colors, either can be rendered darker
                         depending on the choice of the filter.
View original page 5Page 6 · Read text
Use: (see page 8) Yellow and also green filters are especially useful for improved rendering of clouds. Orange
and red for cutting through the bluish haze in the distance. Blue color improving the otherwise too pale flesh
tones in studio portraits using panchromatic emulsions with high red sensitivity. Infrared for the exceptionally
revealing qualities at the red and the invisible infrared rays. Ultraviolet protective filter for the absorption of the
photographically harmful ultraviolet rays.

B. Color conversion filters
Designed for: Adjustment of the light composition (color temperature) to better match the color balance of
color films (especially transparency films).

Explanation: Every color film is balanced to a definite color temperature depending an its intended use. At this
color temperature, the film produces true to nature colors. With ascending temperatures, however, an average
blue color cast appears, whereas with law color temperature, an average reddish cast predominates. Color
conversion filters serve to eliminate these undesirable color casts. 4www.butkus.org

Use: The red-brown colored filters when blue predominates, and blue colored filters when red predominates in
order to reestablish the balance of the light reaching the film. Each filter type is supplied in these three
strengths. 2, 5 and 11, (abbreviated forms of 20, 50 and 110 Mired). Intermediate gradations can be formed by
combining any two filters.


Modern color temperature meters will
indicate the proper filter to use, taking into
consideration the type of film and the
prevailing light conditions. The most
commonly encountered ranges of color
temperature are also covered in the double
table A + B (page 7 and 9).

Example: Ektachrome daylight film,
overcast sky . . . which filters?

Solution: 1. Film: Look up film type
(brand) being used. (Ektachrome-daylight =
upper part of page), follow appropriate
guide line to edge of page (5500' Kelvin),
slide page 7 to the left until guide line A
(5500 K) and B meet. Hold pages in this
position!

2. Lighting: Observe the type of lighting
and its color temperature range overcast =
6600 --7000


3. Filter: The adjacent gray bar of table B indicates the filter (R 2) with light value correction (--0.5) and the
extension of exposure, 1.5 times.

The guide lines hereunder listed require sliding page 7 somewhat further to the left.
View original page 6
Page 7 · Read text
Light value correction = exposure increase factor. General average values are given for pan emulsions (in
parenthesis for ortho emulsions). These, however, can be modified according to the type and brand of the
photographic material and according to the type of lighting.

· The infrared filter features special compensation for focusing difference between visible and infrared portion
of the spectrum. Direct ground glass focusing may be employed with full assurance of sharp  pictures.4www.butkus.org

Rollei filters provide maximum effectiveness

By using coating-adjusted fillers with the lenses, the brilliance of the picture is essentially heightened. This
heightening of contrast is fully effected only when proper lens accessories are used.
View original page 7
Page 8 · Read text
Rollei optical lens accessories are supplied with anti-reflection coating which will not wear off. The Rollei
filters, in particular, have an individual type at coating designed to enhance the effect of their particular color.
They achieve maximum contrast in their specific range of operation.

ROLLEIPOL


                             For black and white and for color.

                              Purpose: Elimination or subduing al disturbing reflections (glare) from
                                 shiny, non-metallic objects or surfaces. Under certain conditions,
                                     filtering of the blue sky. Especially useful for regulation of the colors
                                (colored reflections) and control of sky tone in color pictures.

                               Explanation: If the direction of movement of a light beam is imagined
                                  to be the axle of a wheel, then the spokes of the wheel correspond to the
                                various plans of oscillation of the light waves (i.e., we are looking at the
                                    light beam in cross section). Polarization will reduce the many planes of
                                osculation to merely one.
View original page 8Page 9 · Read text
Polarization takes place when light waves, striking at a certain angle, are reflected by shiny bodies (with the
exception of metals). This polarized segment of light can be retained in full or in part by placing the Rolleipol
filter across the plane at oscillation: the reflections disappear. (The filter itself has a polarizing effect an the light
which passes through it.) Further, since there is also polarized light in the blue sky, this can be eliminated: the
use at the Rolleipol filter results in subdued (darkened) sky portions. 4www.butkus.org

Not all reflected light is polarized. If reflections are to be eliminated, 1, the filter must be turned (an its optical
axis) in the direction of the vibrations as required, and 2. the camera position must be changed to gain the best
effect. This is attained when the beam of light striking the reflecting body and the line of camera view farm an
angle at 60--74', (varies according to material at the subject).

Application: 1. For eliminating or subduing disturbing reflections when photographing reflecting objects
(polish, porcelain, painted and lacquered finishes, etc., -- reproduction of textures and material), when
photographing glass surfaces and the surface of water (the reflecting surfaces became transparent), 2. for
filtering sky when photographing landscapes: the blue sky is darkened by absorption of the polarized light it
captains. The effect may be observed in advance by looking through the filter. Light value correction about --1.5
= increase at exposure about 3 X.

For Use: Fasten the Rolleipol filter on finder lens (red dot at the top) and rotate the front ring of the Rolleipol
until the desired effect is obtained an ground glass. Note the white number marking and transfer to the taking
lens.

ROLLEISOFT LENS 0 AND 1


                              Purpose: Softening of super-critical definition producing striking fluffy halo-
                                    effects, especially with back-lighting.


                              Explanation: The taking lens Of the Rollei gives super-critical definition
                               required for the majority of exposures. If, occasionally, softer definition is
                               desired (e. 9. for portraits and certain dramatic effects) this is obtained by
                                attaching the Rolleisoft Soft Focus Lens in front of the lens.


The Rolleisoft lens consists at a plane parallel glass disc with a few concentric ground-in grooves. While
otherwise the lens permits only sharpness or softness through adjustment of the focus, the Rolleisoft lens
obtains both simultaneously: Between these grooves the rays of light pass unimpeded to the film and produce a
sharp impression, i. e., the basis of the image. At the grooves, however, the light rays are diverted with the
result that an additional image of slightly softer definition is superimposed. Both together produce the soft focus
effect: The exposure shows fluffy softened contours and sunny halo-lights; distracting fine details recede and the
fatal impression of depth definition is improved. By means of the Rolleisoft the Rollei-lens becomes a soft
focus  lens.4www.butkus.org

Application: Best results are obtained by using the entire surface of Rolleisoft, i. e., with full aperture. With
Rolleisoft 1 (with increased number Of grooves) it is permissible to stop down to f: 5.6. Smaller apertures tend
to decrease the soft focus effect.
View original page 9Page 10 · Read text
Rolleisoft 0 is used for weak soft faces effect: primarily for strong contrasts of light and glittering objects, i. e.,
chiefly for backlighted subjects. Rolleisoft t is used for greater soft focus effect: for soft lighting. -- Chief field
at application generally: portraiture. Best suited tar: contrasting, highlighted subjects. Rolleisoft increases the
plastic, sunny character of backlighted pictures. Speed and focal length remain unchanged. Generous exposures
increase the halo-effect. The ground glass screen shows full focused sharpness when using Rolleisoft lenses.
The Rolleisoft effect can be judged at any time an the ground glass screen by placing the Rolleisoft in front of
the finder lens.

For Use: Fasten Rolleisoft to inner bayonet at the taking lens.

ROLLEIKIN 3.5 and 2.8


                                     Designed for: Taking up to 36 exposures 1 X 1 1/2 inch,
                                   on 35-min.-film. Ideal for series of pictures and color
                                      photography on miniature film.


                            The attachment consists of:

                                               1. Case

                                               2. Film Guide Frame

                                               3. Take-up Spool

                                               4. Exposure-Counter-Knob

                                               5. Extension-Spindle for Rewind Knob (two types, for
                                         previous and new Rollei models)

                                               6. Inner Spool Knob

                                               7. Focusing Screen Mask

                                               8. Direct View Finder Mask

                                               9. Lens Hood Mask.
View original page 10Page 11 · Read text
Applicability of this accessory: Fits Rolleiflex above
numbers 1,100,000 and Rolleicord above numbers
1,137,000. (The combination back for two picture sizes
was originally not provided with the first camera series,
but can be ordered additionally).--Earlier Rollei-models
use Rolleikin 1 (with special back).

A. Installing the Counter-Knob *

(The exposure-counter-knob accepts 35 mm. and No.
120 [B 2-] film.
Your dealer will gladly take care of the fitting for you.)

1. Remove the top film-knob by unscrewing the 3
counter-sunk screws.

2. Fasten counter-knob tightly by means of the three
screws supplied.

3. Remove protective lining from gummed insert and
paste it on the counter-knob. 4www.butkus.org

· Not required with Rolleikin 2.8,
View original page 11
Page 12 · Read text
B. Assembling the Rolleikin

1. Adjust film pressure plate by a sliding
movement, pressing down at the same time,
thereby bringing the inscription "24 X 36 mm. (1
X 11/~ in.)" into view.

2. Pull counter-knob, fit-in take-up spool on the
right and insert completely.

3. Rewind-Parts: Screw extension spindle on
rewind-knob by rotating the latter. Snap inner
spool-knob over opposite spool bearing pin,
(slipping the metal tongue between the rollers of
the film-feed when using a Rolleiflex).

4. Inserting the film guide. frame: Press spring
actuated clamp-bar at an acute angle (as shown)
against the bottom of the film gate and insert
completely. To remove: Push frame downward
(against the clamp-bar) and lift out.

5. First insert forward edge of focusing screen
mask under the grip, snap down and secure by
pressing the retaining device. Be sure the mask is
properly centered inside the ground glass frame.

6. Insert the frame-finder mask underneath the
button above the frame-finder in such a way that
the edge (marked with a white dot) is pushed-in
first, then press the two lateral fixing buttons into
position.4www.butkus.org
View original page 12
Page 13 · Read text
C. Loading
                                                     1. Open camera back, pull rewind knob, fit-in film
                                                   cartridge on the left and then insert fully.

                                                     2. Introduce film-lead (which - in the Rolleiflex -
                                                              first passes through the film-feed rollers) into the
                                            double slit of the take-up spool, letting it touch on
                                                 the right. Tighten up by giving spool a short turn.

                                                     3. Make sure the mouth of the cartridge points
                                                     straight ahead in line with the tightened film lead,
                                              then close back.


4. Press-and-release counter-knob until the red dots of the Rolleikin counter face each other. (Disregard counter
for No. 120 [B 2-] film completely.)

5. To set counter for the first exposure: Advance counter dial to No. l by actuating film transport three times
(see page 15).
View original page 13Page 14 · Read text
D. Film transport


                                                     1. Press-and-release counter-knob before actuating
                                                film transport. The exposure counter advances
                                                automatically to the next number.
                                                     2. Advance film as usual to the stop.

                                       E. Rewinding
                                                     1. After the last exposure has been made, rewind
                                                film by keeping counter-knob pressed down
                                                     2. simultaneously rotating rewind-knob clockwise.

                                         F. Note
                                                     1. The rewind also permits the removal of only
                                                      partially exposed films. In order to prevent the
                                                film . lead tram slipping into the cartridge when
                                              rewinding, be sure to thread the film backward, i.
                                                               e., against the winding direction into the double-
                                                                 slit of the take-up spool when loading.


When reloading a partially exposed cartridge, advance film two frames beyond the last exposure (skipping one
frame for safety).

2. Always adjust film pressure plate properly (see B 1). (A sure sign of inaccurate adjustment when using the
Rolleikin: Camera back will not close all the way.)
View original page 14Page 15 · Read text
3. When installing the Rolleikin in the camera the empty rail film spool should be laid safely away in the
Rolleikin case for later use since it must be used again when inserting the next roll of film. 4www.butkus.org

4. Shutter cocking as usual: with Rolleitlex, normal swing of the crank.

5. Double exposure device is in operation in the Rolleitlex and cannot be disengaged when using Rolleikin.
With Rolleicard it must be disengaged in order to unlock shutter.


PLATE-ADAPTER

Designed for: Single 2 1/4 X 2 1/4 inch-
exposures on 2 1/4 X 3 1/2 inch plates of
sheet-film. A desirable facility for the use of
special emulsions, immediate or individual
processing and such special tasks as studies of
portraiture, trick photography, reproductions,
technical tests etc.

The outfit consists of:
1. Adapter back (1)
2. Cut-film or plate holders (2)
3. Cut-film sheaths
Also available: Focusing-screen slides (3)
Leather case for two holders

All parts are available separately. Focusing is
done as usual on the reflex focusing-screen and
only in special cases (i.e. when using two
Rolleinars combined, or utilizing the picture
area to the fullest extent) on the adapter
focusing-screen.
View original page 15
Page 16 · Read text
A. Attaching the Adapter Back 4www.butkus.org

1. Remove take-up spool from camera.

2. Take off camera bade. 3. Attach adapter
back

(without plate holder!).
View original page 16
Page 17 · Read text
B. Loading the Plate-Holder


1. Withdraw slide.

2. Lift up locking lever on back of holder and

3. let it slip inside after a quarter turn. Spring
action pushes out plate-carrier.

4. Slide plate (or cut-film with cut film sheath
placed underneath) into carrier.

5. Retract lever, lock by a quarter turn and fold
down (the number remaining visible). Close
holder by reinserting slide.

Note: Conserve push-strip by always removing
slide from empty holders before storing away. 4www.butkus.org


C. Inserting the Plate-Holder

Swing catch out of way and slide holder down the
lateral grooves of the adapter back. The catch
locks holder against unintentional removal.
View original page 17
Page 18 · Read text
D. Exposure


1. Withdraw slide.


2. Lift up lever and let it slip inside after a
quarter-turn. The plate moves into the focal plane
by spring action.


3. After the exposure, retract lever first, then fold
upward after a quarter-turn. The letter "B"
indicates that the plate has been exposed. 4www.butkus.org


4. Only now reinsert slide.

E. Focusing-Screen Holder

1. Insert the closed holder.

2. Withdraw slide. Spring action presses focusing
screen automatically into the focal plane.

3. Reinsert slide first, and then remove holder.

F. Note

1. Shutter cocking as usual: with Rolleiflex,
normal swing of the crank.

2. For use of plate adapter with Rolleicord the
double exposure device must be disengaged in
order to unlock shutter.
View original page 18
Page 19 · Read text
PANORAMA HEAD


Purpose: Panorama pictures, composed of two or
more individual pictures. Complete circle (360°)
may be had with 10 exposures.

For Use:
1. Screw panorama head at first only lightly into
tripod  socket.4www.butkus.org

2. Match pins and sockets of panorama head and
camera, then press together.

3. Tighten screw firmly.

4. Mount on a sturdy tripod.


5. Level off horizontally by centering bubble of
spirit level.

6. Start exposures at left of proposed view-swing
camera one number or click to right for each
succeeding exposure.

7. Care should be used when trimming pictures for
mounting --sufficient overlap is provided to make
matching easy. If moving clouds are included in
pictures, exposures must be taken in rapid
succession.

8. Make full use of entire negative area and be
sure that prints match in contrast and tone. Line
the pictures up accurately and cut them. Mount on
cardboard with matching edges together and
panorama is ready.
View original page 19
Page 20 · Read text
ROLLEIFIX TRIPOD HEAD


                       Can be used for all Rollei models with grooved edge an the tripod
                               socket.


                          Designed for: Quick fastening at the Rollei to the tripod or to the
                              bracket of an electronic flash unit.

                             Operation:
                                 1. Screw the Rolleifix firmly to the tripod.
                                 2. Raise the catch on the under side of the lock-lever and push lever
                         downward.
                                 3. Place the camera on the Rolleifix and slide it forward so that the
                               tripod socket reaches the forward end at the retaining grooves.
                                 4. Throw the locking lever upward to secure. 4www.butkus.org

                  METAL EVER READY CASE

                           For use with all Rollei models provided with groove an the edge at
                              the tripod socket.

                          Designed for: Complete protection: Air, dust, water-tight. For storing
                              the camera in a floatable splash-proof, light metal container; unique
                              pivoting bracket provided for fast shooting.
View original page 20Page 21 · Read text
A. To open:

1. With a circular movement raise the clamp handle.
2. Push the front part of case down.
3. Push the camera case back and press down firmly until it is fully
opened.
4. Swing the camera up and back in the retaining grooves until the
tripod socket until the catch locks.
5. In order to change film: Press the locking lever on the front of the
holder downward and pull the camera forward out of the holder. 4www.butkus.org

When taking pictures the case may either remain open (far
photography at eye level the two sides serve as handles) or can be
almost closed.

B. To close:
1. Grip with two fingers behind the pivot of the camera harder,
unlatch it by pulling forward and move the camera forward and
downward.
2. Raise the lower part, close the case and pull the clamp handle
around and down until it locks. Make certain that the two catches
close properly.

C. Notice:

1. In order to use the Rolleicord in the case, an extra (provided)
rubber pad is glued an the corresponding pad in the case.
2. In the two spring steel clips of the case, 1--2 extra rails of film or
Rollei desiccant tubes (for absorption of the moisture within the
case), can be placed. The discoloration of the deep blue silicon
crystals indicates the extent of saturation. Repeated regeneration is
possible by heating the tube (for example over a hot plate). 4www.butkus.org
View original page 21
From the M. Butkus archive. Original publisher and archive notices are retained.
Check the model and edition against your equipment.
PDF verified 2026-10-10.