Film cameras
Vest Pocket Ensign User manual
User manual for Vest Pocket Ensign. 8 pages in English. Read the original PDF, download or print a copy without registration.
8 pagesEnglish0.9 MB PDF
Loading your manual…Open PDF directly
Document details
- Brand
- Ensign
- Model / document
- Vest Pocket Ensign
- Document type
- User manual
- Language
- English
- Pages
- 8
- File size
- 0.9 MB
- Category
- Film cameras
- Document date
- Not specified in catalog
Search available document text
Find a term, then jump to its page in the original PDF. Image-only pages may not be searchable; check the PDF for exact wording and diagrams.
Page 2 · Read text
"Vest Pocket Ensign"
                      CAMERA INSTRUCTIONS.

Before attempting to use the Camera coil should read the following instructions and make yourself familiar kith
the functions of the various parts and movements.
Try the working of the Shutter, time and instantaneous, before inserting the film.
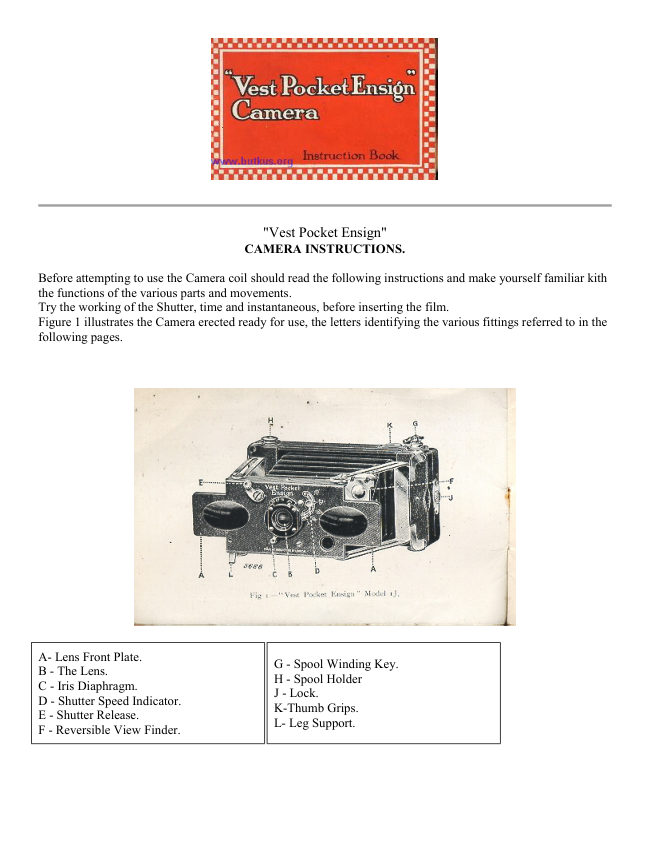
Figure 1 illustrates the Camera erected ready for use, the letters identifying the various fittings referred to in the
following pages.


A- Lens Front Plate.
                          G - Spool Winding Key.
B - The Lens.
                          H - Spool Holder
C - Iris Diaphragm.
                                                J - Lock.
D - Shutter Speed Indicator.
                                 K-Thumb Grips.
E - Shutter Release.
                                        L- Leg Support.
F - Reversible View Finder.
View original page 2Page 3 · Read text
TO OPEN.-Place the fingertip or thumb under one of the square
                                ends of the Lens Front Plate AA (fig. 1) and raise it about an
                                     inch. Then grasp both ends of AA as in Fig. 2 with finger and
                            thumb and pull the front slowly forward until it locks firmly in
                                    the bayonet joints provided in the four ends of the plated struts.
                            The Camera is now fully extended and rigidly
                                  held in the correct position for making exposures.


TO CLOSE.--full the supporting plated struts slightly outward, and the front will be freed so that it can be
replaced in its original closed position. The Camera is now ready for slipping into its case. It is most important
that the movements of opening and closing the Camera shall be made very slowly, the effect of too rapidly
drawing out the front of a Folding Camera is to damage the bellows by
forming therein a partial vacuum and also to draw the film forward out of the focal plane.

THE LENS. Model 1 J is supplied with a single Achromatic Lens. The Handle C (Fig. 1) which is movable
radially right or left, controls the Iris Diaphragm of the Lens and the stop aperture required, either f 11, f'10, f
22 or f/32, is indicated by a small pointer working on a scale placed above the Lens mount.
Model 1J TTH is supplied with a TTH Luxor Anastigmat Lens and a somewhat different arrangement is
provided for regulating the Iris diaphragm, a portion of the Lens mount itself being rotated and the stop aperture
indicated by a white line which registers with a series of lines and figures engraved on the Lens Front Plate. In
the case of this model the stops are f/7.7, f 11, f/16, f 22 and f/32.
For notes on "F values or what the stops mean" see '' ENSIGNOTIME'' supplied with this Camera.

DISTANCE FROM CAMERA - The subject to he photographed should not be less than 12 feet from the
Camera, everything at that distance and beyond will be in focus. For shorter distances the '' Ensignette" Portrait
Attachments can be supplied for taking pictures at 3, 6 and 10 feet from the Camera state model of '' Vest
Pocket Ensign'' when ordering Portrait Attachment (i.e. either 1J or 1J TTH).

THE SHUTTER - The Shutter fitted to the '' Vest Pocket Ensign " is of the "Everset'' variety and can be
arranged for "Time,'' '' Bulb '' or Instantaneous exposures of 1/20th, 1/40th and ,1/60th of a second. To operate
place the button I) (Fig. 1) so that its pointer is at Move the lever E (Fig. 1) slowly downwards to its fullest
extent. The '' click'' indicates that the shutter has given an exposure of one-twentieth of a second. The lever upon
release automatically moves back into position for the next exposure. Faster speeds of 1/40th and 1/60th of a
second are obtained simply by moving the pointer 1) to the figure required.

If the pointer is moved one place further to the letter 11, the shutter will open when the lever E (Fig. I) is
pressed down and remains open until the lever is released.  This is for giving short time
exposures and must only be done when the Camera is on a firm support. It is not practicable to hold the Camera
in the hand for time exposures owing to risk of movement.
When the pointer D is opposite the letter T, the Shutter will open on pressing the lever E, and remain open until
it is pressed a second time- this provision is for long time exposures.
View original page 3Page 4 · Read text
THE VIEW FINDER is normally in the correct position for taking
                               upright pictures; when the Camera is turned for horizontal views,
                                the View Finder must be moved into the corresponding position by
                            swinging it over with the finger (Fig 3). When taking upright
                                 pictures ignore subject shown in portion of Finder marked AA, and
                        when taking oblong pictures
                              ignore those portions marked BB (Fig. 3).


IMPORTANT.-Always see that the View Finder is returned to its original position before closing the Camera.
Now examine the back of the Camera. On one of the ends is a roughened metal button, this is used to lock or
unlock the back (see J, Fig. 1), beside it is seen either the word "closed'' or '' open,'' sliding the button reveals
one word and conceals the other.


                 Show the word " Open." With the finger and thumb lightly hold the curved
                        grips (see K, Fig. 1) when the back may easily be pulled off (Fig. 4). When
                       replacing note two slight projections on the opposite end to the sliding
                       button. Put this end of the back on first, being careful to see that the
                       projections are engaged with the corresponding ones on the body. Now close
                       the back down and slide the button to show the word " closed,'' the back is
                now locked in position

                 Remove the back again and look at the inside of the Camera. To the right and
                            left are the chambers for the film spools (Fig. 5) above the left hand one
                     being the winding key, shown at G in Figs. 5 and 1.


.


                       TO LOAD.-,1t each end of the spool chamber there are
                                        projecting cups, inside, which engage with the projecting
                                    ends of the spool bobbin and must be withdrawn when
                                      loading the Camera. There is a similar projecting cup in the
                                      spool chamber opposite the Winding Key and this cup and
                                        the Winding Key must also be withdrawn when loading.
                           When loading a '' Vest Pocket Ensign " the new spool of
                                       film is placed in the spool chamber at the end furthest away
                                  from the Winding Key. If there is an empty reel in this
                                 chamber it must be taken out.


Withdraw these cups be pulling out the knobs from the outside of Camera and also the Winding Key as far as
they will go.
Now place the empty spool in the spool chamber at the Winding Key end of the Camera, see that it engages
with the Winding Key and also push home the knob at the other end so that it engages.
View original page 4Page 5 · Read text
Now break and remove the band which secures the film on the full spool and place the spool in the film
chamber pressing home tile knobs so that they engage with the projecting ends of the spool.
See that the loose end of the paper is on the top and points in the direction as shown in Fig. 6. Now lead
the paper across the back of the Camera (see Pig. (,) until sufficient length is available for insertion in the long
slot of the empty spool at the winder end. Give the Winding Key two turns so that the empty reel engages the
paper securely and observe that it turns square, true and taut.


                                        Make sure that all three spool holders as
                                                      well as the Winding Key are pressed right
                                         home then put on the back and lock it,
                                               showing the word "closed" (in the manner
                                                      previously indicated).

                                                Turn the Winding Key watching the
                                                            circular red window in the middle of the
                                                 back until '' O'' appears. Proceed then to
                                              wind slowly and cautiously until figure '' 1
                                                                                                                                '' is seen. The film is now in the correct
                                                         position for the first exposure. Successive
                                                    exposures are made by turning until the
                                                          figures 2, 3, 4, etc., appear.


IMPORTANT.-Never wind the film with the camera front in the closed position. After exposure, first wind the
film to the next number and then close the Camera if desired.

TO UNLOAD.-When the last exposure is made, turn the Winding Key until the film is wound right off the
spool at the non-winder end. Remove the back, seal the exposed spool with the gummed strip, withdraw the
Winding Key from engagement and also the cup which holds the end of the spool on the opposite side, then lift
out the exposed spool and replace with the empty reel from the opposite spool chamber. To re-load proceed as
before.
IMPORTANT.--After loading and before replacing the hack see that all three spool holders are pushed right
home and that the Winding Key is properly engaged in the slotted spindle of the empty reel.

                      NOTES.

Do not attempt to give a longer exposure than 1/20th of a second with the Camera held in the hand.

When taking time exposures, landscape or horizontal shape, pull out leg support 1, and stand on a table or other
firm support as shown in Fig. 1, for portrait or upright shape time exposures no leg is required, the Lens Front
Plate A forming the necessary support when the Camera is turned this way.

Load and unload the Camera in as subdued a light as is available, not in broad sunshine.

Keep the Camera in its case to protect it from dust, etc.
View original page 5Page 6 · Read text
HOW TO DEVELOP AND PRINT.
Films can be developed in Developing Tanks or in a Dark Room. No sign of the picture can be seen after
exposure until the Film has been developed.

Development MUST take place in a Dark Room by Ruby Light or in a Tank. For the former any room is
suitable, from which ALL, light is excluded.
Before proceeding to develop. the following articles should be provided
Dark Room Lamp   .. " Ensign " Dark Roost Lamps from I - each.
Three Dishes  " Ensign'' Porcelain Dishes are the best.
Developer ...   ...   ... " Ensign-Victol " Developer recommended.
Acid Hypo Fixing   ... " Ensign " Branded Chemicals are reliable.
Class Measure .   ... "Mascot" Measure from 1/-each, " Ensign " Film Clips ... Prices from 2d. each.

Light the red lamp. Mix the developer (an ordinary tumbler holds 10 ozs. solution) and place in one dish, fill
another with water, whilst the third must contain the fixing solution.


               TO DEVELOP IN THE STRIP- In the red light unroll the spool and
                           separate the sensitive film from the paper. Attach an " Ensign " Clip to
                        each end of the film and holding each clip as in Fig. 7 pass the film, dull
                           side up, through the various solutions. The clips may be left on the films
                              until dry.

                              First soak Film in clean water about one minute, then place in developer
                       and rock dish gently : in about eight minutes the picture should appear
                           quite plain when held up to the light (see Fig. 8), the picture will of
                         course appear in the negative form, i.e-. the sky or light parts dark and
                           the shadows or dark portions light.


After developing transfer at once to Fixing Bath Hypo 2 ozs., water 10 ozs. (a tablespoonful of Hypo equals 1
oz.) for about ten minutes. until all the white and creamy appearance is entirely gone, After fixing it is quite safe
to use white light. Now wash the fixed Films for an hour in running water or frequent changes.
After washing place to dry by pinning the films to the edge of a shelf by one corner taking care that nothing
comes into contact with either side while drying.


                   CORRECT EXPOSURE The negatives should have the sky
                                  black, high lights very dark, deepest shadows clear. every detail
                                      visible.

                   UNDER EXPOSURE. Sky black and other parts thin and show
                            no detail.

                   OVER EXPOSURE. - Sky thin (grey), detail everywhere visible
                                but flat and without contrast.
View original page 6Page 7 · Read text
FOG.-Appearance black all over shows fogging by light, cause--
white light in dark room or too long exposure to the red lamp.

Keep dishes and measures thoroughly clean. Set aside one dish for each special purpose and use it for that only.
Do not contaminate the developer with the fixing solution.

PRINTING. Provide the following articles :-
Printing Frame  " Ensign " Metal Printing Frames are the best. Self-toning Paper ... A simple daylight printing
paper.
Hypo   ...   ... " Ensign " Hypo-cleanest and most reliable.

Place a negative in the printing frame dull side up and on it place a piece of printing paper with the sensitive
side in contact with the dull side of the negative. Put on the hinged back and fix down the springs. Now place
the frame in the light to print (sunlight if not too bright). Examine the print from time to tine in a dull light by
unfixing ONE spring and turning back half the back, taking care not to move all the paper. The print is done
when it appears rather darker than you wish the finished picture to be.

FIXING THE PRINTS.-Place print in plain water face down and keep moving for a few minutes, then give
them two changes of clean water and transfer them one by one to the following fixing bath : Hypo I oz., water
10 ozs. Fix for fifteen minutes, keeping the prints in constant motion, then wash in nine or ten changes of clean
water. Lay face up to dry.


                 "ALDIS-ENSIGN" Vertical Enlarger.
                      Fixed Focus Models.
                           Brilliantly sharp enlargements can easily be made by anyone without
                       previous experience with this enlarger.
                   The negative in film carrier is placed in the slot, the light switched on, the
                     bromide paper or post card is then placed on the table and the exposure
                     made.
                          Fitted for Electric Light or Gas (but without globe or mantle).
                   Model F1.-Enlarges a "Vest Pocket
                      Ensign" negative to 5 1/2 by 3 1/2.
                     Supplementary Lens Outfits for making pictures half as large again with
                            this Enlarger can be supplied. Alsomade in other sizes, particulars on
                         application.
View original page 7Page 8 · Read text
"ALDIS-ENSIGN" Vertical Enlarger.
Variable Focus Model.

A choice of eight different sizes of enlargement can be obtained
with this enlarger and there is no actual focusing.
Fitted for Electric or Gas (without globe or mantle) so simple and
perfect are the adjustments that the alteration from one size to
another can easily be made in the dark.
Model V2.--Enlarges a "Vest Pocket Ensign " negative eight
various sizes from about 4-3/4 by 3 up to and including 11 1/4 by 7
3/8.
Made also in larger sizes, particulars on application.


 "Ensign-Speedy" Film
 UNLESS the Film is right you cannot get good pictures and upon
 the choice of film the success or failure of your hobby depends
 " ENSIGN-SPEEDY " FILMS
 are made to fit all makes of Roll Film Cameras in all the popular
 sizes and will ensure your making photography a success.
View original page 8
From the M. Butkus archive. Original publisher and archive notices are retained.
Check the model and edition against your equipment.
PDF verified 2026-10-10.