Film cameras
VIVITAR V2000 User manual
User manual for VIVITAR V2000. 18 pages in English. Read the original PDF, download or print a copy without registration.
18 pagesEnglish2.7 MB PDF
Loading your manual…Open PDF directly
Document details
- Brand
- Vivitar
- Model / document
- VIVITAR V2000
- Document type
- User manual
- Language
- English
- Pages
- 18
- File size
- 2.7 MB
- Category
- Film cameras
- Document date
- Not specified in catalog
Search available document text
Find a term, then jump to its page in the original PDF. Image-only pages may not be searchable; check the PDF for exact wording and diagrams.
Page 7 · Read text
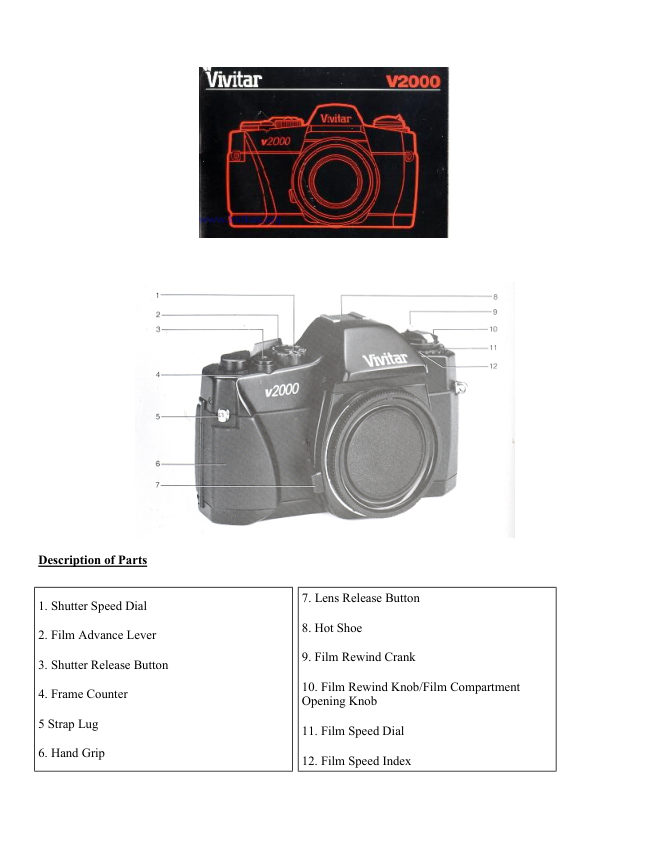
Description of Parts
   1. Shutter Speed Dial
   z.  Film Advance Lever
     Shutter Release Button
   4. Frame Counter
  q  Strap Lug
  6 Hand Grip
   7. Lens Release Button
   U. Hol Shoe
  9  Film Rewind Crank
 10.  Film Rewind Knob/Film Compartment Opening Knob
 11  Film Speed Dial
 12. Film Speed Index
 13. Viewfinder Eyepiece
 14. Rewind Shaft
 t5.  Film Chamber
 to.  Battery Compartment Cover
17  Tripod Socket
 18.  Film Guide Bars
19. Sprocket
20. Back Cover
21   Film Pressure Plate
22  Film Take-Up Spool
23  Film Rewind Button
View original page 7Page 8 · Read text
www.butkus.usGetting Started
you're probably anxious to take a few pictures. In fact, that's what we strongly recorrlmard
doing as soon as possible First we'd like you to do a set-up of the camera This will provide a
system check of basic camera functions as well as give you a feel for the camera We urge
you, however, to read this instruction manual completely so that you can get the most
enjoyment from your camera.
Photo Tips
At various points in the book, we will give you some tips that will help you take better pictures
and care of Vour camera.
System Set-Up
Please fold out the photographs of your camera from the front and back covers so that you can
refer to the numbered call-outs of parts as we go along
Belore You Do Anything Else. .  .
 '1. pull up on the Rewind Crank (9). The Back Cover (20) will pop open. Remove the white,
   protective paper and discard  it Firing the shutter with this paper in place could cause
  oamage
2 Gently close the door until you hear a soft click. Push down on the film rewind knob to
   reseat it.                                                                                   ;
Mounting/Removing  the Lens
Your camera utilizes a bayonet "K" mount (also referred to as 'PK') and will accept other
lenses with a compatible "K" mount designation
View original page 8
Page 9 · Read text
To mount the lens:
 1. Match the red dot on the lens with the red dot on the camera mount (See Fig. A.)
 2. Gently insert the lens into the camera mount and turn  it clockwise  until it clicks into position
3 To remove the lens, grasp the lens with your left hand and depress the Lens Release Button
    (7) with your index   f inger while rotating the lens to the left (counter-clockwise). Genly
   remove the lens from the camera body.
Loading the Batteries
 1 . With a small coin, rotate the Battery Compartment Cover (16) counter-clockwise  and
   remove  it. DO NOT use a screwdriver, because too much force may damage the Cover.
2. Holding the Battery Compartment Cover in your hand, drop in and stack two LR44 or SR44
   batteries so that the plus (*) signs are facing up.
3. Replace the Cover The positive (*) side of the batteries should face the (+) contact at the
   bottom of the battery compartment. Turn the Cover clockwise with a coin until it stoos flush
   with the bottom plate of the camera.
  DO NOT OVERTIGHTEN.
Battery Check
   Wtth yourthumb, pullthe Film Advance Lever (2) out about 1 /2inch from the camera body.
   This is known as the "stand-off" or "ready" position which activates the system electronrcs.
   Put the camera up to your eye and gently depress the Shutter Release Button (3) until you
  see one            of              the three                       colored                        LED                                symbols                                                                    light                                                               up. When this occurs, you know                                                                                (-|. O -)       your   that             batteries                    are                OK and                                 the                                system circuits                                                   are                                                   complete
          lf you don't see any lights in the viewfinder, remove the batteries and make sure their
   positrve (*) orientation  is correct.
  Push the Advance Lever back toward the camera body until it stops This turns off the
   electronics, locks the Shutter Release to avoid accidental  firing, and avoids battery drain.
View original page 9Page 10 · Read text
www.butkus.us
      Photo Tip:
     Some photographers replace the batteries in their camera on their birthdays or before
      annual vacations Others take them lo a camera store and check them lf in doubt,
       replace them after one year or following extraordinarily heavy use
Battery Corrosion
Avoid damage to your camera Most all batteries will leak after long periods of inactivity  lf you
don't plan to use your camerator a month or more. remove them and put them in a small
plastic bag for safety
Loading the Film
1 Pull up on the Film Rewind Crank (9) and open the Back Cover (20) all the way to the nght
  NOTE When the Back Cover opens.  it automatically resets the Frame Counter (4) to 'S'
    (zero),
2. Make sure the Film Rewind Crank is in the fully up position.

      Photo Tip:
      Never load or unload film in direct sunlighl Find some shade or use your body to shade
       the camera when loading and unloading.
3  Insert the 35mm film cassette in the Film Chamber (15). Gently push down and turn the Film
   Rewind Crank until  it fully seats.
4 Stretch the film leader across the Film Guide Bars (18) Align the Sprocket (19)
   with the holes on the bottom edge of the film leader
5  Insert the film leader tip into one of the slots of the Take-Up Spool (22). Check that the teeth
    of the Sprocket (19) are engaged in the film's sprocket holes
6 Using the Film Advance Lever (2) gently advance the film with several short strokes until
View original page 10Page 11 · Read text
the filmi9   leader has made one rotation around the Take-Up Spool
    Slowly and gently turn the Film Rewind Crank (9) clockwise  rn the direction of the arrow until
   you feel resistance You have now created the proper tension and film flatness at the film
    olane.
   Gently close and apply pressure to the Back Cover until  it clicks shut.
   Advance the film and  f ire the shLrtter by pushing down on the Shutter Release Button (3)
    several times until the black index mark in the Frame Counter Window (4) is opposite the
    silver dot between the "0" and"2". The shutter is now cocked and ready for picture number
    one.

      Pholo Tip:
     When you advance the  f ilm check that the Film Rewind Knob (10) turns at the same
      time lf it does the film is advancing properly lf it doesn't turn, the film has disengaged
       from the Take-Up Spool and you should open the back cover and re-thread the film
       leader as explained above.

Setting the Film Speed
1 Note the film speed indicated on the film package or instruction sheet
 2. Turn the Film Speed Dial (11) untilthe ISO speed of the film is opposite the white Film
   Speed Index mark (12).

Setting the Shutter Speed
1 Turn the Shutter Speed Dial (1) in either direction until the desired speed is opposite the
   white index line and audibly clicks into position.
  NOTE: There are no intermediate speeds in between those on the dial and incorrect
         exposures will result  if interpolated speeds are attempted. In the "B' (bulb) position,
          the exposure system is inoperative.
View original page 11Page 12 · Read text
www.butkus.us 2. Shutter speeds of 11125 or above are recommended for brightly lighted scenes, sports
   photography and when fasl films e g ISO 400 are used

      Photo Tip:
      To avoid camera shake (and blurred pictures). when using telephoto lenses, seiect a
        fast film and, as a rule of thumb, use the focal length of the lens as an approximate
        shutter speed guide Examples: 135mm lens: 11125 sec.; 500mm lens: 1/500 sec.
 3. SHUTTER SPEED RECOMMENDATIONS WITH ISO 1OO FILM

    Stationary sublects in low light                                      1Io1/151hsec
    Indoors in normal conditions                                                               1 /20 to 1 160
   Outdoors on a clear day                                                                         1 I 125 Io 1 1250
    Fast moving objects                                                                     1 /2501o 1 12000
   Mountains and / or snow scenes                                                      1 i 500 Io 1 /2000
Setting the Lens Aperture
 1. With your right thumb, pull the Film Advance Lever (2) away from tfre camera body about
   112 inch to activate the camera's electronrcs
2 Hold the camera up to your eye, press down part way on the Shutter Release Button (3) and
    turn the Aperture Ring on the lens both ways and look at the glowing LEDs on the left side
    of the viewf inder
  RED means STCP! Don't shoot!
  GREEN means GOI Shoot the oicture.
   The "f " symbol means too much light.                                                                              /
   The '-"  symbol means not enough light


                                                                                                                                                                                                                                                                                                                                                                                                                                                             f
View original page 12Page 13 · Read text
The circle in the center is like a traffic signal.  lt turns from red to green when you can
"go" Just turn the Aperture Ring in either direction until you get a green signal.  lf you're  in
low light, you may have to change Io a slower shutter speed in order 10 get a green signal
  ar?                 _1rA                _fi_  -i--,,T\               1r

     \-/                                             \-/                     _\l  -             rl,                 -       -a\_/r\                                    \ \  | //   :      _                      -.rn:
    Too much      GO!          Not enough
       ligh|                                              lightl
  Overexposure Good exposure Underexposure

Rotate the Shutter Speed Dial and the Lens Aperture Ring a few times and practice getting
the green light.

   Photo Tip:
   Since the Shutter Speed Dial and Lens Aperture Ring are integrated in the exposure
    setting you can use thrs versatile feature to achieve some interesting resulls, e g. use a
   slower shutter speed to blur the background while you track a moving car or athlete.

   This completes the system check of the camera. We urge you to read on for
            more tips and important facts about your new camera.
View original page 13Page 14 · Read text
www.butkus.usCamera Holding Technique
 1. Cradle the lens with your left hand so that your palm is directly under the lens ano your
   thumb and index finger are positioned on the Lens Aperture Ring as shown in the photos.
   (See Fig. B and C  )
 2. Hold the camera body so that your right index finger is over the Shutter Release Button,
    your thumb is resting against the Film Advance Lever, and your middle and fourth fingers
   are holding the Hand Grip (6).
 3. Bring the camera up to your eye and press your left elbow against your body for camera
    support. Keep your right arm relaxed

      Photo Tip:
      Take a tip from competitive athletes Don't be tight. To relax, take a deep breath and let
               it out slowly. Concentrate. Don't push down sharply on the Shutter Release Button.
      Apply pressure evenly and smoothty Lean against a wall, a fence, or a friend to keeo
      body movement and vibration to a minimum.
         Shooting with a telephoto or telezoom lens? USE A TRlpOD.
Focusing
Put the camera up to your eye and turn the Focusing Ring on the lens. As you turn the ring you
will see three different things happening in the viewfinder:
 1. The entire screen will go from a blur to sharp focus. This allows you to focus quickly  in
    srtuations where you don't have time for "fine tuning" of the focus.
2. The outside rtng of the "donut" in the center of the viewfrnder will shimmer or appear
    partially broken and become sharp when you achieve focus. This is orre of your t'fine
   tuntng" focusing aids, which is especially useful with long telephoto lenses and the
   viewfinder is not as briqht.
View original page 14Page 15 · Read text
3 Inside the "donut" is a split image rangefinder which separates the subject horizontally and
    aligns  it when in focus.
  NOTE: Telephoto or telezbom lenses with an aperture of t 15.6 or slower may cause the top
           portion of the split image to  ' black out" and become unusable. This is normal with
          slow lenses and there is nothing wrong with the camera.

      Photo Tlp:
      Your photo dealer carries a variety of rubber eye cups, diopters, right angle finders and
       other focusrng accessoiies which are extremely helpful in photography requiring fine
       focusing, e.g. macro.
Rewinding the Film
1. When you reach the last frame of your film, you will feel a definite resistance in the Film
   Advance Lever. A glance at the Frame Counter window will verify this.
2. Turn the camera over and depress the Film Rewind Button (23) until  it clicks.
3. Fold out the Film Rewind Crank (9) and turn  it clockwise  in the direction of the arrow.
4. While you're winding, you wili feel a certain tension on the crank, When the film leaves the
   Take-Up Spool and Sprocket, this tension will suddenly stop. Wind for a few more turns to
   put all of the film into the cassette.

      Photo Tip:
     Remember. Never load or unload a camera in direct sunlight. Find shade or shade the
      camera with your body.
5. Gently  lift the Film Rewind Crank to pop open the Back Cover. Continue lifting the Crank
    until  it stops to disengage the Rewind Shaft (14). Remove the film cassette and put  it
   immediately in its protective canister.
View original page 15Page 16 · Read text
www.butkus.us The "8" (Bulb) Setting
  When you select 'B'on the Shutter Speed Dial, the shutter will remain open as long as you
  depress the Shutter Release Button. This is a professional feature which will allow you to shoot
  "open flash" photos of interiors where multiple exposures are necessary or take time
  exposures of longer than one second, e.g a night scene.

       Photo Tip:
       Use a triood and cable release!
  Electronic Flash Photography
  *" tt   unit.  lt is "a*electronically coupled to the shutter mechanism and will automatically  fire the flash
  when the shutter is fired.
  1. Insert your flash unit into the Hot Shoe  lf the flash has a locking knob, turn  it to secure the
      flash 1o the shoe
  2. Set the Shutter Speed Dial (1)to 1/125 second or slower.
    NOTE. Electronic flash photography at shutter speeds faster than 1 /125 are not possible
     with this camera.
  3. Set the appropriate  f /stop on the Lens Aperture Ring. (Please refer to your flash's
      instructions to determine aperture values according to the Guide Number of the flash.)

  Do's and Don'ts
 YOU SHOULD...
  1. Care for your camera as you would a fine instrument
  2. Keep  it in a case when not in use.
  3. Use a camel hair brush and blower to remove dust.

10
View original page 16Page 17 · Read text
4. Clean the lens and eyepiece with lens cleaning liquid and tissue.
 5. Talk to your photo retarler about camera care and use.

NEVER, NEVER.  .  .
1 Touch the shutter curtain.
2 Get the camera wet.
3. Try to clean the reflex mirror.
4 Clean lhe camera with solvents.
5. Leave the camera in your car's trunk, glove compartment, or rear window.
6. Store the camera for a long period without removing the batteries. Or store  it unprotected  in
   a hot, humid or dusty environment.
7. Blow compressed  air in the mirror box compartment.
Specilications
Camera Type: 35mm SLR with focal plane shutter TTL metering with 3 LED display.
Film Format:24mm x 36mm.
Mount Type: Quick release "K" type bayonet mount.
Shutter: Verticaltravel. metal focal plane shutter.
Shutter Speeds: B to 1 /2000 set manually by adjusting shutter speed dial.
Flash Synchronization:  Hot-shoe, X-contact, synchronized at 1 l125th second or slower
ahrltar   cnooaluPvvv.
Viewf inder: Fixed, eye-level pentaprism type 0 B6x image magnification at infinity with 50mm
lens. 93 oercent horizontal and vertical view of actual picture area.
Focusirig Screen: Horizontal split image.


                                                                                                                      11
View original page 17Page 18 · Read text
www.butkus.us
  Displays in Viewfinder:
      Red * LED       overexposure warning
      Green O LED      correct exoosure indication
      Red  LED       underexposure warning           -
  Exposure Measurement: Open aperture TTL measurement system, center weighted
  area measurement
                                                                                      1 /2000s)  Measurement range ISO 100/21 o: EV3  (f /2, 1 12s\ - EVl9 (f/16,
  Film Speed Range: ISO 25 to 1600
  Film Advance: Single frame advance, thumb lever action with 135' throw and 30' stand-off.
  Safety mechanism prevents double-frame advance or double exposure. Shutter release button
   is interlocked by moving the advance lever to stored position.
  Film Rewind: Manual
  Frame Counter: Progressive type, automatically reset when camera back is opened
  Power Source: Two 1.5v alkaline (LR44) or silver (SR44) batteries
  Dimensions: 133 x 85 x 50 mm (5.24x 3.35 x 1 97 tn.).
  Weight: 410 g (14 5 oz.), camera body only.

  Specifications are subject to change without notice,


12
View original page 18Related documents and language editions
From the M. Butkus archive. Original publisher and archive notices are retained.
Check the model and edition against your equipment.
PDF verified 2026-10-10.