Photography reference
Watson Film Loader Product booklet
Product booklet for Watson Film Loader. 7 pages in English. Read the original PDF, download or print a copy without registration.
7 pagesEnglish2.1 MB PDF
Loading your manual…Open PDF directly
Document details
- Brand
- Watson
- Model / document
- Watson Film Loader
- Document type
- Product booklet
- Language
- English
- Pages
- 7
- File size
- 2.1 MB
- Category
- Photography reference
- Document date
- Not specified in catalog
Contents
Search available document text
Find a term, then jump to its page in the original PDF. Image-only pages may not be searchable; check the PDF for exact wording and diagrams.
Page 3 · Read text
INTRODUCTION


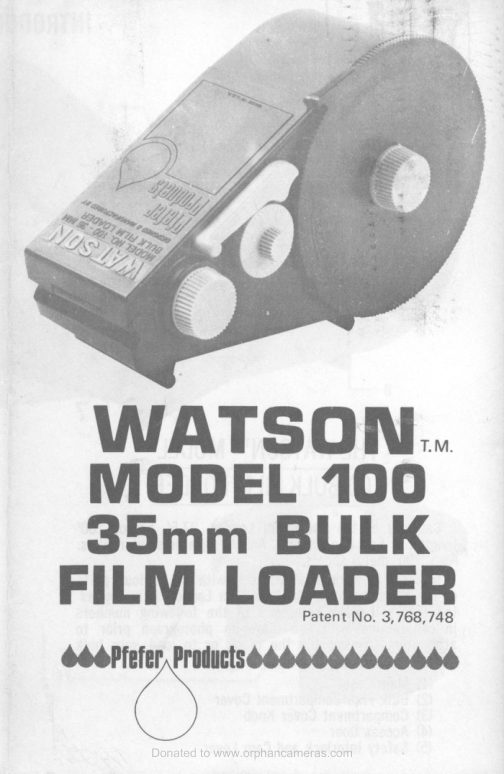
      THE WATSONT" MODEL                                  (6)(7) BulkCassetteFilm ClosingSpindle Activator and Bearing
       100 BULK FILM LOADER                                 (8)(9) CountingSprocket AssemblyKnob
                                                                        (10) Film Winding Assembly
  Capacity of the Bulk Film Loader: 27.5', 55' or 100'                  (11) Film-Way Light Trap
                                                                                    (12) Cassette Compartmentlengths of Eastman, Dupont, Ansco, Agfa or similar films.
Also, 100' metal spools.                                                               Your new Watson Model 100 Bulk Film Loader is made
   In order to familiarize yourself with the various parts                 of modern plastics and has a tendency to attract electro-
of the Watson Model 100 Bulk Film Loader, it is sugges-                  static dust. One of the best methods to reduce and/or
ted that you make reference to the following numbers               reverse this phenomenon is to wipe the Loader and its
in conjunction with the blown-up photograph prior to                parts with a very mild solution of any household deter-
attempting to assemble the crank or to load your bulk                gent. Use a soft lintless cloth which has been saturated
film.                                                              with the detergent solution and wrung fairly dry. After
    (1) Main Case                                                        cleaning, wipe the Loader and parts with paper towels or
    (2) Bulk Film Compartment Cover                              any other type of lint-free material. This should be done
    (3) Compartment Cover Knob                                        before each loading of your bulk film.
    (4) Access Door                                                                                       It is advisable to practice the loading procedure with
     (5) Safety Interlock and Cam LeverDonated to www.orphancameras.comsome old film before actually using new film.
View original page 3Page 4 · Read text
ASSEMBLY
   INSTRUCTIONS

  Your all new Watson Model 100                                                                                                                                                                                                                                                                                                                                                                                                                                                                                                                                                                                                •
Bulk Film Loader comes fully as-
sembled and ready to operate with
the exception of the Film Winding
Assembly. To install such Assembly,
please do the following:
   1. Remove the Bulk Film Compart-
ment Cover (2) by unscrewing the
Compartment Cover Knob (3).
  2. Remove the Bulk Film Compart-
ment Cover (2) by pulling straight
out and away from the Main Case
(1). In the Compartment Cover is an
envelope containing the Film Wind-
ing Assembly, which consists of: 1
crank, 1 shaft, 1 knob and 2 screws.
  3. Open the hinged Access Door
(4) by moving the Safety Interlock
and Cam Lever (5) up and to the
right (in a clockwise direction) until
the Cam Lever stops.
  4. Raise the door and swing it
back until it stops.
   5. Install the shaft of the Film
Winding Assembly (10) from the in-
side of the Cassette Compartment
(12).
  6. Screw the knob on to the crank                                                 11
using a Phillips-head screwdriver
(not supplied).
   7. Screw the crank and knob as-
sembly onto the shaft. Your Loader
is now ready to be used.         Donated to www.orphancameras.com
View original page 4
Page 5 · Read text
SPECIAL NOTE:

  When loading Leica, Nikon, Contax, Pentax and all other
special cassettes, loading is similar in all cases, except
that these cassettes must be closed mechanically when
you have finished loading them. When using the above
special cassettes, after you have reached the number of
exposures you desire, turn the Cassette Closing Activator
and Bearing (7) in a counter-clockwise direction to close
and lock the cassette. Special features have been incor-
porated in the Cassette Compartment (12) of the Watson
Model 100 to keep these special cassettes from turning
when winding film on to the spools. On those cassettes
with felt light traps, be sure that the felt is clean and
FREE OF ALL DUST and pointed in the direction so that
the film will enter in a straight line.

          TIPS ON LOADING

   • When leaving film in the Loader, to guard against
accidental exposure, always turn the Bulk Film Compart-
ment Cover (2) to the extreme clockwise or closed
position.
   • As in all photographic procedures, cleanliness is of
optimum importance with the Film Loader. Be sure the
Loader is free from dirt and dust before using it.
   • Limit your cassettes to no more than 36 exposures
plus the four frames of leader.
   • Empty and reusable cassettes can be obtained from
your photo dealer. Be sure to ask that the cassettes be
returned if you send your film out for processing.
   •  It is wise to develop your first roll of bulk loaded
film soon, in order to insure that you are loading the
cassettes correctly.
   • Many 35mm cameras require that film leader is cut
to fit into take-up spool. This is easily done with a
scissors or X-Acto Knife.

      Designed And Manufactured By
    Pfefer Products • Simi Valley, California

      ©Copyright 1976 Pfefer Products
                    Donated to www.orphancameras.com
View original page 5Page 6 · Read text
LOADING INSTRUCTIONS                                2. (a) putPickitupin theyourBulkrightFilmhand.CompartmentWith yourCoverindex(2)fingerand
                                                                               locate the Film-Way Light Trap (11) in the apron
  The following may be done with the LIGHTS ON:                                  of the Compartment Cover (2).
  1. Set the Loader on its feet and place it so that the                    (b)With the middle finger of your right hand at the
Bulk Film Compartment is facing you and place the Bulk                     very top of the Cover (2), you will note that the
Film Compartment Cover (2) within easy reach on the                      Film Way is pointing at about a 30° angle to the
table or bench where you are working.                                                left of vertical. In that position, slide the Bulk
                                                                           Film Compartment Cover (2) into the Main Case
                                                                                                                       (1).
                                                              (c)When it has seated itself, turn it in a clockwise
                                                                              direction (to the right) until you feel a definite
                                                                              snap. The Film-Way Light Trap (11) is now in place
                                                                   and your film is under tension.
                                                                           (d) Attach the Bulk Film Compartment Cover (2) to
                                                                        the Case by screwing the Knob (3) in the center
                                                                            of the cover into the Bulk Film Spindle (6). DO
   2. Move the Safety Interlock and Cam Lever (5) up and                  NOT JAM TOO TIGHTLY.
to the right (in a clockwise direction) so as to open Access
Door (4) and raise door to open position. Return Safety
 Interlock and Cam Lever (5) to the left and down
 (counter-clockwise) until it engages the dimple between
 the Cassette Closing Activator (7) and the Counting Knob
 (8) •
   3. Turn off ALL LIGHTS.
  The following steps must be done in TOTAL DARKNESS.
 In addition to your Loader, you will need your bulk film
supply.
   1. (a) Unwrap your bulk film.                                                 3. Raise the Safety Interlock and Cam Lever (5) up and
     (b) Hold the film in your right hand so that it unwinds               to the right (in a clockwise direction) until it stops.
       from the top in a counter-clockwise direction (to                You may now TURN ON YOUR LIGHTS and the remainder
        your left).                                                     of your loading may take place in an artificial or day-
                                                                                  light atmosphere. CAUTION: Do not use in direct sunlight
                                                                       or intense artificial light.


                                                                                               NOTE:
     (c)Feed the end of the film through the gate and
        over the Sprocket Assembly (9).                                   Universal Shim — This shim must be removed (with a
    (d)CAREFULLY slide the bulk film on to the Bulk                knife or sharp-pointed screwdriver) when loading Leica
        Film Spindle (6) while always holding on to the                 cassettes. Replace the Shim when loading all other types
       end of the film near or at the Sprocket Assembly               of cassettes (if you do not use Leica cassettes, do not
            (9).             Donated to www.orphancameras.comremove the Shim).
View original page 6Page 7 · Read text
5. Move the Counting Knob (8) to zero. Hold the Loader
                                                                          in your left hand, with your left thumb on the Cassette
                                                               Closing Activator and Bearing Assembly (7). With your
                                                                           right hand, and in a clockwise direction, wind as many
                                                         frames into the cassette as you would like, up to 36
   1. Attach the bulk film to the cassette spool so that            PLUS FOUR. The Counting Knob (8) will record the number
the keyed end of the spool is pointing toward the Film                of exposures you have wound into the cassette. The four
Winding Assembly (10). Do not open light trap to advance              additional frames are necessary to take up the loss
film in order to attach film to cassette. Pull out only             caused by that film exposed while you were attaching it
enough film for attaching and positioning cassette in                to the spool of the cassette and for the leader necessary
Loader. Masking tape may be used to attach the film to               to attach it to your camera. In other words, should you
the Cassette Spool and care should be taken to insure               desire 36 exposures, your final count will be 40. For 18
that the film is lined up properly on the spool in order to              exposures, your final count will be 22.
prevent the film from buckling when winding.

   2. (a) Assemble the cassette.
     (b)Pull out the shaft of the Film Winding Assembly
        (10) until it stops.
      (c)Pull out the Cassette Closing Activator and
        Bearing (7).
    (d)Drop the cassette into its Compartment (12) in
        the nose of the Case.
     (e)Release the Cassette Closing Activator and Bear-
       ing Assembly (7) and rotate the Assembly to be                                                                        6.After loading your required amount of frames:       sure that the Cassette is held by the Bearing (7).
                                                                     (a)Rotate Bulk Film Compartment Cover (2) in a
   3. Move the Safety Interlock and Cam Lever (5) in a                    clockwise direction (to the right) until you feel a
counter-clockwise direction (to the left) until it again                          definite snap.
engages the dimple and at the same time close the                   (b)Raise Safety Interlock and Cam Lever (5) up and
Access Door (4). Make sure to snap BOTH sides of the                       to the right until it stops.
Door closed. Push in the Film Winding Assembly (10) and                    (c)Raise Access Door (4) to the open position.
take up any slack of the film by rotating such Assembly                     (d)Pull out Film Winding Assembly (10).
in a clockwise direction.                                                                (e) Hold Cassette Closing Activator and Bearing (7) in
  4. Rotate the Compartment Cover (2) all the way                       the open position.
counterclockwise (to the left) in the direction noted on                        (1) CAREFULLY lift out Cassette and cut film approx-
Cover stating "gate is open," until you feel a definite                       imately one inch from the Cassette.
snap, guaranteeing that the gate is locked in the open                       (g) Your loader is now ready to repeat the Cassette
position.               Donated to www.orphancameras.comloading procedure.
View original page 7From the M. Butkus archive. Original publisher and archive notices are retained.
Check the model and edition against your equipment.
PDF verified 2026-10-10.