Film cameras
Yashicamat User manual
User manual for Yashicamat. 13 pages in English. Read the original PDF, download or print a copy without registration.
13 pagesEnglish2.3 MB PDF
Loading your manual…Open PDF directly
Document details
- Brand
- Yashica
- Model / document
- Yashicamat
- Document type
- User manual
- Language
- English
- Pages
- 13
- File size
- 2.3 MB
- Category
- Film cameras
- Document date
- Not specified in catalog
Search available document text
Find a term, then jump to its page in the original PDF. Image-only pages may not be searchable; check the PDF for exact wording and diagrams.
Page 2 · Read text
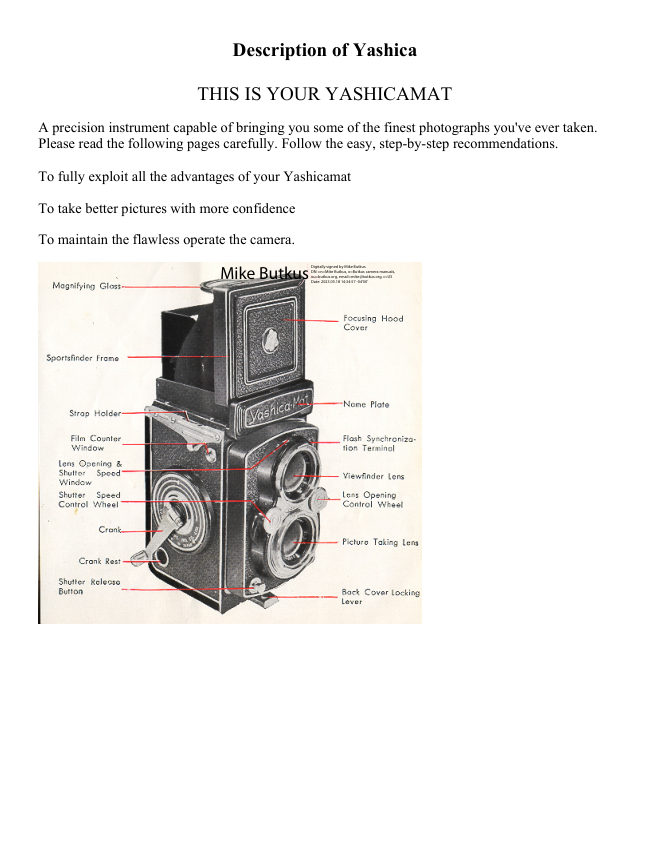
Description of Yashica

               THIS IS YOUR YASHICAMAT

A precision instrument capable of bringing you some of the finest photographs you've ever taken.
Please read the following pages carefully. Follow the easy, step-by-step recommendations.

To fully exploit all the advantages of your Yashicamat

To take better pictures with more confidence

To maintain the flawless operate the camera.


                                                                                                                                                                          Digitally signed by Mike Butkus
                                                                                                                               DN: cn=Mike Butkus, o=Butkus camera manuals,
                                                                                                                                              ou=butkus.org, email=mike@butkus.org, c=US                     Mike Butkus Date: 2023.05.18 14:34:57 -04'00'
View original page 2Page 4 · Read text
REMOVING THE CAMERA FROM THE CASE


Just snap off the bottom when removing the entire front element of the carrying case.
To remove the camera for film loading raise the two metal Lock Slides. Spread the
sides of the cave apart and lift the camera free.

Your Yashica camera comes complete with a deluxe, leather eveready case. While the
camera is in the case, all working parts are visible and ready to use. All you need to do
is open the back-snap and lift the top at the case forward.


LOADING THE FILM


                  120 size film, 12 pictures per roll, in the popular 2 1/4
             X 2 1/4 size. Black-and-White or Color

                        (1) To unlock back cover, turn the tripod socket in the
                       direction marked 'O'. Then open the Bock Cover by
                    swinging it out.

                        (2) Remove the Take-Up Spool in the Lower Film
                  Chamber by pulling out the lower Film Spool Locking
                      Spring.
View original page 4Page 5 · Read text
www.butkus.us


                                             (3) Place the Take-Up Spool in the
                                   Upper Film Chamber by pulling
                                         out the Upper Film Spool Locking
                                          Spring.

                                             (4) Place a new roll of size 120
                                           film in the Lower Film Camber.

                                             (5) Flip up the Film Transport
                                    Crank and slowly wind it
                                       clockwise so that the wider slot of
                                           the Take-up Spool in the Upper
                                     Film Chamber faces upward. Then
                                          gently draw out the film leader and
                                          thread it firmly and evenly into the
                                                   slot.

                                             (6) Gently wind the Crank
                                         clockwise.

                                                (7) Advance the film by slowly
                                        winding the Crank until the
                                        arrow on the film points to the
                                                 triangles on either side of the
                                       camera body.

                                                (8) Close the camera back cover
                                       and lock it by turning the
                                          Tripod-Socket in the direction
                                      marked 'C'. The letter S' will
                                          appear in the Film Counter
                                    Window.


The Yashicamat transport employs a fine, precision mechanism, constructed to provide years of
trouble-free performance.
 Like any fine instrument it should be treated with care and respect.

The following are recommended:

a. Operate the film transport crank gently. It is important that the clockwise, film-advancing stroke
of the crank be first completed before it is brought bock.
View original page 5Page 6 · Read text
b. In loading the film, be sure that the paper leader is inserted in the take-up spool so that the film
will crow evenly.


                      (1 ) Wind the crank clockwise until it comes to a stop. The letter
                              'S' will have disappeared and No. 1 will appear in the Film
                    Counter Window.

                        (2) Then wind the Crank counter-clockwise until it stops. You are
                     ready to Snap your first picture.

                    For subsequent exposures a smooth pendulum swing, first
                  downward to stop and then upward to stop, advance the film and
                    winds the shutter simultaneously.


                    (A) The downward wind advances the
                      film and moves up the number of the next
                      film in the Film Counter Window.

                    (B) The upward-wind activates the
                        shutter.

                    (C) The position of the Crank when it is
                      flipped back into its rest after your
                       pictures have been taken.


The shutter should not be kept wound when not in use because it weakens the shutter spring, and
there is the possibility you may unknowingly press the shutter button and waste a film.
View original page 6Page 7 · Read text
www.butkus.us

TO REMOVE THE LENS CAP


                 Raise the lower cap and fold back on its hinge.

                Turn the upper cap counter clockwise and
                 remove.


LENS OPENING AND SHUTTER SPEED


                  (A) The arrow points to the Lens Opening and Shutter
                 Speed Scale Window. The letter 'f' on the left of the
               window indicates lens opening and 'see' indicates shutter
                    speed.

                   (B) The shutter speed is set by turning the Control Wheel
                   with your right-hoed thumb either up or down as
                    indicated by the arrow. The red shutter speed figures
                   should be set so that the red line in the window runs
                    exactly through the center of the figures.

                   (C) The lens opening is set by turning the Control Wheel
                   with your left-hand thumb either up or down as indicated
                by the arrow. The block lens opening figures should be
                      set so that the red line in the window runs exactly through
                    the center of the figures.

                The correct combination of lens opening (aperture) and
                     shutter speed (exposure) is imperative to obtain a good
                     picture For details see Pages 10 and 11.
View original page 7Page 8 · Read text
SIGHTING THE SUBJECT AND FOCUSING


                                 Your Yashicamat is a twin-lens reflex camera.
                                 The lower lens takes the picture. The upper
                                          lens is for focusing and composing on the
                                    ground glass viewing screen.

                                            (1) Open the focusing hood by lifting it at the
                                        back.


(2) Rotate the Focusing Knob until your subject on the ground glass screen is sharp. The bright
round lens in the center of the ground glass viewing screen enables you to obtain a sharp focus and
should be the center of the picture you are composing on the screen. The red lines on the screen
help you to judge proportion and proper composition. Compose your subject on the ground gloss as
you would like to see it in the final picture.

MAGNIFYING GLASS - Assures more accurate focusing


                                 (A) Raise the Magnifying Glass by pressing the
                                        front of the Focusing Hood Cover inward, holding
                                      the Focusing Hood so that it does not close.

                          When using the Magnifying Glass, place your eye
                                     as close to the Magnifying Glass as possible.

                                   (B) Always make sure that you have first lowered
                                      the Magnifying Glass before closing the Focusing
                            Hood


Sight your Subject through the Sports Finder Window.

(A) Depress the Focusing Hood Cover until it clicks into place. Lift the Yashica to your eye level.

(B) Push the Release Button to closing the Hood cover.
View original page 8Page 9 · Read text
www.butkus.us

TAKING FLASH PICTURES
Your Yashicamat offers M-X synchronization


                          Correct exposures for flash pictures will be obtained easily
                       and correctly by consulting the guide numbers printed on the
                        package of the flash bulbs.

                  When taking color flash pictures you may need filters or
                       hove to use proper bulbs according to the type of films (Day-
                              light or Tungsten) you ore using.


FLASH PICTURES

Your camera dealer will be glad to supply the proper flash attachment for your camera.

As you become more proficient at taking pictures, you will want to acquire accessories that
increase the versatility of your YashicaMat. One of the first accessories you will want will be a
flash unit.

Your Yashica is ready and waiting. Synchronization for flash is built-in. A standard PC connector
plugs into the flash terminal. The battery case is attached to the camera via an arm that screws. into
the tripod socket.

Selector Position M           X            X

Bulb used       Medium Peak      Short Peak       Medium Peak

                                                       1/30 or slower when using self
Shutter Speed    Any Speed        1/60 or slower
                                                          timer


Do not use short Peak Bulb with "M" M' Synchronization.
Move the selector to X position when using Electronic Flash

There are hand bracket flash units you can purchase. The flash has a bracket to hold the camera and a
cord coming from the flash unit to the sync plug on the camera. They are more expensive than a hot shoe
flash.
View original page 9Page 10 · Read text
Cable Release


             A standard, overlap-type Cable Release can be fitted to your Yashica. Simply
                    unscrew the Shutter Release Ring and Screw in the Cable Release. Your
                   camera dealer will supply the proper Cable Release for your camera. See left
                        Picture.


SELF-TIMER


                           For taking self-portraits or group pictures, you have about 8 seconds to
                               get into the picture. Therefore your camera must be mounted on a
                               tripod or brace to prevent a blurred picture.


Caution! Be sure to move the synch selector to the X position when using Self-timer.

ASA SPEED INDICATOR


                  The ASA speed dial on the focuing knob is to keep record of your film speed.
                   Turn dial to your film speed number. Since the camera has no meter, this is
                          just to remind you what film you have in the camera.


UNLOADING THE FILM
View original page 10Page 11 · Read text
www.butkus.us


                             After all 12 pictures have been taken, wind the Film Transport Crank
                           about 6 times to take up the remaining film. Some times the crank may
                             catch when the film comes to the end of the spool. In that case don't
                               forcefully turn the crank; just open the camera and remove the film. The
                                      tail end of the film has stuck to the slot of the spool.


In addition to focusing, there ore two other basic adjustments on any fine camera the LENS APERTURE or
OPENING and the SHUTTER SPEED.

THE LENS OPENING

The lens opening controls the amount of light that will pass through the lens onto the light sensitive film.
Your Yashicamat, with its Yashinon lens, offers openings at f 3.5, 4, 5.6, 8, 11, 16, 22.

Notice that the lower the number, the larger the opening. F 3.5 is the largest opening, f 22 the smallest.

To set the lens opening, move the Aperture Control Wheel to the desired number on the Aperture Scale.

SHUTTER SPEED

The Shutter Speed controls the duration of the exposure. Shutter speeds on this camera with its fine Copal
Shutter are 1, 1/2 1/4 1,8, 1/15, 1/30, 1/60, 1/125, 1/250, 1/500 of as second and B. The 'B' setting is for taking
pictures with an exposure longer that 1 second. Use a Tripod or Brace when using B. When you press the
Shutter Release Bu ton on the 'B' setting the shutter stays open until you release pressure on the button. It is
advisable to set the shutter speed before you wind the shutter at all times.

Camera may be Hand Held               Use a Tripod or Brace

Average                            Time
              Action Pictures                     Slow speeds
Pictures                                Exposure

1/30 1/60
              1/250 1/500                     'B'        1 sec 1,'2 1/4 1/8 1/15
1/125


EXPOSURE

Exposure means finding the right combination of lens-opening (aperture) and shutter speed in relation to the
sensitivity (ASA) of your film. (ASA) indicates American Standard Association. For example, if you are using
a film of ASA 200 (TRI-X type) sensitivity your correct exposure will be according to the following table

DAYLIGHT EXPOSURE TABLE

Your shutter speed will be 1/125 with aperture numbers shown below.
View original page 11Page 12 · Read text
Cloudy-Dull or
Bright Sun      Hazy Sun        Cloudy-Bright
                                         Open Shade (4)

Light Subject
                  f/32              f/22              f/16              f/11
(1)

Average
                  f/22              f/16              f/11               f/8
Subjects (2)

Dark Subject
                  f/16              f/11               f/8                 f/5.6
(3)


(1) Light Subjects: Distant landscapes, near-by people with sea, beach and snow scene. in the background.

(2) Average Subjects: Near-by people, houses, gardens, buildings and places not in the shade. Advisable to use
this class when light and dark objects are in about equal proportions.

(3) Dark Subjects: People in cork clothing: trees, flowers, animals and large buildings,

(4) Open Shade: Subjects shaded from the sun but lighted by a wide area of open sky. The less the open sky the
larger the lens opening.
If you are using on ASA 100 film, you will make a larger lens-opening or lower your shutter speed (1/ 60)

But if you never want to make a mistake, use an exposure meter. Be sure to consult your local camera dealer.

DEPTH-OF-FIELD


               When you focus the camera a subject there is is certain distance
                        in front and back back of subject within which other objects will
                       also appear sharp. This is known as the " Depth-of-Field", and it
                       varies with the lens aperture. The smaller the aperture the greater
                       the Depth-of-Field; it is much larger at f 22 than at f: 3.5.

                  At the focusing knob is a scale which will indicate the Depth-of-
                      Field when the camera is focused at various distances. You will
                       notice that an either side of the f :3.5 figure is a of numbers which
                       represent lens apertures. When the camera is focused on your
                       subject look for the aperture you are using on either side of the
                       scale to determine the Depth-of-Field. Thus, if the camera is
                     focused at 10 feet and the lens aperture is f/8 the Depth-of-Field
                       (area in which all objects are sharp) is from about 8 to 13 ft.


You can also use the depth-of-field score to use your Yashica as a fixed-focus camera. In this case set the
infinity mark on the distance scale opposite the lens aperture being used. If the aperture is f: 8 you will notice
that all objects from about 25 feet to infinity will be sharp.

REVIEW:
a. Select your exposure combination
b. Set the lens opening aperture)
c. Set the shutter speed
View original page 12Page 13 · Read text
www.butkus.us

d. Wind the crank downward to advance the film
e. Wind the crank upward to wind the shutter
f. Compose (on the ground gloss or through the sports finder)
g. Take the picture
h. Replace the crank in its Rest

FILTERS
Your Yashicamat accepts sunshades and filter's adapter rings in convenient Bayonet mounts that readily fasten
to the 'taking' lens. A complete range of filters and supplementary lenses are available in the popular Series V
size Bay mm 30.4


Initially, you will find a yellow filter ideal for bringing out clouds in landscape pictures and for general uses. As
you become more advanced, you may want to use various filters, such as orange, green, etc. for different
effects. Your camera dealer will give you complete information.

Notice!
Be sure to replace the lens Cap when your camera is not in use. Keep your camera away from dust and
moisture. For cleaning the lens surface to remove dust or dirt, always wipe very lightly by using clean gauze or
lens cleaning cloth. Do not wipe the lens with a dirty handkerchief. When you are not using your camera for a
long period do not leave the shutter set.
View original page 13
From the M. Butkus archive. Original publisher and archive notices are retained.
Check the model and edition against your equipment.
PDF verified 2026-10-10.