Film cameras
Zeiss Ikon Ermanox User manual
User manual for Zeiss Ikon Ermanox. 9 pages in English. Read the original PDF, download or print a copy without registration.
9 pagesEnglish3.4 MB PDF
Loading your manual…Open PDF directly
Document details
- Brand
- Zeiss Ikon
- Model / document
- Zeiss Ikon Ermanox
- Document type
- User manual
- Language
- English
- Pages
- 9
- File size
- 3.4 MB
- Category
- Film cameras
- Document date
- Not specified in catalog
Search available document text
Find a term, then jump to its page in the original PDF. Image-only pages may not be searchable; check the PDF for exact wording and diagrams.
Page 2 · Read text
General.
It  is absolutely necessary' before manillulating the camera'
to read these instructions carefullv. No force must be used'
In view of the heavy weight of the lerrs, do not allow the
Ermanox to lie on its back, with the lens facing upwards.
The Ermanox should alwavs lie orr its side, as shown in the
illustration.
Focussing.
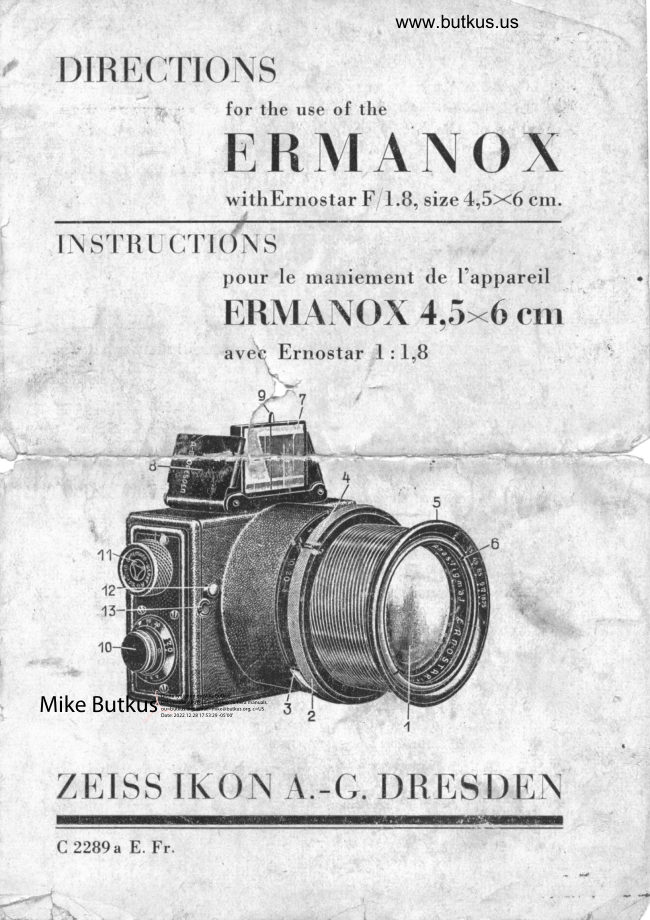
Pull out the lens I in its focussing rnount by turning the
urilled ring in clockwise directions until the spring catch 3
audibly .t upt into a notch on the adjusting ring' The in'
tlex 4'will  ihen be on the infinity mark @, showing that all
objects beyond the distance mark on the scale will be in
focos. Focussing on nearer objects is done by turning the
nrilled ring 2  ii  the same directions as previously until the
irrdex 4 is brought opllosite the nyinber on the scale, corre'
sponding to the distance require'-"
The divisions of the scale are so rggulated that they serve
 as well to control the depth of focus., Wherr focussing a dis-
lance just centrally between two numbers, the depth of focus-wln      b-d lim-itEd by these 'two-'intmbers
The distances rnarked on the Ernostar F/l'8,  focal lerrgth
8,5 cm. (3'/r") are as follows:
t32 44 27 19 15 12 9 B 7 6,5 6 5,5 5,1 4,8                4,5 4,3 4  feet.
Suppose an object is 17 feet from the camera and the index
 u"f h"lf-*ay  between the 19 and 15 feet marks, then this
object as well as all others within these two distances will
be sharJr. Take arrother example: suppose the object to be
 at 9 feet, the limit of the depth will be in the rniddle of the
two adjoining intervals, viz' about 10,5 and 8,5 feet.
The depth of focus of the Ernostar when used at F/1. B being
very limited because of its high luminosity, the focussing has
 to be done very carefully. This is particularly important when
 it  is intended subsequently to make enlargernents. In sudr
 cases focus by rneans of the screen antl use a magnifying glass.
 Diaphragnt.
The Iris diaphragm is regulated by turning the numbers on
 the ring 5 ; the rnark 6 shows the stop which is used.
2
View original page 2
Page 3 · Read text
www.butkus.us
The Focussing Screen.
The focussing screen on the side oJrposite the lens scrves for
viewing the subject photographed and for adjusting the lens
in order to obtain absolutely sharp pictures. On the screen
is a lighthood, which erects itself automatically on raising
the cover held by a press-button catch.
The finder.
The picture  field can be viewed in the Newton finder 7,
which when the camera is closed is protected by the cover B.
It  is raised by lifring the protecting pin 9. The two halfs of
the cover B and the diopter then spring automatically into
position. The sighting takes place over the notch at the tolr
of the diopter and through the centre of the lens 7 marked
by two intersecting lines.
The focal plane shutryr
is wound up (set) by tur2ilrg the knob  Il  to the right as far
as it will go. It can be s?t, or the slits altered, even when the
plate or film is in posilrion for exposure.
The slits are reculaterl hy means of knob l0 w-hich mrrst he
drawn outward and then turned till  its index mark is opposite
the number on the disc which represents the width of slit in mm.
Vlren making long (O) or short (Z) time exposures, the widest
slit of the shutter is used. A speed table within the finder-
casing shows the speeds which are obtained with the different
slits and spring tensions.
Three sorts of exposures can be made:
l. Instantaneous    up tot/rnooth of a second.Regulate
  the width of  slit and the spring tension according to the
  speed table and set the shutter by means of knob 10. Release
  by pressure on button l2 or by means of the cable release,
  attached at 13.
2.Short  Time  Exposures    (Z).  Place knob l0 on the
   letter Z  and, set the shutter. A pressure on the release
   will open the shutter, and when this pressure ceases, the
  shutter will close.
3. Long Time Exposures  (O). Place knob l0 on the letterO
  and set the shutter. A pressure on the release will open the
   shutter, and it will remain open till a second pressure closes it.
                                      3
View original page 3Page 5 · Read text
The Spring Tension.
The knob for regulating this is located on the other side of
the camera body opposite the number 10. In a small round
opening above this knob is the number showing the spring
tension. To ensure absence of vibration when taking tirne
exposures release the spring. With the spring wound up and
the knob l0 placed on Z or Oo the tension will, when setting
the shutter, be released automatically and will return to the          o'1".position    When  it  is desired only to reduce the tension
somewhat, bring  it back to position oof " and then set the
sllring to the tension required.
Inserting the dark slide.
After lifting the spring catch arrd pulling out the focussing
screen, insert the slide supplied with the camera. The slide
has been carefully tested for accurate focussing.
Time Exposures.         /
Time exposures should be made wlt.h the camera fixed to a
tripod. For horizontal exposures it   is'l advisable, and for ver-
tical exposures it is necessary. to use 'a tripod head with lens                                                                   'to                                                      fhF -suppdrt.  !'irst screw the iTCad and tiren*the camerd
tripod. Open up the rear light hood; place the knob l0 ou
O, set the shutter and open by exerting a pressure on the
wire release. The irnage is then visible in the focussing screen.
The diaphrap5m must be opened to  its full aperture. After
focussing close the shutter by a second l)ressure on the release,
and in the place of the focussirrg screen insert the dark
slide and remove the sheath. For long time exposures place
the knob l0 on O, for short time exposures on Z. Release the
shutter preferably by rneans of a wire lelease and not by
I)ressure on the knob 12.
I nstantaneous E xpo sur es
can be rnade with the camera in the harrd or orr the tripod.
Irr the latter case it is advisable to use the focussing screen,
as described in the section "Tirne Exposures". After sharply
focussing the object, regulate the button l0 according to the
width of the  slit  desired, adjust the tension and set the
shutter by turning the knob  Il  to the right. Replace the back
of the focussing screen by the dark slide and draw out the
+
View original page 5
Page 6 · Read text
www.butkus.us
       sheath. When taking instantaneous pictures without tripod,
      hold the camera firmly with both hands, view the object try
      means of the diopter and finder lens and release the shutter
      by a light pressure on the knob 12.
      Closing the Camera.
       Close the view finder by means of the pin 9 pressing dowrr
       the diopter at the same time' The lids will follow automati-
       cally. Return the lens to its original position on infinity
 t\l      rnark (co) by turning the milled ring 2 to the left arrd cover
   I     the lens with the cap to protect against dust and damage.
                                                                                                                                   !
I   When the Camera is not used wind up the shutter      Intportant  !
     The extreme luminosity of the Ernostar lenses requires an
        absolutely plane surface fcr receiving the image. Consequently
       only plates should be used, pot film packs.
     Vhen purchasirrg extra y'ark slides always state that they are
        irrtended for the Ermanox cantera.
s


                    Instructions
       pour  le maniement  de l'uPPareil
        Ermanox 1.5*6 cm
r                    avec Ernostar 1: I,B
t;
       Avant de commencer  i prendre des vues,  il est indispensable
         tle bien se familiariser avec le fonctionnement de I'appareil
      eu 6tutliant la p16sente notice. Jamais employer de la force
      ou mettre I'appareil avec l'objectif tourn6 vers le haut, le
       cadre  i verre d6poli vers le bas (i cause du poids 6lev6 de
           I'obj ectif).
                                            5
View original page 6Page 7 · Read text
Mise au point.
Avancer l'objectif  (I) en tournant l'anneau molett6 (2) dans
le sens des aiguilles d'une montre (l'objectif vue d'en face)
jusqu'au d6clic perceptible du ressort (3). L'index (4) se
trouve alors sur la marque @ de l'6chelle des distances et
I'objectif est au point net pour I'infini'  Pour mettre au point
pour des objets plus rapproch6s tourner I'anneau (2) dans la
m6me direction et mettre I'index en regard du nombre corre-
spondant de l'6chelle.
L'6chelle des distances a le grantl avantage qu'elle indique
aussi la profondeur de nettet6 : Si I'on met l'index (4) sur
Ie milieu entre deux traits voisins, tous les objets entre ces
deux traits seront reproduits avec nettetr6 :  si  I'on  ri:gle
directement sur urr des traits de l'6chelle, les limites de la
profondeur de nettet6 se trouvent  i peu prds aux milieux des
deux intervalles voisins. Par exemp.ie:
L'6chelle pour l'Ernostar I  : 1,8 f :  8,5 cm est marqu6e
co 40 13,4 8rI 5,8 1,5 3,7 3.,2 2,8 2,4 2,2 2  I,B
                                                 1,2  )            r,7 1,6 1,5 r,4 i,3pour la mise au point  i 7 m la zonp de nettet6 s'6tend de
8,1  i 5 B s1 af cr  ::iglr.t   sr-r' .[,$ m /on obticndr'r nets to'ts
les objets entre 5 m et 4 m environ.
Important:
Le travail avec l'objectif extra-lumineux  exige une mise au
point trds exacte et nous recommandons de d6terminer  la
distance de I'objet   i  l'aide d'un t6l6mitre ou dans des cas
plus difficiles de faire la mise au point sur le verre d6poli
Pour utiliser le verre d6poli ouvrir le bouton  i pression, qui
maintient I'abat-jour qui se d6ploie alors.
Le diaphragtne ufriso
se rigle en tournant l'anneau ext6rieur (5) la marque corre.
spondante de l'6chelle etant mise en regard de l'index fixe (6).
Le uiseur,
Le viseur (7) ferm6 est prot696 par deux volets (B). En soule-
vant la lentille (7) i  I'aide de la griffe (9) le viseur se dresse
automatiquement. Viser le sujet en faisant coincider la pointe
de la mire avec le centre de la lentille (7).
6
View original page 7Page 8 · Read text
www.butkus.us
L'obturateur d rideau.
R6gler la fente par le bouton (10) en le tirant dehors et
tournant de fagon que son index soit plac6 sur le trait du
chiffre de l'6chelle qui indique I'ouverture de la fente'
Pour faire la pose ,<2, ou uOr, le rideau fonctionne toujours
i  la plus gt"ttde ouverture. Un tableau plac6 en dessous de
la lentille du viseur, indique les vitesses obtenues avec une
ouverture de fente et une tension du ressort d6terrnin6s.
Armer I'obturateur en tournant le bouton (f I) (jusqu'i l'arr6t)
tlans le sens de la marche des aiguilles d'une montre'
L'obturateur permet trois variations:
I. In stantan6s      j usqu'uu   t/,,,nnI'c de secon de: R6gler
  I'ouverture du rideau et la tensiorr du ressort d'apris le
  tableau et armer. D6clencher par une pression sur le bouton
  (12) ou par le d6clencheur flexible viss6 sur l'6crou (13)'
2. Poses courtes:   Placer le bouton(10) sur <<2" et armer'
  Une pression sur le d6cle'rrcheur ouvre loobturateur. Lorsque
   la pression cesse l'obturateur se ferme.
3.Poses  longues:   Placer le bouton (10) sur <O' etarmer'
  Une pressiott .ot  ie 'declertcheur oirvre I'obturateur, une
  seconde pression le ferme'
R|glage du ressort.
Le bouton molett6 servant  i  tendre le ressort se trouve du
c6t6 oppos6 i celui oi est plac6 le bouton (f 0). Au-dessus de
ce bouton se trouve une ouverture ronde dans latluelle on
voit le chiffre 2 lorsque le ressort est tendu.
Pour faire  la pose, le ressort doit toujours 6tre d6tendu
(tension  l)  afin d'6viter les tr6pidations. Lorsque le ressort
est tendu et que I'on rnet le bouton (10) sur Z ouO,le ressort
se d6tend automatiquement.
La r6duction directe d'une tension 6lev6e rr'est pas possible,
 il faut toujours d6tendre d'abord le ressort complitement'
Pour rnettre le chdssis.
Retirer le verrou, enlever le cadre  i  verre d6poli et intro-
rluire le chissis dans les rainures.
                                             7
View original page 8Page 9 · Read text
Pour faire la pose.
Placer l'appareil sur un pied, le mieux  i I'aide d'une plaque
interm6diaire avec support-objectif (indispensable pour prises
de vues verticales). Ouvrir I'abat-jour du verre d6poli, r6gler
le bouton (10) pour .,Or, armer l'obturateur et I'ouvrir par
une pression 6ur le d6clencheur. Donner au diaphragme Iris
la plus grande ouverture et contr6ler la nettet6 de loimage
sur Ie verre d6poli. Fermer loobturateur. Remplacer le verre
d6poli par le chAssis. R6gler et armer loobturateur. Retirer
le volet du chdssis et faire I'exposition i I'aide du d6clen-
eheur flexible.
P our  I air e I'instantan6.
Saisir I'appareil avec les deux rnains ou le mettre sur le pied.
Faire la mise au point  i I'aide de l'6chelle des distances ou sur
le verre d6lroli. R6gl"t la fente dtr rouleau i'l'aide du bou-
ton (10), tendre le ressort et arrner ltobturateur.  Remplacer
le verre d6poli par le chissis etc.  .-
En travaillant sans pied tenir l'appareil avec leg deux mains,
regarder I'objet dans le viseur et r'd6clencher I'obturateur
par une legere pression sur ie boutoh (I2).
Pour  f ermer I'appareil.
Fermer d'abord le viseur. Ramener I'objectif dans sa position
originale en tournant I'anneau (2) dans la direction oppos6e
i  celle des aiguilles doune montre et le prot6ger par son
bouchon. Lorsque I'appareil ne sert pas I'obturateur doit
toujours 6tre armri.
lmportant:
Le travail avec des objectifs doune si grande luminosit6 exige
un matr6riel absolument plan;  il  est donc n6cessaire d'em-
ployer des plaques au lieu des filmpacks. En commandant
des ch6ssis suppl6mentaires indiquer <pour Ermanoxr, pour
6tre sffr d'une pr6cision absolue.


rxvllr. ?395. 5. 133.          Imprim6 en Allemagne           Din -{ tr.
              ltade in Gerriidsi
View original page 9From the M. Butkus archive. Original publisher and archive notices are retained.
Check the model and edition against your equipment.
PDF verified 2026-10-10.