Film cameras
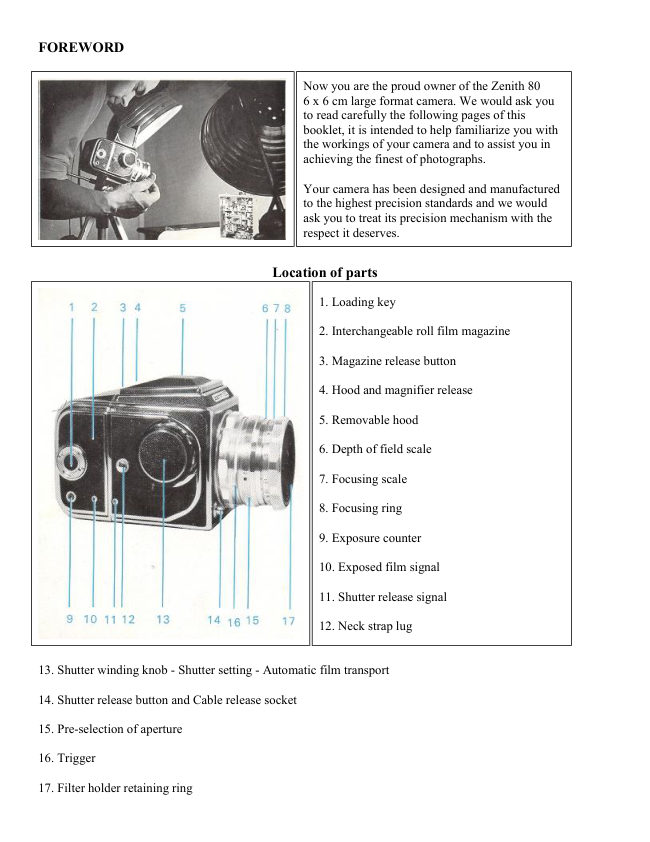
Zenith 80 User manual
User manual for Zenith 80. 11 pages in English. Read the original PDF, download or print a copy without registration.
11 pagesEnglish1.4 MB PDF
Loading your manual…Open PDF directly
Document details
- Brand
- Zenit
- Model / document
- Zenith 80
- Document type
- User manual
- Language
- English
- Pages
- 11
- File size
- 1.4 MB
- Category
- Film cameras
- Document date
- Not specified in catalog
Search available document text
Find a term, then jump to its page in the original PDF. Image-only pages may not be searchable; check the PDF for exact wording and diagrams.
Page 4 · Read text
Winding the shutter

                                                Turn the large winding knob clockwise
                                                                until it stops. When this is done, several
                                                         things will happen: the mirror is lowered
                                                            into the viewing position, film is
                                                  advanced to the next exposure, and both
                                                        film and shutter signals are actuated.
                                        (WHITE in these windows means that
                                                     both are ready for exposure; RED that
                                                        film is exposed and that the shutter has
                                                  been released. Shutter speeds can only be
                                                 changed after the shutter has been
                              WOUND and the shutter must never be
                                                              fired with the speed control knob in the
                                                         outer position.

                                                      Practice making a complete turn of the
                                               knob in one movement. Hold the camera
                                                     with the left hand, with the lens pointing
                                                downwards: then as you turn the knob
                                                     with your right hand, turn the camera,
                                                     with your left hand, in the opposite
                                                              direction.


Shutter setting
Shutter speeds are selected by pulling the wind-on knob outwards and rotating in either direction until the speed
required is opposite the index mark on the camera body and then releasing it so that it engages firmly. There are
10 shutter speeds (from 1/2 second to 1/1 000th second) in addition to "B".

Film advance
After loading the magazine, the film is automatically advanced by winding the shutter.

The signals
The film signal and shutter signal on the right side of the camera show: White when the film is advanced and
the shutter is wound; red when the film is exposed and the shutter is released.

Remember
Always wind the shutter immediately after exposure!
Then you will be ready for the next exposure. The mirror will be down and you are ready for view-finding and
focusing. The shutter. despite its being constructed of selected stainless steel can, like any other fine precision
mechanism, be damaged by rough handling. BE CAREFUL WITH IT. If you do not intend to use the camera
for some time, it is advisable to release the shutter.
View original page 4Page 6 · Read text
Using the depth of field scale
This scale, engraved on the lens mount, enables you to be sure that everything in the picture will be in focus and
sharp. This is how you do it: Focus on the nearest object in the picture and note its distance from the camera.
Then focus on the furthest object and note that distance. With these two points in mind, revolve the focusing
ring until both of them lie between the same stop on either side of the red triangle that shows the point of focus.
If the two points lie outside the stop that you had planned to use, you will have to stop down further, reducing
shutter speed to compensate. The lens, therefore, is focused on that "imaginary point" which gives you all the
depth of field you want.


                                                    There are two buttons on top of the
                                                      camera. The front, or smaller one,
                                                          operates the focusing hood. (The back,
                                                          or larger one, releases the magazine.)
                                            To open the hood, press the smaller
                                                         button to the right.


                                            To close the hood. fold down the side
                                                         panels one after the other, then the back
                                                            panel, then the hood cover until it
                                                                  clicks. When the hood is open, the
                                                        magnifier is raised by pushing the same
                                                            button, again to the right. Always fold
                                            down the magnifier into its "closed'
                                                            position before closing the focusing
                                                      hood. To avoid fingerprints be careful
                                                         not to touch the glass surface.


The ground glass hood and magnifier
Opening the hood will expose the ground glass with a clear parallax-free image. When the hood button is
pressed again to the right the magnifier will spring up, ready for the most critical focusing. To clean the ground
glass surface, first remove the roll film magazine. Then push the hood towards the back of the camera, and it
will slide off easily. The magnifier is easily cleaned by pulling it gently out of its grooved socket. If desired an
optician can replace the magnifier lens with one ground to your eyeglass prescription.
View original page 6Page 7 · Read text
www.butkus.us

Why the image is so bright and clear
There are two good reasons why the image you see is so bright that it permits critical focusing under almost any
light condition. First, the ground glass itself is so fine that it is practically grain less. Second, under the ground
glass is that wonderful light-gathering Fresnel lens that increases overall brightness by 250% and brightens the
corners by more than 100%. As a result, composing your picture is a great deal easier - since you need not move
your head from side to side in an effort to see the corners - and focusing is speeded up tremendously. Under
poor conditions of light, you will appreciate these advantages. You can be sure that you are getting all possible
light through your fast (2.8) lens where you will need it most - on the ground glass. Lack of these features have,
in the past, restricted the use of the single lens reflex.


Loading the film magazine


                          The magazine slide has to be
                                  inserted _ pulled out at right angles
                                  to the magazine The curled end of
                                 the magazine slide should always
                                point towards the camera body.

                        To release the roll-holder turn lock
                                counter-clockwise.

                                 Pull out the roll-holder and turn the
                               lock back clockwise to open up the
                              clamps.

                         Open up the arm fitted with knurled
                            wheel first and insert empty spool.
                               then raise flat arm and insert film.
                      Do not raise both spool arms at
                               once.
View original page 7Page 8 · Read text
Now keep the thumb on the film roll and pull the film paper out
                            about 4 in. The black side of the paper should be towards you.

                       Be sure to push the paper under the clamps. Turn the roll-holder lock
                             counter-clockwise and the paper is held in this position.

                             Fasten the paper tongue into the empty spool and turn the knurled
                         knob so the paper lies flat. The loaded roll-holder can now be
                                inserted in the magazine. Turn lock clockwise and then the holder
                                will be locked and the paper released.

                       Open the window the magazine and wind the film with the loading
                          key until figure "1" appears.

                   Now turn the loading key counterclockwise until stop when
                             figure "l" will appear in the film counter window.


The film indicator incorporated in the window cover reminds you of the DIN speeds of your film.

After the 12th exposure, wind the shutter again with the winding knob and the signals in both camera
and magazine will be on WHITE. Now wind up the film with the magazine loading key observing
through the rear window when the film is wound off.

Be sure that film and shutter signal windows are of the same color before detaching the magazine.

Changing magazines
Press the lock button to the right and lift with your right hand when you want to detach the film magazine.

Attaching
To attach the magazine correctly, hook it on the lower tabs of the camera, push the button to the right, swing the
magazine forward to the camera body and press the button to the led.


                                            The slide
                                                       This is your safeguard against fogged
                                                               film. Treat it carefully and keep it free
                                                          of dust. It is part of a foolproof system;
                                             when the slide is completely in you
                                                       cannot fire the shutter (there are no
                                                    missed shots with the Zenith 80), when
                                                            the slide is out you cannot detach the
                                                     magazine: Always insert the slide at
                                                                 right angles to the body of the camera
                                                               to avoid light leakage.
View original page 8Page 9 · Read text
www.butkus.us


Remember! Wind the shutter after every exposure. Be sure that film and shutter signal windows are the same
color before attaching the magazine.

Intentional double exposures
Designed to prevent accidental double exposure, the Zenith 80 does permit them when you want to. Simply
remove the magazine, wind the shutter again, and re-expose on the same film frame.

Changing lenses


                                                             To remove the lens,
                                                                               grasp the milled
                                                                                          collar at its base
                                                                             with your right
                                                                              hand. Press the lens
                                                                               lock release, turn
                                                                                    the lens 3 of a full
                                                                                     turn counter-
                                                                             clockwise as far as
                                                                                                                           it will go.


Now lift the lens out. To insert the lens, be sure the red dot at the base of the lens mount is opposite the red dot
on the camera. Turn the lens 3 of a full turn clockwise until the lock clicks. The lens will then be secured and.
what is more, properly set for its focal length.


Flash photography


                               The Zenith 80 is fitted with variable synchronization
                                          suitable for both bulb and electronic flash. The synchronizer
                                        control shown below incorporates a single 3 mm. co-axial
                                     connection socket located at its centre. To adjust the
                                       synchronization, rotate the control, by means of the small
                                         protrusion, until the black dot is aligned with the required
                                    symbol.


For Electronic flash

the black dot should be set against    and a maximum shutter speed of 1/30th sec. must be used.
View original page 9Page 10 · Read text
For Bulb Flash
the maximum shutter speed permissible is dependent on the class of bulb used. With "M" class bulbs (e.g. PF1
and 1 B - PF5 - AG1 and 1 B) the maximum speed is 1 /8th sec. With special application "FP" (focal plane)
class bulbs any shutter speed between 1/8th and 1/1000th sec. can be used. In both cases the black dot on the
control should be set against (flashbulb icon)

Filters and Lens hood


                                      Your Zenith 80 is supplied as standard with three
                                                           filters (yellow, yellow/green and orange) in special
                                             40.5 mm. screw-in mounts. In order to fit these
                                                           filters to the camera it is first necessary to set the
                                                 lens to 0.9 meters. on the focusing scale. This will
                                                reveal the internal lens-hood/filter holder which can
                                              then be unscrewed. The filter required is then
                                          screwed on to the rear end of the hood, and the
                                           complete assembly replaced on the lens. If the
                                                   internal lens-hood is not replaced it will be noted
                                                    that the front ring of the lens is threaded to accept
                                       58 mm. screw-in accessories.


Filters supplied


Color                        Exposure Factor       Effects and uses

                                                       "Correct" rendition with panchromatic film
Yellow/Green                  1.5x                    (lightens grass and foliage - slightly
                                                    darkens sky).

                                                       Contrast filter - gives very full correction
Med. Yellow                 2x                    of sky tones and lightens greens slightly
                                                    with panchromatic film.

                                              High contrast filter - ideal for architecture,
Orange                     4x                  heavy darkening of sky, lightens
                                                     brickwork.
View original page 10Page 11 · Read text
www.butkus.us

                       Care of your
                   ZENITH 80

    1. Keep your camera and lens clean and protected from "dust" and moisture at all times.

        2. Do not touch the surface of the lens since the natural acidity of the skin will attack the delicate
        coating. Dirt, traces of condensation, etc. on the lens can be removed by lightly wiping over the surface
       with a clean, well washed, flannel or soft cloth, or cotton wool dampened with absolute alcohol, ether or
        ether spirit mixture. Any smears can be removed with a dry soft cloth.

        3. Never try to clean the mirror or underside of the ground glass screen (this is a job for a specialist).

       In the unlikely event of your camera needing attention NEVER ATTEMPT THIS YOUR SELF.
          It could turn a minor adjustment into an expensive repair.


                                              Inspection Department

                                             Before leaving our premises all cameras and
                                                  associated equipment receive 1 00% inspection
                                         by a team of highly trained inspectors.


Service Department

Staffed by a team of highly trained technicians
including a sizable complement of Russian
factory trained mechanics.
View original page 11From the M. Butkus archive. Original publisher and archive notices are retained.
Check the model and edition against your equipment.
PDF verified 2026-10-10.