All 2 available source parts are included below.
Part 1
Kindly supplied courtesy of Jerry Kleindolph and Sharon Hanna in the United States
White Shuttle Sewing Machine Manual (1878)
Part One
At a very large expense, we have had the White Shuttle Sewing Machine explicitly illustrated, and within the following pages we submit these illustrations with such explanations as will enable any one, with little or no experience, to readily understand and satisfactorily work the machine.
All we ask is that you will carefully read and follow these directions, and you can confidently rest assured that you will find yourself the possessor of the best Sewing Machine in the world.
------------------------
TO THE DEALER
The White Shuttle Sewing Machine is minutely inspected, thoroughly tested, and shipped to you in complete working order. In all ordinary shipments, these machines are sent in good order, "set up and crated", so that you need only exercise some little care in unpacking them, and in cleaning off the dirt and dust it may have received in transit to you. Then oil, as hereinafter directed, and your machine is ready for use.
------------------------
TO THE JOBBER
For large jobbers or for the export trade, where orders are for one hundred or more machines at a time, we ship securely and compactly boxed, so that in transportation charges a big saving is obtained.
In this manner of shipping, as before stated, all the work is carefully inspected; the heads of the machines have been tested in sewing, and are boxed by themselves, whilst the stands are taken apart and shipped in as small and compact shape as possible. Consequently, for the information of this class of trade, we submit and call attention to our first illustration -- THE STAND -- and explanation as to how to set it up properly.
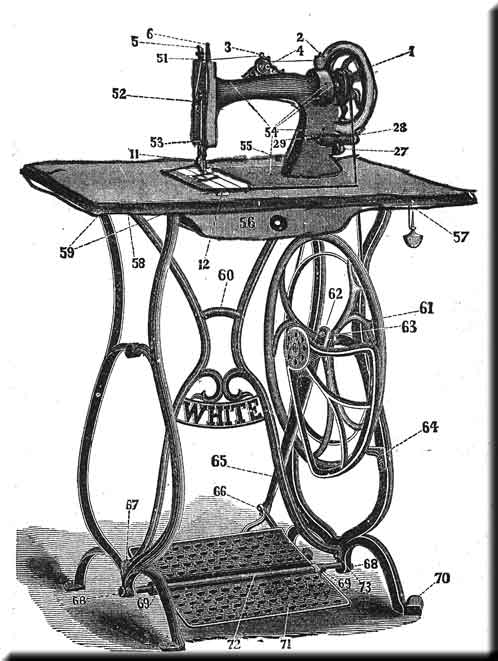
In the first place, remove the nuts 68-68 and cones 69-69 from the treadle rod 72 and slide the treadle 71 on the rod with cone on each side of the treadle.
In the second place, attach the stud 63 securely to the right hand leg then slide upon this stud, in regular rotation, one of the cones, balance wheel, and the remaining cone, so that the pointed ends of the cone will fit snugly into the balance wheel; they should fit neither too tight nor too loose but so as to permit the wheel to revolve true and with but little friction. WITH THESE CONES THE OPERATOR IS ENABLED READILY TO TAKE UP ANY LOST MOTION OR WEAR, AND THEREBY RELIEVE THE BALANCE WHEEL FROM IRREGULAR MOTION AND UNNECESSARY NOISE. Next, attach the pitman 65 to the balance wheel, then the shield to the right hand leg at 64.
Having thus put together these disconnected parts it is an easy matter for a beginner to determine their relative positions by reference to the cut. 60 represents the brace. The left hand and the right hand legs are connected to the braceby screws as shown in cut. 57 represents the oil can in its holder. 55 represents a wooden pin in table for machine to rest on when turned back for oiling; this pin is taken out of the table and packed with the stand when it is shipped in boxes.
To have the machine run extraordinarily light the greatest care must be exercised in setting up the stand work. Every thing must be true and in line.
Be sure that you have the wood work placed upon the stand so that the belt does not rub against it, and also, so that it does not rub against the balance wheel of the machine.
If the stand rests upon the floor in an uneven manner and the floor is level it is evident that the stand is not properly set up, in which case loosen the screws and nuts and place the stand in its proper position, and gradually tighten its connections.
Place the tube rubbers in the holes in the front part of the table before you connect the machine head, by its hinges, to the table.
To prevent noise, no part of the machine should touch the wood work, but the machine head should rest entirely upon the table and hinge rubbers.
----------------------------
We have now the machine upon its table, connected to the stand, and the next lesson for a beginner is to become thoroughly acquainted with the operation of the machine.
THE TREADLE MOVEMENT
WE CLAIM AN IMPORTANT IMPROVEMENT IN TREADLES, BY ALLOWING "ROOMY" SPACE FOR THE FEET SO THAT THE OPERATOR IS NOT "CRAMPED UP" BY THE USE OF BOTH FEET. Physicians will acknowledge the advantages of this improvement, and will tell you that nearly all the diseases contracted by seamstresses and working girls in the use of the sewing machine arise from the cramped position in which they have been compelled heretofore to sit and place their feet upon so little space, and from the fact that the majority of sewing machines run too heavy.
THESE OBJECTIONS ARE REMOVED IN THE WHITE SHUTTLE SEWING MACHINE
The treadle movement should be thoroughly learned, so that the operator can readily revolve the balance wheel by means of the treadle with either foot.
Remove the belt from the balance wheel and place your feet on the treadle directly over the treadle rod, then take hold of the balance wheel and turn it toward you, allowing the feet to move freely with the motion thus commenced, and continue this motion by an alternate pressure of the heel and toe until a regular and easy motion is obtained.
Do not attempt to learn anything else until you are proficient in the use of the treadle, so that you can start it and stop it without ever turning it in the wrong direction.
------------------------------
TO OPERATE THE MACHINE
Having become perfectly familiar with the treadle movement, now replace the belt and connect the fly wheel of the machine with the balance wheel of the stand; raise the presser foot 11 with the lever 7, remove the slides over the shuttle and take out the shuttle; then start the fly wheel of the machine towards you and continue the motion thus imparted, with the feet, as per instructions given above.
After becoming expertly proficient in this motion and without the shuttle in or the machine threaded, place a piece of cloth between the feed and the presser foot; let the presser foot down upon it and operate the machine in this way until you are accustomed to guiding the material in whatever direction you might desire.
NOTE -- Do not run the machine with the presser foot down on the feed and no cloth between the two.
Do not pull the cloth to or from you in such a manner as to bend the needle.
Do not undertake to do practical sewing, but pratice upon strips of cloth until you can produce a regular motion of the machine and guide the work as you wish.
TO SET THE NEEDLE
Raise the needle bar 6 to its highest point and pass the shank of the needle up into the hole in the needle bar as far as you can push it, with the long grooves of the needle turned precisely toward the left and fasten securely with the needle screw.
TO SEW EXTRAORDINARILY HEAVY GOODS IT MAY BE NECESSARY TO LOWER THE NEEDLE A VERY LITTLE
The needle when descending should pass through the center of the the throat plate and if properly set the point of the shuttle should enter the largest part of the loop formed with the thread.
---------------------------
NEEDLES AND THREAD TO BE USED
The size of the needle should conform to the size of the thread, and both be suitable to the material sewed. Use as fine a needle as will permit the thread to pass freely through the eye.
A No. 1 needle may be used for all kinds of ordinary family sewing, where thread from numbers 50 to 80 is used; there is seldom a necessity of using a coarser cotton than No. 30, because every stitch made by a sewing machine is just double as strong as one made by hand. In general sewing use the same size of thread above and below.
Be careful that your needles are perfect -- not bent, nor blunt points. We especially request our dealers to buy their needles and oil from us. All genuine needles are stamped "White" on the shank.
The following index will show the size of needle, thread and silk to be used:
|
COTTON
|
TWIST
|
NEEDLE
|
|
150 to 300
|
000
|
000
|
|
90 to 150
|
00
|
00
|
|
70 to 90
|
o
|
0
|
|
50 to 70
|
A & B
|
1
|
|
30 to 50
|
C
|
2
|
|
20 to 30
|
D
|
3
|
|
8 to 20
|
E & F
|
|
For leather, use a twist pointed needle.
Part Two
Part 2
Kindly supplied courtesy of Jerry Kleindolph and Sharon Hanna in the United States
White Shuttle Sewing Machine Manual (1878)
Part Two
TO FILL THE BOBBINS WITH THREAD
NEVER USE GLAZED THREAD ON THE BOBBIN
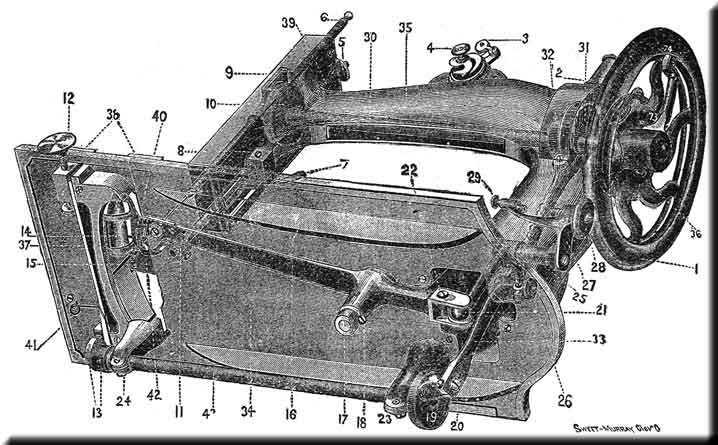
27 represents the Bobbin Winder which is fastened firmly to the arm of the machine. Place the spool of thread on spool standard 2, and fasten the end of the thread between the end of the bobbin and the bobbin winder shaft, and put the other end of the bobbin in the bobbin winder which will press the friction wheel 28 against the flywheel of the machine; then turn clutch 74 off from pin on fly-wheel, and proceed to work the machine as in sewing, and guide the thread evenly with the left hand until the bobbin id nearly or quite full. By this device the operator can wind bobbins without running the entire machine, or without removing the attachments, or disturbing the garment sewed.
 --------------------------------------
TO THREAD THE SHUTTLE
THE SHUTTLE
OF THE
WHITE SEWING MACHINE IS
ACKNOWLEDGED TO BE
THE LEAST COMPLICATED
OF ANY IN THE MARKET.
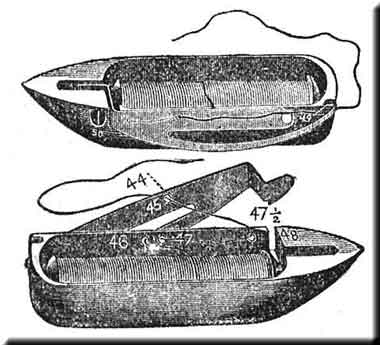
Having raised the latch 45 holding the bobbin so that the thread will draw off the under side place one end of the bobbin into the center of the heel of the Shuttle, and drop the other end into the slotted hole 48 in point of the shuttle; then pass the thread through the hole 46 then back through the hole 47; then out through the hole 47 1/2; then through the hole 44 in the latch; thence pass the thread outward, under the outside spring, as shown. In all cases the thread must pass out under the outside spring.
WE HAVE NO SPIRAL SPRINGS ABOUT OUR SHUTTLE. IT IS SIMPLE, DURABLE AND EFFECTIVE. THERE IS ONLY ONE HOLE TO THREAD THROUGH, AS THE OTHER HOLES ARE ALL SLOTTED.
To open the latch, press slightly against it, and open.
---------------------------------------
TO REMOVE THE SHUTTLE
Open the front shuttle slide to take the Shuttle from the machine. Do not undertake to turn the machine back for oiling with the rear shuttle slide partly pulled out.
TO CONTROL THE TENSIONS
When the stitching shows the under thread drawn through on top of the fabric, the tension on the shuttle thread is too loose, or the tension on the upper thread is too tight; if it shows the upper thread drawn down on the under side of the fabric, it indicates that the tension is too tight on the shutle thread or too loose on the upper thread.
4 represents the tension nut. By turning it to the right you tighten the tension on the upper thread; and by turning it to the left you loosen the tension on the upper thread.
50 represents the tension screw in the shuttle. To increase the tension turn the screw to the right with the shuttle screw driver; to decrease the tension, turn the screw to the left.
WE CLAIM A DECIDED ADVANTAGE IN THE CONTROL OF OUR SHUTTLE TENSION, AS IT IS SO ARRANGED THAT WE CAN INCREASE OR DECREASE IT WITHOUT REMOVING THE SHUTTLE FROM THE MACHINE, OR DISARRANGING THE WORK.
-----------------------------------
TO CHANGE THE LENGTH OF STITCH
12 represents the Feed Screw. By turning it to the right you shorten the stitch; by turning it to the left you lengthen the stitch.
------------------------------------
TO THREAD THE MACHINE
Place the spool of thread on the spool standard 2, pass the thread under the tension check spring at 3, then once around the tension wheel, then through thread guide 51 on top of the face plate then through the eyelets respectively at the top and bottom of take up 52, then through threaded guide 53, and thence through the eye of the needle.
-------------------------------------
TO COMMENCE WORK
In threading the needle and shuttle respectively, you should leave an end of thread about two inches in length to each. Hold the end of the upper thread loosely in the left hand, and with the right hand gently revolve the fly wheel until the needle passes to its lowest point and returns, when if it is set properly a loop will be formed through which the shuttle will pass, and as the needle ascends it wil draw up the lower or shuttle thread. Now see that the shuttle slides are both closed over the shuttle, and the machine is ready for practical operation.
------------------------------------
TO REMOVE THE WORK
Stop the machine with the needle at its highest point; raise the presser foot; slacken the upper thread by drawing about three inches from the top spool, then take hold of your work and pull it directly from, keeping the top thread in the slot of the presser foot which will prevent bending the needle. Cut the threads close to the cloth which will leave the ends projecting from needle and shuttle, preparatory to commencing work again.
---------------------------------------
KEEP THE MACHINE WELL CLEANED AND OILED
If the machine is dirty or gummed up with poor oil, clean it off by the use of spirits of turpentine or kerosene; then wipe dry and apply fine sperm oil, as follows: The figure 54 represents five oil holes on the upper part of the machine through which you can insert the nozzle of the oil can and oil. KEEP THE INSIDE WORKING PARTS OF THE MACHINE THOROUGHLY OILED. In addition to the oil holes the upper part of the machine should be thoroughly oiled on the needle bar; also the roller and pivot on which the take up 52 works. The bearings of the bobbin winder, in which the spindle and shaft revolve should be kept constantly oiled. To oil the under side, slip the belt off the balance wheel and turn the machine back on its hinges and oil all the places indicated by the numbers 13 - 17 - 19 - 20 - 21 - 23 - 24 - 25 - 26 - 37. Use only the best quality of sperm oil, and then after standing a few moments take a cloth slightly moistened with oil and clean off the superfluous oil from the japanned parts of the machine, also from the needle bar and the race in which the shuttle vibrates.
The Iron Stand
Oil should be distributed frequently upon the treadle rod cones at 60; upon the balance wheel cones at 63; and upon the pitman connections at 62 - 66.
----------------------------------------
THREAD
Do not use poor thread. You must not expect to make a nice smooth stitch with cheap, uneven thread. Clark's six cord spool cotton is the best, and we will fill all orders for it promptly, by mail or express, on receipt of price, viz: 65 cents per dozen spools.
------------------------------------------
EXPLANATION OF DIFFICULTIES THAT SOMETIMES OCCUR WITH BEGINNERS
If the upper thread breaks it may be caused by the needle not being properly set, or the machine not threaded correctly, or the upper tension too tight, or the thread uneven and the needle too small for it, or the needle eye too sharp, or the presser foot attached to the machine so that the needle rubs it in passing.
If the under thread breaks it may be caused by the shuttle being improperly threaded, or too much tension upon it, or by the bobbin being wound too full so that the thread slips over the ends of the bobbin in the shuttle, or by the thread being caught in the shuttle slides.
If the needle breaks it is more than likely your own fault, caused by pulling the goods to or from you in such a manner that the needle strikes the throat plate and is bound to break. The needle may, however, break in trying to sew extraordinary heavy seams when the pressure on the presser foot is not heavy enough.
To create more pressure upon the goods, turn the pressure bar nut 5 to the right; to decrease the pressure turn it to the left.
If the machine skips stitches the needle may not be aligned correctly if the long groove is not exactly to the left.
If the stitches are not even it may be caused by the presser foot not resting evenly upon the fabric sewed, or by the feed not being high enough, or by the stitch being too short, or by pulling the cloth, or by using too fine a needle with two coarse or uneven thread.
Notice
The leather band should always be tight enough not to slip. If it slips or does not force the needle through thick goods, cut off a very short piece and readjust the ends. The belt should not be so tight as to prevent an easy motion of the machine.
-----------------------------------------
FREE WITH EACH MACHINE
One hemmer which is also the feller, one braider, one quilter, one pair castors (attached to the right hand leg), one bottle of oli, one oil can, one oil can holder (attached to the underside of the table), one screw driver, one gauge and screw, one shuttle in the machine, six bobbins, six needles, one shuttle tension screw driver and one spool of thread on machine, ready for use, and one copy of directions.
DIRECTIONS FOR USING THE ATTACHMENTS
Hemming
Raise the needle to its highest point, remove the presser foot and in its place attach the hemmer. Insert the edge of the cloth, folded up, into the mouth of the hemmer and with a pin or thread in the fold draw the edge of the cloth far enough through the hemmer so that the needle will enter the cloth at its extreme edge; then proceed to sew, keeping the edge turned as it feeds through.
Felling
The hemmer is also a feller. Sew together two pieces of cloth with the under edge projecting between an eighth and quarter of an inch beyond the upper edge, then trim the edges if necessary, and open the work flat, wrong side up, and fold down the wider edge toward the left over the narrow edge, and then pass the folded edge into the feller the sam as ordinary hemming.
Wide Hemming
Any width hem can be made with the hemmer and feller upon light fabrics, by simply folding the goods the desired width of hem and then passing the edge through, as in narrow hemming. To successfully do various widths of hemming upon all classes of goods, we recommend the sets of hemmers of which there are five sizes. The complete set is sold for $1.00, and is extra.
Cording
The corder is fastened to the presser bar the same as the presser foot. Pass the cord through the tube on the edge of the corder and carry the end of the cord from you about three inches; fold the fabric you desire to cord and place one sid eof the fold under the tube and the other over it; draw the cloth to the left so that the folded edge is close against the cord tube ; then let down the corder and proceed to sew.
If the needle stitches too far from the cord or too close simply loosen the screw and swing the corder to the right or left, as required.
Braiding
The braider is attached the same as the corder. Insert the braid down through the hole in the braider, under the bar, and carry the braid far enough back of the needle for the feed to take hold of it, then let it down on the fabric and proceed the same as in plain sewing.
ITEM -- When you turn a corner in braiding, after the braider presser foot has been let down, draw the braid back so that there will be no slack between the braider and the braid.
Binding
The adjustable binder attached to the machine with the gauge screw and can be adjusted for any width of binding. Put the binding through both hooks of the binder and draw it over the feed, then place the cloth to be bound between the two hooks, close against the binding and let down the presser foot, and proceed to sew as in ordinary sewing.
Quilting
The quilter is attached to the presser bar by being passed through it in the hole just above the presser foot; move the quilter further from the needle for a wide space between rows, or close to the needle for a narrow space.
Tucking, Gathering and Embroidering
These are attachments that we do not make, but keep for sale at manufacturers' price, and each is acompanied with the necessary directions for use.
KEY TO ILLUSTRATIONS
|
1 Fly Wheel of Machine
|
36 Screw to secure Fly Wheel to Main Shaft
|
|
2 Spool Standard
|
37 Feed Bar
|
|
3 Tension Check Spring
|
38 Space in which Slides Cover Shuttle
|
|
4 Tension and Nut
|
39 Presser Bar Spiral Spring
|
|
5 Presser Bar and Nut
|
40 Shuttle Carrier
|
|
6 Needle Bar
|
41 Feed Spring
|
|
7 Presser Bar Lifter
|
42 Throat Plate
|
|
8 Inside Slide, to steady Presser Bar
|
43 Feed Arbor
|
|
9 Heart on Needle Bar
|
51 Eyelet near top of Face Plate
|
|
10 Disc for driving Heart
|
52 Take Up
|
|
11 Presser Foot
|
53 Eyelet near bottom of Face Plate
|
|
12 Feed Screw
|
54 Five Oil Holes on top of Machine
|
|
13 Feed Cam
|
55 Wooden Pin in Table for Machine to rest on when
turned back for oiling
|
|
14 Shuttle
|
56 Drawer in Table
|
|
15 Needle Hole in 42
|
57 Oil Can in Holder
|
|
16 Shuttle Lever
|
58 Screw to secure Brace to upper part of left Leg
|
|
17 Shuttle Lever Stud
|
59 Screws to secure Leg to Table
|
|
18 Screws to secure Cone on 17
|
60 Brace
|
|
19 Disc on end of Feed Arbor
|
61 Balance Wheel
|
|
20 Screw to secure Feed Lever to Link on Disc 19
|
62 Screw to secure Pitman to Balance Wheel
|
|
21 Lever Arm and Ball to give motion to 16
|
63 Stud and Cones to secure Balance Wheel to right
hand Leg
|
|
22 Screw to take up wear on 16
|
64 Screw to secure Shield over Balance Wheel
|
|
23 and 24 Screws to take up wear on 43
|
65 Pitman
|
|
25 Stud on which are secured 21 and 33
|
66 Screws to secure Pitman to Treadle
|
|
26 Screw which secures 21 to 33
|
67 and 73 Screws to secure Brace to Legs
|
|
27 Bobbin Winder
|
68 and 68 Nuts on end of Treadle Rod
|
|
28 Friction Wheel on Bobbin Winder
|
69 and 69 Cones to secure Treadle on 72
|
|
29 Nut on short end of Bobbin Winder
|
70 Casters on Right Hand Leg
|
|
30 Main Shaft
|
71 Treadle
|
|
31 Large Eccentric
|
72 Treadle Rod
|
|
32 Screws to take up wear on Eccentric
|
|
|
33 Feed Lever
|
|
|
34 Bed of Machine
|
|
|
35 Arm of Machine
|
|
****************************************
Part One